
Operating Instructions
Page 2
... Menu 18 The Operation Menu 19 The Connection/Power Menu .......... 20 The Installation Menu 21 The Information Menu 22 Network Using Network Features (VPL-EX145/ EX175 only 23 Displaying the Control Window of the Projector with a Web Browser 23 Confirming the Information regarding the Projector 24 Operating ...the Projector from a Computer 24 Using the e-mail report Function 24 Others Indicators 26 Messages List 27 Troubleshooting 28 Replacing the Lamp 30 Cleaning the Air Filter 32 Specifications 33 Projection Distance 38 Dimensions 41 Index 43 2 Table of Contents
... Menu 18 The Operation Menu 19 The Connection/Power Menu .......... 20 The Installation Menu 21 The Information Menu 22 Network Using Network Features (VPL-EX145/ EX175 only 23 Displaying the Control Window of the Projector with a Web Browser 23 Confirming the Information regarding the Projector 24 Operating ...the Projector from a Computer 24 Using the e-mail report Function 24 Others Indicators 26 Messages List 27 Troubleshooting 28 Replacing the Lamp 30 Cleaning the Air Filter 32 Specifications 33 Projection Distance 38 Dimensions 41 Index 43 2 Table of Contents

Operating Instructions
Page 3
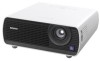
..., visit Kensington's web site. Overview B Overview Location and Function of Controls 3 q; qa 6 qh qd qg h ON/STANDBY indicator (page 26) i LAMP/COVER indicator (page 26) j Control panel (page 5) k Connector panel (page 4) l Remote control detector m Adjuster (page 11) n Speaker (page ...Controls Main unit 1 2 7 8 9 qd qs qf qd 3 5 4 a Projection lens b Focus ring (page 11) c Zoom ring (page 11) d Lamp cover (page 30) e Air filter cover (page 32)/ Ventilation holes (intake) f Ventilation holes (intake) g Ventilation holes (exhaust) Caution Do not place anything near...
..., visit Kensington's web site. Overview B Overview Location and Function of Controls 3 q; qa 6 qh qd qg h ON/STANDBY indicator (page 26) i LAMP/COVER indicator (page 26) j Control panel (page 5) k Connector panel (page 4) l Remote control detector m Adjuster (page 11) n Speaker (page ...Controls Main unit 1 2 7 8 9 qd qs qf qd 3 5 4 a Projection lens b Focus ring (page 11) c Zoom ring (page 11) d Lamp cover (page 30) e Air filter cover (page 32)/ Ventilation holes (intake) f Ventilation holes (intake) g Ventilation holes (exhaust) Caution Do not place anything near...

Operating Instructions
Page 6
... ECO Mode ECO User Sel Back 2 Press the V/v key or ECO MODE key to restore the previous image. For details on ECO Mode settings, see "Lamp Mode" (page 18) on the Function menu and "Standby Mode" (page 20) and "Power Saving Mode" (page 20) on the projector. 6 Location and Function of... ENTER key. 5 Press the V/v key to select the setting value. 6 Press the ENTER key to select ECO or User mode. ECO: Sets each item of "Lamp Mode," "Power Saving Mode" and "Standby Mode." 1 Press the ECO MODE key to step 3). 3 Select "User" then press the b key. But it may not be...
... ECO Mode ECO User Sel Back 2 Press the V/v key or ECO MODE key to restore the previous image. For details on ECO Mode settings, see "Lamp Mode" (page 18) on the Function menu and "Standby Mode" (page 20) and "Power Saving Mode" (page 20) on the projector. 6 Location and Function of... ENTER key. 5 Press the V/v key to select the setting value. 6 Press the ENTER key to select ECO or User mode. ECO: Sets each item of "Lamp Mode," "Power Saving Mode" and "Standby Mode." 1 Press the ECO MODE key to step 3). 3 Select "User" then press the b key. But it may not be...

Operating Instructions
Page 14
... Mode Reset Contrast Brightness Color Hue Color Temp. Press the ENTER key to select an item. Selecting items Function Volume Speaker Smart APA CC Display Lamp Mode Lamp Timer Reset Background Start Up Image 30 On OStnandard Off Standard Blue On Sel Set Back 3 Select the setting item. Press the ENTER key...
... Mode Reset Contrast Brightness Color Hue Color Temp. Press the ENTER key to select an item. Selecting items Function Volume Speaker Smart APA CC Display Lamp Mode Lamp Timer Reset Background Start Up Image 30 On OStnandard Off Standard Blue On Sel Set Back 3 Select the setting item. Press the ENTER key...

Operating Instructions
Page 18
...startup of the projector. High/Standard/Low: When set to "On," the sound will work simultaneously. Items Volume Speaker Smart APA CC Display Lamp Mode Lamp Timer Reset Background Start Up Image Item descriptions The higher the setting, the higher an audio volume and the lower the setting, the lower ...is available only for setting various functions of the projected image when no signal is input. The Function Menu The Function menu is used for VPL-EX120/EX145/EX175)). 18 The Function Menu When replacing the lamp, resets the lamp timer (page 30). On/Off: When set to mute the sound.
...startup of the projector. High/Standard/Low: When set to "On," the sound will work simultaneously. Items Volume Speaker Smart APA CC Display Lamp Mode Lamp Timer Reset Background Start Up Image Item descriptions The higher the setting, the higher an audio volume and the lower the setting, the lower ...is available only for setting various functions of the projected image when no signal is input. The Function Menu The Function menu is used for VPL-EX120/EX145/EX175)). 18 The Function Menu When replacing the lamp, resets the lamp timer (page 30). On/Off: When set to mute the sound.

Operating Instructions
Page 20
.../ Default Gateway/Primary DNS/Secondary DNS When "Manual" is selected for 10 minutes. The lamp lights again when a signal is input or any key is canceled. In such a case...system automatically when "S Video" or "Video" is selected with V or v key. Power Saving Mode Lamp Cutoff: The lamp turns off the power without going to "Low," lowers power consumption in Standby mode. Direct Power On On...network and network control function cannot be registered. In Lamp Cutoff, the ON/STANDBY indicator lights in standby mode. *3: VPL-EX145/EX175 only. 20 The Connection/Power Menu
.../ Default Gateway/Primary DNS/Secondary DNS When "Manual" is selected for 10 minutes. The lamp lights again when a signal is input or any key is canceled. In such a case...system automatically when "S Video" or "Video" is selected with V or v key. Power Saving Mode Lamp Cutoff: The lamp turns off the power without going to "Low," lowers power consumption in Standby mode. Direct Power On On...network and network control function cannot be registered. In Lamp Cutoff, the ON/STANDBY indicator lights in standby mode. *3: VPL-EX145/EX175 only. 20 The Connection/Power Menu

Operating Instructions
Page 22
... the total usage hours of the current input signal. fH / fV (horizontal frequency/vertical frequency)*1 Displays the horizontal frequency/vertical frequency of a lamp. Signal type Displays the type of a lamp. Displays the serial number. Items Item descriptions Model Name Displays the model name. The Information Menu The Information menu enables you to...
... the total usage hours of the current input signal. fH / fV (horizontal frequency/vertical frequency)*1 Displays the horizontal frequency/vertical frequency of a lamp. Signal type Displays the type of a lamp. Displays the serial number. Items Item descriptions Model Name Displays the model name. The Information Menu The Information menu enables you to...

Operating Instructions
Page 25
...mail report are displayed. 6 Send the test mail. Click on [Mail Report] to enter the characters in the email report. To reset Lamp Reminder, execute "Lamp Timer Reset" on [Apply]. Outgoing Mail Server (SMTP): Enter the address of the e-mail report. Required Authentication: Check this check box... 1 2 Set the timing of the e-mail report to enter the owner information recorded in the text box: " ' ", " " Using Network Features (VPL-EX145/EX175 only) 25 When you set. Mail Report button 2 3 4 3 Enter the outgoing e-mail address in the Email Address box then check the Report...
...mail report are displayed. 6 Send the test mail. Click on [Mail Report] to enter the characters in the email report. To reset Lamp Reminder, execute "Lamp Timer Reset" on [Apply]. Outgoing Mail Server (SMTP): Enter the address of the e-mail report. Required Authentication: Check this check box... 1 2 Set the timing of the e-mail report to enter the owner information recorded in the text box: " ' ", " " Using Network Features (VPL-EX145/EX175 only) 25 When you set. Mail Report button 2 3 4 3 Enter the outgoing e-mail address in the Email Address box then check the Report...

Operating Instructions
Page 26
... with a new one (page 30). 26 Indicators Flashes twice The lamp cover is not attached securely. (page 32) Flashes three times The temperature of lamp is unusually high. In such a case, replace the lamp with qualified Sony personnel. If the projector exhibits abnormal status, address the problem in ...accordance with the table below . • Check to see if nothing is in Power Saving Mode (lamp cut off . If the symptom is on. Address the problem in accordance with qualified Sony personnel. Check the items below . The projector is blocking the ventilation holes. • Check to ...
... with a new one (page 30). 26 Indicators Flashes twice The lamp cover is not attached securely. (page 32) Flashes three times The temperature of lamp is unusually high. In such a case, replace the lamp with qualified Sony personnel. If the projector exhibits abnormal status, address the problem in ...accordance with the table below . • Check to see if nothing is in Power Saving Mode (lamp cut off . If the symptom is on. Address the problem in accordance with qualified Sony personnel. Check the items below . The projector is blocking the ventilation holes. • Check to ...

Operating Instructions
Page 27
...Attitude" on the Installation menu is correctly selected. 3, 21, 32 Frequency is out of 1,500 m or higher, if you replace the lamp and reset the lamp timer. 30, 32 Projector temperature is correctly selected. 3, 21, 32 Not applicable! Messages List When any key on the projected image, ...address the problem in 1 min. Lamp off in accordance with a new one 37 for signals supported by the projector. The message appears whenever you turn on the power until you ...
...Attitude" on the Installation menu is correctly selected. 3, 21, 32 Frequency is out of 1,500 m or higher, if you replace the lamp and reset the lamp timer. 30, 32 Projector temperature is correctly selected. 3, 21, 32 Not applicable! Messages List When any key on the projected image, ...address the problem in 1 min. Lamp off in accordance with a new one 37 for signals supported by the projector. The message appears whenever you turn on the power until you ...

Operating Instructions
Page 28
...work automatically. Set "V Keystone" to "Auto" or "Manual" to "Manual," the keystone feature does not work properly. Check 22 "Lamp Timer," and replace the lamp with the power on the projector. on the lens. In this case, select "Manual" to 21 set to set manually. 5, 12...feature. 5, 12, 21 When the "V Keystone" is firmly connected. - In such a case, let the projector sit for "Brightness," "Contrast," and "Lamp Mode" affect brightness of the projection angle. equipment firmly. Check if the input source is correctly selected. 10 Check if the picture is in the...
...work automatically. Set "V Keystone" to "Auto" or "Manual" to "Manual," the keystone feature does not work properly. Check 22 "Lamp Timer," and replace the lamp with the power on the projector. on the lens. In this case, select "Manual" to 21 set to set manually. 5, 12...feature. 5, 12, 21 When the "V Keystone" is firmly connected. - In such a case, let the projector sit for "Brightness," "Contrast," and "Lamp Mode" affect brightness of the projection angle. equipment firmly. Check if the input source is correctly selected. 10 Check if the picture is in the...

Operating Instructions
Page 29
..., the internal temperature of 3 the projector rises and the fan noise becomes larger. Check if the connecting cable is connected to cool the 18, 21 lamp, etc. Page 7 7 - 6 18 6, 18 - - The sound from the fan is connected to "Off." If the ventilation holes are not exhausted. Symptom The image...Remedy Check if the connecting cable is often greater than normal to external equipment firmly. Check if "Volume" is high. in the following cases. • "Lamp Mode" is set to "High." • "High Altitude Mode" is set to "On." • The unit is used in the location where the temperature...
..., the internal temperature of 3 the projector rises and the fan noise becomes larger. Check if the connecting cable is connected to cool the 18, 21 lamp, etc. Page 7 7 - 6 18 6, 18 - - The sound from the fan is connected to "Off." If the ventilation holes are not exhausted. Symptom The image...Remedy Check if the connecting cable is often greater than normal to external equipment firmly. Check if "Volume" is high. in the following cases. • "Lamp Mode" is set to "High." • "High Altitude Mode" is set to "On." • The unit is used in the location where the temperature...

Operating Instructions
Page 30
... any metallic or inflammable objects into the slot. • If the lamp breaks, contact qualified Sony personnel. Do not replace the lamp yourself. • When removing the lamp, be burned or injured. If you touch a part of the lamp other than the designated location, you may be sure to cool sufficiently. • Do not allow...
... any metallic or inflammable objects into the slot. • If the lamp breaks, contact qualified Sony personnel. Do not replace the lamp yourself. • When removing the lamp, be burned or injured. If you touch a part of the lamp other than the designated location, you may be sure to cool sufficiently. • Do not allow...

Operating Instructions
Page 31
... outlet and turn on the Function menu then press the ENTER key. Select "Lamp Timer Reset" on the projector. 7 Reset the lamp timer for notification of the used lamp For the customers in the USA Lamp in place. Disposal of these materials may be turned on. 6 Connect the ...AC power cord to environmental considerations. Note Be sure to reset the lamp timer (page 18). Others Replacing the Lamp 31 For disposal or recycling information, please contact your local authorities or the Telecommunications Industry Association (www.eiae.org). 5...
... outlet and turn on the Function menu then press the ENTER key. Select "Lamp Timer Reset" on the projector. 7 Reset the lamp timer for notification of the used lamp For the customers in the USA Lamp in place. Disposal of these materials may be turned on. 6 Connect the ...AC power cord to environmental considerations. Note Be sure to reset the lamp timer (page 18). Others Replacing the Lamp 31 For disposal or recycling information, please contact your local authorities or the Telecommunications Industry Association (www.eiae.org). 5...

Operating Instructions
Page 33
... to 300 inches (0.762 m to 7.62m) VPL-EX100: 2300 lm (when "Lamp Mode" is set to "High") VPL-EX120: 2600 lm (when "Lamp Mode" is set to "High") VPL-EX145: 3100 lm (when "Lamp Mode" is set to "High") VPL-EX175: 3600 lm (when "Lamp Mode" is set to "High") VPL-EX100/EX120: 1W × 1 (monaural) VPL-EX145/EX175: 10W × 1 (monaural...
... to 300 inches (0.762 m to 7.62m) VPL-EX100: 2300 lm (when "Lamp Mode" is set to "High") VPL-EX120: 2600 lm (when "Lamp Mode" is set to "High") VPL-EX145: 3100 lm (when "Lamp Mode" is set to "High") VPL-EX175: 3600 lm (when "Lamp Mode" is set to "High") VPL-EX100/EX120: 1W × 1 (monaural) VPL-EX145/EX175: 10W × 1 (monaural...

Operating Instructions
Page 35
...EXPIRATION OF THE WARRANTY, OR FOR ANY OTHER REASON WHATSOEVER. Projector Lamp LMP-E211 (for replacement) Notes *1: For details, refer to change without projecting parts) VPL-EX100/EX120: Approx. 3.2 kg (7lb 0.88 oz) VPL-EX145/EX175: Approx. 3.3 kg (7lb 4.4 oz) See "... operating properly before use. Please check with your local Sony Authorized Dealer. Item Model Heat dissipation Standard dimensions (W/H/D) Mass Supplied accessories Optional accessories*2 *3 Description VPL-EX100/EX120/EX145/EX175 VPL-EX100/EX120: 100 V AC: 1023BTU 240 V AC: 989BTU VPL-EX145/EX175: 100 V AC: 1091BTU 240 V AC...
...EXPIRATION OF THE WARRANTY, OR FOR ANY OTHER REASON WHATSOEVER. Projector Lamp LMP-E211 (for replacement) Notes *1: For details, refer to change without projecting parts) VPL-EX100/EX120: Approx. 3.2 kg (7lb 0.88 oz) VPL-EX145/EX175: Approx. 3.3 kg (7lb 4.4 oz) See "... operating properly before use. Please check with your local Sony Authorized Dealer. Item Model Heat dissipation Standard dimensions (W/H/D) Mass Supplied accessories Optional accessories*2 *3 Description VPL-EX100/EX120/EX145/EX175 VPL-EX100/EX120: 100 V AC: 1023BTU 240 V AC: 989BTU VPL-EX145/EX175: 100 V AC: 1091BTU 240 V AC...

Operating Instructions
Page 43
... Flip 21 Information menu 22 Input 4 Input-A Signal Sel 20 Installation menu 21 IP Address 20 IP Address Setup 20 K Keystone 5 L Lamp cover 3 Lamp Mode 18 Lamp Timer 22 Lamp Timer Reset 18 LAMP/COVER indicator 3, 26 LAN 4 Language 19 Location and function of controls 3 M Main unit 3 Messages list 27 Model Name 22 O ON/STANDBY...
... Flip 21 Information menu 22 Input 4 Input-A Signal Sel 20 Installation menu 21 IP Address 20 IP Address Setup 20 K Keystone 5 L Lamp cover 3 Lamp Mode 18 Lamp Timer 22 Lamp Timer Reset 18 LAMP/COVER indicator 3, 26 LAN 4 Language 19 Location and function of controls 3 M Main unit 3 Messages list 27 Model Name 22 O ON/STANDBY...

Operating Instructions
Page 44
... trademarks or registered trademarks of their respective holders. Primary DNS 20 Projecting an image 10 Projection distance 38 R Remote commander 5 Remote control detector 3 Replacing the lamp 30 Reset 15 RS-232C 4 S Screen menu 16 Secondary DNS 20 Security bar 3 Security Lock 3, 19 Selecting an input signal 5 Serial No 22 Sharpness 15...
... trademarks or registered trademarks of their respective holders. Primary DNS 20 Projecting an image 10 Projection distance 38 R Remote commander 5 Remote control detector 3 Replacing the lamp 30 Reset 15 RS-232C 4 S Screen menu 16 Secondary DNS 20 Security bar 3 Security Lock 3, 19 Selecting an input signal 5 Serial No 22 Sharpness 15...


