Operating Instructions
Page 2
... Contents Overview About the Supplied Manuals 3 Features 4 Location and Function of Controls .... 6 Top/Front/Left Side 6 Rear/Right Side/Bottom 6 Control Panel 7 Connector Panel 8 Remote Commander 9 Presentation Tool (VPL-CX76 only 11 Adjustments and Settings Using a Menu Using a MENU 24 The PICTURE... Projector 12 Connecting the Projector 13 Connecting a Computer 13 Connecting a VCR 14 Projecting 15 Turning Off the Power 18 Convenient Functions Selecting the Menu Language .......... 19 Security Lock 20 Other Functions 22 Controlling the Computer Using the Supplied Remote ...
... Contents Overview About the Supplied Manuals 3 Features 4 Location and Function of Controls .... 6 Top/Front/Left Side 6 Rear/Right Side/Bottom 6 Control Panel 7 Connector Panel 8 Remote Commander 9 Presentation Tool (VPL-CX76 only 11 Adjustments and Settings Using a Menu Using a MENU 24 The PICTURE... Projector 12 Connecting the Projector 13 Connecting a Computer 13 Connecting a VCR 14 Projecting 15 Turning Off the Power 18 Convenient Functions Selecting the Menu Language .......... 19 Security Lock 20 Other Functions 22 Controlling the Computer Using the Supplied Remote ...
Operating Instructions
Page 5
... to control the projector away from operating incorrectly. Security Functions Security lock This function makes it off and the power cord is disconnected. Overview Off & Go feature The cooling fan built into the projector will work even after turning it possible to prevent projection of a picture on . System expandability using a network (VPL-CX76 only) Connection to a wireless...
... to control the projector away from operating incorrectly. Security Functions Security lock This function makes it off and the power cord is disconnected. Overview Off & Go feature The cooling fan built into the projector will work even after turning it possible to prevent projection of a picture on . System expandability using a network (VPL-CX76 only) Connection to a wireless...
Operating Instructions
Page 6
... 500 hours. j Ventilation holes (intake)/Lamp cover k Ventilation holes (intake) l Speaker m Security lock Connects to the right or left for minor tilt adjustment of Controls For details, see "Control Panel" on page 7. h Rear remote control detector i Adjusters (hind pad) Turn the appropriate adjuster to an optional security cable (from Kensington). Location and Function of...
... 500 hours. j Ventilation holes (intake)/Lamp cover k Ventilation holes (intake) l Speaker m Security lock Connects to the right or left for minor tilt adjustment of Controls For details, see "Control Panel" on page 7. h Rear remote control detector i Adjusters (hind pad) Turn the appropriate adjuster to an optional security cable (from Kensington). Location and Function of...
Operating Instructions
Page 8
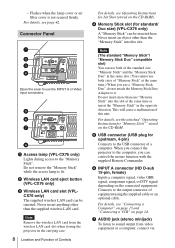
...projector in the same slot. (You cannot use both of the standard size "Memory Stick" and the "Memory Stick Duo" in the carrying case. 8 Location and Function of Controls For details, see page 42. b Wireless LAN card eject button (VPL-CX76 only) c Wireless LAN card slot (VPLCX76 only) The supplied wireless...than the supplied wireless LAN card. For details, see "Connecting a Computer" on page 13 and "Connecting a VCR" on the CD-ROM. Note (The standard "Memory Stick"/ "Memory Stick Duo" compatible slot) You can control the mouse function with the supplied Remote Commander. e ...
...projector in the same slot. (You cannot use both of the standard size "Memory Stick" and the "Memory Stick Duo" in the carrying case. 8 Location and Function of Controls For details, see page 42. b Wireless LAN card eject button (VPL-CX76 only) c Wireless LAN card slot (VPLCX76 only) The supplied wireless...than the supplied wireless LAN card. For details, see "Connecting a Computer" on page 13 and "Connecting a VCR" on the CD-ROM. Note (The standard "Memory Stick"/ "Memory Stick Duo" compatible slot) You can control the mouse function with the supplied Remote Commander. e ...
Operating Instructions
Page 9
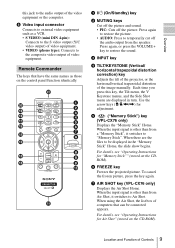
c INPUT key d TILT/KEYSTONE (Vertical/ horizontal trapezoidal distortion correction) key Adjusts the tilt of the projector, or the horizonal/vertical trapezoidal distortion of the video equipment or the computer. Remote Commander The keys that have the same names as a VCR. • S VIDEO (mini DIN 4-pin):... type): Connects to temporarily cut off the picture. h Video input connector Connects to external video equipment such as those on the control panel function identically. Press again, or press the VOLUME + key to the audio output of the image manually. Overview this key...
c INPUT key d TILT/KEYSTONE (Vertical/ horizontal trapezoidal distortion correction) key Adjusts the tilt of the projector, or the horizonal/vertical trapezoidal distortion of the video equipment or the computer. Remote Commander The keys that have the same names as a VCR. • S VIDEO (mini DIN 4-pin):... type): Connects to temporarily cut off the picture. h Video input connector Connects to external video equipment such as those on the control panel function identically. Press again, or press the VOLUME + key to the audio output of the image manually. Overview this key...
Operating Instructions
Page 10
...key is displayed on this unit. key Enlarges the image at a desired location on page 22. Resets the value of a computer only when the projector is connected to its original size. k Strap holder For attaching a strap. n M/m/ l RESET/ESCAPE key Functions as the mouse buttons of ... factory preset value or returns the enlarged image to a computer using the USB cable. m D ZOOM (Digital Zoom) +/- For details, see "Controlling the Computer Using the Supplied Remote Commander (When Using the USB Cable)" on the screen. i ENTER key j FUNCTION 1, 2, 3 keys The FUNCTION 1 and 2 keys do...
...key is displayed on this unit. key Enlarges the image at a desired location on page 22. Resets the value of a computer only when the projector is connected to its original size. k Strap holder For attaching a strap. n M/m/ l RESET/ESCAPE key Functions as the mouse buttons of ... factory preset value or returns the enlarged image to a computer using the USB cable. m D ZOOM (Digital Zoom) +/- For details, see "Controlling the Computer Using the Supplied Remote Commander (When Using the USB Cable)" on the screen. i ENTER key j FUNCTION 1, 2, 3 keys The FUNCTION 1 and 2 keys do...
Operating Instructions
Page 11
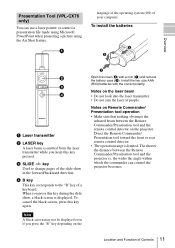
... remote control detector on the laser beam • Do not look into the laser transmitter. • Do not aim the laser at people. c SLIDE G/g key Used to the "B" key of the slide show , a black screen is limited. To cancel the black screen, press this key pressed. Presentation Tool (VPL-CX76 only) You can control the projector...
... remote control detector on the laser beam • Do not look into the laser transmitter. • Do not aim the laser at people. c SLIDE G/g key Used to the "B" key of the slide show , a black screen is limited. To cancel the black screen, press this key pressed. Presentation Tool (VPL-CX76 only) You can control the projector...
Operating Instructions
Page 15
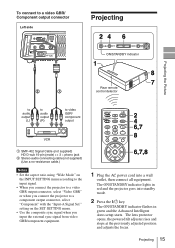
To connect to a video GBR/ Component output connector Left side Projecting ON/STANDBY indicator Projecting the Picture Rear remote control detector to audio output (L) to audio output (R) to video GBR/ component output VCR A SMF-402 Signal Cable (not supplied) HD D-sub 15-pin (male) ↔ ....) Notes • Set the aspect ratio using "Wide Mode" on the SET SETTING menu. • Use the composite sync signal when you connect the projector to a video GBR output connector, select "Video GBR" or when you input the external sync signal from video GBR/component equipment. 1 Plug the AC...
To connect to a video GBR/ Component output connector Left side Projecting ON/STANDBY indicator Projecting the Picture Rear remote control detector to audio output (L) to audio output (R) to video GBR/ component output VCR A SMF-402 Signal Cable (not supplied) HD D-sub 15-pin (male) ↔ ....) Notes • Set the aspect ratio using "Wide Mode" on the SET SETTING menu. • Use the composite sync signal when you connect the projector to a video GBR output connector, select "Video GBR" or when you input the external sync signal from video GBR/component equipment. 1 Plug the AC...

Operating Instructions
Page 17
Projecting the Picture menu and adjust the tilt using the M/m/
Projecting the Picture menu and adjust the tilt using the M/m/
Operating Instructions
Page 19
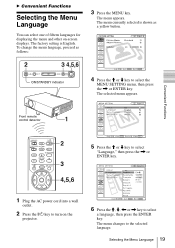
... to the selected language. B Convenient Functions Selecting the Menu Language You can select one of fifteen languages for displaying the menu and other on the projector. 6 Press the M, m, < or , key to select a language, then press the ENTER key. Convenient Functions 1 Plug the AC power cord into a wall outlet. 2 Press the ?/1 key... appears. The factory setting is shown as follows: 3 Press the MENU key. To change the menu language, proceed as a yellow button. ON/STANDBY indicator Front remote control detector 4 Press the M or m key to turn on -screen displays.
... to the selected language. B Convenient Functions Selecting the Menu Language You can select one of fifteen languages for displaying the menu and other on the projector. 6 Press the M, m, < or , key to select a language, then press the ENTER key. Convenient Functions 1 Plug the AC power cord into a wall outlet. 2 Press the ?/1 key... appears. The factory setting is shown as follows: 3 Press the MENU key. To change the menu language, proceed as a yellow button. ON/STANDBY indicator Front remote control detector 4 Press the M or m key to turn on -screen displays.
Operating Instructions
Page 22
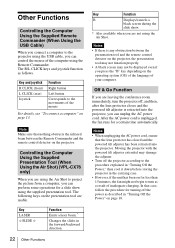
...the presentation tool are leaving the conference room immediately, turn as follows. Controlling the Computer Using the Supplied Presentation Tool (When Using the Air Shot) (VPL-CX76 only) When you press the "B" key depending on the projector. Notes • If there is unplugged, the fan runs for a...8226; When unplugging the AC power cord, ensure that nothing obstructs the infrared beam between the presentation tool and the remote control detector on the projector, the presentation tool may not function properly. • A black screen may damage the adjuster. • Turn off...
...the presentation tool are leaving the conference room immediately, turn as follows. Controlling the Computer Using the Supplied Presentation Tool (When Using the Air Shot) (VPL-CX76 only) When you press the "B" key depending on the projector. Notes • If there is unplugged, the fan runs for a...8226; When unplugging the AC power cord, ensure that nothing obstructs the infrared beam between the presentation tool and the remote control detector on the projector, the presentation tool may not function properly. • A black screen may damage the adjuster. • Turn off...
Operating Instructions
Page 30
Selects the remote control detectors (IR Receiver) on the front and rear of the On projector lights when the projector is displayed on the screen. Locks all the control panel keys on the rear and side Off panels of the projector so that the projector can cancel the adjustment by pressing the APA key again... power saving mode, no signal is input for 10 minutes. Front & Rear Selects whether the SONY logo on when it , the APA function will be operated only with the Remote Commander. To lock the control panel keys, set to "On." If you adjust the picture manually. 30 The SET SETTING...
Selects the remote control detectors (IR Receiver) on the front and rear of the On projector lights when the projector is displayed on the screen. Locks all the control panel keys on the rear and side Off panels of the projector so that the projector can cancel the adjustment by pressing the APA key again... power saving mode, no signal is input for 10 minutes. Front & Rear Selects whether the SONY logo on when it , the APA function will be operated only with the Remote Commander. To lock the control panel keys, set to "On." If you adjust the picture manually. 30 The SET SETTING...
Operating Instructions
Page 32
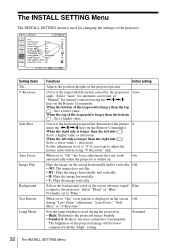
... Keystone Side Shot Auto Focus Image Flip Background Test Pattern Lamp Mode Functions Initial setting Adjusts the position (height) of the projector. Corrects the trapezoidal distortion caused by the projection angle. Select "Auto" for automatic correction, or "Manual" for changing the...... V Keystone: Auto Side Shot: 0 Auto Focus: On Image Flip: Off Background: Blue Test Pattern: Off Lamp Mode: Standard Lens Control: On High Altitude Mode:Off Security Lock: Off Input-A Setting items Tilt... The INSTALL SETTING Menu The INSTALL SETTING menu is used for manual...
... Keystone Side Shot Auto Focus Image Flip Background Test Pattern Lamp Mode Functions Initial setting Adjusts the position (height) of the projector. Corrects the trapezoidal distortion caused by the projection angle. Select "Auto" for automatic correction, or "Manual" for changing the...... V Keystone: Auto Side Shot: 0 Auto Focus: On Image Flip: Off Background: Blue Test Pattern: Off Lamp Mode: Standard Lens Control: On High Altitude Mode:Off Security Lock: Off Input-A Setting items Tilt... The INSTALL SETTING Menu The INSTALL SETTING menu is used for manual...
Operating Instructions
Page 33
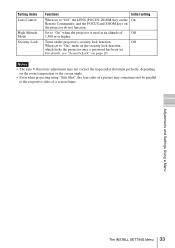
...the security lock function, which locks the projector once a password has been set. Notes • The auto V Keystone adjustment may not correct the trapezoidal distortion perfectly, depending on the projector do not function. Setting items Lens Control High Altitude Mode Security Lock Functions Initial... setting When set to "Off," the LENS (FOCUS, ZOOM) key on the On Remote Commander, and the FOCUS and ZOOM keys ...
...the security lock function, which locks the projector once a password has been set. Notes • The auto V Keystone adjustment may not correct the trapezoidal distortion perfectly, depending on the projector do not function. Setting items Lens Control High Altitude Mode Security Lock Functions Initial... setting When set to "Off," the LENS (FOCUS, ZOOM) key on the On Remote Commander, and the FOCUS and ZOOM keys ...

Operating Instructions
Page 38
... and unplug the power cord. 2 Place a protective sheet (cloth) beneath the projector and turn the projector over. 3 Remove the air filter cover. 4 Remove the air filter. Remove dust from the outside of the projector or on the remote commander. 38 Cleaning the Air Filter Claws 5 Wash the air filter with a ...mild detergent solution and dry it in a notch on the air filter cover. • To erase a message, press any key on the control panel of the ventilation holes ...
... and unplug the power cord. 2 Place a protective sheet (cloth) beneath the projector and turn the projector over. 3 Remove the air filter cover. 4 Remove the air filter. Remove dust from the outside of the projector or on the remote commander. 38 Cleaning the Air Filter Claws 5 Wash the air filter with a ...mild detergent solution and dry it in a notch on the air filter cover. • To erase a message, press any key on the control panel of the ventilation holes ...
Operating Instructions
Page 41
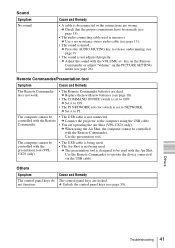
... Shot (VPL-CX76 only). c Set it to ON. • The PJ NETWORK selector switch is set to OFF. c Replace them with new batteries (see page 13). • The audio connecting cable used is not being used with the Remote Commander. The computer cannot be controlled with the... Remote Commander to PJ. c The presentation tool is not connected. Use the presentation tool. c Adjust the sound with the Remote Commander. • The USB cable is designed to the computer using the Air Shot, the computer cannot be used . c Connect the projector to be controlled with...
... Shot (VPL-CX76 only). c Set it to ON. • The PJ NETWORK selector switch is set to OFF. c Replace them with new batteries (see page 13). • The audio connecting cable used is not being used with the Remote Commander. The computer cannot be controlled with the... Remote Commander to PJ. c The presentation tool is not connected. Use the presentation tool. c Adjust the sound with the Remote Commander. • The USB cable is designed to the computer using the Air Shot, the computer cannot be used . c Connect the projector to be controlled with...
Operating Instructions
Page 43
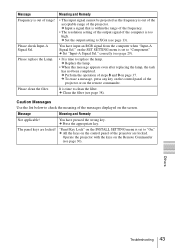
...the keys on the Remote Commander (see page 13). You have input an RGB signal from the computer when "Input-A Signal Sel." correctly (see page 38). Message Meaning and Remedy Not applicable! Operate the projector with the keys on the control panel of the projector are locked! Please ...clean the filter. Others Troubleshooting 43 c To erase a message, press any key on the control panel of steps 8 and 9 on the screen. Meaning and...
...the keys on the Remote Commander (see page 13). You have input an RGB signal from the computer when "Input-A Signal Sel." correctly (see page 38). Message Meaning and Remedy Not applicable! Operate the projector with the keys on the control panel of the projector are locked! Please ...clean the filter. Others Troubleshooting 43 c To erase a message, press any key on the control panel of steps 8 and 9 on the screen. Meaning and...

Operating Instructions
Page 52
... L Lamp Mode 32, 33 Lamp replacement 36 Lamp Timer 34 Language 31 selecting the menu language 19 Lens Control 33 Lens protector 6 Location and function of controls connector panel 8 control panel 7 rear/right side/bottom 6 Remote Commander 9 top/front/left side 6 M Menu clearing the menu display 25 INFORMATION Menu 34 INPUT SETTING menu 27...
... L Lamp Mode 32, 33 Lamp replacement 36 Lamp Timer 34 Language 31 selecting the menu language 19 Lens Control 33 Lens protector 6 Location and function of controls connector panel 8 control panel 7 rear/right side/bottom 6 Remote Commander 9 top/front/left side 6 M Menu clearing the menu display 25 INFORMATION Menu 34 INPUT SETTING menu 27...

Operating Instructions
Page 53
R Remote Commander 9 front remote control detector 6 location and function of controls ...........9 rear remote control detector 6 Reset resettable items 25 resetting an item 25 S Scan Converter 28 Screen size 12, 44 Security Lock 33 Sharpness 26 Shift 28 Side Shot 32, 33 Smart APA 29 Specifications 44 Startup screen 16 Status 31 Supplied accessories 45 T Test Pattern 32 Tilt 32 Troubleshooting 39 U USB connector 13 V V Keystone 32 Volume 26 W Wide Mode 27 Index 53 Others
R Remote Commander 9 front remote control detector 6 location and function of controls ...........9 rear remote control detector 6 Reset resettable items 25 resetting an item 25 S Scan Converter 28 Screen size 12, 44 Security Lock 33 Sharpness 26 Shift 28 Side Shot 32, 33 Smart APA 29 Specifications 44 Startup screen 16 Status 31 Supplied accessories 45 T Test Pattern 32 Tilt 32 Troubleshooting 39 U USB connector 13 V V Keystone 32 Volume 26 W Wide Mode 27 Index 53 Others

