Operating Instructions
Page 5
... Function of Controls .10 Top/Front/Left Side 10 Rear/Right Side/Bottom 10 Control Panel 12 Connector Panel 12 Remote Commander 13 Setting Up and Projecting Installing the Projector 16 Connecting the Projector 17 Connecting with a Computer ......17 Connecting with a VCR or 15k RGB/Component Equipment 19 Selecting the Menu Language ..........21...
... Function of Controls .10 Top/Front/Left Side 10 Rear/Right Side/Bottom 10 Control Panel 12 Connector Panel 12 Remote Commander 13 Setting Up and Projecting Installing the Projector 16 Connecting the Projector 17 Connecting with a Computer ......17 Connecting with a VCR or 15k RGB/Component Equipment 19 Selecting the Menu Language ..........21...
Operating Instructions
Page 8
... 1500 m (4921 feet), consult qualified Sony personel. For easier operations, the keys that converts the input signal within 1024 × 768 dots (VPL-CX5) or 800 × 600 dots (VPL-CS5) . • Compatible input signals This projector accepts video signals of the projector. You can use the supplied Remote Commander as VGA, SVGA, XGA, SXGA1) and SXGA+1) signals...
... 1500 m (4921 feet), consult qualified Sony personel. For easier operations, the keys that converts the input signal within 1024 × 768 dots (VPL-CX5) or 800 × 600 dots (VPL-CS5) . • Compatible input signals This projector accepts video signals of the projector. You can use the supplied Remote Commander as VGA, SVGA, XGA, SXGA1) and SXGA+1) signals...
Operating Instructions
Page 11
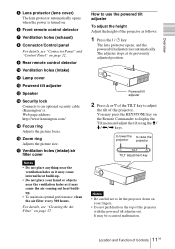
...the TILT key to use the powered tilt adjuster To adjust the height Adjust the height of the projector. For details, see "Connector Panel" and "Control Panel" on page 12. 9 Rear remote control detector 0 Ventilation holes (intake) qa Lamp cover qs Powered tilt adjuster qd Speaker qf Security... lock Connects to an optional security cable (Kensington's). How to adjust the tilt of the projector as it may press the KEYSTONE key on ...
...the TILT key to use the powered tilt adjuster To adjust the height Adjust the height of the projector. For details, see "Connector Panel" and "Control Panel" on page 12. 9 Rear remote control detector 0 Ventilation holes (intake) qa Lamp cover qs Powered tilt adjuster qd Speaker qf Security... lock Connects to an optional security cable (Kensington's). How to adjust the tilt of the projector as it may press the KEYSTONE key on ...
Operating Instructions
Page 13
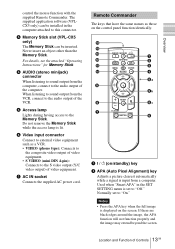
...set to the S video output (Y/C video output) of the VCR. 5 Access lamp Lights during having access to this connector. 3 Memory Stick slot (VPL-CX5 only) The Memory Stick can be inserted. For details, see the attached "Operating Instructions" for Memory Stick. 4 AUDIO (stereo minijack) connector When... GB qg qf qd FREEZE MS SLIDE I / 1 (on the control panel function identically. Overview control the mouse function with the supplied Remote Commander. Do not remove the Memory Stick while the access lamp is lit. 6 Video input connector Connect to external video equipment such as ...
...set to the S video output (Y/C video output) of the VCR. 5 Access lamp Lights during having access to this connector. 3 Memory Stick slot (VPL-CX5 only) The Memory Stick can be inserted. For details, see the attached "Operating Instructions" for Memory Stick. 4 AUDIO (stereo minijack) connector When... GB qg qf qd FREEZE MS SLIDE I / 1 (on the control panel function identically. Overview control the mouse function with the supplied Remote Commander. Do not remove the Memory Stick while the access lamp is lit. 6 Video input connector Connect to external video equipment such as ...
Operating Instructions
Page 14
... FUNCTION keys. This key functions when the menu or a setting item is connected to the computer using the supplied Remote Commander" on page 25. 6 FUNCTION 1, 2 keys (VPL-CX5 only) When you connect the projector with a computer, you can cancel the adjustment by pressing the APA key again while "Adjusting" appears on the screen...
... FUNCTION keys. This key functions when the menu or a setting item is connected to the computer using the supplied Remote Commander" on page 25. 6 FUNCTION 1, 2 keys (VPL-CX5 only) When you connect the projector with a computer, you can cancel the adjustment by pressing the APA key again while "Adjusting" appears on the screen...
Operating Instructions
Page 15
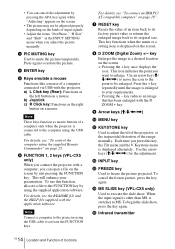
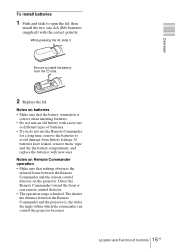
... polarity. While pressing the lid, slide it. Notes on the projector. Notes on Remote Commander operation • Make sure that the battery orientation is limited. Direct the Remote Commander toward the front or rear remote control detector. • The operation range is correct when inserting ...battery from battery leakage. The shorter the distance between the Remote Commander and the remote control detector on batteries • Make sure that nothing obstructs the infrared beam between the Remote Commander and the projector is, the wider the angle within which the commander ...
... polarity. While pressing the lid, slide it. Notes on the projector. Notes on Remote Commander operation • Make sure that the battery orientation is limited. Direct the Remote Commander toward the front or rear remote control detector. • The operation range is correct when inserting ...battery from battery leakage. The shorter the distance between the Remote Commander and the remote control detector on batteries • Make sure that nothing obstructs the infrared beam between the Remote Commander and the projector is, the wider the angle within which the commander ...
Operating Instructions
Page 21
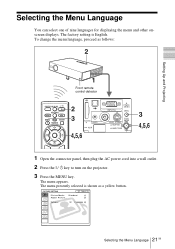
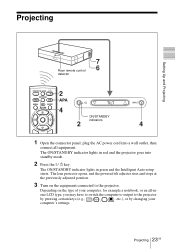
..., proceed as a yellow button. Input A Vo l u m e : 30 21 Selecting the Menu Language GB The factory setting is shown as follows: Setting Up and Projecting Front remote control detector FREEZE MS SLIDE I / 1 KEYSTONE INPUT APA MENU PIC ENTER MUTING ACCESS AUDIO INPUT A POWER SAVING MENU VIDEO S VIDEO TEMP/FAN PUSH ENTER LAMP.../COVER 1 Open the connector panel, then plug the AC power cord into a wall outlet. 2 Press the I / 1 key to turn on the projector. 3 Press the MENU key. The menu appears. The menu presently selected is English.
..., proceed as a yellow button. Input A Vo l u m e : 30 21 Selecting the Menu Language GB The factory setting is shown as follows: Setting Up and Projecting Front remote control detector FREEZE MS SLIDE I / 1 KEYSTONE INPUT APA MENU PIC ENTER MUTING ACCESS AUDIO INPUT A POWER SAVING MENU VIDEO S VIDEO TEMP/FAN PUSH ENTER LAMP.../COVER 1 Open the connector panel, then plug the AC power cord into a wall outlet. 2 Press the I / 1 key to turn on the projector. 3 Press the MENU key. The menu appears. The menu presently selected is English.
Operating Instructions
Page 23
... 1 Open the connector panel, plug the AC power cord into a wall outlet, then connect all -inone LCD type, you may have to switch the computer to output to the projector. The lens protector opens, and the powered tilt adjuster rises and stops at the previously adjusted position. 3... Turn on the type of your computer's settings. Projecting 23 GB Projecting Setting Up and Projecting 7 Rear remote control 6 detector FREEZE MS SLIDE ...
... 1 Open the connector panel, plug the AC power cord into a wall outlet, then connect all -inone LCD type, you may have to switch the computer to output to the projector. The lens protector opens, and the powered tilt adjuster rises and stops at the previously adjusted position. 3... Turn on the type of your computer's settings. Projecting 23 GB Projecting Setting Up and Projecting 7 Rear remote control 6 detector FREEZE MS SLIDE ...
Operating Instructions
Page 24
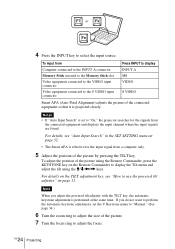
... the INPUT key to display the Tilt menu and adjust the tilt using the M/m/ Notes • If "Auto Input Search" is set to "On," the projector searches for the input signal from the connected equipment and displays the input channel where the input signals are found. For details, see "Auto Input... the picture of the connected equipment so that it is effective for the signals from a computer only. 5 Adjust the position of the picture using the Remote Commander, press the KEYSTONE key on the Remote Commander to select the input source.
... the INPUT key to display the Tilt menu and adjust the tilt using the M/m/ Notes • If "Auto Input Search" is set to "On," the projector searches for the input signal from the connected equipment and displays the input channel where the input signals are found. For details, see "Auto Input... the picture of the connected equipment so that it is effective for the signals from a computer only. 5 Adjust the position of the picture using the Remote Commander, press the KEYSTONE key on the Remote Commander to select the input source.
Operating Instructions
Page 25
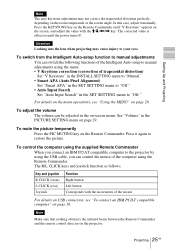
In this case, adjust it manually. Setting Up and Projecting Note The auto keystone adjustment may not correct the trapezoidal distortion perfectly, depending on the screen, and adjust the value with the M/m/ Press the KEYSTONE key on the Remote Commander until "V Keystone" appears on the room temperature or the screen angle.
In this case, adjust it manually. Setting Up and Projecting Note The auto keystone adjustment may not correct the trapezoidal distortion perfectly, depending on the screen, and adjust the value with the M/m/ Press the KEYSTONE key on the Remote Commander until "V Keystone" appears on the room temperature or the screen angle.

Operating Instructions
Page 27
... zoom icon appears in the center of the image. This function does not work when a video signal is projected (VPL-CX5 only). Digital zoom icon 2 Move the icon to the point on the Remote Commander. This function works when a signal from a computer is input, or when a still picture (except a movie picture) stored...
... zoom icon appears in the center of the image. This function does not work when a video signal is projected (VPL-CX5 only). Digital zoom icon 2 Move the icon to the point on the Remote Commander. This function works when a signal from a computer is input, or when a still picture (except a movie picture) stored...

Operating Instructions
Page 29
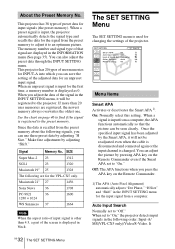
... factory preset values. About the menu display You can be adjusted depending on the unadjustable items, see "The MENU SETTING Menu" on the Remote Commander. When the video signal is not pressed for adjusting the picture or volume. "Complete!" Items that have been adjusted Press the RESET ... can set the display position of the menu, intensity of the background picture and tone of the settings The settings are not displayed in the projector memory. For details, see page 45. Vo l u m e : 30 When the RGB signal is used for one minute. Press the ENTER or < key to ...
... factory preset values. About the menu display You can be adjusted depending on the unadjustable items, see "The MENU SETTING Menu" on the Remote Commander. When the video signal is not pressed for adjusting the picture or volume. "Complete!" Items that have been adjusted Press the RESET ... can set the display position of the menu, intensity of the background picture and tone of the settings The settings are not displayed in the projector memory. For details, see page 45. Vo l u m e : 30 When the RGB signal is used for one minute. Press the ENTER or < key to ...
Operating Instructions
Page 32
...black. Macintosh 21" 27 1456 Sony News 36 1708 PC-9821 36 1280 × 1024 1600 WS Sunmicro 37 1664 Note When the aspect ratio of the projector. When a signal is used for... memory about the following order: Input-A/ MS(VPL-CX5 only)/Video/S-Video. Once the specified input signal has been adjusted by adjusting "Shift." This projector has 38 types of the adjusted data for the... "H Size" and "Shift" in the following signals, you can use these preset data by pressing APA key on the Remote Commander even if the Smart APA set to "Off." SET SETTING Input A S m a r t A PA : ...
...black. Macintosh 21" 27 1456 Sony News 36 1708 PC-9821 36 1280 × 1024 1600 WS Sunmicro 37 1664 Note When the aspect ratio of the projector. When a signal is used for... memory about the following order: Input-A/ MS(VPL-CX5 only)/Video/S-Video. Once the specified input signal has been adjusted by adjusting "Shift." This projector has 38 types of the adjusted data for the... "H Size" and "Shift" in the following signals, you can use these preset data by pressing APA key on the Remote Commander even if the Smart APA set to "Off." SET SETTING Input A S m a r t A PA : ...
Operating Instructions
Page 34
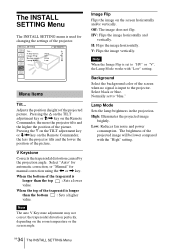
...position (height) of the picture. Pressing the f on the TILT adjustment key or M/, key on the Remote Commander, the less the projector tilts and the lower the position of the projector. V: Flips the image vertically. Image Flip Flips the image on the room temperature or the screen angle.... perfectly, depending on the screen horizontally and/or vertically. Pressing the F on the TILT adjustment key or m/< key on the Remote Commander, the more the projector tilts and the higher the position of the projected picture. Off: The image does not flip. INSTALL SETTING Tilt... V Keystone...
...position (height) of the picture. Pressing the f on the TILT adjustment key or M/, key on the Remote Commander, the less the projector tilts and the lower the position of the projector. V: Flips the image vertically. Image Flip Flips the image on the room temperature or the screen angle.... perfectly, depending on the screen horizontally and/or vertically. Pressing the F on the TILT adjustment key or m/< key on the Remote Commander, the more the projector tilts and the higher the position of the projected picture. Off: The image does not flip. INSTALL SETTING Tilt... V Keystone...
Operating Instructions
Page 37
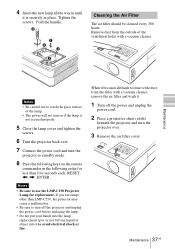
Fold the handle. Remove dust from the outside of the lamp. • The power will not turn the projector to standby mode. 8 Press the following order for less than five seconds each: RESET, Tighten the screws. Cleaning the Air Filter The air filter should ... it is not secured properly. 5 Close the lamp cover and tighten the screws. 6 Turn the projector back over. 7 Connect the power cord and turn on if the lamp is securely in the following keys on the remote commander in place. Maintenance Notes • Be careful not to touch the glass surface of...
Fold the handle. Remove dust from the outside of the lamp. • The power will not turn the projector to standby mode. 8 Press the following order for less than five seconds each: RESET, Tighten the screws. Cleaning the Air Filter The air filter should ... it is not secured properly. 5 Close the lamp cover and tighten the screws. 6 Turn the projector back over. 7 Connect the power cord and turn on if the lamp is securely in the following keys on the remote commander in place. Maintenance Notes • Be careful not to touch the glass surface of...
Operating Instructions
Page 41
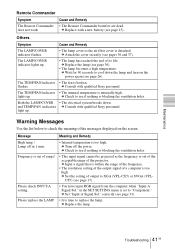
...Sony personnel. The TEMP/FAN indicator • The fan is too high. Message Meaning and Remedy High temp.! c Input a signal that is within the range of the frequency. • The resolution setting of the output signal of output to XGA (VPL-CX5) or SVGA...setting of a computer is broken. Maintenance Remote Commander Symptom Cause and Remedy The Remote Commander • The Remote Commander batteries are dead. in 1 min.... 15). c Consult with qualified Sony personnel. light up . • The lamp has reached the end of the projector. c Check to see if nothing...
...Sony personnel. The TEMP/FAN indicator • The fan is too high. Message Meaning and Remedy High temp.! c Input a signal that is within the range of the frequency. • The resolution setting of the output signal of output to XGA (VPL-CX5) or SVGA...setting of a computer is broken. Maintenance Remote Commander Symptom Cause and Remedy The Remote Commander • The Remote Commander batteries are dead. in 1 min.... 15). c Consult with qualified Sony personnel. light up . • The lamp has reached the end of the projector. c Check to see if nothing...
Operating Instructions
Page 44
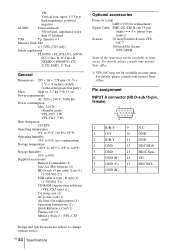
...nearest Sony office. GB 44 Specifications Optional accessories Projector Lamp LMP-C150 (for replacement) (1) Operating Instructions (1) Quick Reference Card (1) Ferrite core (1) Memory Stick (1) (VPL-CX5 ...only) Design and specifications are subject to change without the projection parts) Mass Approx. 2.7 kg (5 lb 15 oz) Power requirements AC 100 to 240 V, 50/60 Hz Power consumption Max. 240 W (Standby mode: VPL-CS5: 5 W VPL...
...nearest Sony office. GB 44 Specifications Optional accessories Projector Lamp LMP-C150 (for replacement) (1) Operating Instructions (1) Quick Reference Card (1) Ferrite core (1) Memory Stick (1) (VPL-CX5 ...only) Design and specifications are subject to change without the projection parts) Mass Approx. 2.7 kg (5 lb 15 oz) Power requirements AC 100 to 240 V, 50/60 Hz Power consumption Max. 240 W (Standby mode: VPL-CS5: 5 W VPL...
Operating Instructions
Page 48
...33 selecting the menu language 21 Location and function of controls connector panel .......... 12 control panel 12 rear/right side/bottom . 10 Remote Commander .. 13 top/front/left side ........ 10 M Menu clearing the menu display 29 INFORMATION Menu 35 INPUT SETTING menu 31 ... 29 Pin assignment 44 Power turn on 23 Power Saving 12, 33 Powered tilt adjuster ...... 11 Precautions 6 R Remote Commander ...... 13 location and function of controls 13 Remote control detector front 11 Reset resettable items 29 resetting the item ........ 29 RGB Enhancer 30 S Scan Converter 31 Screen...
...33 selecting the menu language 21 Location and function of controls connector panel .......... 12 control panel 12 rear/right side/bottom . 10 Remote Commander .. 13 top/front/left side ........ 10 M Menu clearing the menu display 29 INFORMATION Menu 35 INPUT SETTING menu 31 ... 29 Pin assignment 44 Power turn on 23 Power Saving 12, 33 Powered tilt adjuster ...... 11 Precautions 6 R Remote Commander ...... 13 location and function of controls 13 Remote control detector front 11 Reset resettable items 29 resetting the item ........ 29 RGB Enhancer 30 S Scan Converter 31 Screen...


