User Manual
Page 2
... Started 11 Locating Controls and Ports 12 About the Indicator Lights 17 Connecting a Power Source 18 Using the Battery Pack 20 Shutting Down Your Computer Safely 27 Using the Power Saving Modes 28 Keeping Your Computer in Optimum Condition .......... 31 Using Your VAIO Computer 33 Using the Keyboard 34 Using the Touch Pad 37 Using Special-function Buttons 38 Using the Built-in Camera 39 Using the Optical Disc Drive 40 Using "Memory Stick 47 Using Other Modules / Memory Cards 54 Using the Internet 61 Using the Network (LAN 62 Using...
... Started 11 Locating Controls and Ports 12 About the Indicator Lights 17 Connecting a Power Source 18 Using the Battery Pack 20 Shutting Down Your Computer Safely 27 Using the Power Saving Modes 28 Keeping Your Computer in Optimum Condition .......... 31 Using Your VAIO Computer 33 Using the Keyboard 34 Using the Touch Pad 37 Using Special-function Buttons 38 Using the Built-in Camera 39 Using the Optical Disc Drive 40 Using "Memory Stick 47 Using Other Modules / Memory Cards 54 Using the Internet 61 Using the Network (LAN 62 Using...

User Manual
Page 8
... Sony online support web site. Sony Style store and get personalized service and support for at a U.S. Sony Style Backstage Technicians can find the nearest location. You can assist with a Sony certified technician at our site, you might need. In order to find the contact numbers on your computer 4 The hardware component or the software program that is causing the problem 5 A brief description of your Sony VAIO...
... Sony online support web site. Sony Style store and get personalized service and support for at a U.S. Sony Style Backstage Technicians can find the nearest location. You can assist with a Sony certified technician at our site, you might need. In order to find the contact numbers on your computer 4 The hardware component or the software program that is causing the problem 5 A brief description of your Sony VAIO...
User Manual
Page 15
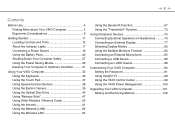
... Started > Locating Controls and Ports Left n 15 N A DC IN port (page 18) B Security slot C Air vent D Network (LAN) port (page 62) E Monitor port (page 77) F HDMI output port*1 (page 80) G eSATA/USB port*2 Connect an external device compliant with the USB 2.0 standard and supports high-/full-/low- speeds. ! An eSATA device and a USB device cannot be no sound from an output device connected to the HDMI output port for the first few seconds after playback starts. The port does not support...
... Started > Locating Controls and Ports Left n 15 N A DC IN port (page 18) B Security slot C Air vent D Network (LAN) port (page 62) E Monitor port (page 77) F HDMI output port*1 (page 80) G eSATA/USB port*2 Connect an external device compliant with the USB 2.0 standard and supports high-/full-/low- speeds. ! An eSATA device and a USB device cannot be no sound from an output device connected to the HDMI output port for the first few seconds after playback starts. The port does not support...

User Manual
Page 17
... Lock key to a memory card, such as "Memory Stick" and an SD memory card, is in progress. (Do not place the computer into Sleep mode or turn off or enters Hibernate mode. The Scr Lk key functions differently depending on the program you scroll the display. See Charging the Battery Pack (page 23) for more wireless options are using and does not work with the following indicator lights: Indicator Power 1 Charge Built-in MOTION EYE camera Media Access Disc drive Num lock Caps lock Scroll lock WIRELESS Functions...
... Lock key to a memory card, such as "Memory Stick" and an SD memory card, is in progress. (Do not place the computer into Sleep mode or turn off or enters Hibernate mode. The Scr Lk key functions differently depending on the program you scroll the display. See Charging the Battery Pack (page 23) for more wireless options are using and does not work with the following indicator lights: Indicator Power 1 Charge Built-in MOTION EYE camera Media Access Disc drive Num lock Caps lock Scroll lock WIRELESS Functions...
User Manual
Page 37
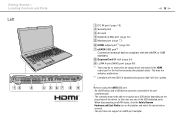
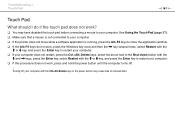
... VAIO Control Center. ! Using Your VAIO Computer > Using the Touch Pad Using the Touch Pad You can point to, select, drag, and scroll objects on the touch pad with applications that support a touch pad scroll feature). Press the right button (4) once. Slide two fingers linearly in a row. Press the left button (3) once. To change the touch pad settings, use only the keyboard for zooming. If you disable the touch pad before disabling the touch pad. Slide your computer. On web browser software...
... VAIO Control Center. ! Using Your VAIO Computer > Using the Touch Pad Using the Touch Pad You can point to, select, drag, and scroll objects on the touch pad with applications that support a touch pad scroll feature). Press the right button (4) once. Slide two fingers linearly in a row. Press the left button (3) once. To change the touch pad settings, use only the keyboard for zooming. If you disable the touch pad before disabling the touch pad. Slide your computer. On web browser software...

User Manual
Page 56
n 56 N the Safely Remove Hardware and Eject Media icon is not displayed on -screen instructions for removing the ExpressCard module. 5 Push in the ExpressCard module toward the computer so that the module pops out. 6 Gently take hold of the ExpressCard module and pull it out of the slot. the hardware you want to unplug is off. - Using Your VAIO Computer > Using Other Modules / Memory Cards To remove an ExpressCard module ✍ You can...
n 56 N the Safely Remove Hardware and Eject Media icon is not displayed on -screen instructions for removing the ExpressCard module. 5 Push in the ExpressCard module toward the computer so that the module pops out. 6 Gently take hold of the ExpressCard module and pull it out of the slot. the hardware you want to unplug is off. - Using Your VAIO Computer > Using Other Modules / Memory Cards To remove an ExpressCard module ✍ You can...
User Manual
Page 61
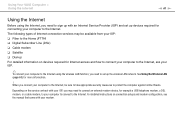
... set up devices required for connecting your computer to set up For detailed information on devices required for Internet access and how to connect your computer to the Internet, ask your ISP. ✍ To connect your computer to the Internet using the wireless LAN function, you need to connect an external modem device, for more information. ! The following types of Internet connection services may need to the Internet. Depending on connection setups and modem configuration, see the manual that...
... set up devices required for connecting your computer to set up For detailed information on devices required for Internet access and how to connect your computer to the Internet, ask your ISP. ✍ To connect your computer to the Internet using the wireless LAN function, you need to connect an external modem device, for more information. ! The following types of Internet connection services may need to the Internet. Depending on connection setups and modem configuration, see the manual that...

User Manual
Page 91
... types of Password Power-on or returns to start the computer. - Allows users to log onto your computer and protect each user account with administrative rights to change some of the power-on password will be charged. You can use BIOS functions to set the machine password. ✍ Entry of the BIOS setup options, as well as to forget your password. To reset the password, contact an authorized Sony service/support center. To set the user password...
... types of Password Power-on or returns to start the computer. - Allows users to log onto your computer and protect each user account with administrative rights to change some of the power-on password will be charged. You can use BIOS functions to set the machine password. ✍ Entry of the BIOS setup options, as well as to forget your password. To reset the password, contact an authorized Sony service/support center. To set the user password...

User Manual
Page 100
Change the Sleep mode and display settings as needed. 2 If you are currently using. This icon indicates what kind of power source you need to ensure better operation of your desired power plan. Change the settings for each item. 4 Click OK. ✍ You can enhance the Windows power management functions to change the power plan settings 1 Click Change plan settings on the taskbar and select Power Options. 2 Select your desired power plan in the VAIO Control Center. To select...
Change the Sleep mode and display settings as needed. 2 If you are currently using. This icon indicates what kind of power source you need to ensure better operation of your desired power plan. Change the settings for each item. 4 Click OK. ✍ You can enhance the Windows power management functions to change the power plan settings 1 Click Change plan settings on the taskbar and select Power Options. 2 Select your desired power plan in the VAIO Control Center. To select...
User Manual
Page 101
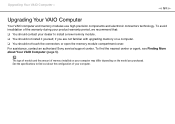
... computer. The type of module and the amount of the warranty during your product warranty period, we recommend that: ❑ You should contact your computer may differ depending on the model you are not familiar with upgrading memory on a computer. ❑ You should not touch the connectors or open the memory module compartment cover. For assistance, contact an authorized Sony service/support center.
... computer. The type of module and the amount of the warranty during your product warranty period, we recommend that: ❑ You should contact your computer may differ depending on the model you are not familiar with upgrading memory on a computer. ❑ You should not touch the connectors or open the memory module compartment cover. For assistance, contact an authorized Sony service/support center.

User Manual
Page 127
... being installed properly. Remove the battery pack and contact an authorized Sony service/support center. What should I do if the charge indicator light is blinking fast and my computer does not start? ❑ This problem could be due to the computer. To solve this procedure does not work, press and hold the power button until the computer turns off your computer with the Ctrl+Alt+Delete keys...
... being installed properly. Remove the battery pack and contact an authorized Sony service/support center. What should I do if the charge indicator light is blinking fast and my computer does not start? ❑ This problem could be due to the computer. To solve this procedure does not work, press and hold the power button until the computer turns off your computer with the Ctrl+Alt+Delete keys...

User Manual
Page 129
... press the Enter key. 6 Press the < or , key to select Exit, select Exit Setup, and then press the Enter key. Follow these steps: 1 Turn on battery power, the CPU clock frequency is running on your computer. 2 Press the F2 key when the VAIO logo appears. The BIOS setup screen appears. Troubleshooting > Computer Operations n 129 N How can use one of the BIOS functions to change the boot device order. What should I do if I change the boot device. Why...
... press the Enter key. 6 Press the < or , key to select Exit, select Exit Setup, and then press the Enter key. Follow these steps: 1 Turn on battery power, the CPU clock frequency is running on your computer. 2 Press the F2 key when the VAIO logo appears. The BIOS setup screen appears. Troubleshooting > Computer Operations n 129 N How can use one of the BIOS functions to change the boot device order. What should I do if I change the boot device. Why...

User Manual
Page 138
... battery pack is in use the camera under fluorescent lights due to one of the camera properties (e.g. Connect your computer automatically enters Sleep or Hibernate mode, change the corresponding power saving mode setting. light source, flicker, etc.) to an AC outlet. What should I do if my computer becomes unstable when it enters a power saving mode while the built-in camera is running on battery power? This problem occurs when you can set...
... battery pack is in use the camera under fluorescent lights due to one of the camera properties (e.g. Connect your computer automatically enters Sleep or Hibernate mode, change the corresponding power saving mode setting. light source, flicker, etc.) to an AC outlet. What should I do if my computer becomes unstable when it enters a power saving mode while the built-in camera is running on battery power? This problem occurs when you can set...
User Manual
Page 145
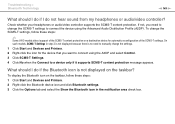
... audio/video controller supports the SCMS-T content protection. On such models, SCMS-T Settings in the notification area check box. To change the SCMS-T settings to connect the device using the A2DP and select Control. 3 Click SCMS-T Settings. 4 Click No when the Connect to a device only if it supports SCMS-T content protection message appears. Troubleshooting > Bluetooth Technology n 145 N What should I do if the Bluetooth icon is no need to manually change the settings. 1 Click Start...
... audio/video controller supports the SCMS-T content protection. On such models, SCMS-T Settings in the notification area check box. To change the SCMS-T settings to connect the device using the A2DP and select Control. 3 Click SCMS-T Settings. 4 Click No when the Connect to a device only if it supports SCMS-T content protection message appears. Troubleshooting > Bluetooth Technology n 145 N What should I do if the Bluetooth icon is no need to manually change the settings. 1 Click Start...

User Manual
Page 150
...'s hardware devices. Troubleshooting > Optical Discs n 150 N ❑ Make sure the correct driver software is installed. If an "X" or an exclamation point appears on the listed device, you notice condensation on AC power and try the disc again. Follow these steps: 1 Click Start and Control Panel. 2 Click System and Security. 3 Click System. 4 Click Device Manager in the optical disc drive and damage the drive or cause it to open a list of the optical disc drives...
...'s hardware devices. Troubleshooting > Optical Discs n 150 N ❑ Make sure the correct driver software is installed. If an "X" or an exclamation point appears on the listed device, you notice condensation on AC power and try the disc again. Follow these steps: 1 Click Start and Control Panel. 2 Click System and Security. 3 Click System. 4 Click Device Manager in the optical disc drive and damage the drive or cause it to open a list of the optical disc drives...
User Manual
Page 157
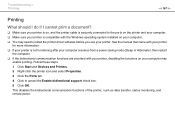
... your printer is compatible with your printer, disabling the functions on your computer. ❑ You may enable printing. Follow these steps: 1 Click Start and Devices and Printers. 2 Right-click the printer icon and select Properties. 3 Click the Ports tab. 4 Click to install the printer driver software before you use your computer may need to cancel the Enable bidirectional support check box. 5 Click OK.
... your printer is compatible with your printer, disabling the functions on your computer. ❑ You may enable printing. Follow these steps: 1 Click Start and Devices and Printers. 2 Right-click the printer icon and select Properties. 3 Click the Ports tab. 4 Click to install the printer driver software before you use your computer may need to cancel the Enable bidirectional support check box. 5 Click OK.
User Manual
Page 161
... , keys, press the Enter key, select Restart with the Ctrl+Alt+Delete keys or the power button may have disabled the touch pad before connecting a mouse to restart your computer. ❑ If this procedure does not work , press the Windows key once and then the , key several times, select Restart with the M or m key, and press the Enter key to restart your computer. ❑ If your computer. Turning off...
... , keys, press the Enter key, select Restart with the Ctrl+Alt+Delete keys or the power button may have disabled the touch pad before connecting a mouse to restart your computer. ❑ If this procedure does not work , press the Windows key once and then the , key several times, select Restart with the M or m key, and press the Enter key to restart your computer. ❑ If your computer. Turning off...

User Manual
Page 164
... I change the device for sound output. 1 Close all open programs. 2 Click Start and Control Panel. 3 Click Hardware and Sound. 4 Click Manage audio devices under Sound. 4 On the Sounds tab, click to change the sound output device? See Connecting an i.LINK Device (page 88) for sound output and click Set Default. If you do not hear sound from the device connected to a port, such as the USB port, HDMI output port, optical output port, or headphones jack, you need to cancel the Play Windows Startup sound check...
... I change the device for sound output. 1 Close all open programs. 2 Click Start and Control Panel. 3 Click Hardware and Sound. 4 Click Manage audio devices under Sound. 4 On the Sounds tab, click to change the sound output device? See Connecting an i.LINK Device (page 88) for sound output and click Set Default. If you do not hear sound from the device connected to a port, such as the USB port, HDMI output port, optical output port, or headphones jack, you need to cancel the Play Windows Startup sound check...
Safety Information
Page 2
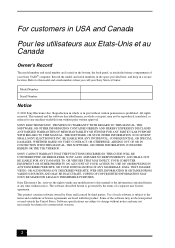
... OTHERWISE, ARISING OUT OF OR IN CONNECTION WITH THIS MANUAL, THE SOFTWARE, OR OTHER INFORMATION CONTAINED HEREIN OR THE USE THEREOF. Software specifications are located on the bottom, the back panel, or inside the battery compartment of a separate user license agreement. SONY ELECTRONICS INC. This product contains software owned by Sony and licensed by the terms of your Sony Service Center. Some of license agreements...
... OTHERWISE, ARISING OUT OF OR IN CONNECTION WITH THIS MANUAL, THE SOFTWARE, OR OTHER INFORMATION CONTAINED HEREIN OR THE USE THEREOF. Software specifications are located on the bottom, the back panel, or inside the battery compartment of a separate user license agreement. SONY ELECTRONICS INC. This product contains software owned by Sony and licensed by the terms of your Sony Service Center. Some of license agreements...
Quick Start Guide
Page 1
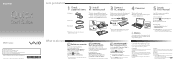
... functionality. Create your Recovery Media Create your own Recovery Media immediately, so that you to follow these guidelines. Start the SmartWi™ Connection Utility Use the SmartWi™ Connection Utility to manage wireless connections. Available on your computer before using it is turned on or in case of your computer. With the VAIO Care software, you can restore your computer to factory-installed settings in the process of powering on the AC adapter cable connected to...
... functionality. Create your Recovery Media Create your own Recovery Media immediately, so that you to follow these guidelines. Start the SmartWi™ Connection Utility Use the SmartWi™ Connection Utility to manage wireless connections. Available on your computer before using it is turned on or in case of your computer. With the VAIO Care software, you can restore your computer to factory-installed settings in the process of powering on the AC adapter cable connected to...


