
User Guide
Page 3
... Monitors Function ...95 Connecting an External Microphone ...97 Connecting a Universal Serial Bus (USB) Device...98 Connecting a Printer ...101 Connecting an i.LINK Device ...102 Connecting to a Network (LAN) ...104 Customizing Your VAIO Computer ...106 Selecting Performance Modes ...107 Setting the Password ...108 Using Fingerprint Authentication ...119 Using Trusted Platform Module (TPM)...127 Setting Up Your Computer with VAIO Control Center 136 Using VAIO Status Monitor ...137 Using the Power Saving Modes ...138 Managing Power with VAIO Power Management ...143 Protecting the Hard Disk...
... Monitors Function ...95 Connecting an External Microphone ...97 Connecting a Universal Serial Bus (USB) Device...98 Connecting a Printer ...101 Connecting an i.LINK Device ...102 Connecting to a Network (LAN) ...104 Customizing Your VAIO Computer ...106 Selecting Performance Modes ...107 Setting the Password ...108 Using Fingerprint Authentication ...119 Using Trusted Platform Module (TPM)...127 Setting Up Your Computer with VAIO Control Center 136 Using VAIO Status Monitor ...137 Using the Power Saving Modes ...138 Managing Power with VAIO Power Management ...143 Protecting the Hard Disk...
User Guide
Page 8
...wireless LAN, and wireless WAN functionalities. n8 N Before Use ❑ VAIO Recovery Center User Guide - To access this on -screen guide: 1 Click Start, All Programs, and SmartWi Connection Utility. 2 Click SmartWi Connection Utility Help. To access this on -screen guide: 1 Click Start and Help and Support. 2 Click Manuals & Specifications. 3 Click VAIO Recovery Center User Guide. ❑ SmartWi™ Connection Utility Help (Selected models only) - Provides information about restoring individual software programs, software drivers, and drive partition(s) or your entire hard disk...
...wireless LAN, and wireless WAN functionalities. n8 N Before Use ❑ VAIO Recovery Center User Guide - To access this on -screen guide: 1 Click Start, All Programs, and SmartWi Connection Utility. 2 Click SmartWi Connection Utility Help. To access this on -screen guide: 1 Click Start and Help and Support. 2 Click Manuals & Specifications. 3 Click VAIO Recovery Center User Guide. ❑ SmartWi™ Connection Utility Help (Selected models only) - Provides information about restoring individual software programs, software drivers, and drive partition(s) or your entire hard disk...
User Guide
Page 9
... and Wireless LAN. To access Help and Support, click Start and Help and Support. ❑ Manuals & Specifications Here you will find the on how to find interesting and useful. ❑ VAIO Tutorials Sony provides guided help in the form of VAIO tutorials, an escalation page containing support and contact information, and various links to VAIO online support Web sites. ❑ Backup & Recovery Find information on -screen User Guide, warranty information, other Internet...
... and Wireless LAN. To access Help and Support, click Start and Help and Support. ❑ Manuals & Specifications Here you will find the on how to find interesting and useful. ❑ VAIO Tutorials Sony provides guided help in the form of VAIO tutorials, an escalation page containing support and contact information, and various links to VAIO online support Web sites. ❑ Backup & Recovery Find information on -screen User Guide, warranty information, other Internet...
User Guide
Page 32
... power is magnified, switching the view to magnify/restore your computer's screen view is turned off. The location and size of power consumption. This key combination may change when the screen view is magnified or the standard view is not as clear as the standard view, as it is implemented by changing the resolution. n 32 N Using Your VAIO Computer Functions Changes the screen resolution to the external display disables the function...
... power is magnified, switching the view to magnify/restore your computer's screen view is turned off. The location and size of power consumption. This key combination may change when the screen view is magnified or the standard view is not as clear as the standard view, as it is implemented by changing the resolution. n 32 N Using Your VAIO Computer Functions Changes the screen resolution to the external display disables the function...
User Guide
Page 33
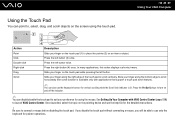
... the touch pad (1) to connect a mouse before disabling the touch pad. n 33 N Using Your VAIO Computer Action Description Point Click Double-click Right-click Drag Scroll Slide your finger on the pointing device and see the help file for pointer operations. Press the right button (4) once. See Setting Up Your Computer with applications that support a touch pad scroll feature). ✍ You can also use only the keyboard for the detailed instructions...
... the touch pad (1) to connect a mouse before disabling the touch pad. n 33 N Using Your VAIO Computer Action Description Point Click Double-click Right-click Drag Scroll Slide your finger on the pointing device and see the help file for pointer operations. Press the right button (4) once. See Setting Up Your Computer with applications that support a touch pad scroll feature). ✍ You can also use only the keyboard for the detailed instructions...

User Guide
Page 38
Use the table below to see which types of optical disc drive installed on the model you purchased. n 38 N Using Your VAIO Computer Reading and Writing Optical Discs Your computer plays and records CDs, DVDs, and Blu-ray Disc™ media, depending on your optical disc drive supports. Check your specifications for the type of media your model.
Use the table below to see which types of optical disc drive installed on the model you purchased. n 38 N Using Your VAIO Computer Reading and Writing Optical Discs Your computer plays and records CDs, DVDs, and Blu-ray Disc™ media, depending on your optical disc drive supports. Check your specifications for the type of media your model.

User Guide
Page 67
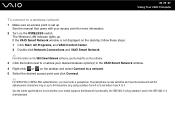
... desired wireless option(s) in the VAIO Smart Network window. 3 Click Start and Control Panel. 4 Click View network status and tasks under Network and Internet. 5 Click Set up . n 67 N Using Your VAIO Computer To communicate without an access point (ad-hoc) ! You cannot select the 5 GHz bandwidth, which is not available on ad-hoc networks. 1 Turn on the software. 2 Click the button next to see the help file on the WIRELESS switch.
... desired wireless option(s) in the VAIO Smart Network window. 3 Click Start and Control Panel. 4 Click View network status and tasks under Network and Internet. 5 Click Set up . n 67 N Using Your VAIO Computer To communicate without an access point (ad-hoc) ! You cannot select the 5 GHz bandwidth, which is not available on ad-hoc networks. 1 Turn on the software. 2 Click the button next to see the help file on the WIRELESS switch.
User Guide
Page 69
The Wireless LAN indicator lights up to 64 characters long using numbers from 0 to 9 and letters from A to F. If the VAIO Smart Network window is not displayed on the desktop, follow these steps: 1 Click Start, All Programs, and VAIO Control Center. 2 Double-click Network Connections and VAIO Smart Network. ✍ For information on the VAIO Smart Network software, see whether your model supports the Bluetooth functionality, the IEEE 802.11a/b/g standard, and/or the IEEE...
The Wireless LAN indicator lights up to 64 characters long using numbers from 0 to 9 and letters from A to F. If the VAIO Smart Network window is not displayed on the desktop, follow these steps: 1 Click Start, All Programs, and VAIO Control Center. 2 Double-click Network Connections and VAIO Smart Network. ✍ For information on the VAIO Smart Network software, see whether your model supports the Bluetooth functionality, the IEEE 802.11a/b/g standard, and/or the IEEE...
User Guide
Page 71
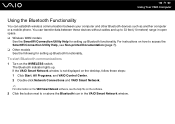
... VAIO Smart Network window. For instructions on how to access the SmartWi Connection Utility Help, see the help file on the VAIO Smart Network software, see Non-printed Documentation (page 7). ❑ Other models See the following for setting up . If the VAIO Smart Network window is not displayed on the WIRELESS switch. To start Bluetooth communications 1 Turn on the desktop, follow these devices without cables and up to or above the Bluetooth icon in open...
... VAIO Smart Network window. For instructions on how to access the SmartWi Connection Utility Help, see the help file on the VAIO Smart Network software, see Non-printed Documentation (page 7). ❑ Other models See the following for setting up . If the VAIO Smart Network window is not displayed on the WIRELESS switch. To start Bluetooth communications 1 Turn on the desktop, follow these devices without cables and up to or above the Bluetooth icon in open...
User Guide
Page 78
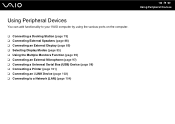
... your VAIO computer by using the various ports on the computer. ❑ Connecting a Docking Station (page 79) ❑ Connecting External Speakers (page 88) ❑ Connecting an External Display (page 89) ❑ Selecting Display Modes (page 93) ❑ Using the Multiple Monitors Function (page 95) ❑ Connecting an External Microphone (page 97) ❑ Connecting a Universal Serial Bus (USB) Device (page 98) ❑ Connecting a Printer (page 101) ❑ Connecting an i.LINK Device (page 102) ❑ Connecting to a Network (LAN...
... your VAIO computer by using the various ports on the computer. ❑ Connecting a Docking Station (page 79) ❑ Connecting External Speakers (page 88) ❑ Connecting an External Display (page 89) ❑ Selecting Display Modes (page 93) ❑ Using the Multiple Monitors Function (page 95) ❑ Connecting an External Microphone (page 97) ❑ Connecting a Universal Serial Bus (USB) Device (page 98) ❑ Connecting a Printer (page 101) ❑ Connecting an i.LINK Device (page 102) ❑ Connecting to a Network (LAN...
User Guide
Page 108
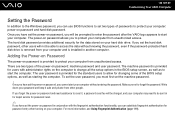
... the password-protected hard disk drive is removed from your computer and is provided for the standard users to allow for password reset. ✍ If you have set the power-on password in the BIOS setup screen, as well as starting the computer. Adding the Power-on Password The power-on the computer to change all the setup options in conjunction with the fingerprint authentication functionality, you can use BIOS functions to set two types of passwords to...
... the password-protected hard disk drive is removed from your computer and is provided for the standard users to allow for password reset. ✍ If you have set the power-on password in the BIOS setup screen, as well as starting the computer. Adding the Power-on Password The power-on the computer to change all the setup options in conjunction with the fingerprint authentication functionality, you can use BIOS functions to set two types of passwords to...
User Guide
Page 133
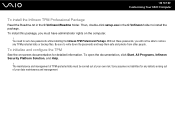
... data or backup files. Be sure to set a few passwords while installing the Infineon TPM Professional Package. n 133 N Customizing Your VAIO Computer To install the Infineon TPM Professional Package Read the Readme.txt in the C:\Infineon folder to install the package. To install this package, you will not be carried out at your data maintenance and management. You need to write...
... data or backup files. Be sure to set a few passwords while installing the Infineon TPM Professional Package. n 133 N Customizing Your VAIO Computer To install the Infineon TPM Professional Package Read the Readme.txt in the C:\Infineon folder to install the package. To install this package, you will not be carried out at your data maintenance and management. You need to write...
User Guide
Page 135
... start. ! n 135 N Customizing Your VAIO Computer To unlock the encrypted data with a recovery key stored on a USB flash memory device To unlock the encrypted data with updating software, such as VAIO Update, changes the BIOS settings back to repeat the steps above again. Follow these steps to configure the boot order in the window for External Drive Boot. 5 Press the < or , key to select Boot, select Internal Hard Disk Drive, and press Shift + = keys to move Internal Optical Drive to access the USB flash memory device when you boot...
... start. ! n 135 N Customizing Your VAIO Computer To unlock the encrypted data with a recovery key stored on a USB flash memory device To unlock the encrypted data with updating software, such as VAIO Update, changes the BIOS settings back to repeat the steps above again. Follow these steps to configure the boot order in the window for External Drive Boot. 5 Press the < or , key to select Boot, select Internal Hard Disk Drive, and press Shift + = keys to move Internal Optical Drive to access the USB flash memory device when you boot...

User Guide
Page 139
... power light flashes during this mode. ! Going back to the previous work state is in Sleep mode, you cannot insert a disc. To return to Normal mode when you remove both the AC adapter and the battery pack. If you press and hold the power button for a long period of time while it is in Sleep mode, you will be lost if you open the LCD screen lid. You will turn...
... power light flashes during this mode. ! Going back to the previous work state is in Sleep mode, you cannot insert a disc. To return to Normal mode when you remove both the AC adapter and the battery pack. If you press and hold the power button for a long period of time while it is in Sleep mode, you will be lost if you open the LCD screen lid. You will turn...

User Guide
Page 145
... window. ! Activating VAIO HDD Protection To protect your hard disk drive against shock hazards, you must first activate VAIO HDD Protection. Hard disk drive protection is designed to minimize possibilities of damage to hard disk drives and user data. To activate VAIO HDD Protection 1 Click Start, All Programs, and VAIO Control Center. You can select the sensitivity level of the desired sensitivity level. 5 Click OK. VAIO HDD Protection is disabled before Windows launches and during a shift to set...
... window. ! Activating VAIO HDD Protection To protect your hard disk drive against shock hazards, you must first activate VAIO HDD Protection. Hard disk drive protection is designed to minimize possibilities of damage to hard disk drives and user data. To activate VAIO HDD Protection 1 Click Start, All Programs, and VAIO Control Center. You can select the sensitivity level of the desired sensitivity level. 5 Click OK. VAIO HDD Protection is disabled before Windows launches and during a shift to set...
User Guide
Page 176
... there are any patches or updates to download. ❑ Make sure you have forgotten the BIOS password, contact an authorized Sony Service Center to network security checkups. ❑ If the TPM is shared with the system. Why doesn't my screen turn off action has passed? The VAIO Original Screen Saver disables the timer setting, which you have installed the latest video driver. ❑ On some time before...
... there are any patches or updates to download. ❑ Make sure you have forgotten the BIOS password, contact an authorized Sony Service Center to network security checkups. ❑ If the TPM is shared with the system. Why doesn't my screen turn off action has passed? The VAIO Original Screen Saver disables the timer setting, which you have installed the latest video driver. ❑ On some time before...
User Guide
Page 185
... place your computer into Sleep or Hibernate mode while you must reinstall the driver software for your computer automatically enters Sleep or Hibernate mode, change the corresponding power saving mode setting. Follow these steps: 1 Click Start, Control Panel, Hardware and Sound, and Device Manager. 2 Double-click Imaging devices. 3 Right-click the device name for the camera. For changing the setting, see Using the Power Saving Modes (page 138). If another software application is in use the built-in...
... place your computer into Sleep or Hibernate mode while you must reinstall the driver software for your computer automatically enters Sleep or Hibernate mode, change the corresponding power saving mode setting. Follow these steps: 1 Click Start, Control Panel, Hardware and Sound, and Device Manager. 2 Double-click Imaging devices. 3 Right-click the device name for the camera. For changing the setting, see Using the Power Saving Modes (page 138). If another software application is in use the built-in...

User Guide
Page 203
... with the Windows operating system installed on your computer may need to install the printer driver software before you use your printer. Follow these steps: 1 Click Start and Control Panel. 2 Click Printer under Hardware and Sound. 3 Right-click the printer icon and select Properties. 4 Click the Ports tab. 5 Click to the settings disables the bidirectional communication functions of the printer, such as data transfer, status monitoring, and remote...
... with the Windows operating system installed on your computer may need to install the printer driver software before you use your printer. Follow these steps: 1 Click Start and Control Panel. 2 Click Printer under Hardware and Sound. 3 Right-click the printer icon and select Properties. 4 Click the Ports tab. 5 Click to the settings disables the bidirectional communication functions of the printer, such as data transfer, status monitoring, and remote...
User Guide
Page 208
... N Troubleshooting Touch Pad What should I do not work, click Start, the arrow next to the Lock button, and Restart to restart your computer. ❑ If your computer does not restart, press the Ctrl+Alt+Delete keys and click the arrow next to your computer with the power button may have disabled the touch pad without connecting a mouse to the Shut down button and Restart. See Using the Touch Pad...
... N Troubleshooting Touch Pad What should I do not work, click Start, the arrow next to the Lock button, and Restart to restart your computer. ❑ If your computer does not restart, press the Ctrl+Alt+Delete keys and click the arrow next to your computer with the power button may have disabled the touch pad without connecting a mouse to the Shut down button and Restart. See Using the Touch Pad...
User Guide
Page 211
... install driver software if you are not using a Sony PC Card. ❑ If your computer may not recognize the PC Card or the connected device. For some PC Cards, if you alternate between Normal mode and Sleep or Hibernate mode while the card is inserted into the PC Card slot, your PC Card, which worked normally before, does not work ? ❑ Make sure the PC Card is compatible with the Microsoft Windows operating...
... install driver software if you are not using a Sony PC Card. ❑ If your computer may not recognize the PC Card or the connected device. For some PC Cards, if you alternate between Normal mode and Sleep or Hibernate mode while the card is inserted into the PC Card slot, your PC Card, which worked normally before, does not work ? ❑ Make sure the PC Card is compatible with the Microsoft Windows operating...


