User Guide
Page 5
... to articles, the VAIO technology page, specifications, and system and software information. Printed Documentation ❑ Quick Start Guide - On-screen Documentation ❑ Help and Support - Use my VAIO Access interactive help with Internet and wireless setup, security setup, personalizing your VAIO computer with VAIO Care, system restore, backup and recovery, and contact Sony support. To access...
... to articles, the VAIO technology page, specifications, and system and software information. Printed Documentation ❑ Quick Start Guide - On-screen Documentation ❑ Help and Support - Use my VAIO Access interactive help with Internet and wireless setup, security setup, personalizing your VAIO computer with VAIO Care, system restore, backup and recovery, and contact Sony support. To access...
User Guide
Page 11
...' instructions. ❑ Locating Controls and Ports (page 12) ❑ About the Indicator Lights (page 18) ❑ Connecting a Power Source (page 19) ❑ Using the Battery Pack (page 20) ❑ Shutting Down Your Computer Safely (page 28) ❑ Updating Your Computer (page 29) Be sure to get started using your VAIO computer. ! Upon completion, connect one device (for...
...' instructions. ❑ Locating Controls and Ports (page 12) ❑ About the Indicator Lights (page 18) ❑ Connecting a Power Source (page 19) ❑ Using the Battery Pack (page 20) ❑ Shutting Down Your Computer Safely (page 28) ❑ Updating Your Computer (page 29) Be sure to get started using your VAIO computer. ! Upon completion, connect one device (for...

User Guide
Page 12
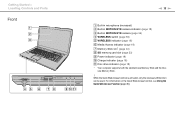
The appearance of your computer may also vary in specifications. It may be different from those illustrated in this manual due to identify the controls and ports shown on the following pages. ! Getting Started > Locating Controls and Ports n 12 N Locating Controls and Ports Take a moment to variations in some countries or areas.
The appearance of your computer may also vary in specifications. It may be different from those illustrated in this manual due to identify the controls and ports shown on the following pages. ! Getting Started > Locating Controls and Ports n 12 N Locating Controls and Ports Take a moment to variations in some countries or areas.
User Guide
Page 13
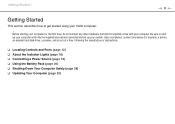
... (monaural) B Built-in MOTION EYE camera indicator (page 18) C Built-in MOTION EYE camera (page 36) D WIRELESS switch (page 59) E WIRELESS indicator (page 18) F Media Access indicator (page 18) G Memory Stick slot* (page 44) H SD memory card slot (page 52) I Power indicator (page 18) J Charge indicator (page 18) K Disc drive indicator (page 18) * Your computer supports both the standard-size...
... (monaural) B Built-in MOTION EYE camera indicator (page 18) C Built-in MOTION EYE camera (page 36) D WIRELESS switch (page 59) E WIRELESS indicator (page 18) F Media Access indicator (page 18) G Memory Stick slot* (page 44) H SD memory card slot (page 52) I Power indicator (page 18) J Charge indicator (page 18) K Disc drive indicator (page 18) * Your computer supports both the standard-size...
User Guide
Page 14
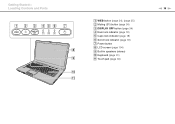
Getting Started > Locating Controls and Ports A WEB button (page 34), (page 35) B Muting (S1) button (page 34) C DISPLAY OFF button (page 34) D Num lock indicator (page 18) E Caps lock indicator (page 18) F Scroll lock indicator (page 18) G Power button H LCD screen (page 104) I Built-in speakers (stereo) J Keyboard (page 31) K Touch pad (page 33) n 14 N
Getting Started > Locating Controls and Ports A WEB button (page 34), (page 35) B Muting (S1) button (page 34) C DISPLAY OFF button (page 34) D Num lock indicator (page 18) E Caps lock indicator (page 18) F Scroll lock indicator (page 18) G Power button H LCD screen (page 104) I Built-in speakers (stereo) J Keyboard (page 31) K Touch pad (page 33) n 14 N

User Guide
Page 15
speeds. ! While the Quick Web Access function is activated, only the headphones jack and the USB ports are functional. Getting Started > Locating Controls and Ports Right n 15 N A Headphones jack (page 64) B Microphone jack (page 77) C Hi-Speed USB (USB 2.0) ports* (page 78) D Optical disc drive (page 37) E Drive eject button (page 37) F Manual eject hole (page 133) G Security slot * Support high-/full-/low- For information on the Quick Web Access function, see Using the Quick Web Access Function (page 35).
speeds. ! While the Quick Web Access function is activated, only the headphones jack and the USB ports are functional. Getting Started > Locating Controls and Ports Right n 15 N A Headphones jack (page 64) B Microphone jack (page 77) C Hi-Speed USB (USB 2.0) ports* (page 78) D Optical disc drive (page 37) E Drive eject button (page 37) F Manual eject hole (page 133) G Security slot * Support high-/full-/low- For information on the Quick Web Access function, see Using the Quick Web Access Function (page 35).

User Guide
Page 16
Getting Started > Locating Controls and Ports Left n 16 N A DC IN port (page 19) B Network (Ethernet) port (page 58) C Air vent D Monitor port (page 66) E HDMI output port (page 66) F i.LINK 4-pin (S400) port (page 80) G Hi-Speed USB (USB 2.0) port* (page 78) H ExpressCard/34 slot (page 49) * Supports high-/full-/low- speeds. ! While the Quick Web Access function is activated, only the DC IN port, the network (Ethernet) port, and the USB port are functional. For information on the Quick Web Access function, see Using the Quick Web Access Function (page 35).
Getting Started > Locating Controls and Ports Left n 16 N A DC IN port (page 19) B Network (Ethernet) port (page 58) C Air vent D Monitor port (page 66) E HDMI output port (page 66) F i.LINK 4-pin (S400) port (page 80) G Hi-Speed USB (USB 2.0) port* (page 78) H ExpressCard/34 slot (page 49) * Supports high-/full-/low- speeds. ! While the Quick Web Access function is activated, only the DC IN port, the network (Ethernet) port, and the USB port are functional. For information on the Quick Web Access function, see Using the Quick Web Access Function (page 35).

User Guide
Page 17
Getting Started > Locating Controls and Ports Back/Bottom n 17 N A Air vents B Battery connector (page 20) C Memory module compartment cover (page 97)
Getting Started > Locating Controls and Ports Back/Bottom n 17 N A Air vents B Battery connector (page 20) C Memory module compartment cover (page 97)
User Guide
Page 18
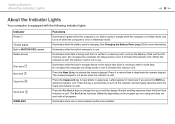
... press the Shift key while the indicator is in lowercase if you are enabled. Illuminates while the built-in use . See Charging the Battery Pack (page 23) for more wireless options are using and does not work with the following indicator lights: Indicator Power 1 Charge Built-in MOTION EYE camera Media...
... press the Shift key while the indicator is in lowercase if you are enabled. Illuminates while the built-in use . See Charging the Battery Pack (page 23) for more wireless options are using and does not work with the following indicator lights: Indicator Power 1 Charge Built-in MOTION EYE camera Media...

User Guide
Page 19
... AC adapter (3). 2 Plug the other end of the power cord into an AC outlet (2). 3 Plug the cable connected to your computer. See Using Hibernate Mode (page 92). The shape of the DC In plug varies depending on the computer. If you do not intend to use either an AC adapter or...
... AC adapter (3). 2 Plug the other end of the power cord into an AC outlet (2). 3 Plug the cable connected to your computer. See Using Hibernate Mode (page 92). The shape of the DC In plug varies depending on the computer. If you do not intend to use either an AC adapter or...

User Guide
Page 23
... power indicator Blinks fast in this manual from your first battery charge. To select your desired maximum charge level, see Using the Battery Charge Functions (page 25). The battery pack is running out of power. (Normal mode) The battery pack is running out of delivery. Charge the battery pack as described...
... power indicator Blinks fast in this manual from your first battery charge. To select your desired maximum charge level, see Using the Battery Charge Functions (page 25). The battery pack is running out of power. (Normal mode) The battery pack is running out of delivery. Charge the battery pack as described...
User Guide
Page 30
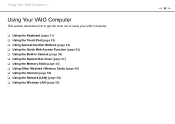
... the most out of using your VAIO computer. ❑ Using the Keyboard (page 31) ❑ Using the Touch Pad (page 33) ❑ Using Special-function Buttons (page 34) ❑ Using the Quick Web Access Function (page 35) ❑ Using the Built-in Camera (page 36) ❑ Using the Optical Disc Drive (page 37) ❑ Using the Memory...
... the most out of using your VAIO computer. ❑ Using the Keyboard (page 31) ❑ Using the Touch Pad (page 33) ❑ Using Special-function Buttons (page 34) ❑ Using the Quick Web Access Function (page 35) ❑ Using the Built-in Camera (page 36) ❑ Using the Optical Disc Drive (page 37) ❑ Using the Memory...
User Guide
Page 32
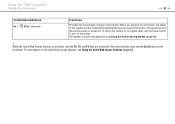
Using Your VAIO Computer > Using the Keyboard n 32 N Combinations/Feature Fn + (F12): hibernate Functions Provides the lowest level of the system and the connected peripheral devices are saved ... turned off. Any other function keys and the Scr Lk key are functional. For information on power management, see Using the Quick Web Access Function (page 35). For details on the Quick Web Access function, see Using the Power Saving Modes...
Using Your VAIO Computer > Using the Keyboard n 32 N Combinations/Feature Fn + (F12): hibernate Functions Provides the lowest level of the system and the connected peripheral devices are saved ... turned off. Any other function keys and the Scr Lk key are functional. For information on power management, see Using the Quick Web Access Function (page 35). For details on the Quick Web Access function, see Using the Power Saving Modes...
User Guide
Page 34
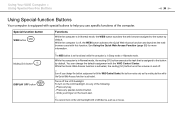
See Using the Quick Web Access Function (page 35) for more information. ! The WEB button is not functional while the .... You cannot turn on the touch pad. ! You can change the button assignment with the VAIO Control Center. Press any key. - Using Your VAIO Computer > Using Special-function Buttons n 34 N Using Special-function Buttons Your computer is in ... While the computer is equipped with special buttons to help you change the default assignment with the VAIO Control Center, the button works only as a mouse. Turns off . ! Slide your finger on the LCD backlight...
See Using the Quick Web Access Function (page 35) for more information. ! The WEB button is not functional while the .... You cannot turn on the touch pad. ! You can change the button assignment with the VAIO Control Center. Press any key. - Using Your VAIO Computer > Using Special-function Buttons n 34 N Using Special-function Buttons Your computer is in ... While the computer is equipped with special buttons to help you change the default assignment with the VAIO Control Center, the button works only as a mouse. Turns off . ! Slide your finger on the LCD backlight...

User Guide
Page 41
For information on how to use the VAIO Update, see Updating Your Computer (page 29). ❑ Depending on system environment, you should follow these... to play such contents normally, download and install the latest updates for the WinDVD BD using the VAIO Update. Notes on playing discs To achieve optimum performance when playing discs, you may find sound interruptions...unplug the AC adapter while the optical disc drive is playing a disc. Do not use circular discs. Using Your VAIO Computer > Using the Optical Disc Drive n 41 N Notes on Using the Optical Disc Drive Notes on your ...
For information on how to use the VAIO Update, see Updating Your Computer (page 29). ❑ Depending on system environment, you should follow these... to play such contents normally, download and install the latest updates for the WinDVD BD using the VAIO Update. Notes on playing discs To achieve optimum performance when playing discs, you may find sound interruptions...unplug the AC adapter while the optical disc drive is playing a disc. Do not use circular discs. Using Your VAIO Computer > Using the Optical Disc Drive n 41 N Notes on Using the Optical Disc Drive Notes on your ...
User Guide
Page 52
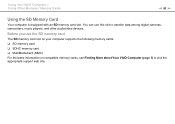
... card ❑ MultiMediaCard (MMC) For the latest information on compatible memory cards, see Finding More about Your VAIO Computer (page 5) to transfer data among digital cameras, camcorders, music players, and other audio/video devices. Using Your VAIO Computer > Using Other Modules / Memory Cards n 52 N Using the SD Memory Card Your computer is equipped...
... card ❑ MultiMediaCard (MMC) For the latest information on compatible memory cards, see Finding More about Your VAIO Computer (page 5) to transfer data among digital cameras, camcorders, music players, and other audio/video devices. Using Your VAIO Computer > Using Other Modules / Memory Cards n 52 N Using the SD Memory Card Your computer is equipped...

User Guide
Page 56
... not equipped with a built-in modem, you may be sure to take appropriate security measures to protect the computer against online threats. Using Your VAIO Computer > Using the Internet n 56 N Using the Internet Before using the wireless LAN function, you connect your computer to the Internet, be...an external modem device, for connecting your computer. For the detailed instructions on devices required for more information. ! See Using the Wireless LAN (page 59) for the Internet and how to connect your computer to the Internet, ask your ISP. ✍ To connect your computer to the ...
... not equipped with a built-in modem, you may be sure to take appropriate security measures to protect the computer against online threats. Using Your VAIO Computer > Using the Internet n 56 N Using the Internet Before using the wireless LAN function, you connect your computer to the Internet, be...an external modem device, for connecting your computer. For the detailed instructions on devices required for more information. ! See Using the Wireless LAN (page 59) for the Internet and how to connect your computer to the Internet, ask your ISP. ✍ To connect your computer to the ...

User Guide
Page 63
Using Peripheral Devices > Using Peripheral Devices You can add functionality to your VAIO computer by using the various ports on the computer. ❑ Connecting External Speakers or Headphones (page 64) ❑ Connecting an External Display (page 65) ❑ Selecting Display Modes (page 72) ❑ Using the Multiple Monitors Function (page 74) ❑ Connecting an External Microphone (page 77) ❑ Connecting a USB Device (page 78) ❑ Connecting an i.LINK Device (page 80) n 63 N
Using Peripheral Devices > Using Peripheral Devices You can add functionality to your VAIO computer by using the various ports on the computer. ❑ Connecting External Speakers or Headphones (page 64) ❑ Connecting an External Display (page 65) ❑ Selecting Display Modes (page 72) ❑ Using the Multiple Monitors Function (page 74) ❑ Connecting an External Microphone (page 77) ❑ Connecting a USB Device (page 78) ❑ Connecting an i.LINK Device (page 80) n 63 N

User Guide
Page 69
... the computer and the other than the one end of your TV (1) into an AC outlet. 2 Plug one provided by Sony for sound output. Always use the device driver provided by Sony is used, the image will not be displayed and the audio will not be heard. To connect a TV to your... I change the device for updates. To hear sound from the device connected to the HDMI output port, you need to change the sound output device? (page 149). 1 Plug the power cord of an HDMI cable (2) to external input. 4 Set up the TV configuration system. !
... the computer and the other than the one end of your TV (1) into an AC outlet. 2 Plug one provided by Sony for sound output. Always use the device driver provided by Sony is used, the image will not be displayed and the audio will not be heard. To connect a TV to your... I change the device for updates. To hear sound from the device connected to the HDMI output port, you need to change the sound output device? (page 149). 1 Plug the power cord of an HDMI cable (2) to external input. 4 Set up the TV configuration system. !

User Guide
Page 70
... devices. Additionally, you need to change the device for more information on the computer. 4 Press the Fn+F7 keys to change the sound output device? (page 149). 1 Turn on the TV and set its input to the HDMI input. 3 Plug one end of an HDMI cable to the connected TV. ✍...; You can be adjusted by the connected audio device only. See Why doesn't my screen display a video? (page 139) for the detailed procedure. To connect a high-quality digital sound output device between your computer and a TV !
... devices. Additionally, you need to change the device for more information on the computer. 4 Press the Fn+F7 keys to change the sound output device? (page 149). 1 Turn on the TV and set its input to the HDMI input. 3 Plug one end of an HDMI cable to the connected TV. ✍...; You can be adjusted by the connected audio device only. See Why doesn't my screen display a video? (page 139) for the detailed procedure. To connect a high-quality digital sound output device between your computer and a TV !