
User Guide
Page 2
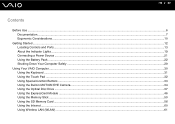
... ...10 Getting Started ...12 Locating Controls and Ports...13 About the Indicator Lights ...19 Connecting a Power Source ...21 Using the Battery Pack ...22 Shutting Down Your Computer Safely ...29 Using Your VAIO Computer ...30 Using the Keyboard ...31 Using the Touch Pad ...32 Using Special-function Buttons ...33 Using the Built-in...
... ...10 Getting Started ...12 Locating Controls and Ports...13 About the Indicator Lights ...19 Connecting a Power Source ...21 Using the Battery Pack ...22 Shutting Down Your Computer Safely ...29 Using Your VAIO Computer ...30 Using the Keyboard ...31 Using the Touch Pad ...32 Using Special-function Buttons ...33 Using the Built-in...
User Guide
Page 4
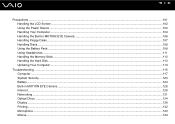
n4 N Precautions ...101 Handling the LCD Screen ...102 Using the Power Source ...103 Handling Your Computer ...104 Handling the Built-in MOTION EYE Camera...106 Handling Floppy Disks ...107 Handling Discs ...108 Using the Battery Pack ...109 Using Headphones ...111 Handling the Memory Stick ...112 Handling the Hard Disk ...113 Updating Your Computer ...114 Troubleshooting ...115 Computer ...117 System Security ...123 Battery...124 Built-in MOTION EYE Camera...126 Internet ...129 Networking ...131 Optical Discs ...134 Display ...138 Printing ...142 Microphone ...143 Mouse ...144
n4 N Precautions ...101 Handling the LCD Screen ...102 Using the Power Source ...103 Handling Your Computer ...104 Handling the Built-in MOTION EYE Camera...106 Handling Floppy Disks ...107 Handling Discs ...108 Using the Battery Pack ...109 Using Headphones ...111 Handling the Memory Stick ...112 Handling the Hard Disk ...113 Updating Your Computer ...114 Troubleshooting ...115 Computer ...117 System Security ...123 Battery...124 Built-in MOTION EYE Camera...126 Internet ...129 Networking ...131 Optical Discs ...134 Display ...138 Printing ...142 Microphone ...143 Mouse ...144
User Guide
Page 12
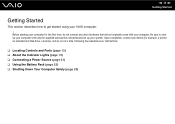
... any other hardware that did not originally come with only the supplied accessories connected and set up your computer with your computer. Before starting your VAIO computer. ! Be sure to get started using your computer for example, a printer, an external hard disk drive, a scanner, and so on) at a time, following the... manufacturers' instructions. ❑ Locating Controls and Ports (page 13) ❑ About the Indicator Lights (page 19) ❑ Connecting a Power Source (page 21) ❑ Using the Battery Pack (page 22) ❑ Shutting Down Your Computer Safely (page 29)
... any other hardware that did not originally come with only the supplied accessories connected and set up your computer with your computer. Before starting your VAIO computer. ! Be sure to get started using your computer for example, a printer, an external hard disk drive, a scanner, and so on) at a time, following the... manufacturers' instructions. ❑ Locating Controls and Ports (page 13) ❑ About the Indicator Lights (page 19) ❑ Connecting a Power Source (page 21) ❑ Using the Battery Pack (page 22) ❑ Shutting Down Your Computer Safely (page 29)

User Guide
Page 18
Bottom n 18 N Getting Started A Battery connector (page 22) B Air vents C Memory module compartment cover (page 97)
Bottom n 18 N Getting Started A Battery connector (page 22) B Air vents C Memory module compartment cover (page 97)
User Guide
Page 19
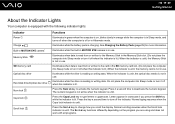
.... Illuminates while the drive is reading or writing data. Press it a second time to turn it off when this indicator is lit. See Charging the Battery Pack (page 25) for more information. Do not place the computer into Sleep mode or turn it off the indicator. Press the Num Lk key... the indicator is unlit, the Memory Stick is not in use . Press the Scr Lk key to the Memory Stick in use . Illuminates while the battery pack is unlit.
.... Illuminates while the drive is reading or writing data. Press it a second time to turn it off when this indicator is lit. See Charging the Battery Pack (page 25) for more information. Do not place the computer into Sleep mode or turn it off the indicator. Press the Num Lk key... the indicator is unlit, the Memory Stick is not in use . Press the Scr Lk key to the Memory Stick in use . Illuminates while the battery pack is unlit.
User Guide
Page 21
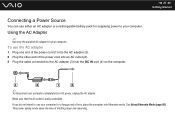
... cord into an AC outlet (2). 3 Plug the cable connected to your computer. If you do not intend to use either an AC adapter or a rechargeable battery pack for supplying power to the AC adapter (3) into Hibernate mode. n 21 N Getting Started Connecting a Power Source You can use your computer for a long period...
... cord into an AC outlet (2). 3 Plug the cable connected to your computer. If you do not intend to use either an AC adapter or a rechargeable battery pack for supplying power to the AC adapter (3) into Hibernate mode. n 21 N Getting Started Connecting a Power Source You can use your computer for a long period...
User Guide
Page 22
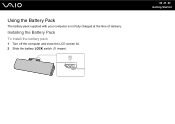
Using the Battery Pack The battery pack supplied with your computer is not fully charged at the time of delivery. Installing the Battery Pack To install the battery pack 1 Turn off the computer and close the LCD screen lid. 2 Slide the battery LOCK switch (1) inward. n 22 N Getting Started
Using the Battery Pack The battery pack supplied with your computer is not fully charged at the time of delivery. Installing the Battery Pack To install the battery pack 1 Turn off the computer and close the LCD screen lid. 2 Slide the battery LOCK switch (1) inward. n 22 N Getting Started

User Guide
Page 23
n 23 N Getting Started 3 Slide the battery pack diagonally into the battery compartment until the projections (2) on either side of the battery compartment fit into the U-shaped cuts (3) on either side of the battery pack.
n 23 N Getting Started 3 Slide the battery pack diagonally into the battery compartment until the projections (2) on either side of the battery compartment fit into the U-shaped cuts (3) on either side of the battery pack.

User Guide
Page 24
n 24 N Getting Started 4 Rotate the battery pack in the direction of the arrow, and push the battery pack down into place. 5 Slide the battery LOCK switch outward to secure the battery pack on the computer. ✍ When your computer is designed to operate only with genuine Sony battery packs. This computer is directly connected to AC power and has a battery pack installed, it clicks into the compartment until it uses power from the AC outlet. !
n 24 N Getting Started 4 Rotate the battery pack in the direction of the arrow, and push the battery pack down into place. 5 Slide the battery LOCK switch outward to secure the battery pack on the computer. ✍ When your computer is designed to operate only with genuine Sony battery packs. This computer is directly connected to AC power and has a battery pack installed, it clicks into the compartment until it uses power from the AC outlet. !
User Guide
Page 25
... indicator turns off. To select your first battery charge. Charge the battery pack as described in orange Meaning The battery pack is charging. The charge indicator light turns on while the battery pack is charging. To charge the battery pack 1 Install the battery pack. 2 Connect the AC adapter to ...the computer. n 25 N Getting Started Charging the Battery Pack The battery pack supplied with your computer is not fully charged...
... indicator turns off. To select your first battery charge. Charge the battery pack as described in orange Meaning The battery pack is charging. The charge indicator light turns on while the battery pack is charging. To charge the battery pack 1 Install the battery pack. 2 Connect the AC adapter to ...the computer. n 25 N Getting Started Charging the Battery Pack The battery pack supplied with your computer is not fully charged...
User Guide
Page 26
... While some software applications or peripheral devices are using battery power, you should save your computer and install a fully charged battery pack. Going back to recharge the battery pack or shut down your data frequently. The battery pack continues to charge while you should save your computer...When your data frequently and manually activate a power management mode, such as Sleep or Hibernate. Your computer is impossible. If the battery pack wears out when the computer enters Sleep mode, you should either connect the AC adapter to the previous work state is supplied ...
... While some software applications or peripheral devices are using battery power, you should save your computer and install a fully charged battery pack. Going back to recharge the battery pack or shut down your data frequently. The battery pack continues to charge while you should save your computer...When your data frequently and manually activate a power management mode, such as Sleep or Hibernate. Your computer is impossible. If the battery pack wears out when the computer enters Sleep mode, you should either connect the AC adapter to the previous work state is supplied ...
User Guide
Page 27
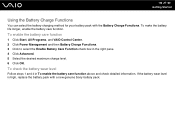
... battery life longer, enable the battery care function. To check the battery wear level Follow steps 1 and 4 in the right pane. 4 Click Advanced. 5 Select the desired maximum charge level. 6 Click OK. n 27 N Getting Started Using the Battery Charge Functions You can select the battery charging method for your battery pack with a new genuine Sony battery pack. If the battery...
... battery life longer, enable the battery care function. To check the battery wear level Follow steps 1 and 4 in the right pane. 4 Click Advanced. 5 Select the desired maximum charge level. 6 Click OK. n 27 N Getting Started Using the Battery Charge Functions You can select the battery charging method for your battery pack with a new genuine Sony battery pack. If the battery...

User Guide
Page 28
You may lose data if you remove the battery pack while your fingertip underneath the tab (3) on and not connected to the AC adapter or if you remove the battery pack while the computer is on the battery pack, and turn the battery pack in Sleep mode. To remove the battery pack 1 Turn off the computer and close the LCD screen lid. 2 Slide the battery LOCK switch (1) inward. 3 Slide and hold the battery RELEASE latch (2) inward, put your computer is in the direction of the arrow, and then slide it away from the computer. n 28 N Getting Started Removing the Battery Pack !
You may lose data if you remove the battery pack while your fingertip underneath the tab (3) on and not connected to the AC adapter or if you remove the battery pack while the computer is on the battery pack, and turn the battery pack in Sleep mode. To remove the battery pack 1 Turn off the computer and close the LCD screen lid. 2 Slide the battery LOCK switch (1) inward. 3 Slide and hold the battery RELEASE latch (2) inward, put your computer is in the direction of the arrow, and then slide it away from the computer. n 28 N Getting Started Removing the Battery Pack !
User Guide
Page 87
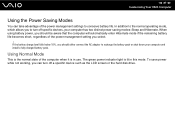
... level falls below 10%, you select. ! Using Normal Mode This is the normal state of the power management settings to recharge the battery pack or shut down your computer has two distinct power saving modes: Sleep and Hibernate. The green power indicator light is in this mode. To ... working, you to the normal operating mode, which allows you can take advantage of the computer when it is lit in use. n 87 N Customizing Your VAIO Computer Using the Power Saving Modes You can turn off a specific device such as the LCD screen or the hard disk drive. In addition to...
... level falls below 10%, you select. ! Using Normal Mode This is the normal state of the power management settings to recharge the battery pack or shut down your computer has two distinct power saving modes: Sleep and Hibernate. The green power indicator light is in this mode. To ... working, you to the normal operating mode, which allows you can take advantage of the computer when it is lit in use. n 87 N Customizing Your VAIO Computer Using the Power Saving Modes You can turn off a specific device such as the LCD screen or the hard disk drive. In addition to...
User Guide
Page 88
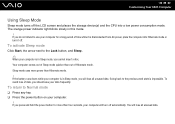
... your computer will turn it is in this mode. ! If you press and hold the power button for a long period of Hibernate mode. If the battery runs down while your computer for more power than out of time while it off automatically. If you do not intend to Normal mode ❑... computer into a low power consumption mode. To avoid loss of Sleep mode quicker than Hibernate mode. ! You will lose all unsaved data. n 88 N Customizing Your VAIO Computer Using Sleep Mode Sleep mode turns off the LCD screen and places the storage device(s) and the CPU into Hibernate mode or turn off...
... your computer will turn it is in this mode. ! If you press and hold the power button for a long period of Hibernate mode. If the battery runs down while your computer for more power than out of time while it off automatically. If you do not intend to Normal mode ❑... computer into a low power consumption mode. To avoid loss of Sleep mode quicker than Hibernate mode. ! You will lose all unsaved data. n 88 N Customizing Your VAIO Computer Using Sleep Mode Sleep mode turns off the LCD screen and places the storage device(s) and the CPU into Hibernate mode or turn off...
User Guide
Page 90
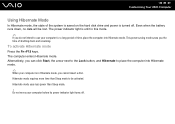
... of time, place the computer into Hibernate mode. Alternatively, you the time of shutting down , no data will be activated. n 90 N Customizing Your VAIO Computer Using Hibernate Mode In Hibernate mode, the state of the system is saved on the hard disk drive and power is turned off . Hibernate... mode requires more time than Sleep mode. ! Even when the battery runs down and resuming. Hibernate mode uses less power than Sleep mode to place the computer into Hibernate mode. ✍ When your computer before...
... of time, place the computer into Hibernate mode. Alternatively, you the time of shutting down , no data will be activated. n 90 N Customizing Your VAIO Computer Using Hibernate Mode In Hibernate mode, the state of the system is saved on the hard disk drive and power is turned off . Hibernate... mode requires more time than Sleep mode. ! Even when the battery runs down and resuming. Hibernate mode uses less power than Sleep mode to place the computer into Hibernate mode. ✍ When your computer before...
User Guide
Page 92
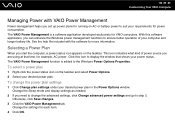
n 92 N Customizing Your VAIO Computer Managing Power with the software for more information. This icon indicates what kind of your computer and longer battery life. Otherwise, click Save changes. 3 Click the VAIO Power Management tab. See the help file included with VAIO Power Management Power management helps you set up ...power plans for running on AC or battery power to step 3. Change the settings for VAIO computers. Selecting a Power Plan When you are using at that shows your requirements for example, AC power. With this icon to ...
n 92 N Customizing Your VAIO Computer Managing Power with the software for more information. This icon indicates what kind of your computer and longer battery life. Otherwise, click Save changes. 3 Click the VAIO Power Management tab. See the help file included with VAIO Power Management Power management helps you set up ...power plans for running on AC or battery power to step 3. Change the settings for VAIO computers. Selecting a Power Plan When you are using at that shows your requirements for example, AC power. With this icon to ...
User Guide
Page 95
... do so may result in personal injury or equipment damage. ❑ ESD can damage electronic components. n 95 N Upgrading Your VAIO Computer Adding and Removing Memory If you want to your system. Install the memory module only at an ESD workstation. Improper installation of... electricity (cellophane wrappers, for using and modifying electronic equipment. ❑ Turn off your computer and disconnect it from its power sources (battery pack and AC adapter) and from any telecommunication links, networks, or modems before you upgrade your memory module. ❑ Electrostatic discharge...
... do so may result in personal injury or equipment damage. ❑ ESD can damage electronic components. n 95 N Upgrading Your VAIO Computer Adding and Removing Memory If you want to your system. Install the memory module only at an ESD workstation. Improper installation of... electricity (cellophane wrappers, for using and modifying electronic equipment. ❑ Turn off your computer and disconnect it from its power sources (battery pack and AC adapter) and from any telecommunication links, networks, or modems before you upgrade your memory module. ❑ Electrostatic discharge...
User Guide
Page 97
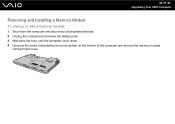
n 97 N Upgrading Your VAIO Computer Removing and Installing a Memory Module To change or add a memory module 1 Shut down the computer and disconnect all peripheral devices. 2 Unplug the computer and remove the battery pack. 3 Wait about an hour until the computer cools down. 4 Unscrew the screw (indicated by the arrow below) on the bottom of the computer and remove the memory module compartment cover.
n 97 N Upgrading Your VAIO Computer Removing and Installing a Memory Module To change or add a memory module 1 Shut down the computer and disconnect all peripheral devices. 2 Unplug the computer and remove the battery pack. 3 Wait about an hour until the computer cools down. 4 Unscrew the screw (indicated by the arrow below) on the bottom of the computer and remove the memory module compartment cover.
User Guide
Page 99
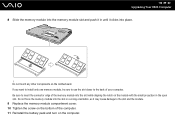
... memory module into the slot in the open slot. Be sure to insert the connector edge of the memory module into place. ! n 99 N Upgrading Your VAIO Computer 8 Slide the memory module into the memory module slot and push it in until it clicks into the slot while aligning the notch on... to the slot and the module. 9 Replace the memory module compartment cover. 10 Tighten the screw on the bottom of the computer. 11 Reinstall the battery pack and turn on the motherboard. If you want to install only one memory module, be sure to use the slot closer to the back...
... memory module into the slot in the open slot. Be sure to insert the connector edge of the memory module into place. ! n 99 N Upgrading Your VAIO Computer 8 Slide the memory module into the memory module slot and push it in until it clicks into the slot while aligning the notch on... to the slot and the module. 9 Replace the memory module compartment cover. 10 Tighten the screw on the bottom of the computer. 11 Reinstall the battery pack and turn on the motherboard. If you want to install only one memory module, be sure to use the slot closer to the back...


