VAIO User Guide
Page 9
... comfort and work effectiveness. ❑ Positioning an external display - nN 9 Before Use ❑ Viewing angle of the display as well. ❑ Lighting - Choose a location where windows and lights do not create glare and reflection on the display. Make sure the display screen is at a comfortable viewing distance.
... comfort and work effectiveness. ❑ Positioning an external display - nN 9 Before Use ❑ Viewing angle of the display as well. ❑ Lighting - Choose a location where windows and lights do not create glare and reflection on the display. Make sure the display screen is at a comfortable viewing distance.
VAIO User Guide
Page 15
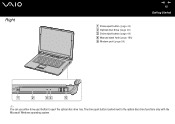
Right A Drive eject button (page 40) B Optical disc drive (page 40) C Drive eject button (page 40) D Manual eject hole (page 186) E Modem port (page 56) nN 15 Getting Started ✍ You can use either drive eject button to the optical disc drive functions only with the Microsoft Windows operating system. The drive eject button located next to eject the optical disc drive tray.
Right A Drive eject button (page 40) B Optical disc drive (page 40) C Drive eject button (page 40) D Manual eject hole (page 186) E Modem port (page 56) nN 15 Getting Started ✍ You can use either drive eject button to the optical disc drive functions only with the Microsoft Windows operating system. The drive eject button located next to eject the optical disc drive tray.
VAIO User Guide
Page 33
To shut down your computer. 2 Click Start and then Turn Off Computer. The power indicator light turns off computer window appears. 3 Click Turn Off. 4 Respond to any peripherals connected to your computer properly, as described below. nN 33 Getting Started Shutting Down Your Computer Safely To avoid losing unsaved data, be sure to shut down your computer 1 Turn off any prompts warning you to save documents or to consider other users and wait for your computer to turn off automatically. The Turn off .
To shut down your computer. 2 Click Start and then Turn Off Computer. The power indicator light turns off computer window appears. 3 Click Turn Off. 4 Respond to any peripherals connected to your computer properly, as described below. nN 33 Getting Started Shutting Down Your Computer Safely To avoid losing unsaved data, be sure to shut down your computer 1 Turn off any prompts warning you to save documents or to consider other users and wait for your computer to turn off automatically. The Turn off .
VAIO User Guide
Page 35
For more information on the standard keys, see Windows Help and Support Center and click on the Customizing your computer link. nN 35 Using Your VAIO Computer Using the Keyboard Your keyboard is very similar to a desktop computer keyboard, but has additional keys that perform model-specific tasks.
For more information on the standard keys, see Windows Help and Support Center and click on the Customizing your computer link. nN 35 Using Your VAIO Computer Using the Keyboard Your keyboard is very similar to a desktop computer keyboard, but has additional keys that perform model-specific tasks.
VAIO User Guide
Page 36
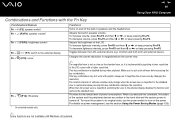
Functions Turns on and off the built-in speaker volume. To decrease volume, press Fn+F3 and then m or To increase volume, press Fn+F4 and then M or ,, or keep pressing Fn+F4. Adjusts the built-in speakers and the headphones. nN 36 Using Your VAIO Computer Combinations and Functions with the Fn Key Combinations/Feature Fn + % (F2): speaker switch* Fn + 2 (F3/F4): speaker volume* Fn + 8 (F5/F6): brightness control Fn + Fn + /T (F7): switch to the external display (F10): zoom* Fn + (F12): Hibernate * On selected models only.
Functions Turns on and off the built-in speaker volume. To decrease volume, press Fn+F3 and then m or To increase volume, press Fn+F4 and then M or ,, or keep pressing Fn+F4. Adjusts the built-in speakers and the headphones. nN 36 Using Your VAIO Computer Combinations and Functions with the Fn Key Combinations/Feature Fn + % (F2): speaker switch* Fn + 2 (F3/F4): speaker volume* Fn + 8 (F5/F6): brightness control Fn + Fn + /T (F7): switch to the external display (F10): zoom* Fn + (F12): Hibernate * On selected models only.
VAIO User Guide
Page 39
...windows may change in resolution. When the LCD screen view is magnified, switching the view to your computer, the Magnify screen button is disabled. See Setting Up Your Computer with graphic images because it magnifies the screen view by changing the resolution. nN 39 Using Your VAIO... Computer ✍ When an external display is connected to the external display disables the function and restores the standard view. VGN-FS600 Series models Special-function button Functions S1/S2 buttons By default, the ...
...windows may change in resolution. When the LCD screen view is magnified, switching the view to your computer, the Magnify screen button is disabled. See Setting Up Your Computer with graphic images because it magnifies the screen view by changing the resolution. nN 39 Using Your VAIO... Computer ✍ When an external display is connected to the external display disables the function and restores the standard view. VGN-FS600 Series models Special-function button Functions S1/S2 buttons By default, the ...
VAIO User Guide
Page 44
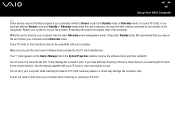
nN 44 Using Your VAIO Computer Playing CDs To play an audio CD 1 Insert the disc into the optical disc drive. 2 If nothing appears on the desktop once you insert an audio CD disc, then click Start, point to All Programs, and click to select an option. If the Audio CD window appears, click to open a CD program, such as the SonicStage software.
nN 44 Using Your VAIO Computer Playing CDs To play an audio CD 1 Insert the disc into the optical disc drive. 2 If nothing appears on the desktop once you insert an audio CD disc, then click Start, point to All Programs, and click to select an option. If the Audio CD window appears, click to open a CD program, such as the SonicStage software.
VAIO User Guide
Page 45
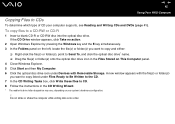
...(s) onto the optical disc drive icon in the CD Writing Wizard. * The read/write drive letter designation may vary, depending on This Computer panel. 4 Close Windows Explorer. 5 Click Start and then My Computer. 6 Click the optical disc drive icon under Devices with the file(s) or folder(s) you want to copy listed... a disc. To copy files to a CD-RW or CD-R 1 Insert a blank CD-R or CD-RW disc into the optical disc drive. nN 45 Using Your VAIO Computer Copying Files to CDs To determine which type of CD your system's hardware configuration. !
...(s) onto the optical disc drive icon in the CD Writing Wizard. * The read/write drive letter designation may vary, depending on This Computer panel. 4 Close Windows Explorer. 5 Click Start and then My Computer. 6 Click the optical disc drive icon under Devices with the file(s) or folder(s) you want to copy listed... a disc. To copy files to a CD-RW or CD-R 1 Insert a blank CD-R or CD-RW disc into the optical disc drive. nN 45 Using Your VAIO Computer Copying Files to CDs To determine which type of CD your system's hardware configuration. !
VAIO User Guide
Page 49
... mode or Hibernate mode. You do not need to correct the problem. We recommend that you are inserting the PC Card in the System Properties window, remove the software driver and then reinstall it. Do not force a PC Card into the slot. It may not enter Hibernate power management mode...inserting or removing a PC Card. If you have difficulty inserting a PC Card, check that you may damage the connector pins. nN 49 Using Your VAIO Computer ✍ Some devices may enter Standby mode. It may not function properly if you continually switch to your computer may damage the connector pins...
... mode or Hibernate mode. You do not need to correct the problem. We recommend that you are inserting the PC Card in the System Properties window, remove the software driver and then reinstall it. Do not force a PC Card into the slot. It may not enter Hibernate power management mode...inserting or removing a PC Card. If you have difficulty inserting a PC Card, check that you may damage the connector pins. nN 49 Using Your VAIO Computer ✍ Some devices may enter Standby mode. It may not function properly if you continually switch to your computer may damage the connector pins...
VAIO User Guide
Page 50
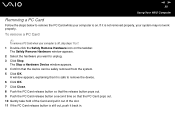
... ✍ To remove a PC Card when your computer is not removed properly, your computer is still out, push it back in. The Safely Remove Hardware window appears. 2 Select the hardware you want to remove the device. 6 Click OK. 7 Click Close. 8 Push the PC Card release button so that the release button... of the Card and pull it out of the slot. 11 If the PC Card release button is on the taskbar. nN 50 Using Your VAIO Computer Removing a PC Card Follow the steps below to remove the PC Card while your system may not work properly. The Stop a Hardware Device...
... ✍ To remove a PC Card when your computer is not removed properly, your computer is still out, push it back in. The Safely Remove Hardware window appears. 2 Select the hardware you want to remove the device. 6 Click OK. 7 Click Close. 8 Push the PC Card release button so that the release button... of the Card and pull it out of the slot. 11 If the PC Card release button is on the taskbar. nN 50 Using Your VAIO Computer Removing a PC Card Follow the steps below to remove the PC Card while your system may not work properly. The Stop a Hardware Device...
VAIO User Guide
Page 53
... Stick media into your system and appears in place. You can insert a Memory Stick media into the slot until it clicks in your My Computer window as a local drive, under the appropriate letter (depending on the configuration of your computer). ✍ The location of the Memory Stick media slot depends on...
... Stick media into your system and appears in place. You can insert a Memory Stick media into the slot until it clicks in your My Computer window as a local drive, under the appropriate letter (depending on the configuration of your computer). ✍ The location of the Memory Stick media slot depends on...
VAIO User Guide
Page 54
... steps: To view the contents 1 Click Start and then My Computer. If the Memory Stick window does not appear when you insert a Memory Stick media. The My Computer window appears. 2 Click Memory Stick. The Memory Stick window appears, displaying the contents stored on Memory Stick Duo media, visit the Memory Stick web site... correct direction as you can choose to view, print, copy or organize your images or data stored on the model you purchased, the Memory Stick window may damage the computer. ✍ Your computer supports Memory Stick Duo media. From this...
... steps: To view the contents 1 Click Start and then My Computer. If the Memory Stick window does not appear when you insert a Memory Stick media. The My Computer window appears. 2 Click Memory Stick. The Memory Stick window appears, displaying the contents stored on Memory Stick Duo media, visit the Memory Stick web site... correct direction as you can choose to view, print, copy or organize your images or data stored on the model you purchased, the Memory Stick window may damage the computer. ✍ Your computer supports Memory Stick Duo media. From this...
VAIO User Guide
Page 55
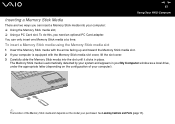
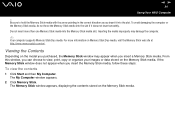
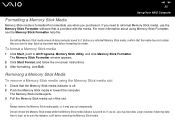
... lose data. Do not remove the Memory Stick media while the Memory Stick media indicator is off before formatting the media. nN 55 Using Your VAIO Computer Formatting a Memory Stick Media Memory Stick media is formatted for immediate use the Memory Stick Formatter software that is off . 2 Push the Memory Stick... Exit. To format a Memory Stick media 1 Click Start, point to load, so be sure the indicator is provided with the media. The Memory Stick Formatter window appears. 2 Click Start Format, and follow the on . Large volumes of the slot. !
... lose data. Do not remove the Memory Stick media while the Memory Stick media indicator is off before formatting the media. nN 55 Using Your VAIO Computer Formatting a Memory Stick Media Memory Stick media is formatted for immediate use the Memory Stick Formatter software that is off . 2 Push the Memory Stick... Exit. To format a Memory Stick media 1 Click Start, point to load, so be sure the indicator is provided with the media. The Memory Stick Formatter window appears. 2 Click Start Format, and follow the on . Large volumes of the slot. !
VAIO User Guide
Page 56
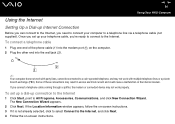
... your telephone cable, you're ready to connect to the Internet, and click Next. 4 Follow the on-screen instructions. If the Location Information window appears, follow the on the computer. 2 Plug the other end into the wall jack (2). ✍ Your computer does not work with multiple ... to a coin-operated telephone, and may result in excess electrical current and could cause a malfunction in the internal modem. nN 56 Using Your VAIO Computer Using the Internet Setting Up a Dial-up Internet Connection Before you can connect to the Internet, you connect a telephone cable coming through a...
... your telephone cable, you're ready to connect to the Internet, and click Next. 4 Follow the on-screen instructions. If the Location Information window appears, follow the on the computer. 2 Plug the other end into the wall jack (2). ✍ Your computer does not work with multiple ... to a coin-operated telephone, and may result in excess electrical current and could cause a malfunction in the internal modem. nN 56 Using Your VAIO Computer Using the Internet Setting Up a Dial-up Internet Connection Before you can connect to the Internet, you connect a telephone cable coming through a...
VAIO User Guide
Page 59
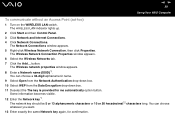
... same Network key again, for me automatically option button. Some information becomes visible. 12 Enter the Network key*1. nN 59 Using Your VAIO Computer To communicate without an Access Point (ad-hoc) 1 Turn on the WIRELESS LAN switch. The WIRELESS LAN indicator lights up. ...2 Click Start and then Control Panel. 3 Click Network and Internet Connections. 4 Click Network Connections. The Wireless network properties window appears. 8 Enter a Network name (SSID)*1. You can choose a 32-digit alphanumeric name. 9 Select Open from the Network Authentication drop-down box....
... same Network key again, for me automatically option button. Some information becomes visible. 12 Enter the Network key*1. nN 59 Using Your VAIO Computer To communicate without an Access Point (ad-hoc) 1 Turn on the WIRELESS LAN switch. The WIRELESS LAN indicator lights up. ...2 Click Start and then Control Panel. 3 Click Network and Internet Connections. 4 Click Network Connections. The Wireless network properties window appears. 8 Enter a Network name (SSID)*1. You can choose a 32-digit alphanumeric name. 9 Select Open from the Network Authentication drop-down box....
VAIO User Guide
Page 60
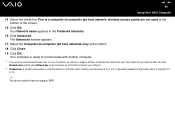
... is a computer-to -computer (ad hoc) networks only option button. 18 Click Close. 19 Click OK. The Advanced window appears. 17 Select the Computer-to -computer (ad hoc) network; nN 60 Using Your VAIO Computer 14 Select the check box This is ready to communicate with another computer. *1 If you want to...
... is a computer-to -computer (ad hoc) networks only option button. 18 Click Close. 19 Click OK. The Advanced window appears. 17 Select the Computer-to -computer (ad hoc) network; nN 60 Using Your VAIO Computer 14 Select the check box This is ready to communicate with another computer. *1 If you want to...

VAIO User Guide
Page 61
The Wireless Network Connection Status window appears. 5 Click Properties. The Wireless Network Connection Properties window appears. 6 On the Wireless Networks tab, click Advanced. nN 61 Using Your VAIO Computer To disconnect from a computer-to select Any available network (access point preferred), and click Close. 8 ...Click OK. 9 Click Close. 10 Turn off the WIRELESS LAN switch. The Network Connections window appears. 4 In the right ...
The Wireless Network Connection Status window appears. 5 Click Properties. The Wireless Network Connection Properties window appears. 6 On the Wireless Networks tab, click Advanced. nN 61 Using Your VAIO Computer To disconnect from a computer-to select Any available network (access point preferred), and click Close. 8 ...Click OK. 9 Click Close. 10 Turn off the WIRELESS LAN switch. The Network Connections window appears. 4 In the right ...
VAIO User Guide
Page 90
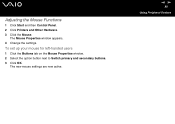
The Mouse Properties window appears. 4 Change the settings. nN 90 Using Peripheral Devices Adjusting the Mouse Functions 1 Click Start and then Control Panel. 2 Click Printers and Other Hardware. 3 Click the Mouse. To set up your mouse for left-handed users 1 Click the Buttons tab on the Mouse Properties window. 2 Select the option button next to Switch primary and secondary buttons. 3 Click OK. The new mouse settings are now active.
The Mouse Properties window appears. 4 Change the settings. nN 90 Using Peripheral Devices Adjusting the Mouse Functions 1 Click Start and then Control Panel. 2 Click Printers and Other Hardware. 3 Click the Mouse. To set up your mouse for left-handed users 1 Click the Buttons tab on the Mouse Properties window. 2 Select the option button next to Switch primary and secondary buttons. 3 Click OK. The new mouse settings are now active.
VAIO User Guide
Page 100
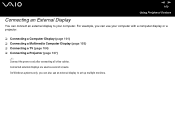
On Windows systems only, you can use an external display to your computer with a computer display or a projector. ❑ Connecting a Computer Display (page 101) ❑ Connecting a Multimedia ...
On Windows systems only, you can use an external display to your computer with a computer display or a projector. ❑ Connecting a Computer Display (page 101) ❑ Connecting a Multimedia ...

VAIO User Guide
Page 111
... may not return to the other . If you to the monitor (VGA) port, your desktop across separate displays. You can function as an open application window or a toolbar, from one display to the other . ✍ Your external display or TV may not work properly. otherwise your software may not support the..., if you have an external display attached to distribute portions of your computer's LCD and the external display can move the cursor from one single window on each display.
... may not return to the other . If you to the monitor (VGA) port, your desktop across separate displays. You can function as an open application window or a toolbar, from one display to the other . ✍ Your external display or TV may not work properly. otherwise your software may not support the..., if you have an external display attached to distribute portions of your computer's LCD and the external display can move the cursor from one single window on each display.