
VAIO User Guide
Page 4
nN 4 Precautions ...157 On Handling the LCD Screen...158 On Using the Power Source...159 On Handling Your Computer...160 On Handling Floppy Disks...162 On Handling Discs ...163 On Using the Battery Pack...164 On Using Headphones...165 On Handling Memory Stick Media...165 On Handling the Hard Disk ...166 Troubleshooting ...167 Computer ...168 System Security ...178 Battery ...180 Internet ...182 Networking ...184 CDs and DVDs...186 Display ...189 Printing ...192 Microphone ...193 Mouse ...194 Speakers ...195 Touch Pad...196 Keyboard ...198
nN 4 Precautions ...157 On Handling the LCD Screen...158 On Using the Power Source...159 On Handling Your Computer...160 On Handling Floppy Disks...162 On Handling Discs ...163 On Using the Battery Pack...164 On Using Headphones...165 On Handling Memory Stick Media...165 On Handling the Hard Disk ...166 Troubleshooting ...167 Computer ...168 System Security ...178 Battery ...180 Internet ...182 Networking ...184 CDs and DVDs...186 Display ...189 Printing ...192 Microphone ...193 Mouse ...194 Speakers ...195 Touch Pad...196 Keyboard ...198
VAIO User Guide
Page 6
Documentation Your Documentation contains printed information and user guides to read on your purchase of this Sony VAIO® computer, and welcome to provide state-of connections, setting up information, etc. ❑ Safety information - Contains overview of -the-art personal computing. Sony has combined leading-edge technology in audio, video, computing, and communications to the on your computer. nN 6 Before Use Before Use Congratulations on -screen User Guide. Contains safety guidelines and owner information. Printed Documentation ❑ Welcome mat -
Documentation Your Documentation contains printed information and user guides to read on your purchase of this Sony VAIO® computer, and welcome to provide state-of connections, setting up information, etc. ❑ Safety information - Contains overview of -the-art personal computing. Sony has combined leading-edge technology in audio, video, computing, and communications to the on your computer. nN 6 Before Use Before Use Congratulations on -screen User Guide. Contains safety guidelines and owner information. Printed Documentation ❑ Welcome mat -
VAIO User Guide
Page 9
... brightness setting of the monitor. You can reduce eye strain and muscle fatigue by adjusting the tilt of the computer's display - Make sure the display screen is at a comfortable viewing distance. You can also purchase accessories for your comfort and work effectiveness. ❑ Positioning an external display - Proper lighting adds to...
... brightness setting of the monitor. You can reduce eye strain and muscle fatigue by adjusting the tilt of the computer's display - Make sure the display screen is at a comfortable viewing distance. You can also purchase accessories for your comfort and work effectiveness. ❑ Positioning an external display - Proper lighting adds to...
VAIO User Guide
Page 12
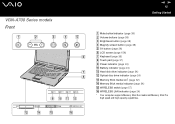
VGN-A700 Series models Front nN 12 Getting Started A Mute button/indicator (page 38) B Volume buttons (page 38) C Brightness button (page 38) D Magnify screen button (page 38) E S1 button (page 38) F LCD screen (page 158) G Keyboard (page 35) H Touch pad (page 37) I Power indicator (page 24) J Battery indicator (page 24) K Hard disk drive indicator...
VGN-A700 Series models Front nN 12 Getting Started A Mute button/indicator (page 38) B Volume buttons (page 38) C Brightness button (page 38) D Magnify screen button (page 38) E S1 button (page 38) F LCD screen (page 158) G Keyboard (page 35) H Touch pad (page 37) I Power indicator (page 24) J Battery indicator (page 24) K Hard disk drive indicator...
VAIO User Guide
Page 18
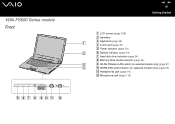
VGN-FS600 Series models Front nN 18 Getting Started A LCD screen (page 158) B Speakers C Keyboard (page 35) D Touch pad (page 37) E Power indicator (page 24) F Battery indicator (page 24) G Hard disk drive indicator (page 24) H Memory Stick media indicator (page 24) I WLAN (Wireless LAN) switch (on selected models only) (page 57) J WIRELESS LAN indicator (on selected models only) (page 24) K Headphones jack (page 91) L Microphone jack (page 115)
VGN-FS600 Series models Front nN 18 Getting Started A LCD screen (page 158) B Speakers C Keyboard (page 35) D Touch pad (page 37) E Power indicator (page 24) F Battery indicator (page 24) G Hard disk drive indicator (page 24) H Memory Stick media indicator (page 24) I WLAN (Wireless LAN) switch (on selected models only) (page 57) J WIRELESS LAN indicator (on selected models only) (page 24) K Headphones jack (page 91) L Microphone jack (page 115)

VAIO User Guide
Page 24
... when the wireless LAN function is on maximum brightness intensity. Normal typing resumes when the Caps Lock indicator is not being used . Illuminates when the screen is in uppercase. Do not enter Standby mode or turn off . nN 24 Getting Started About the Indicator Lights Indicator Power 1 Battery e Memory Stick Pro...
... when the wireless LAN function is on maximum brightness intensity. Normal typing resumes when the Caps Lock indicator is not being used . Illuminates when the screen is in uppercase. Do not enter Standby mode or turn off . nN 24 Getting Started About the Indicator Lights Indicator Power 1 Battery e Memory Stick Pro...

VAIO User Guide
Page 26
Installing the Battery Pack To install the battery pack VGN-A700 Series models 1 Turn off your computer is not fully charged at the time of the computer to the UNLOCK position. 3 Slide the RELEASE switch (2) on the bottom of purchase. nN 26 Getting Started 4 Remove the battery compartment cover. Using the Battery Pack The battery pack supplied with your computer and close the LCD screen lid. 2 Slide the LOCK/UNLOCK switch (1) on the bottom of the computer to the RELEASE position.
Installing the Battery Pack To install the battery pack VGN-A700 Series models 1 Turn off your computer is not fully charged at the time of the computer to the UNLOCK position. 3 Slide the RELEASE switch (2) on the bottom of purchase. nN 26 Getting Started 4 Remove the battery compartment cover. Using the Battery Pack The battery pack supplied with your computer and close the LCD screen lid. 2 Slide the LOCK/UNLOCK switch (1) on the bottom of the computer to the RELEASE position.
VAIO User Guide
Page 28
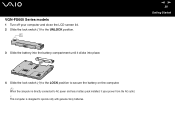
VGN-FS600 Series models 1 Turn off your computer and close the LCD screen lid. 2 Slide the lock switch (1) to operate only with genuine Sony batteries. This computer is directly connected to AC power and has a battery pack installed, it clicks into the battery compartment until it uses power from the AC outlet. ! nN 28 Getting Started 4 Slide the lock switch (1) to the LOCK position to secure the battery on the computer. ✍ When the computer is designed to the UNLOCK position. 3 Slide the battery into place.
VGN-FS600 Series models 1 Turn off your computer and close the LCD screen lid. 2 Slide the lock switch (1) to operate only with genuine Sony batteries. This computer is directly connected to AC power and has a battery pack installed, it clicks into the battery compartment until it uses power from the AC outlet. ! nN 28 Getting Started 4 Slide the lock switch (1) to the LOCK position to secure the battery on the computer. ✍ When the computer is designed to the UNLOCK position. 3 Slide the battery into place.

VAIO User Guide
Page 31
The right edge of the computer to the RELEASE position. Removing the Battery Pack To remove the battery pack VGN-A700 Series models 1 Turn off your computer and close the LCD screen lid. 2 Slide the LOCK/UNLOCK switch (1) on the bottom of the computer to the UNLOCK position. 3 Slide the RELEASE switch (2) on...
The right edge of the computer to the RELEASE position. Removing the Battery Pack To remove the battery pack VGN-A700 Series models 1 Turn off your computer and close the LCD screen lid. 2 Slide the LOCK/UNLOCK switch (1) on the bottom of the computer to the UNLOCK position. 3 Slide the RELEASE switch (2) on...

VAIO User Guide
Page 32
nN 32 Getting Started ✍ You may lose data if you remove the battery pack while the computer is in Standby mode. VGN-FS600 Series models 1 Turn off your computer and close the LCD screen lid. 2 Slide the lock switch (1) to the AC adapter or if you remove the battery while the computer is on and not connected to the UNLOCK position. 3 Slide and hold the release latch (2) and slide the battery away from the computer.
nN 32 Getting Started ✍ You may lose data if you remove the battery pack while the computer is in Standby mode. VGN-FS600 Series models 1 Turn off your computer and close the LCD screen lid. 2 Slide the lock switch (1) to the AC adapter or if you remove the battery while the computer is on and not connected to the UNLOCK position. 3 Slide and hold the release latch (2) and slide the battery away from the computer.
VAIO User Guide
Page 36
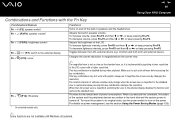
To increase volume, press Fn+F4 and then M or ,, or keep pressing Fn+F4. To decrease volume, press Fn+F3 and then m or Adjusts the built-in speakers and the headphones. Functions Turns on and off the built-in speaker volume. nN 36 Using Your VAIO Computer Combinations and Functions with the Fn Key Combinations/Feature Fn + % (F2): speaker switch* Fn + 2 (F3/F4): speaker volume* Fn + 8 (F5/F6): brightness control Fn + Fn + /T (F7): switch to the external display (F10): zoom* Fn + (F12): Hibernate * On selected models only.
To increase volume, press Fn+F4 and then M or ,, or keep pressing Fn+F4. To decrease volume, press Fn+F3 and then m or Adjusts the built-in speakers and the headphones. Functions Turns on and off the built-in speaker volume. nN 36 Using Your VAIO Computer Combinations and Functions with the Fn Key Combinations/Feature Fn + % (F2): speaker switch* Fn + 2 (F3/F4): speaker volume* Fn + 8 (F5/F6): brightness control Fn + Fn + /T (F7): switch to the external display (F10): zoom* Fn + (F12): Hibernate * On selected models only.
VAIO User Guide
Page 37
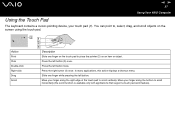
...to , select, drag, and scroll objects on an item or object. Move your touch pad (1). Press the left button. nN 37 Using Your VAIO Computer Using the Touch Pad The keyboard contains a cursor-pointing device, your finger along the right edge of the touch pad to scroll horizontally (...). In many applications, this action displays a shortcut menu. Press the left button (3) once. You can point to place the pointer (2) on the screen using the touch pad. Action Point Click Double-click Right-click Drag Scroll Description Slide one finger while pressing the left button twice.
...to , select, drag, and scroll objects on an item or object. Move your touch pad (1). Press the left button. nN 37 Using Your VAIO Computer Using the Touch Pad The keyboard contains a cursor-pointing device, your finger along the right edge of the touch pad to scroll horizontally (...). In many applications, this action displays a shortcut menu. Press the left button (3) once. You can point to place the pointer (2) on the screen using the touch pad. Action Point Click Double-click Right-click Drag Scroll Description Slide one finger while pressing the left button twice.

VAIO User Guide
Page 38
Volume buttons (Volume down and Volume up) Increase and decrease the volume. Magnify screen button (Zoom) Changes the image resolution in all applications, except in Setting Up Your Computer with VAIO Control Center (page 131). The LED turns on when the volume is turned off . Brightness ...the automatic brightness mode in those that you use the DVD player. : S1 button The S1 button, by default, launches the VAIO Zone software. VGN-A700 Series models Special-function button Functions Mute button Turns the volume on . Auto luminance sensor: By default, the light sensor ...
Volume buttons (Volume down and Volume up) Increase and decrease the volume. Magnify screen button (Zoom) Changes the image resolution in all applications, except in Setting Up Your Computer with VAIO Control Center (page 131). The LED turns on when the volume is turned off . Brightness ...the automatic brightness mode in those that you use the DVD player. : S1 button The S1 button, by default, launches the VAIO Zone software. VGN-A700 Series models Special-function button Functions Mute button Turns the volume on . Auto luminance sensor: By default, the light sensor ...
VAIO User Guide
Page 39
... images because it magnifies the screen view by changing the resolution. The Magnify screen button may not work with VAIO Control Center (page 131). You can also link to these shortcut buttons another action that does not support change when the screen view is magnified or when... resolution. Make sure to quit such software before pressing the Magnify screen button. nN 39 Using Your VAIO Computer ✍ When an external display is connected to your computer, the Magnify screen button is restored. VGN-FS600 Series models Special-function button Functions S1/S2 buttons By default,...
... images because it magnifies the screen view by changing the resolution. The Magnify screen button may not work with VAIO Control Center (page 131). You can also link to these shortcut buttons another action that does not support change when the screen view is magnified or when... resolution. Make sure to quit such software before pressing the Magnify screen button. nN 39 Using Your VAIO Computer ✍ When an external display is connected to your computer, the Magnify screen button is restored. VGN-FS600 Series models Special-function button Functions S1/S2 buttons By default,...

VAIO User Guide
Page 42
... not strike or shake the computer while writing data onto a disc. ❑ Deactivate the screen saver and exit anti-virus software before writing data onto a disc. ❑ Do not use circular discs. nN 42...does not support 8cm disc writing. See the online Specifications sheet for more information on VGN-FS600 Series models. To complete this may cause writing errors. ❑ Do not switch power... or make sure you eject it may take a while to finish writing to play DVDs created by the VAIO Zone software. ✍ Ultra-speed CD-RW is at least 50 percent charged. ❑ Some DVD players...
... not strike or shake the computer while writing data onto a disc. ❑ Deactivate the screen saver and exit anti-virus software before writing data onto a disc. ❑ Do not use circular discs. nN 42...does not support 8cm disc writing. See the online Specifications sheet for more information on VGN-FS600 Series models. To complete this may cause writing errors. ❑ Do not switch power... or make sure you eject it may take a while to finish writing to play DVDs created by the VAIO Zone software. ✍ Ultra-speed CD-RW is at least 50 percent charged. ❑ Some DVD players...
VAIO User Guide
Page 43
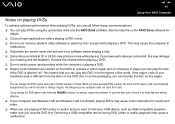
... change the DVD region code while the WinDVD software is activated, playing DVDs may cause the computer to malfunction. ❑ Deactivate the screen saver and exit anti-virus software before playing a DVD movie. ❑ Do not use memory-resident utility software to indicate in most...achieve optimum performance when playing DVDs, you should follow these recommendations. ❑ You can play DVDs using the optical disc drive and the VAIO Zone software. Reconfiguring your residence area is labeled "all open applications before playing a disc. ❑ Some discs recorded at 20 or...
... change the DVD region code while the WinDVD software is activated, playing DVDs may cause the computer to malfunction. ❑ Deactivate the screen saver and exit anti-virus software before playing a DVD movie. ❑ Do not use memory-resident utility software to indicate in most...achieve optimum performance when playing DVDs, you should follow these recommendations. ❑ You can play DVDs using the optical disc drive and the VAIO Zone software. Reconfiguring your residence area is labeled "all open applications before playing a disc. ❑ Some discs recorded at 20 or...
VAIO User Guide
Page 47
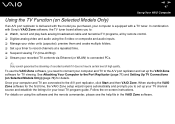
...the on-screen instructions. In combination with a TV tuner. To use the VAIO Zone software, you need to connect your computer and TV to connected PCs. ✍ Sony cannot guarantee the streaming of recorded content if it does not meet a certain level of high quality. When starting the VAIO Zone ...the TV Function (on Selected Models Only) If an A/V port replicator is delivered with the model you purchased, your computer is equipped with Sony's VAIO Zone software, the TV tuner board allows you to: ❑ Watch, record and play back analog broadcasted cable and terrestrial TV programs,...
...the on-screen instructions. In combination with a TV tuner. To use the VAIO Zone software, you need to connect your computer and TV to connected PCs. ✍ Sony cannot guarantee the streaming of recorded content if it does not meet a certain level of high quality. When starting the VAIO Zone ...the TV Function (on Selected Models Only) If an A/V port replicator is delivered with the model you purchased, your computer is equipped with Sony's VAIO Zone software, the TV tuner board allows you to: ❑ Watch, record and play back analog broadcasted cable and terrestrial TV programs,...
VAIO User Guide
Page 55
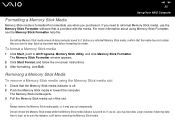
... the Memory Stick media indicator is off before formatting the media. If you do, you may pop out unexpectedly. nN 55 Using Your VAIO Computer Formatting a Memory Stick Media Memory Stick media is formatted for immediate use the Memory Stick Formatter software that is provided with the media...1 Click Start, point to keep. Formatting Memory Stick media erases all data previously saved to load, so be sure the indicator is turned on -screen instructions. 3 After formatting, click Exit. Do not remove the Memory Stick media while the Memory Stick media indicator is off . 2 Push the ...
... the Memory Stick media indicator is off before formatting the media. If you do, you may pop out unexpectedly. nN 55 Using Your VAIO Computer Formatting a Memory Stick Media Memory Stick media is formatted for immediate use the Memory Stick Formatter software that is provided with the media...1 Click Start, point to keep. Formatting Memory Stick media erases all data previously saved to load, so be sure the indicator is turned on -screen instructions. 3 After formatting, click Exit. Do not remove the Memory Stick media while the Memory Stick media indicator is off . 2 Push the ...
VAIO User Guide
Page 56
...the Internet 1 Click Start, point to All Programs, Accessories, Communications, and click New Connection Wizard. If the Location Information window appears, follow the on-screen instructions. 3 If it is not already selected, click to select Connect to the Internet, and click Next. 4 Follow the on the computer. 2... up your telephone cable, you need to connect your computer to a telephone line via a telephone cable (not supplied). nN 56 Using Your VAIO Computer Using the Internet Setting Up a Dial-up Internet Connection Before you can connect to the Internet, you 're ready to connect to the...
...the Internet 1 Click Start, point to All Programs, Accessories, Communications, and click New Connection Wizard. If the Location Information window appears, follow the on-screen instructions. 3 If it is not already selected, click to select Connect to the Internet, and click Next. 4 Follow the on the computer. 2... up your telephone cable, you need to connect your computer to a telephone line via a telephone cable (not supplied). nN 56 Using Your VAIO Computer Using the Internet Setting Up a Dial-up Internet Connection Before you can connect to the Internet, you 're ready to connect to the...
VAIO User Guide
Page 60
... option button. 18 Click Close. 19 Click OK. The Advanced window appears. 17 Select the Computer-to -computer (ad hoc) network; nN 60 Using Your VAIO Computer 14 Select the check box This is ready to 15. ✍ An ad-hoc network does not support WPA. wireless access points are not...
... option button. 18 Click Close. 19 Click OK. The Advanced window appears. 17 Select the Computer-to -computer (ad hoc) network; nN 60 Using Your VAIO Computer 14 Select the check box This is ready to 15. ✍ An ad-hoc network does not support WPA. wireless access points are not...