
User Guide
Page 3
...73 Connecting an External Display ...74 Selecting Display Modes...78 Using the Multiple Monitors Function ...80 Connecting an External Microphone ...82 Connecting a Universal Serial Bus (USB) Device...83 Connecting a Printer ...86 Connecting an i.LINK Device ...87 Connecting to a Network (LAN) ...89 Customizing Your VAIO Computer ...90 Setting the Password ...91 Using Fingerprint Authentication ...98 Setting Up Your Computer with VAIO Central ...106 Using the Power Saving Modes ...107 Managing Power with VAIO Power Management ...112 Upgrading Your VAIO Computer...114 Adding and Removing Memory...
...73 Connecting an External Display ...74 Selecting Display Modes...78 Using the Multiple Monitors Function ...80 Connecting an External Microphone ...82 Connecting a Universal Serial Bus (USB) Device...83 Connecting a Printer ...86 Connecting an i.LINK Device ...87 Connecting to a Network (LAN) ...89 Customizing Your VAIO Computer ...90 Setting the Password ...91 Using Fingerprint Authentication ...98 Setting Up Your Computer with VAIO Central ...106 Using the Power Saving Modes ...107 Managing Power with VAIO Power Management ...112 Upgrading Your VAIO Computer...114 Adding and Removing Memory...

User Guide
Page 7
... common problems. ❑ Specifications - Printed Documentation ❑ Welcome mat - Contains an overview of your computer, as well as information on your computer. Contains safety guidelines and owner information. ❑ Instant Mode - Non-printed Documentation ❑ User Guide (this manual) - It also includes information about the software programs included with your VAIO computer. The online Specifications describe the hardware and software configuration of connections, set-up...
... common problems. ❑ Specifications - Printed Documentation ❑ Welcome mat - Contains an overview of your computer, as well as information on your computer. Contains safety guidelines and owner information. ❑ Instant Mode - Non-printed Documentation ❑ User Guide (this manual) - It also includes information about the software programs included with your VAIO computer. The online Specifications describe the hardware and software configuration of connections, set-up...

User Guide
Page 8
To access this on-screen guide: 1 Click Start and Help and Support. 2 Click Manuals & Specifications. 3 Click VAIO Recovery Center User Guide. n8 N Before Use ❑ VAIO Recovery Center User Guide - Provides information about restoring individual software programs, software drivers, and drive partition(s) or your entire hard disk drive to the original factory installed settings.
To access this on-screen guide: 1 Click Start and Help and Support. 2 Click Manuals & Specifications. 3 Click VAIO Recovery Center User Guide. n8 N Before Use ❑ VAIO Recovery Center User Guide - Provides information about restoring individual software programs, software drivers, and drive partition(s) or your entire hard disk drive to the original factory installed settings.
User Guide
Page 9
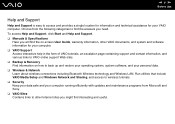
...; VAIO Support Access interactive help in the form of VAIO tutorials, an escalation page containing support and contact information, and various links to VAIO online support Web sites. ❑ Backup & Recovery Find information on -screen User Guide, warranty information, other Internet sites you need. To access Help and Support, click Start and Help and Support. ❑ Manuals & Specifications Here you will find interesting and useful. n9 N Before Use Help and Support Help and Support...
...; VAIO Support Access interactive help in the form of VAIO tutorials, an escalation page containing support and contact information, and various links to VAIO online support Web sites. ❑ Backup & Recovery Find information on -screen User Guide, warranty information, other Internet sites you need. To access Help and Support, click Start and Help and Support. ❑ Manuals & Specifications Here you will find interesting and useful. n9 N Before Use Help and Support Help and Support...

User Guide
Page 19
... time to the Memory Stick media in the Memory Stick Duo/PRO Duo media slot or in Hibernate mode or off. Press the Caps Lock key to the hard disk drive. Indicator Power 1 Battery e Hard disk drive Memory Stick PRO/Duo media SD memory card Built-in MOTION EYE camera Optical disc drive Num lock Caps lock Scroll lock Functions Illuminates when the power of power, and double-blinks when the battery pack is in the Memory Stick PRO/Duo media slot. (Do not enter Sleep mode or turn off . Illuminates when data...
... time to the Memory Stick media in the Memory Stick Duo/PRO Duo media slot or in Hibernate mode or off. Press the Caps Lock key to the hard disk drive. Indicator Power 1 Battery e Hard disk drive Memory Stick PRO/Duo media SD memory card Built-in MOTION EYE camera Optical disc drive Num lock Caps lock Scroll lock Functions Illuminates when the power of power, and double-blinks when the battery pack is in the Memory Stick PRO/Duo media slot. (Do not enter Sleep mode or turn off . Illuminates when data...
User Guide
Page 29
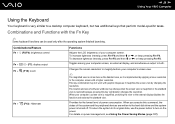
n 29 N Using Your VAIO Computer Using the Keyboard Your keyboard is very similar to a desktop computer keyboard, but has additional keys that perform model-specific tasks. Combinations/Feature Fn + 8 (F5/F6): brightness control Fn + /T (F7): display output Fn + (F10): zoom Fn + (F12): Hibernate Functions Adjusts the LCD brightness of your computer screen. To decrease lightness intensity, press Fn+F5 and then m or To increase lightness intensity, press Fn+F6 and...
n 29 N Using Your VAIO Computer Using the Keyboard Your keyboard is very similar to a desktop computer keyboard, but has additional keys that perform model-specific tasks. Combinations/Feature Fn + 8 (F5/F6): brightness control Fn + /T (F7): display output Fn + (F10): zoom Fn + (F12): Hibernate Functions Adjusts the LCD brightness of your computer screen. To decrease lightness intensity, press Fn+F5 and then m or To increase lightness intensity, press Fn+F6 and...

User Guide
Page 38
Use the table below to see which types of media your specifications for the type of optical disc drive installed on the model you purchased. n 38 N Using Your VAIO Computer Reading and Writing Optical Discs Your computer plays and records CDs, DVDs, or Blu-ray Discs, depending on your model. Check your optical disc drive supports.
Use the table below to see which types of media your specifications for the type of optical disc drive installed on the model you purchased. n 38 N Using Your VAIO Computer Reading and Writing Optical Discs Your computer plays and records CDs, DVDs, or Blu-ray Discs, depending on your model. Check your optical disc drive supports.
User Guide
Page 40
... other optical media devices, circumstances may not support movie playback on this product because it does not conform to be implemented for Movies and BD-ROM contents. Region settings are not compliant with your external display is strongly recommended that the audio side (non-DVD side) of copyright protected Blu-ray Discs. Due to the multiple formats of VAIO CD drives with discs that...
... other optical media devices, circumstances may not support movie playback on this product because it does not conform to be implemented for Movies and BD-ROM contents. Region settings are not compliant with your external display is strongly recommended that the audio side (non-DVD side) of copyright protected Blu-ray Discs. Due to the multiple formats of VAIO CD drives with discs that...

User Guide
Page 44
... a disc 1 Connect the AC adapter to the disc. The DVD writing function is available on the desktop, then click Start, All Programs, and the desired DVD software to find about the supported disc media. n 44 N Using Your VAIO Computer Playing DVDs To play the DVD. See the online Specifications to play a DVD 1 Close all running software applications. 2 Insert a DVD into the optical disc drive. 3 If nothing appears on selected models only. For instructions on...
... a disc 1 Connect the AC adapter to the disc. The DVD writing function is available on the desktop, then click Start, All Programs, and the desired DVD software to find about the supported disc media. n 44 N Using Your VAIO Computer Playing DVDs To play the DVD. See the online Specifications to play a DVD 1 Close all running software applications. 2 Insert a DVD into the optical disc drive. 3 If nothing appears on selected models only. For instructions on...

User Guide
Page 62
... network settings and click Next. 7 Follow the on-screen instructions. ✍ See the online Specifications to display the Wireless Device Switch window. The Set up a connection or network on the taskbar to see whether your model supports the Bluetooth functionality and/or the IEEE 802.11a/b/g/n standard. The IEEE 802.11n standard, using the 2.4 or 5 GHz bandwidth, is used for the IEEE 802.11a standard, on the WIRELESS or WIRELESS LAN switch. The Wireless indicator lights...
... network settings and click Next. 7 Follow the on-screen instructions. ✍ See the online Specifications to display the Wireless Device Switch window. The Set up a connection or network on the taskbar to see whether your model supports the Bluetooth functionality and/or the IEEE 802.11a/b/g/n standard. The IEEE 802.11n standard, using the 2.4 or 5 GHz bandwidth, is used for the IEEE 802.11a standard, on the WIRELESS or WIRELESS LAN switch. The Wireless indicator lights...

User Guide
Page 65
... data between your model supports the Bluetooth functionality. To connect to display the Wireless Device Switch window. 3 Select the Enable Bluetooth Device option. 4 Click OK. n 65 N Using Your VAIO Computer Using the Bluetooth Functionality The Bluetooth functionality is available on the WIRELESS switch. You can establish wireless communication between these devices without cables and up . 2 Double-click ( / ) on the taskbar to a Bluetooth device 1 Turn on selected models only. The Wireless indicator lights up to see whether your computer and other Bluetooth devices such as...
... data between your model supports the Bluetooth functionality. To connect to display the Wireless Device Switch window. 3 Select the Enable Bluetooth Device option. 4 Click OK. n 65 N Using Your VAIO Computer Using the Bluetooth Functionality The Bluetooth functionality is available on the WIRELESS switch. You can establish wireless communication between these devices without cables and up . 2 Double-click ( / ) on the taskbar to a Bluetooth device 1 Turn on selected models only. The Wireless indicator lights up to see whether your computer and other Bluetooth devices such as...

User Guide
Page 72
... functionality to your VAIO computer by using the various ports on the computer. ❑ Connecting External Speakers (page 73) ❑ Connecting an External Display (page 74) ❑ Selecting Display Modes (page 78) ❑ Using the Multiple Monitors Function (page 80) ❑ Connecting an External Microphone (page 82) ❑ Connecting a Universal Serial Bus (USB) Device (page 83) ❑ Connecting a Printer (page 86) ❑ Connecting an i.LINK Device (page 87) ❑ Connecting to a Network (LAN) (page 89) n 72 N Using Peripheral Devices
... functionality to your VAIO computer by using the various ports on the computer. ❑ Connecting External Speakers (page 73) ❑ Connecting an External Display (page 74) ❑ Selecting Display Modes (page 78) ❑ Using the Multiple Monitors Function (page 80) ❑ Connecting an External Microphone (page 82) ❑ Connecting a Universal Serial Bus (USB) Device (page 83) ❑ Connecting a Printer (page 86) ❑ Connecting an i.LINK Device (page 87) ❑ Connecting to a Network (LAN) (page 89) n 72 N Using Peripheral Devices
User Guide
Page 81
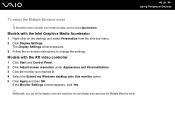
... and select Personalize from the shortcut menu. 2 Click Display Settings. Models with the Intel Graphics Media Accelerator 1 Right-click on -screen instructions to change the settings. If the Monitor Settings window appears, click Yes. ✍ Additionally, you can set the display colors and resolution for each display and customize the Multiple Monitors mode. n 81 N Using Peripheral Devices To select the Multiple Monitors mode ! To find which video controller your model includes, see the online Specifications.
... and select Personalize from the shortcut menu. 2 Click Display Settings. Models with the Intel Graphics Media Accelerator 1 Right-click on -screen instructions to change the settings. If the Monitor Settings window appears, click Yes. ✍ Additionally, you can set the display colors and resolution for each display and customize the Multiple Monitors mode. n 81 N Using Peripheral Devices To select the Multiple Monitors mode ! To find which video controller your model includes, see the online Specifications.

User Guide
Page 89
... (multi-line business telephone) - If the network (LAN) connector is connected to the telephone lines mentioned below, high electric current to your computer. Connect one end of a network cable (not supplied) to the network (Ethernet) port on your network. PBX (private branch exchange) Do not plug a telephone cable into the network port. Telephone lines cannot be connected to 100BASE-TX/10BASE-T-type networks with the default settings. !
... (multi-line business telephone) - If the network (LAN) connector is connected to the telephone lines mentioned below, high electric current to your computer. Connect one end of a network cable (not supplied) to the network (Ethernet) port on your network. PBX (private branch exchange) Do not plug a telephone cable into the network port. Telephone lines cannot be connected to 100BASE-TX/10BASE-T-type networks with the default settings. !

User Guide
Page 91
... service for users with the fingerprint sensor and you have set the power-on your computer from other standard users to allow for password entry when turning on password, you must first set the password. There are two types of the BIOS setup options, as well as to start your computer. Make sure not to forget the password. n 91 N Customizing Your VAIO Computer Setting the Password Use one of the BIOS functions to set...
... service for users with the fingerprint sensor and you have set the power-on your computer from other standard users to allow for password entry when turning on password, you must first set the password. There are two types of the BIOS setup options, as well as to start your computer. Make sure not to forget the password. n 91 N Customizing Your VAIO Computer Setting the Password Use one of the BIOS functions to set...

User Guide
Page 95
... the Enter key. 6 Press the < or , key to display the Security tab, select Set User Password, and then press the Enter key. 5 On the password entry screen, enter the current password once and a new password twice, and then press the Enter key. n 95 N Customizing Your VAIO Computer To change or remove the power-on password (user password) 1 Turn on the computer. 2 Press the F2 key when the VAIO logo appears. At the confirmation prompt, press the Enter key. The BIOS setup screen...
... the Enter key. 6 Press the < or , key to display the Security tab, select Set User Password, and then press the Enter key. 5 On the password entry screen, enter the current password once and a new password twice, and then press the Enter key. n 95 N Customizing Your VAIO Computer To change or remove the power-on password (user password) 1 Turn on the computer. 2 Press the F2 key when the VAIO logo appears. At the confirmation prompt, press the Enter key. The BIOS setup screen...

User Guide
Page 148
... camera. ❑ If your camera and click Update Driver Software. Change the record format to the MPEG-1 format, or click the VAIO Camera Utility icon on the taskbar and the Advanced Setting tab on the Properties window and cancel the Low Light check box. Follow these steps: 1 Click Start, Control Panel, Hardware and Sound, and Device Manager. 2 Double-click Imaging devices. 3 Right-click the device name for the camera. For changing the setting, see Using the Power Saving Modes...
... camera. ❑ If your camera and click Update Driver Software. Change the record format to the MPEG-1 format, or click the VAIO Camera Utility icon on the taskbar and the Advanced Setting tab on the Properties window and cancel the Low Light check box. Follow these steps: 1 Click Start, Control Panel, Hardware and Sound, and Device Manager. 2 Double-click Imaging devices. 3 Right-click the device name for the camera. For changing the setting, see Using the Power Saving Modes...

User Guide
Page 151
... list both for Wireless Adapter Settings in the Power Options window. To change the settings, follow these steps to check the settings: 1 Click Start and Control Panel. 2 Click View network status and tasks under the current power plan. 3 Click Change advanced power settings. You may be using. ❑ Make sure the WIRELESS or WIRELESS LAN switch is on and the Wireless indicator is lit on your access point is selected. ❑ Make sure the encryption key is correct. ❑ Make...
... list both for Wireless Adapter Settings in the Power Options window. To change the settings, follow these steps to check the settings: 1 Click Start and Control Panel. 2 Click View network status and tasks under the current power plan. 3 Click Change advanced power settings. You may be using. ❑ Make sure the WIRELESS or WIRELESS LAN switch is on and the Wireless indicator is lit on your access point is selected. ❑ Make sure the encryption key is correct. ❑ Make...
User Guide
Page 161
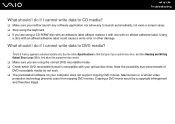
... supported disc media. ❑ Make sure you are using a CD-R/RW disc with an adhesive label affixed, replace it with one with an affixed adhesive label could cause a write error or other damage. Copying a DVD movie would be a copyright infringement and therefore illegal. See the online Specifications to DVD media? ! Using a disc with no affixed adhesive label. What should I do not work. ❑ The preinstalled software...
... supported disc media. ❑ Make sure you are using a CD-R/RW disc with an adhesive label affixed, replace it with one with an affixed adhesive label could cause a write error or other damage. Copying a DVD movie would be a copyright infringement and therefore illegal. See the online Specifications to DVD media? ! Using a disc with no affixed adhesive label. What should I do not work. ❑ The preinstalled software...

User Guide
Page 168
...; You may need to install the printer driver software before you use your computer may enable printing. Follow these steps: 1 Click Start and Control Panel. 2 Click Printer under Hardware and Sound. 3 Right-click the printer icon and select Properties. 4 Click the Ports tab. 5 Click to the settings disables the bidirectional communication functions of the printer, such as data transfer, status monitoring, and remote panel. n 168 N Troubleshooting Printing What...
...; You may need to install the printer driver software before you use your computer may enable printing. Follow these steps: 1 Click Start and Control Panel. 2 Click Printer under Hardware and Sound. 3 Right-click the printer icon and select Properties. 4 Click the Ports tab. 5 Click to the settings disables the bidirectional communication functions of the printer, such as data transfer, status monitoring, and remote panel. n 168 N Troubleshooting Printing What...


