User Guide
Page 2
n2 N Contents Before Use ...5 Documentation ...6 Ergonomic Considerations ...9 Getting Started ...11 Locating Controls and Ports...12 About the Indicator Lights ...16 Setting Up Your Computer ...17 Shutting Down Your Computer Safely ...20 Using Your VAIO Computer ...21 Using the Keyboard ...22 Using the Built-in MOTION EYE Camera...25 Using the Optical Disc Drive ...28 Using the Memory Stick ...38 Using the SD Memory Card ...44 Using the Internet...47 Using the Network (LAN) ...48 Using the Wireless LAN (WLAN) ...49 Using the Bluetooth Function ...52
n2 N Contents Before Use ...5 Documentation ...6 Ergonomic Considerations ...9 Getting Started ...11 Locating Controls and Ports...12 About the Indicator Lights ...16 Setting Up Your Computer ...17 Shutting Down Your Computer Safely ...20 Using Your VAIO Computer ...21 Using the Keyboard ...22 Using the Built-in MOTION EYE Camera...25 Using the Optical Disc Drive ...28 Using the Memory Stick ...38 Using the SD Memory Card ...44 Using the Internet...47 Using the Network (LAN) ...48 Using the Wireless LAN (WLAN) ...49 Using the Bluetooth Function ...52
User Guide
Page 3
... Bus (USB) Device...60 Connecting a Printer ...62 Connecting an i.LINK Device ...63 Customizing Your VAIO Computer ...65 Setting the Password ...66 Setting Up Your Computer with the VAIO Control Center 71 Using the Power Saving Mode...72 Upgrading Your VAIO Computer...75 Adding and Removing Memory...76 Precautions ...82 Handling the LCD Screen ...83 Using the...
... Bus (USB) Device...60 Connecting a Printer ...62 Connecting an i.LINK Device ...63 Customizing Your VAIO Computer ...65 Setting the Password ...66 Setting Up Your Computer with the VAIO Control Center 71 Using the Power Saving Mode...72 Upgrading Your VAIO Computer...75 Adding and Removing Memory...76 Precautions ...82 Handling the LCD Screen ...83 Using the...

User Guide
Page 4
n4 N Troubleshooting ...94 Computer ...96 System Security ...101 Built-in MOTION EYE Camera...102 Networking ...104 Bluetooth Technology ...107 Optical Discs ...111 Display ...116 Printing ...117 Microphone ...118 Mouse ...119 Speakers ...120 Keyboard...122 Floppy Disks ...123 Audio/Video...124 Memory Stick ...128 Peripherals ...129 Support Options ...130 Sony Support Information ...130 Trademarks ...134
n4 N Troubleshooting ...94 Computer ...96 System Security ...101 Built-in MOTION EYE Camera...102 Networking ...104 Bluetooth Technology ...107 Optical Discs ...111 Display ...116 Printing ...117 Microphone ...118 Mouse ...119 Speakers ...120 Keyboard...122 Floppy Disks ...123 Audio/Video...124 Memory Stick ...128 Peripherals ...129 Support Options ...130 Sony Support Information ...130 Trademarks ...134
User Guide
Page 5
...different from those of your computer. n5 N Before Use Before Use Congratulations on your purchase of this User Guide is intended for users of the VAIO computers with the 64-bit operating system. Sony has combined leading-edge technology in audio, video, computing, and communications to the ...on-screen User Guide. Information in the information when your computer comes preinstalled with the Microsoft® ...
...different from those of your computer. n5 N Before Use Before Use Congratulations on your purchase of this User Guide is intended for users of the VAIO computers with the 64-bit operating system. Sony has combined leading-edge technology in audio, video, computing, and communications to the ...on-screen User Guide. Information in the information when your computer comes preinstalled with the Microsoft® ...
User Guide
Page 6
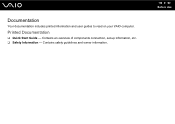
Contains safety guidelines and owner information. Contains an overview of components connection, set-up information, etc. ❑ Safety Information - Printed Documentation ❑ Quick Start Guide - n6 N Before Use Documentation Your documentation includes printed information and user guides to read on your VAIO computer.
Contains safety guidelines and owner information. Contains an overview of components connection, set-up information, etc. ❑ Safety Information - Printed Documentation ❑ Quick Start Guide - n6 N Before Use Documentation Your documentation includes printed information and user guides to read on your VAIO computer.
User Guide
Page 7
... manual by clicking their respective URLs beginning with http://, your computer must be connected to the Sony online support web site at the following URLs: http://esupport.sony.com/EN/VAIO/ for customers in USA http://www.sony.ca/support/ for customers in Canada http://esupport.sony.com/LA/ for customers in Spanish-speaking Latin American...
... manual by clicking their respective URLs beginning with http://, your computer must be connected to the Sony online support web site at the following URLs: http://esupport.sony.com/EN/VAIO/ for customers in USA http://www.sony.ca/support/ for customers in Canada http://esupport.sony.com/LA/ for customers in Spanish-speaking Latin American...
User Guide
Page 8
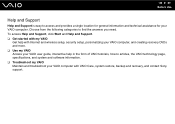
..., and contact Sony support. Choose from the following categories to find the answers you need. n8 N Before Use Help and Support Help and Support is easy to access and provides a single location for general information and technical assistance for your VAIO computer with Internet and wireless setup, security setup, personalizing your VAIO computer, and creating...
..., and contact Sony support. Choose from the following categories to find the answers you need. n8 N Before Use Help and Support Help and Support is easy to access and provides a single location for general information and technical assistance for your VAIO computer with Internet and wireless setup, security setup, personalizing your VAIO computer, and creating...

User Guide
Page 9
Keep your feet are flat on the floor. Let your upper arms hang naturally at your computer. Adjust the level of the computer may make you (1). A footrest may strain eyes, muscles, or tendons. ❑ Furniture and posture - Excessive use of the chair... so your forearms horizontal (2), with good back support. Sit in a chair with your computer - Sit in a neutral, comfortable position (3) while using your sides. Ergonomic Considerations Whenever possible, you should attempt to take account of the following ...
Keep your feet are flat on the floor. Let your upper arms hang naturally at your computer. Adjust the level of the computer may make you (1). A footrest may strain eyes, muscles, or tendons. ❑ Furniture and posture - Excessive use of the chair... so your forearms horizontal (2), with good back support. Sit in a chair with your computer - Sit in a neutral, comfortable position (3) while using your sides. Ergonomic Considerations Whenever possible, you should attempt to take account of the following ...

User Guide
Page 10
... brightness level of the main unit. Choose a location where windows and lights do not exert excessive pressure on the display. Proper lighting adds to your computer to eliminate a risk of mechanical damage. ❑ Lighting - Use the display's tilting feature to find the best position. While adjusting the viewing angle, do not...
... brightness level of the main unit. Choose a location where windows and lights do not exert excessive pressure on the display. Proper lighting adds to your computer to eliminate a risk of mechanical damage. ❑ Lighting - Use the display's tilting feature to find the best position. While adjusting the viewing angle, do not...
User Guide
Page 11
Getting Started This section describes how to get started using your VAIO computer. ❑ Locating Controls and Ports (page 12) ❑ About the Indicator Lights (page 16) ❑ Setting Up Your Computer (page 17) ❑ Shutting Down Your Computer Safely (page 20) n 11 N Getting Started
Getting Started This section describes how to get started using your VAIO computer. ❑ Locating Controls and Ports (page 12) ❑ About the Indicator Lights (page 16) ❑ Setting Up Your Computer (page 17) ❑ Shutting Down Your Computer Safely (page 20) n 11 N Getting Started
User Guide
Page 12
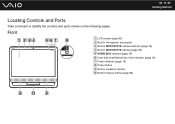
Front A LCD screen (page 83) B Built-in microphone (monaural) C Built-in MOTION EYE camera indicator (page 16) D Built-in MOTION EYE camera (page 25) E WIRELESS indicator (page 16) F Hard disk drive/Optical disc drive indicator (page 16) G Power indicator (page 16) H Power button I Built-in speakers (stereo) J Bottom chassis frame (page 86) n 12 N Getting Started Locating Controls and Ports Take a moment to identify the controls and ports shown on the following pages.
Front A LCD screen (page 83) B Built-in microphone (monaural) C Built-in MOTION EYE camera indicator (page 16) D Built-in MOTION EYE camera (page 25) E WIRELESS indicator (page 16) F Hard disk drive/Optical disc drive indicator (page 16) G Power indicator (page 16) H Power button I Built-in speakers (stereo) J Bottom chassis frame (page 86) n 12 N Getting Started Locating Controls and Ports Take a moment to identify the controls and ports shown on the following pages.

User Guide
Page 13
Back n 13 N Getting Started A Air vent B Cable clamps (page 17), (page 18) C Prop-up stand (page 86) D DC IN port (page 18) E Network (Ethernet) port (page 48) F Hi-Speed USB (USB 2.0) ports* (page 60) G OPTICAL OUT port (page 58) (Output Sampling Rate: 44.1 KHz/48.0 KHz/96.0 KHz) H i.LINK 4-pin (S400) port (page 63) I Memory module compartment cover (page 76) * Support high-/full-/low- The area around the air vent (1) becomes hot while your computer is on. Be sure to wait until the computer cools down before you touch it. speeds. !
Back n 13 N Getting Started A Air vent B Cable clamps (page 17), (page 18) C Prop-up stand (page 86) D DC IN port (page 18) E Network (Ethernet) port (page 48) F Hi-Speed USB (USB 2.0) ports* (page 60) G OPTICAL OUT port (page 58) (Output Sampling Rate: 44.1 KHz/48.0 KHz/96.0 KHz) H i.LINK 4-pin (S400) port (page 63) I Memory module compartment cover (page 76) * Support high-/full-/low- The area around the air vent (1) becomes hot while your computer is on. Be sure to wait until the computer cools down before you touch it. speeds. !

User Guide
Page 15
G Line In jack Connect an external audio device for audio input. H WIRELESS switch (page 49) *1 Your computer supports both the standard-size Memory Stick and the Duo- speeds. size Memory Stick. *2 Support high-/full-/low- Left n 15 N Getting Started A Memory Stick slot*1 (page 38) B Media Access indicator (page 16) C SD memory card slot (page 44) D Hi-Speed USB (USB 2.0) ports*2 (page 60) E Headphones jack (page 58) F Microphone jack Connect an external microphone.
G Line In jack Connect an external audio device for audio input. H WIRELESS switch (page 49) *1 Your computer supports both the standard-size Memory Stick and the Duo- speeds. size Memory Stick. *2 Support high-/full-/low- Left n 15 N Getting Started A Memory Stick slot*1 (page 38) B Media Access indicator (page 16) C SD memory card slot (page 44) D Hi-Speed USB (USB 2.0) ports*2 (page 60) E Headphones jack (page 58) F Microphone jack Connect an external microphone.

User Guide
Page 16
...Hard disk drive/Optical disc drive WIRELESS Functions Illuminates in green when the computer is on, illuminates in orange while the computer is in Sleep mode, and turns off when the computer is turned on. Illuminates when the drive is lit. Do not ...place the computer into Sleep mode or turn it off when this indicator is lit.) When the indicator is... Illuminates when data is read from or written to a memory card. (Do not place the computer into Sleep mode or turn it off when this indicator is reading or writing data.
...Hard disk drive/Optical disc drive WIRELESS Functions Illuminates in green when the computer is on, illuminates in orange while the computer is in Sleep mode, and turns off when the computer is turned on. Illuminates when the drive is lit. Do not ...place the computer into Sleep mode or turn it off when this indicator is lit.) When the indicator is... Illuminates when data is read from or written to a memory card. (Do not place the computer into Sleep mode or turn it off when this indicator is reading or writing data.

User Guide
Page 17
To connect the keyboard and the mouse 1 Plug the keyboard cable (1) and the mouse cable (2) to your desired USB ports (3) on the back of the computer. 2 Route the mouse cable (2) through the cable clamp (4) on the back of your computer. n 17 N Getting Started Setting Up Your Computer Connecting the Keyboard and the Mouse A USB keyboard and a USB mouse are supplied with your computer.
To connect the keyboard and the mouse 1 Plug the keyboard cable (1) and the mouse cable (2) to your desired USB ports (3) on the back of the computer. 2 Route the mouse cable (2) through the cable clamp (4) on the back of your computer. n 17 N Getting Started Setting Up Your Computer Connecting the Keyboard and the Mouse A USB keyboard and a USB mouse are supplied with your computer.

User Guide
Page 18
n 18 N Getting Started Connecting a Power Source You need an AC adapter to connect your computer to an AC power source. ✍ Use only the supplied AC adapter for your computer. To connect the AC adapter 1 Plug one end of the power cord (1) into the AC adapter (3). 2 Plug the other end of the power cord into an AC outlet (2). 3 Plug the AC adapter cable (4) into the DC IN port (5). 4 Route the AC adapter cable through the cable clamp (6).
n 18 N Getting Started Connecting a Power Source You need an AC adapter to connect your computer to an AC power source. ✍ Use only the supplied AC adapter for your computer. To connect the AC adapter 1 Plug one end of the power cord (1) into the AC adapter (3). 2 Plug the other end of the power cord into an AC outlet (2). 3 Plug the AC adapter cable (4) into the DC IN port (5). 4 Route the AC adapter cable through the cable clamp (6).

User Guide
Page 19
If you may lose all unsaved data. n 19 N Getting Started ! Make sure that the AC outlets are easily accessible. ! The shape of the DC In plug varies depending on or in Sleep mode, you unplug the AC adapter from AC power, unplug the AC adapter when the computer is on the AC adapter. ✍ To disconnect your computer completely from your computer while the computer is off.
If you may lose all unsaved data. n 19 N Getting Started ! Make sure that the AC outlets are easily accessible. ! The shape of the DC In plug varies depending on or in Sleep mode, you unplug the AC adapter from AC power, unplug the AC adapter when the computer is on the AC adapter. ✍ To disconnect your computer completely from your computer while the computer is off.
User Guide
Page 20
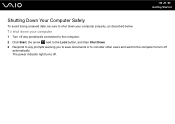
To shut down your computer 1 Turn off any peripherals connected to the computer. 2 Click Start, the arrow next to the Lock button, and then Shut Down. 3 Respond to any prompts warning you to save documents or to consider other users and wait for the computer to shut down your computer properly, as described below. The power indicator light turns off automatically. n 20 N Getting Started Shutting Down Your Computer Safely To avoid losing unsaved data, be sure to turn off .
To shut down your computer 1 Turn off any peripherals connected to the computer. 2 Click Start, the arrow next to the Lock button, and then Shut Down. 3 Respond to any prompts warning you to save documents or to consider other users and wait for the computer to shut down your computer properly, as described below. The power indicator light turns off automatically. n 20 N Getting Started Shutting Down Your Computer Safely To avoid losing unsaved data, be sure to turn off .
User Guide
Page 21
Using Your VAIO Computer This section describes how to get the most out of using your VAIO computer. ❑ Using the Keyboard (page 22) ❑ Using the Built-in MOTION EYE Camera (page 25) ❑ Using the Optical Disc Drive (page 28) ❑ Using the Memory Stick (page 38) ❑ Using the SD Memory Card (page 44) ❑ Using the Internet (page 47) ❑ Using the Network (LAN) (page 48) ❑ Using the Wireless LAN (WLAN) (page 49) ❑ Using the Bluetooth Function (page 52) n 21 N Using Your VAIO Computer
Using Your VAIO Computer This section describes how to get the most out of using your VAIO computer. ❑ Using the Keyboard (page 22) ❑ Using the Built-in MOTION EYE Camera (page 25) ❑ Using the Optical Disc Drive (page 28) ❑ Using the Memory Stick (page 38) ❑ Using the SD Memory Card (page 44) ❑ Using the Internet (page 47) ❑ Using the Network (LAN) (page 48) ❑ Using the Wireless LAN (WLAN) (page 49) ❑ Using the Bluetooth Function (page 52) n 21 N Using Your VAIO Computer
User Guide
Page 22
The keyboard uses a standard key arrangement with your computer. n 22 N Using Your VAIO Computer Using the Keyboard A USB keyboard is supplied with additional keys that perform specific functions.
The keyboard uses a standard key arrangement with your computer. n 22 N Using Your VAIO Computer Using the Keyboard A USB keyboard is supplied with additional keys that perform specific functions.