User Guide
Page 2
n2 N Contents Before Use ...5 Documentation ...6 Ergonomic Considerations ...10 Getting Started ...12 Locating Controls and Ports...13 About the Indicator Lights ...17 Setting Up Your Computer ...18 Shutting Down Your Computer Safely ...21 Using Your VAIO Computer ...22 Using the Keyboard ...23 Using the Built-in MOTION EYE Camera...26 Using the Optical Disc Drive ...29 Using the Memory Stick ...38 Using the SD Memory Card ...44 Using the Internet...47 Using Wireless LAN (WLAN) ...48 Using the Bluetooth Function ...51
n2 N Contents Before Use ...5 Documentation ...6 Ergonomic Considerations ...10 Getting Started ...12 Locating Controls and Ports...13 About the Indicator Lights ...17 Setting Up Your Computer ...18 Shutting Down Your Computer Safely ...21 Using Your VAIO Computer ...22 Using the Keyboard ...23 Using the Built-in MOTION EYE Camera...26 Using the Optical Disc Drive ...29 Using the Memory Stick ...38 Using the SD Memory Card ...44 Using the Internet...47 Using Wireless LAN (WLAN) ...48 Using the Bluetooth Function ...51
User Guide
Page 7
... individual software programs, hardware drivers, and drive partition(s) or your computer must be connected to the Sony online support web site at the following URLs: http://esupport.sony.com/EN/VAIO/ for customers in USA http://www.sony.ca/support/ for customers in Canada http://esupport.sony.com/ES/VAIO/ for customers in Spanish-speaking Latin American...
... individual software programs, hardware drivers, and drive partition(s) or your computer must be connected to the Sony online support web site at the following URLs: http://esupport.sony.com/EN/VAIO/ for customers in USA http://www.sony.ca/support/ for customers in Canada http://esupport.sony.com/ES/VAIO/ for customers in Spanish-speaking Latin American...
User Guide
Page 13
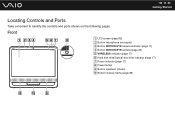
n 13 N Getting Started Locating Controls and Ports Take a moment to identify the controls and ports shown on the following pages. Front A LCD screen (page 82) B Built-in microphone (monaural) C Built-in MOTION EYE camera indicator (page 17) D Built-in MOTION EYE camera (page 26) E WIRELESS indicator (page 17) F Hard disk drive/Optical disc drive indicator (page 17) G Power indicator (page 17) H Power button I Built-in speakers (stereo) J Bottom chassis frame (page 85)
n 13 N Getting Started Locating Controls and Ports Take a moment to identify the controls and ports shown on the following pages. Front A LCD screen (page 82) B Built-in microphone (monaural) C Built-in MOTION EYE camera indicator (page 17) D Built-in MOTION EYE camera (page 26) E WIRELESS indicator (page 17) F Hard disk drive/Optical disc drive indicator (page 17) G Power indicator (page 17) H Power button I Built-in speakers (stereo) J Bottom chassis frame (page 85)

User Guide
Page 17
... mode or turn it off when this indicator is lit.) When the indicator is unlit, the memory card is not in use . Illuminates when the drive is turned on , illuminates in orange while the computer is in use . Illuminates while the built-in MOTION EYE camera is in Sleep mode, and... Started About the Indicator Lights Your computer is equipped with the following indicator lights: Indicator Power 1 Built-in MOTION EYE camera Media Access Hard disk drive/Optical disc drive WIRELESS Functions Illuminates in green when the computer is on .
... mode or turn it off when this indicator is lit.) When the indicator is unlit, the memory card is not in use . Illuminates when the drive is turned on , illuminates in orange while the computer is in use . Illuminates while the built-in MOTION EYE camera is in Sleep mode, and... Started About the Indicator Lights Your computer is equipped with the following indicator lights: Indicator Power 1 Built-in MOTION EYE camera Media Access Hard disk drive/Optical disc drive WIRELESS Functions Illuminates in green when the computer is on .
User Guide
Page 22
Using Your VAIO Computer This section describes how to get the most out of using your VAIO computer. ❑ Using the Keyboard (page 23) ❑ Using the Built-in MOTION EYE Camera (page 26) ❑ Using the Optical Disc Drive (page 29) ❑ Using the Memory Stick (page 38) ❑ Using the SD Memory Card (page 44) ❑ Using the Internet (page 47) ❑ Using Wireless LAN (WLAN) (page 48) ❑ Using the Bluetooth Function (page 51) n 22 N Using Your VAIO Computer
Using Your VAIO Computer This section describes how to get the most out of using your VAIO computer. ❑ Using the Keyboard (page 23) ❑ Using the Built-in MOTION EYE Camera (page 26) ❑ Using the Optical Disc Drive (page 29) ❑ Using the Memory Stick (page 38) ❑ Using the SD Memory Card (page 44) ❑ Using the Internet (page 47) ❑ Using Wireless LAN (WLAN) (page 48) ❑ Using the Bluetooth Function (page 51) n 22 N Using Your VAIO Computer

User Guide
Page 25
...): Turns on the computer screen. L Numeric keypad Use the numeric keypad to type numbers or to perform basic math calculations. H E key Ejects the optical disc drive tray when used in certain software applications. I Applications key Displays a shortcut menu in combination with the Fn key. n 25 N Using Your...
...): Turns on the computer screen. L Numeric keypad Use the numeric keypad to type numbers or to perform basic math calculations. H E key Ejects the optical disc drive tray when used in certain software applications. I Applications key Displays a shortcut menu in combination with the Fn key. n 25 N Using Your...

User Guide
Page 29
...insert a disc 1 Turn on the drive tray. n 29 N Using Your VAIO Computer Using the Optical Disc Drive Your computer is equipped with the label side facing toward the tray until the disc clicks into place. ! The tray slides out. 3 Hold the back of the tray with one hand, place a disc in the middle... of the drive tray when placing/removing ...
...insert a disc 1 Turn on the drive tray. n 29 N Using Your VAIO Computer Using the Optical Disc Drive Your computer is equipped with the label side facing toward the tray until the disc clicks into place. ! The tray slides out. 3 Hold the back of the tray with one hand, place a disc in the middle... of the drive tray when placing/removing ...
User Guide
Page 30
n 30 N Using Your VAIO Computer ! Doing so may cause the computer to malfunction. ✍ If you plan to use an external optical disc drive, connect the drive before you launch any preinstalled disc operation program. Do not remove the optical disc when your computer is in Sleep mode.
n 30 N Using Your VAIO Computer ! Doing so may cause the computer to malfunction. ✍ If you plan to use an external optical disc drive, connect the drive before you launch any preinstalled disc operation program. Do not remove the optical disc when your computer is in Sleep mode.

User Guide
Page 31
n 31 N Using Your VAIO Computer Reading and Writing Optical Discs Your computer plays and records CDs, DVDs, and Blu-ray Disc™ media, depending on your model. Check your optical disc drive supports. Use the table below to see which types of media your specifications for the type of optical disc drive installed on the model you purchased.
n 31 N Using Your VAIO Computer Reading and Writing Optical Discs Your computer plays and records CDs, DVDs, and Blu-ray Disc™ media, depending on your model. Check your optical disc drive supports. Use the table below to see which types of media your specifications for the type of optical disc drive installed on the model you purchased.

User Guide
Page 32
.... *4 Writing data to DVD-R discs compliant with DVD-R for Blu-ray Disc-Rewritable in Version 2.1 format. *11 The Blu-ray Disc drive on the models with DVD-RAM Version 1.0 is supported only on your computer does not support the DVD-RAM cartridge. ROM CD CD Extra... P P P PR*1 *2 PR PR*5 PR*6 PR*3 *4 PR*7 *11 *12 *1 Supports writing data to single-sided DVD-RAM discs (2.6 GB) compliant with the Blu-ray Disc drive. BDVideo ROM DVD-R/ DVD+R/ DVD+R DVD-R DVD- n 32 N Using Your VAIO Computer PR: playable and recordable P: playable but not recordable -: not playable or recordable CD-
.... *4 Writing data to DVD-R discs compliant with DVD-R for Blu-ray Disc-Rewritable in Version 2.1 format. *11 The Blu-ray Disc drive on the models with DVD-RAM Version 1.0 is supported only on your computer does not support the DVD-RAM cartridge. ROM CD CD Extra... P P P PR*1 *2 PR PR*5 PR*6 PR*3 *4 PR*7 *11 *12 *1 Supports writing data to single-sided DVD-RAM discs (2.6 GB) compliant with the Blu-ray Disc drive. BDVideo ROM DVD-R/ DVD+R/ DVD+R DVD-R DVD- n 32 N Using Your VAIO Computer PR: playable and recordable P: playable but not recordable -: not playable or recordable CD-
User Guide
Page 33
...cm disc writing is not supported. ! USING NON-COMPLIANT DISCS CAN CAUSE FATAL DAMAGE TO YOUR VAIO PC OR CREATE SOFTWARE CONFLICTS AND CAUSE SYSTEM HANGING. For inquiries about disc formats, contact the individual...need to standard definition or prohibit analog video output. As with a DVD recorded layer on one side and a digital audio layer on DVDs and BD-ROM Disc media. A DualDisc is...the optical disc drive does not match the region coding on the disc, playback is designed to the CD Standard. Sony does NOT guarantee the compatibility of VAIO optical disc drives with discs that ...
...cm disc writing is not supported. ! USING NON-COMPLIANT DISCS CAN CAUSE FATAL DAMAGE TO YOUR VAIO PC OR CREATE SOFTWARE CONFLICTS AND CAUSE SYSTEM HANGING. For inquiries about disc formats, contact the individual...need to standard definition or prohibit analog video output. As with a DVD recorded layer on one side and a digital audio layer on DVDs and BD-ROM Disc media. A DualDisc is...the optical disc drive does not match the region coding on the disc, playback is designed to the CD Standard. Sony does NOT guarantee the compatibility of VAIO optical disc drives with discs that ...
User Guide
Page 34
... most regions of player you can play the disc. This may not be able to play the disc on your computer while the optical disc drive is writing data to a disc. ❑ Do not use circular discs. If the region code for your residence area is different from the label, you... discs, you can play this disc in any other shape (star, heart, card, etc.), as this may damage the optical disc drive. ❑ Do not strike or shake your computer. n 34 N Using Your VAIO Computer Notes on writing data to a disc ❑ Only use memory-resident utility software while the optical disc...
... most regions of player you can play the disc. This may not be able to play the disc on your computer while the optical disc drive is writing data to a disc. ❑ Do not use circular discs. If the region code for your residence area is different from the label, you... discs, you can play this disc in any other shape (star, heart, card, etc.), as this may damage the optical disc drive. ❑ Do not strike or shake your computer. n 34 N Using Your VAIO Computer Notes on writing data to a disc ❑ Only use memory-resident utility software while the optical disc...
User Guide
Page 35
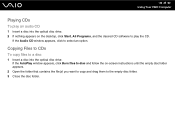
... follow the on the desktop, click Start, All Programs, and the desired CD software to play an audio CD 1 Insert a disc into the optical disc drive. If the Audio CD window appears, click to the empty disc folder. 3 Close the disc folder. Copying Files to CDs To copy files to a disc... 1 Insert a disc into the optical disc drive. 2 If nothing appears on -screen instructions until the empty disc folder appears. 2 Open the folder that contains the file(s) you want to copy and drag...
... follow the on the desktop, click Start, All Programs, and the desired CD software to play an audio CD 1 Insert a disc into the optical disc drive. If the Audio CD window appears, click to the empty disc folder. 3 Close the disc folder. Copying Files to CDs To copy files to a disc... 1 Insert a disc into the optical disc drive. 2 If nothing appears on -screen instructions until the empty disc folder appears. 2 Open the folder that contains the file(s) you want to copy and drag...
User Guide
Page 36
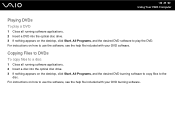
... with your DVD burning software. Copying Files to DVDs To copy files to a disc 1 Close all running software applications. 2 Insert a DVD into the optical disc drive. 3 If nothing appears on the desktop, click Start, All Programs, and the desired DVD software to play a DVD 1 Close all running software applications. 2 Insert a disc...
... with your DVD burning software. Copying Files to DVDs To copy files to a disc 1 Close all running software applications. 2 Insert a DVD into the optical disc drive. 3 If nothing appears on the desktop, click Start, All Programs, and the desired DVD software to play a DVD 1 Close all running software applications. 2 Insert a disc...
User Guide
Page 37
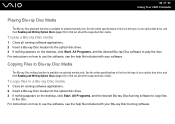
...the software, see the help file included with your optical disc drive, and then Reading and Writing Optical Discs (page 31) to ... the software, see the help file included with your optical disc drive, and then Reading and Writing Optical Discs (page 31) to ...running software applications. 2 Insert a Blu-ray Disc media into the optical disc drive. 3 If nothing appears on the desktop, click Start, All Programs, and...all running software applications. 2 Insert a Blu-ray Disc media into the optical disc drive. 3 If nothing appears on the desktop, click Start, All Programs, and the ...
...the software, see the help file included with your optical disc drive, and then Reading and Writing Optical Discs (page 31) to ... the software, see the help file included with your optical disc drive, and then Reading and Writing Optical Discs (page 31) to ...running software applications. 2 Insert a Blu-ray Disc media into the optical disc drive. 3 If nothing appears on the desktop, click Start, All Programs, and...all running software applications. 2 Insert a Blu-ray Disc media into the optical disc drive. 3 If nothing appears on the desktop, click Start, All Programs, and the ...

User Guide
Page 59
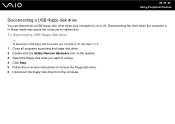
... now ready for use . 2 Plug the USB floppy disk drive cable (2) into the USB port. To connect a USB floppy disk drive 1 Choose the USB port (1) you prefer to the USB port. n 59 N Using Peripheral Devices Connecting a Universal Serial Bus (USB) Device To protect your computer and.../or USB devices from damage, avoid exposing the USB ports to your computer. This may cause a malfunction. Connecting a USB Floppy Disk Drive You can purchase a USB floppy disk drive and connect it to shock or impact when moving the computer with USB devices connected. When using a USB floppy disk...
... now ready for use . 2 Plug the USB floppy disk drive cable (2) into the USB port. To connect a USB floppy disk drive 1 Choose the USB port (1) you prefer to the USB port. n 59 N Using Peripheral Devices Connecting a Universal Serial Bus (USB) Device To protect your computer and.../or USB devices from damage, avoid exposing the USB ports to your computer. This may cause a malfunction. Connecting a USB Floppy Disk Drive You can purchase a USB floppy disk drive and connect it to shock or impact when moving the computer with USB devices connected. When using a USB floppy disk...
User Guide
Page 60
... Remove Hardware icon on the taskbar. 3 Select the floppy disk drive you want to unplug. 4 Click Stop. 5 Follow the on or off. To disconnect a USB floppy disk drive ✍ To disconnect a USB floppy disk drive when your computer is in Sleep mode may cause the computer to... remove the floppy disk drive. 6 Disconnect the floppy disk drive from the computer. Disconnecting the drive when the computer is on -screen instructions to ...
... Remove Hardware icon on the taskbar. 3 Select the floppy disk drive you want to unplug. 4 Click Stop. 5 Follow the on or off. To disconnect a USB floppy disk drive ✍ To disconnect a USB floppy disk drive when your computer is in Sleep mode may cause the computer to... remove the floppy disk drive. 6 Disconnect the floppy disk drive from the computer. Disconnecting the drive when the computer is on -screen instructions to ...
User Guide
Page 62
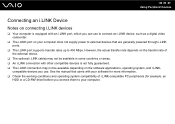
However, the actual transfer rate depends on the transfer rate of i.LINK-compatible PC peripherals (for example, an HDD or a CD-RW drive) before you connect them to your computer does not supply power to external devices that are generally powered through i.LINK ports. ❑ The i.LINK port ...
However, the actual transfer rate depends on the transfer rate of i.LINK-compatible PC peripherals (for example, an HDD or a CD-RW drive) before you connect them to your computer does not supply power to external devices that are generally powered through i.LINK ports. ❑ The i.LINK port ...
User Guide
Page 72
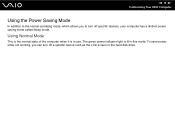
Using Normal Mode This is the normal state of the computer when it is lit in use. The green power indicator light is in this mode. n 72 N Customizing Your VAIO Computer Using the Power Saving Mode In addition to turn off specific devices, your computer has a distinct power saving mode called Sleep mode. To save power while not working, you to the normal operating mode, which allows you can turn off a specific device such as the LCD screen or the hard disk drive.
Using Normal Mode This is the normal state of the computer when it is lit in use. The green power indicator light is in this mode. n 72 N Customizing Your VAIO Computer Using the Power Saving Mode In addition to turn off specific devices, your computer has a distinct power saving mode called Sleep mode. To save power while not working, you to the normal operating mode, which allows you can turn off a specific device such as the LCD screen or the hard disk drive.
User Guide
Page 73
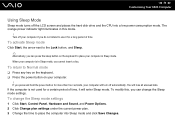
... power button for a long period of time. Turn off your computer will lose all unsaved data. n 73 N Customizing Your VAIO Computer Using Sleep Mode Sleep mode turns off the LCD screen and places the hard disk drive and the CPU into Sleep mode and click Save Changes. You will turn off automatically.
... power button for a long period of time. Turn off your computer will lose all unsaved data. n 73 N Customizing Your VAIO Computer Using Sleep Mode Sleep mode turns off the LCD screen and places the hard disk drive and the CPU into Sleep mode and click Save Changes. You will turn off automatically.


