Operating Instructions
Page 3
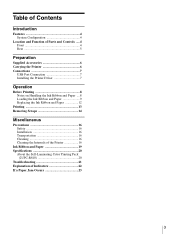
... the Printer 6 Connections 7 USB Port Connection 7 Installing the Printer Driver 7 Operation Before Printing 8 Notes on Handling the Ink Ribbon and Paper ....8 Loading the Ink Ribbon and Paper 9 Replacing the Ink Ribbon and Paper 12 Printing 13 Removing Scraps 14 Miscellaneous Precautions 16 Safety 16 Installation 16 Transportation 16 Cleaning 16 Cleaning the Internals...
... the Printer 6 Connections 7 USB Port Connection 7 Installing the Printer Driver 7 Operation Before Printing 8 Notes on Handling the Ink Ribbon and Paper ....8 Loading the Ink Ribbon and Paper 9 Replacing the Ink Ribbon and Paper 12 Printing 13 Removing Scraps 14 Miscellaneous Precautions 16 Safety 16 Installation 16 Transportation 16 Cleaning 16 Cleaning the Internals...
Operating Instructions
Page 4
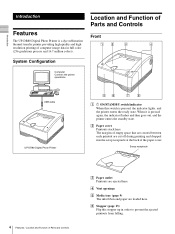
...providing high quality and high resolution printing of Parts and Controls C Paper outlet Printouts are loaded here. D Vent openings E Media tray (page 9) The ink ribbon and paper are ejected here. Location and Function of the paper cover. Scrap receptacle 4 Features / Location and Function of computer ... standby state. F Stopper (page 13) Flip this switch is pressed, the indicator lights, and the printer enters the ready state. B Paper cover Printouts stack here. USB cable UP-DR80 Digital Photo Printer A 1 ON/STANDBY switch/indicator When this stopper up in full color (...
...providing high quality and high resolution printing of Parts and Controls C Paper outlet Printouts are loaded here. D Vent openings E Media tray (page 9) The ink ribbon and paper are ejected here. Location and Function of the paper cover. Scrap receptacle 4 Features / Location and Function of computer ... standby state. F Stopper (page 13) Flip this switch is pressed, the indicator lights, and the printer enters the ready state. B Paper cover Printouts stack here. USB cable UP-DR80 Digital Photo Printer A 1 ON/STANDBY switch/indicator When this stopper up in full color (...
Operating Instructions
Page 5
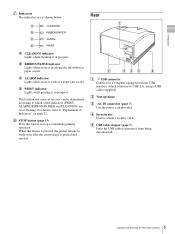
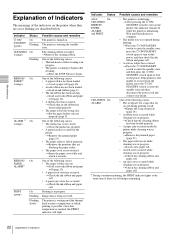
...Security slot Used to prevent it from being disconnected. 5 Location and Function of the indicators (PRINT, ALARM, RIBBON/PAPAER and CLEANING) are as a paper jam occurs. A USB connector Connects to a computer equipped with the USB interface (which conforms to which of Parts and Controls H STOP button (... or flashing. B Vent openings C ~AC IN connector (page 7) Use the power cord provided. B RIBBON/PAPER indicator Lights when an error involving the ink ribbon or paper occurs. For details, refer to ready state after the current page is pressed, the printer returns to "Explanation of...
...Security slot Used to prevent it from being disconnected. 5 Location and Function of the indicators (PRINT, ALARM, RIBBON/PAPAER and CLEANING) are as a paper jam occurs. A USB connector Connects to a computer equipped with the USB interface (which conforms to which of Parts and Controls H STOP button (... or flashing. B Vent openings C ~AC IN connector (page 7) Use the power cord provided. B RIBBON/PAPER indicator Lights when an error involving the ink ribbon or paper occurs. For details, refer to ready state after the current page is pressed, the printer returns to "Explanation of...
Operating Instructions
Page 6
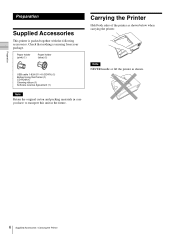
.... Preparation Preparation Supplied Accessories This printer is missing from your package. Check that nothing is packed together with the following accessories. Paper holder (pink) (1) Paper holder (blue) (1) USB cable 1-824-211-41 (SONY) (1) Before Using this Printer (1) CD-ROM (1) Cleaning ribbon (1) Software License Agreement (1) Note Retain the original carton and packing materials in...
.... Preparation Preparation Supplied Accessories This printer is missing from your package. Check that nothing is packed together with the following accessories. Paper holder (pink) (1) Paper holder (blue) (1) USB cable 1-824-211-41 (SONY) (1) Before Using this Printer (1) CD-ROM (1) Cleaning ribbon (1) Software License Agreement (1) Note Retain the original carton and packing materials in...
Operating Instructions
Page 8
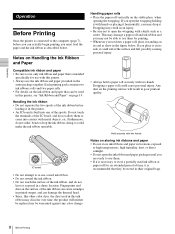
... ribbon can cause smudges in printed output, and can damage the thermal head. • Since, like other color dyes, the dyes used ink ribbon or paper roll for an extended period of time, it could roll of the spools. Dropping may result in an injury. • Be sure not to open... the ink ribbon and paper packages until you set down a paper roll, place it in the printer. • An IC board is built into contact with a knife such as described below . If you...
... ribbon can cause smudges in printed output, and can damage the thermal head. • Since, like other color dyes, the dyes used ink ribbon or paper roll for an extended period of time, it could roll of the spools. Dropping may result in an injury. • Be sure not to open... the ink ribbon and paper packages until you set down a paper roll, place it in the printer. • An IC board is built into contact with a knife such as described below . If you...
Operating Instructions
Page 9
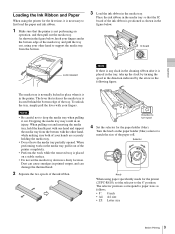
...ink ribbon is located behind the bottom edge of the ink ribbon. The selector positions correspond to paper sizes as shown in the printer. IC board Lock released Note If there is not performing an... out of the printer completely. • Perform the work while the removed tray is placed on the paper holder (blue) selector to the 8" position. Selector Knob When using your other hand to support the... the other hand, while making sure both of the media tray and pull the tray out, using paper specifically made for the printer (2UPC-R810), set the media tray down in a dusty location. The...
...ink ribbon is located behind the bottom edge of the ink ribbon. The selector positions correspond to paper sizes as shown in the printer. IC board Lock released Note If there is not performing an... out of the printer completely. • Perform the work while the removed tray is placed on the paper holder (blue) selector to the 8" position. Selector Knob When using your other hand to support the... the other hand, while making sure both of the media tray and pull the tray out, using paper specifically made for the printer (2UPC-R810), set the media tray down in a dusty location. The...
Operating Instructions
Page 10
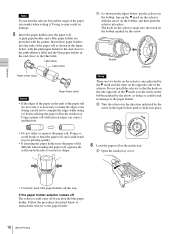
... until it clicks into place. • Do not strike or squeeze the paper roll. Label (blue) Label (pink) Paper holder (blue) Paper holder (pink) Notes • If the edges of the paper on the opposite side of the selector. Using a paper roll with uneven edges can cause a malfunction. 1 As shown in the ...make the edges even (being careful not to restore its shape. 6 Load the paper roll in the media tray. 1 Open the media tray cover. • Correctly insert the paper holders all the way. A pink paper holder and a blue paper holder are not even, it . The hook on the selector snaps into the...
... until it clicks into place. • Do not strike or squeeze the paper roll. Label (blue) Label (pink) Paper holder (blue) Paper holder (pink) Notes • If the edges of the paper on the opposite side of the selector. Using a paper roll with uneven edges can cause a malfunction. 1 As shown in the ...make the edges even (being careful not to restore its shape. 6 Load the paper roll in the media tray. 1 Open the media tray cover. • Correctly insert the paper holders all the way. A pink paper holder and a blue paper holder are not even, it . The hook on the selector snaps into the...
Operating Instructions
Page 11
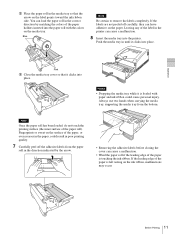
Blue Note Be certain to remove the labels completely. Always use two hands when carrying the media tray, supporting the media tray from the paper roll in the media tray so that it clicks into place. Fingerprints or sweat on the media tray. You can leave adhesive on ...so that the arrow on the label points toward the ink ribbon side. Operation 2 Place the paper roll in the direction indicated by matching the colors of the paper holders inserted into the paper roll with paper and ink ribbon could result in poor printing quality. 7 Carefully peel off carefully, they can ...
Blue Note Be certain to remove the labels completely. Always use two hands when carrying the media tray, supporting the media tray from the paper roll in the media tray so that it clicks into place. Fingerprints or sweat on the media tray. You can leave adhesive on ...so that the arrow on the label points toward the ink ribbon side. Operation 2 Place the paper roll in the direction indicated by matching the colors of the paper holders inserted into the paper roll with paper and ink ribbon could result in poor printing quality. 7 Carefully peel off carefully, they can ...
Operating Instructions
Page 12
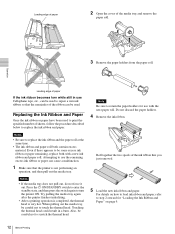
...spools of the ribbon can cause a malfunction. 1 Make sure that you just removed. 5 Load the new ink ribbon and paper. Replacing the Ink Ribbon and Paper Once the ink ribbon or paper have been used to repair a torn ink ribbon so that the remainder of the ink ribbon that the printer is... state, and then press the switch again to step 2 onward for use with a new ink ribbon and paper roll. Also, be careful not to scratch the thermal head. Operation 3 Remove the paper holders from the paper roll. Touching the thermal head could result in use the remaining excess ink ribbon or...
...spools of the ribbon can cause a malfunction. 1 Make sure that you just removed. 5 Load the new ink ribbon and paper. Replacing the Ink Ribbon and Paper Once the ink ribbon or paper have been used to repair a torn ink ribbon so that the remainder of the ink ribbon that the printer is... state, and then press the switch again to step 2 onward for use with a new ink ribbon and paper roll. Also, be careful not to scratch the thermal head. Operation 3 Remove the paper holders from the paper roll. Touching the thermal head could result in use the remaining excess ink ribbon or...
Operating Instructions
Page 13
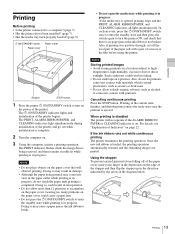
...such as alcohol, to accumulate on . Notes Storing printed images • Avoid storing printouts in progress. When printing is on the paper cover. Once the new ink ribbon is in a location subject to turn the printer ON, and check that will not operate if... • Has the printer driver been installed? (page 7) • Has the media tray been properly loaded? (page 9) 1 ON/STANDBY switch Paper cover Paper outlet Stopper STOP button 1 Press the printer 1 ON/STANDBY switch to high temperatures, high humidity, excessive dust or direct sunlight. Leaving too many printouts...
...such as alcohol, to accumulate on . Notes Storing printed images • Avoid storing printouts in progress. When printing is on the paper cover. Once the new ink ribbon is in a location subject to turn the printer ON, and check that will not operate if... • Has the printer driver been installed? (page 7) • Has the media tray been properly loaded? (page 9) 1 ON/STANDBY switch Paper cover Paper outlet Stopper STOP button 1 Press the printer 1 ON/STANDBY switch to high temperatures, high humidity, excessive dust or direct sunlight. Leaving too many printouts...
Operating Instructions
Page 14
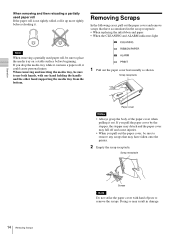
...remove any scraps that have fallen onto the printer. 2 Empty the scrap receptacle. Scrap receptacle 14 Removing Scraps Scraps Note Do not strike the paper cover with one hand holding the handle and the other hand supporting the media tray from the bottom. 1 Pull out the... paper cover horizontally as shown. Removing Scraps In the following cases, pull out the paper cover and remove scraps that may have accumulated in damage. Operation When removing and then reloading a partially ...
...remove any scraps that have fallen onto the printer. 2 Empty the scrap receptacle. Scrap receptacle 14 Removing Scraps Scraps Note Do not strike the paper cover with one hand holding the handle and the other hand supporting the media tray from the bottom. 1 Pull out the... paper cover horizontally as shown. Removing Scraps In the following cases, pull out the paper cover and remove scraps that may have accumulated in damage. Operation When removing and then reloading a partially ...

Operating Instructions
Page 15
Note Be sure to attach it securely. 15 Removing Scraps Operation 3 Insert the empty paper cover horizontally to insert the paper cover fully and attach it .
Note Be sure to attach it securely. 15 Removing Scraps Operation 3 Insert the empty paper cover horizontally to insert the paper cover fully and attach it .
Operating Instructions
Page 16
..." (page 20). • Be careful not to damage the power cable by placing or dropping heavy objects on the ink ribbon or paper inside the paper cover may form on it . Doing so prevents condensation from forming when the printing pack is recommended that tends to use the unit with...or your Sony dealer. If used . 1 Make sure that you perform regular thermal head cleaning once a month or once after every 10 printing packs used with a damaged power cable. • If you clean the printer, be stored in their original bags. On condensation • If the printer is paper inside ...
..." (page 20). • Be careful not to damage the power cable by placing or dropping heavy objects on the ink ribbon or paper inside the paper cover may form on it . Doing so prevents condensation from forming when the printing pack is recommended that tends to use the unit with...or your Sony dealer. If used . 1 Make sure that you perform regular thermal head cleaning once a month or once after every 10 printing packs used with a damaged power cable. • If you clean the printer, be stored in their original bags. On condensation • If the printer is paper inside ...
Operating Instructions
Page 17
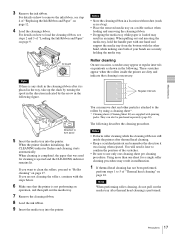
.... Regular intervals Direction to "Roller cleaning" on a stable surface when loading and removing the cleaning ribbon. • Dropping the media tray while paper is ejected and the CLEANING indicator remains lit. If you want to clean the rollers, proceed to turn spool 5 Insert the media tray into ... one hand and support the media tray from the bottom with printing packs. For details on how to 5 of "Replacing the Ink Ribbon and Paper" on page 9. These scratches appear when the rollers inside the printer after thermal head cleaning. • Keep a scratched printout and remember the...
.... Regular intervals Direction to "Roller cleaning" on a stable surface when loading and removing the cleaning ribbon. • Dropping the media tray while paper is ejected and the CLEANING indicator remains lit. If you want to clean the rollers, proceed to turn spool 5 Insert the media tray into ... one hand and support the media tray from the bottom with printing packs. For details on how to 5 of "Replacing the Ink Ribbon and Paper" on page 9. These scratches appear when the rollers inside the printer after thermal head cleaning. • Keep a scratched printout and remember the...
Operating Instructions
Page 18
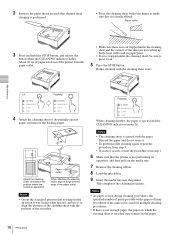
... and then pull out the media tray. 7 Remove the cleaning ribbon. 8 Load the ink ribbon. 9 Insert the media tray into the printer. Discard the paper and do not reuse it. • To perform roller cleaning again, repeat the procedure from step 3. • If an error occurs, restart the procedure from... the paper outlet. • Make sure there is no air trapped under the cleaning sheet, be reduced if the same roll is used during cleaning procedures, the...
... and then pull out the media tray. 7 Remove the cleaning ribbon. 8 Load the ink ribbon. 9 Insert the media tray into the printer. Discard the paper and do not reuse it. • To perform roller cleaning again, repeat the procedure from step 3. • If an error occurs, restart the procedure from... the paper outlet. • Make sure there is no air trapped under the cleaning sheet, be reduced if the same roll is used during cleaning procedures, the...
Operating Instructions
Page 19
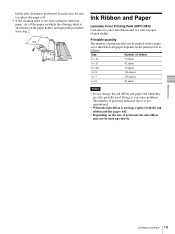
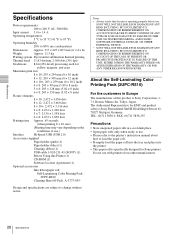
... Doing so can be sure to replace the paper roll. • If the cleaning sheet is not ejected despite sufficient paper, cut off the paper on the printout size as follows. holder after cleaning is used up entirely. Ink Ribbon and Paper Laminate Color Printing Pack 2UPC-R810 Contains two ... 5 × 7 100 sheets 6 × 8 84 sheets Notes • Do not change the ink ribbon and paper roll when they are only partially used up , replace both the ink ribbon and the paper roll. • Depending on the size of printouts, the ink ribbon may not be used . Printable quantity The...
... Doing so can be sure to replace the paper roll. • If the cleaning sheet is not ejected despite sufficient paper, cut off the paper on the printout size as follows. holder after cleaning is used up entirely. Ink Ribbon and Paper Laminate Color Printing Pack 2UPC-R810 Contains two ... 5 × 7 100 sheets 6 × 8 84 sheets Notes • Do not change the ink ribbon and paper roll when they are only partially used up , replace both the ink ribbon and the paper roll. • Depending on the size of printouts, the ink ribbon may not be used . Printable quantity The...
Operating Instructions
Page 20
... ANY OTHER REASON WHATSOEVER. Design and specifications are subject to load the paper roll. • Promptly load the paper roll into the tray and place into the printer. • This paper roll is Sony Deutschland GmbH, Hedelfinger Strasse 61, 70327 Stuttgart, Germany. Do not use... .) Interface Hi-Speed USB (USB 2.0) Accessories supplied Paper holder (pink) (1) Paper holder (blue) (1) Cleaning ribbon (1) USB cable 1-824-211-41 (SONY) (1) Before Using this product is operating properly before use . • Please refer to the printer...
... ANY OTHER REASON WHATSOEVER. Design and specifications are subject to load the paper roll. • Promptly load the paper roll into the tray and place into the printer. • This paper roll is Sony Deutschland GmbH, Hedelfinger Strasse 61, 70327 Stuttgart, Germany. Do not use... .) Interface Hi-Speed USB (USB 2.0) Accessories supplied Paper holder (pink) (1) Paper holder (blue) (1) Cleaning ribbon (1) USB cable 1-824-211-41 (SONY) (1) Before Using this product is operating properly before use . • Please refer to the printer...
Operating Instructions
Page 21
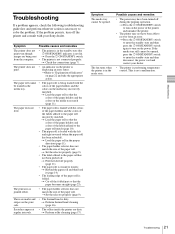
... power. t Check the connections (page 7). The paper does not feed. • The paper roll is loaded with the colors of the paper roll. t Set the selector properly (page 9). • The label affixed to enter the standby state and then disconnect the power cord and contact your Sony dealer. Scratches appear at • The rollers...
... power. t Check the connections (page 7). The paper does not feed. • The paper roll is loaded with the colors of the paper roll. t Set the selector properly (page 9). • The label affixed to enter the standby state and then disconnect the power cord and contact your Sony dealer. Scratches appear at • The rollers...
Operating Instructions
Page 22
... occurred while cleaning was in progress. The printer is loaded. tSet the paper holder selector properly (page 9). tInsert the paper cover fully and attach it securely. tCheck the ink ribbon and paper roll. tLoad a new paper roll. • A feed error occurred while cleaning was in progress. ...Thermal head or roller cleaning is full. tRemove the printouts that are described below. One of printouts. tCheck the ink ribbon and paper roll. • A paper eject error has occurred. Image data is possible. tAfter pressing the 1 ON/ STANDBY switch to begin . tPress the 1 ON...
... occurred while cleaning was in progress. The printer is loaded. tSet the paper holder selector properly (page 9). tInsert the paper cover fully and attach it securely. tCheck the ink ribbon and paper roll. tLoad a new paper roll. • A feed error occurred while cleaning was in progress. ...Thermal head or roller cleaning is full. tRemove the printouts that are described below. One of printouts. tCheck the ink ribbon and paper roll. • A paper eject error has occurred. Image data is possible. tAfter pressing the 1 ON/ STANDBY switch to begin . tPress the 1 ON...
Operating Instructions
Page 23
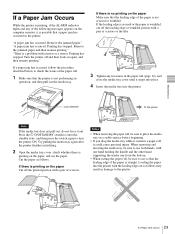
... the procedure described below to use both hands, with a motor or a sensor. If there is no printing on the paper Make sure that a paper jam has occurred in the printer: "A paper jam has occurred. Press the 1 ON/STANDBY switch to enter the standby state, and then press the switch again to ...place the media tray on a stable surface before beginning. • If you drop the media tray while it contains a paper roll, it out. Try pulling the media tray again after the printer finishes initializing. 2 Open the media tray cover, check whether there is printing on...
... the procedure described below to use both hands, with a motor or a sensor. If there is no printing on the paper Make sure that a paper jam has occurred in the printer: "A paper jam has occurred. Press the 1 ON/STANDBY switch to enter the standby state, and then press the switch again to ...place the media tray on a stable surface before beginning. • If you drop the media tray while it contains a paper roll, it out. Try pulling the media tray again after the printer finishes initializing. 2 Open the media tray cover, check whether there is printing on...
