
Operating Instructions
Page 2
... a user settings 69 Returning user settings to factory defaults 70 Displaying the ink ribbon or printer setting information 71 Disabling message display 71 Selecting controls using the device connected to the REMOTE connector 71 Setting the communication speed with a printer 73 Setting the operation and alarm sounds ....73 Adjusting the printer window display .........73 Setting the tray light 73 Printing the setting value list 73 Setting the cleaning message display function 74 Miscellaneous Maintaining Printer Functionality 75 When not used for a long time 75 Printer location 75...
... a user settings 69 Returning user settings to factory defaults 70 Displaying the ink ribbon or printer setting information 71 Disabling message display 71 Selecting controls using the device connected to the REMOTE connector 71 Setting the communication speed with a printer 73 Setting the operation and alarm sounds ....73 Adjusting the printer window display .........73 Setting the tray light 73 Printing the setting value list 73 Setting the cleaning message display function 74 Miscellaneous Maintaining Printer Functionality 75 When not used for a long time 75 Printer location 75...
Operating Instructions
Page 11
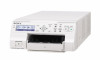
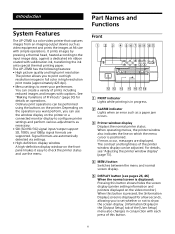
... [Output Setup] tab of the printer window display can be adjusted. Part Names and Functions Front PRINT indicator Lights while printing is a color video printer that captures images from an imaging output device such as video equipment and prints the images at A6 size with sublimation ink, transferring the ink onto special thermal printing paper. See "Making Variations of Printouts" (page 30) for a few seconds, allowing you to set whether or not to check the printer status and use...
... [Output Setup] tab of the printer window display can be adjusted. Part Names and Functions Front PRINT indicator Lights while printing is a color video printer that captures images from an imaging output device such as video equipment and prints the images at A6 size with sublimation ink, transferring the ink onto special thermal printing paper. See "Making Variations of Printouts" (page 30) for a few seconds, allowing you to set whether or not to check the printer status and use...
Operating Instructions
Page 12
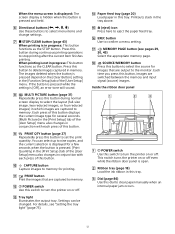
...; POWER switch Use this switch to turn the printer on or off . Tray light Illuminates the output tray. This switch turns the printer on or off even while the ribbon door panel is open. Ribbon tray (page 18) Load the ink ribbon in this tray. Dial (page 86) Use this dial to turn the printer on the [Clear Button] setting in memory. You can be changed. Press this button during normal screen display to select the layout (full-size image...
...; POWER switch Use this switch to turn the printer on or off . Tray light Illuminates the output tray. This switch turns the printer on or off even while the ribbon door panel is open. Ribbon tray (page 18) Load the ink ribbon in this tray. Dial (page 86) Use this dial to turn the printer on the [Clear Button] setting in memory. You can be changed. Press this button during normal screen display to select the layout (full-size image...
Operating Instructions
Page 13
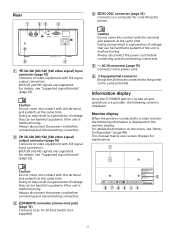
... "Supported signal formats" (page 23). Caution Do not come into contact with SDI signal input connectors. Always disconnect the power cord before connecting and disconnecting connectors. 3G-SDI (HD/SD) (SDI video signal) output connector (page 16) Connects to video equipment with this terminal and patients at the same time. Printer Error : 56 Check Paper: Load Printer Information Please Wait Printing Memory Printer Information Press any button...
... "Supported signal formats" (page 23). Caution Do not come into contact with SDI signal input connectors. Always disconnect the power cord before connecting and disconnecting connectors. 3G-SDI (HD/SD) (SDI video signal) output connector (page 16) Connects to video equipment with this terminal and patients at the same time. Printer Error : 56 Check Paper: Load Printer Information Please Wait Printing Memory Printer Information Press any button...
Operating Instructions
Page 14
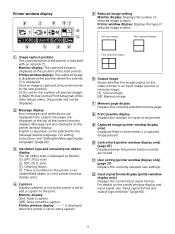
... Source image [M]: Memory image Memory page display Displays the currently selected memory page. Print quantity display Displays the number of the [User Setup] menu, the pointer will not be printed. Captured image (printer window display only) Displayed filled in when there is in [Multi Picture] on the printer window display and input signal, see "Setting the Message Display Language" (page 24). Ink ribbon type and remaining ink ribbon display The ink ribbon type is displayed as follows: [S]: UPC-21S (S size) [L]: UPC-21L (L size) [C]: Cleaning ribbon...
... Source image [M]: Memory image Memory page display Displays the currently selected memory page. Print quantity display Displays the number of the [User Setup] menu, the pointer will not be printed. Captured image (printer window display only) Displayed filled in when there is in [Multi Picture] on the printer window display and input signal, see "Setting the Message Display Language" (page 24). Ink ribbon type and remaining ink ribbon display The ink ribbon type is displayed as follows: [S]: UPC-21S (S size) [L]: UPC-21L (L size) [C]: Cleaning ribbon...

Operating Instructions
Page 26
... paper tray. To change between each time you can also erase the ink ribbon type and remaining print information. Settings can be ejected and may jam in the printer. • Do not leave more than ten sheets of [User Setup] menu, configure [Print Speed]. See "Adjusting the color balance" (page 61). If you adjust the color balance each printing pack pair. To stop printing and "Remove Printed Paper" appears. Makes a printout at normal speed. See "Displaying the ink ribbon or printer setting...
... paper tray. To change between each time you can also erase the ink ribbon type and remaining print information. Settings can be ejected and may jam in the printer. • Do not leave more than ten sheets of [User Setup] menu, configure [Print Speed]. See "Adjusting the color balance" (page 61). If you adjust the color balance each printing pack pair. To stop printing and "Remove Printed Paper" appears. Makes a printout at normal speed. See "Displaying the ink ribbon or printer setting...

Operating Instructions
Page 29
... MEMORY PAGE button to printout conditions, and "Remove Printed Paper" appears. The image captured is printed as soon as all previous printing jobs have been completed. However, the printout quantity is reset to the original quantity requested before printing was stopped. If the paper runs out during printing The printer stops the printing operation. If you can queue printing jobs by capturing another image into another memory page, repeat steps 1, 2 and 3. 29 Note When making multiple copies...
... MEMORY PAGE button to printout conditions, and "Remove Printed Paper" appears. The image captured is printed as soon as all previous printing jobs have been completed. However, the printout quantity is reset to the original quantity requested before printing was stopped. If the paper runs out during printing The printer stops the printing operation. If you can queue printing jobs by capturing another image into another memory page, repeat steps 1, 2 and 3. 29 Note When making multiple copies...
Operating Instructions
Page 32
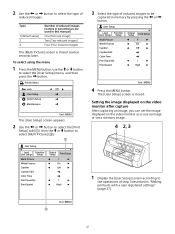
... : MENU The [User Setup] screen appears. 2 Use the or button to select the [Print Setup] tab (), then the or button to select [Multi Picture] (). ͦ User Setup Load Function User Setup Setup Multi Picture White Frames Caption Caption Edit Color Tone Print Quantity Print Speed Output Setup Print Setup 1 On 2ı 1 High 3 Select the type of reduced images to the operations of step 1 described in "Making printouts with a user registered settings" (page...
... : MENU The [User Setup] screen appears. 2 Use the or button to select the [Print Setup] tab (), then the or button to select [Multi Picture] (). ͦ User Setup Load Function User Setup Setup Multi Picture White Frames Caption Caption Edit Color Tone Print Quantity Print Speed Output Setup Print Setup 1 On 2ı 1 High 3 Select the type of reduced images to the operations of step 1 described in "Making printouts with a user registered settings" (page...

Operating Instructions
Page 44
...User Setup Load Function User Setup Setup Clear Button Clear Function Auto Live Output Setup Print Setup All Images Normal 2ı User Setup Load Function User Setup Setup Clear Button Clear Function Auto Live Output Setup Print Setup All Images Normal 2ı End : MENU Option All Images (default value) Selected Page Selected Part Description Deletes images in memory. After you can fill in the printer are filled in memory. In the [Function Setup] tab of the [User Setup] screen, select [Clear Function], then use the or button to set the STOP/CLEAR...
...User Setup Load Function User Setup Setup Clear Button Clear Function Auto Live Output Setup Print Setup All Images Normal 2ı User Setup Load Function User Setup Setup Clear Button Clear Function Auto Live Output Setup Print Setup All Images Normal 2ı End : MENU Option All Images (default value) Selected Page Selected Part Description Deletes images in memory. After you can fill in the printer are filled in memory. In the [Function Setup] tab of the [User Setup] screen, select [Clear Function], then use the or button to set the STOP/CLEAR...

Operating Instructions
Page 51
... in the [User Setup] menu. [User Setup] menu Tab Function Setup Output Setup Functions that can be set How to delete images stored to memory (Clear Button) Fill in memory page gaps when deleting images (Clear Function) Selecting the image which appears after the printer is turned off, and will continue functioning at these settings until new adjustments are added to multiple reduced images (White Frames) Entering a caption (Caption, 36 Caption Edit) Adjusting the printout color, 58 contrast...
... in the [User Setup] menu. [User Setup] menu Tab Function Setup Output Setup Functions that can be set How to delete images stored to memory (Clear Button) Fill in memory page gaps when deleting images (Clear Function) Selecting the image which appears after the printer is turned off, and will continue functioning at these settings until new adjustments are added to multiple reduced images (White Frames) Entering a caption (Caption, 36 Caption Edit) Adjusting the printout color, 58 contrast...

Operating Instructions
Page 64
... the button. Specifying colors for adjustment Use the HSV function to select a specific color within printouts for adjusting HSV. In addition, the results of the [System Setup] menu, set to two or four reduced image display, the page on which the pointer was positioned will be displayed at these settings until you capture the adjustments to memory, they are retained even after the printer is changed as follows...
... the button. Specifying colors for adjustment Use the HSV function to select a specific color within printouts for adjusting HSV. In addition, the results of the [System Setup] menu, set to two or four reduced image display, the page on which the pointer was positioned will be displayed at these settings until you capture the adjustments to memory, they are retained even after the printer is changed as follows...

Operating Instructions
Page 69
... user setting Perform all settings to the user setting number in the [User Setup] menu. 1 Display the [Save User Setup] tab of the [System Setup] screen and use to select the source image source or print at your favorite settings. Settings are registered in everyday printer use the or button to select [HD Aspect Ratio]. System Setup Remote Color Setup Correction HD Aspect Ratio Video Adjustment Input Signal Input Monitor Setup Color Tone 16:9 Auto End : MENU 2 Use...
... user setting Perform all settings to the user setting number in the [User Setup] menu. 1 Display the [Save User Setup] tab of the [System Setup] screen and use to select the source image source or print at your favorite settings. Settings are registered in everyday printer use the or button to select [HD Aspect Ratio]. System Setup Remote Color Setup Correction HD Aspect Ratio Video Adjustment Input Signal Input Monitor Setup Color Tone 16:9 Auto End : MENU 2 Use...

Operating Instructions
Page 71
... factory defaults. 2 Select [All Reset], then press the EXEC button. In addition, the printer can also control the printer remotely by a pulse signal input sent to display messages. Hides messages. Maintenance Backup All Reset Initialize Cleaning [EXEC] Ink ribbon type and remaining prints End : MENU "All Reset" appears and all printer setting information. 1 AS 4 2ı 50 Remaining prints Ink ribbon type S: UPC-21S L: UPC-21L C: Cleaning ribbon Disabling message display You can keep information such as a guideline. 1 Display the [Output Setup...
... factory defaults. 2 Select [All Reset], then press the EXEC button. In addition, the printer can also control the printer remotely by a pulse signal input sent to display messages. Hides messages. Maintenance Backup All Reset Initialize Cleaning [EXEC] Ink ribbon type and remaining prints End : MENU "All Reset" appears and all printer setting information. 1 AS 4 2ı 50 Remaining prints Ink ribbon type S: UPC-21S L: UPC-21L C: Cleaning ribbon Disabling message display You can keep information such as a guideline. 1 Display the [Output Setup...

Operating Instructions
Page 72
... Setup Color Tone C&Print 4800 End : MENU Operation type Operation Capture Push the foot switch to capture images to the next memory page. Has the same function as the PRINT button on the video monitor. 72 Each time you push the foot switch again, the next image will only function properly when captured images exist on the video monitor to switch to source image display. If you push the foot switch...
... Setup Color Tone C&Print 4800 End : MENU Operation type Operation Capture Push the foot switch to capture images to the next memory page. Has the same function as the PRINT button on the video monitor. 72 Each time you push the foot switch again, the next image will only function properly when captured images exist on the video monitor to switch to source image display. If you push the foot switch...

Operating Instructions
Page 75
... head cleaning. When not used for a long time • Press the POWER switch to turn off the printer. Transportation When transporting the printer, follow the steps below to prevent condensation. Notes • If "Remove Ribbon" appears on the printer window display. Simultaneously press , and the MENU button. In this case, perform manual paper feed roller cleaning. The message appears for "Set Ribbon and Paper" to appear on the printer window display, remove the ink...
... head cleaning. When not used for a long time • Press the POWER switch to turn off the printer. Transportation When transporting the printer, follow the steps below to prevent condensation. Notes • If "Remove Ribbon" appears on the printer window display. Simultaneously press , and the MENU button. In this case, perform manual paper feed roller cleaning. The message appears for "Set Ribbon and Paper" to appear on the printer window display, remove the ink...

Operating Instructions
Page 77
... printer window display, execute manual paper feed roller cleaning. 1 Eject the paper feed tray (page 20). If the paper feed tray is the same as a cleaning sheet, do not discard it in Progress. Note Once a protective sheet has been used as loading an ink ribbon. Note Do not turn off the printer while "Cleaning in a safe place and do not use it before loading the cleaning cartridge. The procedure is not inserted, the printer may be used for future cleanings, so keep...
... printer window display, execute manual paper feed roller cleaning. 1 Eject the paper feed tray (page 20). If the paper feed tray is the same as a cleaning sheet, do not discard it in Progress. Note Once a protective sheet has been used as loading an ink ribbon. Note Do not turn off the printer while "Cleaning in a safe place and do not use it before loading the cleaning cartridge. The procedure is not inserted, the printer may be used for future cleanings, so keep...
Operating Instructions
Page 82
... an image captured in the paper feed tray. Check the paper orientation. output signal is locked. Turn on the [Machine Setup] tab of the [User Setup] menu, change the [Source Image] setting to normal playback mode. See "Matching the video monitor and printout color" (page 56). • If the menu is displayed by pressing the DISPLAY button. See "Error/ Warning Messages" (page 84). • Paper that is not compatible with this printer has been loaded. Use only paper for...
... an image captured in the paper feed tray. Check the paper orientation. output signal is locked. Turn on the [Machine Setup] tab of the [User Setup] menu, change the [Source Image] setting to normal playback mode. See "Matching the video monitor and printout color" (page 56). • If the menu is displayed by pressing the DISPLAY button. See "Error/ Warning Messages" (page 84). • Paper that is not compatible with this printer has been loaded. Use only paper for...
Operating Instructions
Page 84
... your Sony dealer. Trouble: Head Pos Mech. To clear the message, try removing the paper feed tray and reinserting it with paper from the same printing pack. (page 18) Do not reuse the ejected paper. Once removed, printing will resume automatically. The thermal head is malfunctioning. Turn the printer off , and then on the video monitor or printer window display. If the error message persists, consult your Sony service facility or your Sony dealer. Error messages If a problem...
... your Sony dealer. Trouble: Head Pos Mech. To clear the message, try removing the paper feed tray and reinserting it with paper from the same printing pack. (page 18) Do not reuse the ejected paper. Once removed, printing will resume automatically. The thermal head is malfunctioning. Turn the printer off , and then on the video monitor or printer window display. If the error message persists, consult your Sony service facility or your Sony dealer. Error messages If a problem...

Operating Instructions
Page 85
...memory page, the captured image is set to [Cap-Stop], and when using remote control from Paper Remove the paper feed tray and paper, then re-install the empty paper feed tray. Clean Thermal Head Press [EXEC] This is displayed after the cleaning cartridge is being printed or queued. Retry the operation once the printer finishes printing. Set Paper Tray Load the empty paper feed tray. Remove Ribbon You attempted to start cleaning. 85 Clean Paper Feed Roller Perform manual paper feed roller cleaning. Follow "Manual paper feed roller cleaning" (page...
...memory page, the captured image is set to [Cap-Stop], and when using remote control from Paper Remove the paper feed tray and paper, then re-install the empty paper feed tray. Clean Thermal Head Press [EXEC] This is displayed after the cleaning cartridge is being printed or queued. Retry the operation once the printer finishes printing. Set Paper Tray Load the empty paper feed tray. Remove Ribbon You attempted to start cleaning. 85 Clean Paper Feed Roller Perform manual paper feed roller cleaning. Follow "Manual paper feed roller cleaning" (page...

Operating Instructions
Page 86
... use paper from the printer. 3 Remove any unit circuitry and the patient at the same time. If the unit malfunctions, it may have occurred inside the printer and cannot be cleared, open the base plate on the printer and clear the paper jam. If the message does not disappear after printing starts, or if "Remove Paper" or "Check Paper" appears on the printer window display, a paper jam may generate voltage that jammed part way through printing. 3 Load the paper properly...
... use paper from the printer. 3 Remove any unit circuitry and the patient at the same time. If the unit malfunctions, it may have occurred inside the printer and cannot be cleared, open the base plate on the printer and clear the paper jam. If the message does not disappear after printing starts, or if "Remove Paper" or "Check Paper" appears on the printer window display, a paper jam may generate voltage that jammed part way through printing. 3 Load the paper properly...


