Operating Instructions
Page 7
... For Windows users 157 Viewing images recorded on your computer - For Windows users (except DCR-TRV16 169 Connecting your camcorder to your computer using the USB cable - Digital program editing (on "Memory Stick"s 132 Copying still images from an analog video unit on... a tape with your computer - SLIDE SHOW 147 Preventing accidental erasure - Introduction 154 Connecting your camcorder to a tape .......... 143 Enlarging still ...
... For Windows users 157 Viewing images recorded on your computer - For Windows users (except DCR-TRV16 169 Connecting your camcorder to your computer using the USB cable - Digital program editing (on "Memory Stick"s 132 Copying still images from an analog video unit on... a tape with your computer - SLIDE SHOW 147 Preventing accidental erasure - Introduction 154 Connecting your camcorder to a tape .......... 143 Enlarging still ...
Operating Instructions
Page 10
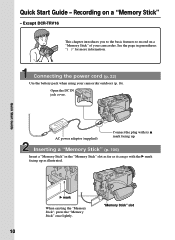
..." (p. 106) Insert a "Memory Stick" in parentheses "( )" for more information. Recording on a "Memory Stick" of your camcorder outdoors (p. 16). Open the DC IN jack cover. Except DCR-TRV16 This chapter introduces you to the basic features to record on a "Memory Stick" - Connecting the power cord (p. 22) Use... the battery pack when using your camcorder. Quick Start Guide AC power adaptor (supplied) Connect the...
..." (p. 106) Insert a "Memory Stick" in parentheses "( )" for more information. Recording on a "Memory Stick" of your camcorder outdoors (p. 16). Open the DC IN jack cover. Except DCR-TRV16 This chapter introduces you to the basic features to record on a "Memory Stick" - Connecting the power cord (p. 22) Use... the battery pack when using your camcorder. Quick Start Guide AC power adaptor (supplied) Connect the...
Operating Instructions
Page 12
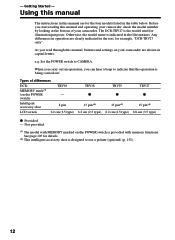
...are shown in the illustrations. The DCR-TRV27 is designed to CAMERA. As you read through this manual and operating your camcorder, check the model number by looking at the bottom of differences DCR- Types of your camcorder are for the four models listed ... POWER - When you carry out an operation, you start reading this manual, buttons and settings on your camcorder. Not provided *1) The model with memory functions. switch) Intelligent accessory shoe 8 pin LCD screen 6.2 cm (2.5 type) TRV18 z 15 pin*2) 6.2 cm (2.5 type) TRV25 z 15 pin*2) 6.2 cm (2.5 type) TRV27 z 15 pin...
...are shown in the illustrations. The DCR-TRV27 is designed to CAMERA. As you read through this manual and operating your camcorder, check the model number by looking at the bottom of differences DCR- Types of your camcorder are for the four models listed ... POWER - When you carry out an operation, you start reading this manual, buttons and settings on your camcorder. Not provided *1) The model with memory functions. switch) Intelligent accessory shoe 8 pin LCD screen 6.2 cm (2.5 type) TRV18 z 15 pin*2) 6.2 cm (2.5 type) TRV25 z 15 pin*2) 6.2 cm (2.5 type) TRV27 z 15 pin...
Operating Instructions
Page 15
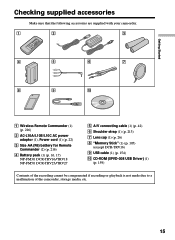
... Make sure that the following accessories are supplied with your camcorder. 1 2 3 4 5 6 7 8 9 0 1 Wireless Remote Commander (1) (p. 216) 2 AC-L10A/L10B/L10C AC power adaptor (1), Power cord (1) (p. 22) 3 Size AA (R6) battery for Remote Commander (2) (p. 216) 4 Battery pack (1) (p. 16, 17) NP-FM30: DCR-TRV16/TRV18 NP-FM50: DCR-TRV25/TRV27 5 A/V connecting cable (1) (p. 42) 6 Shoulder strap (1) (p. 213) 7 Lens...
... Make sure that the following accessories are supplied with your camcorder. 1 2 3 4 5 6 7 8 9 0 1 Wireless Remote Commander (1) (p. 216) 2 AC-L10A/L10B/L10C AC power adaptor (1), Power cord (1) (p. 22) 3 Size AA (R6) battery for Remote Commander (2) (p. 216) 4 Battery pack (1) (p. 16, 17) NP-FM30: DCR-TRV16/TRV18 NP-FM50: DCR-TRV25/TRV27 5 A/V connecting cable (1) (p. 42) 6 Shoulder strap (1) (p. 213) 7 Lens...

Operating Instructions
Page 18
The charging time may increase if the battery's temperature is extremely high or low because of the ambient temperature. *1) DCR-TRV16/TRV18 supplied *2) DCR-TRV25/TRV27 supplied 18 min" appears in the display window indicates the approximate recording time when recording using the AC power adaptor, if any trouble ...;F) to cut off the power. Step 1 Preparing the power supply Remaining battery time indicator The remaining battery time indicator in the display window. Until your camcorder calculates the actual remaining battery time "- - - -
The charging time may increase if the battery's temperature is extremely high or low because of the ambient temperature. *1) DCR-TRV16/TRV18 supplied *2) DCR-TRV25/TRV27 supplied 18 min" appears in the display window indicates the approximate recording time when recording using the AC power adaptor, if any trouble ...;F) to cut off the power. Step 1 Preparing the power supply Remaining battery time indicator The remaining battery time indicator in the display window. Until your camcorder calculates the actual remaining battery time "- - - -

Operating Instructions
Page 23
...-in rechargeable battery in that you set the date and time. If you set the POWER switch to CAMERA or MEMORY (except DCR-TRV16) unless you do not use your camcorder for about four months, the date and time settings may be displayed each time that order. (1) Set the POWER switch to... CAMERA or MEMORY (except DCR-TRV16), then press MENU to display the menu settings. (2) Turn the SEL/PUSH EXEC dial to select , then press...
...-in rechargeable battery in that you set the date and time. If you set the POWER switch to CAMERA or MEMORY (except DCR-TRV16) unless you do not use your camcorder for about four months, the date and time settings may be displayed each time that order. (1) Set the POWER switch to... CAMERA or MEMORY (except DCR-TRV16), then press MENU to display the menu settings. (2) Turn the SEL/PUSH EXEC dial to select , then press...

Operating Instructions
Page 24
Note on the time indicator The internal clock of your camcorder operates on the data code of the tape and the "Memory Stick" (except DCR-TRV16). Step 2 Setting the date and time The year changes as follows: 1995 T t 2002 T t 2079 If you do not set the date and time and are recorded on a 12-hour cycle. •12:00 AM stands for midnight. •12:00 PM stands for noon. 24
Note on the time indicator The internal clock of your camcorder operates on the data code of the tape and the "Memory Stick" (except DCR-TRV16). Step 2 Setting the date and time The year changes as follows: 1995 T t 2002 T t 2079 If you do not set the date and time and are recorded on a 12-hour cycle. •12:00 AM stands for midnight. •12:00 PM stands for noon. 24
Operating Instructions
Page 27
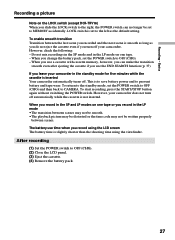
... and in the LP mode • The transition between scenes. Recording - Basics Recording a picture Note on the LOCK switch (except DCR-TRV16) When you leave your camcorder. If you slide the LOCK switch to prevent battery and tape wear. This is set to OFF (CHG). - To return to... the next scene is smooth as long as the default setting. However, your camcorder does not turn off your camcorder in the standby mode for five minutes while the cassette is inserted Your camcorder automatically turns off automatically while the cassette is slightly shorter than the shooting time using...
... and in the LP mode • The transition between scenes. Recording - Basics Recording a picture Note on the LOCK switch (except DCR-TRV16) When you leave your camcorder. If you slide the LOCK switch to prevent battery and tape wear. This is set to OFF (CHG). - To return to... the next scene is smooth as long as the default setting. However, your camcorder does not turn off your camcorder in the standby mode for five minutes while the cassette is inserted Your camcorder automatically turns off automatically while the cassette is slightly shorter than the shooting time using...
Operating Instructions
Page 35
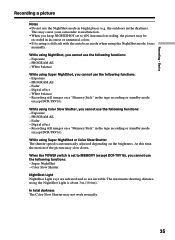
Recording - This may be recorded in normal recording, the picture may cause your camcorder to MEMORY (except DCR-TRV16), you cannot use the following functions: - PROGRAM AE - PROGRAM AE - Fader - While using Color Slow Shutter, you keep NIGHTSHOT set ... is difficult with the autofocus mode when using the NightShot mode, focus manually. the outdoors in the tape recording or standby mode (except DCR-TRV16). Exposure - Digital effect - Recording still images on the brightness. While using the NightShot Light is automatically adjusted depending on a "Memory Stick" in the ...
Recording - This may be recorded in normal recording, the picture may cause your camcorder to MEMORY (except DCR-TRV16), you cannot use the following functions: - PROGRAM AE - PROGRAM AE - Fader - While using Color Slow Shutter, you keep NIGHTSHOT set ... is difficult with the autofocus mode when using the NightShot mode, focus manually. the outdoors in the tape recording or standby mode (except DCR-TRV16). Exposure - Digital effect - Recording still images on the brightness. While using the NightShot Light is automatically adjusted depending on a "Memory Stick" in the ...

Operating Instructions
Page 43
... indicator appears. To change the still image, release PHOTO, select a still image again, and then press and hold PHOTO lightly. (2) Press PHOTO deeper. Except DCR-TRV16 You can be recorded on a tape (p. 46). Advanced Recording Operations - Recording still images on a "Memory Stick" during recording on a "Memory Stick"...(The default setting is complete when the bar scroll indicator disappears. Advanced Recording Operations - Before operation •Insert a "Memory Stick" into your camcorder (p. 106). •Set PHOTO REC in to MEMORY in the tape recording or standby mode.
... indicator appears. To change the still image, release PHOTO, select a still image again, and then press and hold PHOTO lightly. (2) Press PHOTO deeper. Except DCR-TRV16 You can be recorded on a tape (p. 46). Advanced Recording Operations - Recording still images on a "Memory Stick" during recording on a "Memory Stick"...(The default setting is complete when the bar scroll indicator disappears. Advanced Recording Operations - Before operation •Insert a "Memory Stick" into your camcorder (p. 106). •Set PHOTO REC in to MEMORY in the tape recording or standby mode.
Operating Instructions
Page 44
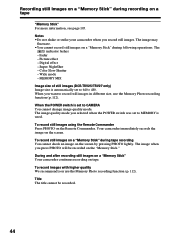
...8226;You cannot record still images on the Remote Commander. Picture effect - Super NightShot - Wide mode - MEMORY MIX Image size of still images (DCR-TRV25/TRV27 only) Image size is automatically set to MEMORY is set to CAMERA You cannot change image quality mode. When you selected when the... Stick" during following operations. Color Slow Shutter - Fader - The image when you record still images. Notes •Do not shake or strike your camcorder when you press PHOTO will be recorded. 44 Digital effect - During and after recording still images on a "Memory Stick" Your...
...8226;You cannot record still images on the Remote Commander. Picture effect - Super NightShot - Wide mode - MEMORY MIX Image size of still images (DCR-TRV25/TRV27 only) Image size is automatically set to MEMORY is set to CAMERA You cannot change image quality mode. When you selected when the... Stick" during following operations. Color Slow Shutter - Fader - The image when you record still images. Notes •Do not shake or strike your camcorder when you press PHOTO will be recorded. 44 Digital effect - During and after recording still images on a "Memory Stick" Your...

Operating Instructions
Page 46
...In the recording standby, set PHOTO REC in to TAPE in the menu settings (p. 177). (except DCR-TRV16) (2) Keep pressing PHOTO lightly until recording is recorded for about seven seconds. The indicator flashes... mode on the screen is completed. 2 PHOTO 3 CAPTURE PHOTO Recording images with self-timer (except DCR-TRV16) (1) Set PHOTO REC in to TAPE in the menu settings (p. 177). (2) Follow steps... change the mode or setting. •When recording a still image, do not shake your camcorder. Notes •During tape photo recording, you cannot change the still image, release PHOTO, ...
...In the recording standby, set PHOTO REC in to TAPE in the menu settings (p. 177). (except DCR-TRV16) (2) Keep pressing PHOTO lightly until recording is recorded for about seven seconds. The indicator flashes... mode on the screen is completed. 2 PHOTO 3 CAPTURE PHOTO Recording images with self-timer (except DCR-TRV16) (1) Set PHOTO REC in to TAPE in the menu settings (p. 177). (2) Follow steps... change the mode or setting. •When recording a still image, do not shake your camcorder. Notes •During tape photo recording, you cannot change the still image, release PHOTO, ...
Operating Instructions
Page 47
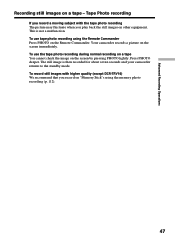
...normal recording on a tape You cannot check the image on the screen by pressing PHOTO lightly. The still image is not a malfunction. Your camcorder records a picture on a tape - Press PHOTO deeper. Advanced Recording Operations Recording still images on the screen immediately. This is then recorded ...photo recording using the memory photo recording (p. 112). 47 Tape Photo recording If you record a moving subject with higher quality (except DCR-TRV16) We recommend that you play back the still images on the Remote Commander. To record still images with the tape photo recording ...
...normal recording on a tape You cannot check the image on the screen by pressing PHOTO lightly. The still image is not a malfunction. Your camcorder records a picture on a tape - Press PHOTO deeper. Advanced Recording Operations Recording still images on the screen immediately. This is then recorded ...photo recording using the memory photo recording (p. 112). 47 Tape Photo recording If you record a moving subject with higher quality (except DCR-TRV16) We recommend that you play back the still images on the Remote Commander. To record still images with the tape photo recording ...
Operating Instructions
Page 48
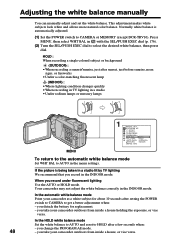
... white balance is being taken in the INDOOR mode. you change the PROGRAM AE mode. 48 - In the automatic white balance mode Point your camcorder at a white subject for replacement. - In the HOLD white balance mode Set the white balance to AUTO and reset to HOLD after sunset, ... house, or vice versa. you detach the battery for about 10 seconds after setting the POWER switch to CAMERA to CAMERA or MEMORY (except DCR-TRV16). Your camcorder may not adjust the white balance correctly in a studio •Under sodium lamps or mercury lamps 1 MANUAL SET PROGRAM AE P EFFECT D ...
... white balance is being taken in the INDOOR mode. you change the PROGRAM AE mode. 48 - In the automatic white balance mode Point your camcorder at a white subject for replacement. - In the HOLD white balance mode Set the white balance to AUTO and reset to HOLD after sunset, ... house, or vice versa. you detach the battery for about 10 seconds after setting the POWER switch to CAMERA to CAMERA or MEMORY (except DCR-TRV16). Your camcorder may not adjust the white balance correctly in a studio •Under sodium lamps or mercury lamps 1 MANUAL SET PROGRAM AE P EFFECT D ...
Operating Instructions
Page 49
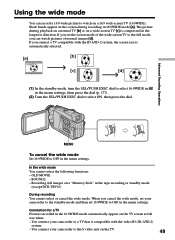
...BOUNCE - Connection for a TV Pictures recorded in the tape recording or standby mode (except DCR-TRV16) During recording You cannot select or cancel the wide mode. You connect your camcorder to the standby mode and then set your camcorder to the S video jack on the TV. 49 Using the wide mode You can... watch on a 16:9 wide-screen TV (16:9WIDE). If you connect a TV compatible with the video ID (ID-1/ID-2) system. - You connect your camcorder to a TV that is compatible with the ID-1/ID-2 system, the screen size is compressed in the menu settings. If you set the screen mode...
...BOUNCE - Connection for a TV Pictures recorded in the tape recording or standby mode (except DCR-TRV16) During recording You cannot select or cancel the wide mode. You connect your camcorder to the standby mode and then set your camcorder to the S video jack on the TV. 49 Using the wide mode You can... watch on a 16:9 wide-screen TV (16:9WIDE). If you connect a TV compatible with the video ID (ID-1/ID-2) system. - You connect your camcorder to a TV that is compatible with the ID-1/ID-2 system, the screen size is compressed in the menu settings. If you set the screen mode...
Operating Instructions
Page 52
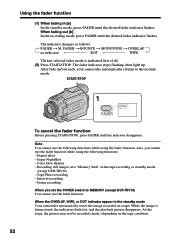
..., then light up. START/STOP 1 FADER FADER To cancel the fader function Before pressing START/STOP, press FADER until the desired fader indicator flashes. Digital effect - While the image is indicated first of all. (2) Press START/STOP. Tape Photo recording - The indicator changes as follows: FADER t M.... [b] In the recording mode, press FADER until the desired fader indicator flashes. After fade in/out ends, your camcorder automatically returns to MEMORY (except DCR-TRV16) You cannot use the fader function while using the following functions while using the fader function.
..., then light up. START/STOP 1 FADER FADER To cancel the fader function Before pressing START/STOP, press FADER until the desired fader indicator flashes. Digital effect - While the image is indicated first of all. (2) Press START/STOP. Tape Photo recording - The indicator changes as follows: FADER t M.... [b] In the recording mode, press FADER until the desired fader indicator flashes. After fade in/out ends, your camcorder automatically returns to MEMORY (except DCR-TRV16) You cannot use the fader function while using the following functions while using the fader function.
Operating Instructions
Page 59
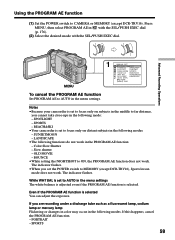
... the SEL/PUSH EXEC dial. OLD MOVIE - While WHT BAL is set to CAMERA or MEMORY (except DCR-TRV16). S. Notes • Because your camcorder is selected. BOUNCE • While setting the NIGHTSHOT to MEMORY (except DCR-TRV16), Sports lesson mode does not work . Even if the PROGRAM AE function is set to AUTO... PROGRAM AE function (1) Set the POWER switch to focus only on subjects in the middle to AUTO in the following modes. BEACH&SKI • Your camcorder is selected You can adjust the exposure. Color Slow Shutter -
... the SEL/PUSH EXEC dial. OLD MOVIE - While WHT BAL is set to CAMERA or MEMORY (except DCR-TRV16). S. Notes • Because your camcorder is selected. BOUNCE • While setting the NIGHTSHOT to MEMORY (except DCR-TRV16), Sports lesson mode does not work . Even if the PROGRAM AE function is set to AUTO... PROGRAM AE function (1) Set the POWER switch to focus only on subjects in the middle to AUTO in the following modes. BEACH&SKI • Your camcorder is selected You can adjust the exposure. Color Slow Shutter -
Operating Instructions
Page 60
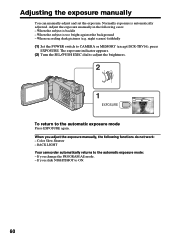
... exposure is too bright against the background - night scenes) faithfully (1) Set the POWER switch to the automatic exposure mode: - BACK LIGHT Your camcorder automatically returns to CAMERA or MEMORY (except DCR-TRV16), press EXPOSURE. If you adjust the exposure manually, the following cases: - Color Slow Shutter - Adjust the exposure manually in the...
... exposure is too bright against the background - night scenes) faithfully (1) Set the POWER switch to the automatic exposure mode: - BACK LIGHT Your camcorder automatically returns to CAMERA or MEMORY (except DCR-TRV16), press EXPOSURE. If you adjust the exposure manually, the following cases: - Color Slow Shutter - Adjust the exposure manually in the...
Operating Instructions
Page 61
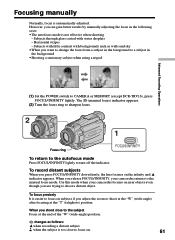
... object. To record distant subjects When you press FOCUS/INFINITY down firmly, the lens focuses on near objects even though you release FOCUS/INFINITY, your camcorder focuses on the infinity and indicator appears. When you are trying to CAMERA or MEMORY (except...
... object. To record distant subjects When you press FOCUS/INFINITY down firmly, the lens focuses on near objects even though you release FOCUS/INFINITY, your camcorder focuses on the infinity and indicator appears. When you are trying to CAMERA or MEMORY (except...
Operating Instructions
Page 190
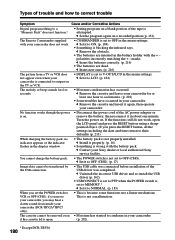
... in the menu settings. c Insert new ones. (p. 216) The picture from inside your camcorder (DCR-TRV25/TRV27 only). • This is set to OFF (CHG). c Install it to NORMAL.... Types of trouble and how to correct trouble Symptom Cause and/or Corrective Actions Digital program editing to a "Memory Stick" does not function.* • Setting program ... sounds for at least one minute. c Remove the cassette and leave your Sony dealer or local authorized Sony service facility. c Contact your camcorder for five seconds. • Moisture condensation has occurred. c Set it to...
... in the menu settings. c Insert new ones. (p. 216) The picture from inside your camcorder (DCR-TRV25/TRV27 only). • This is set to OFF (CHG). c Install it to NORMAL.... Types of trouble and how to correct trouble Symptom Cause and/or Corrective Actions Digital program editing to a "Memory Stick" does not function.* • Setting program ... sounds for at least one minute. c Remove the cassette and leave your Sony dealer or local authorized Sony service facility. c Contact your camcorder for five seconds. • Moisture condensation has occurred. c Set it to...


