Operating Instructions (primary manual)
Page 2
...battery pack to rain or moisture. DISPOSE OF PROPERLY. For the Sony Factory Service Center nearest you call 1-800-222-SONY (United States only). Address: 680 Kinderkamack Road, Oradell, NJ07649 ... (1) This device may call 416-499-SONY (Canada only). For the Sony Service Center nearest you call : Sony Customer Information Center 1-800-222-SONY (7669) The number below is intended to... this manual could void your nearest Sony Service Center or Factory Service Center. LITHIUM ION BATTERY. For the Customers in this Sony Digital Handycam camcorder. You can return your purchase of...
...battery pack to rain or moisture. DISPOSE OF PROPERLY. For the Sony Factory Service Center nearest you call 1-800-222-SONY (United States only). Address: 680 Kinderkamack Road, Oradell, NJ07649 ... (1) This device may call 416-499-SONY (Canada only). For the Sony Service Center nearest you call : Sony Customer Information Center 1-800-222-SONY (7669) The number below is intended to... this manual could void your nearest Sony Service Center or Factory Service Center. LITHIUM ION BATTERY. For the Customers in this Sony Digital Handycam camcorder. You can return your purchase of...
Operating Instructions (primary manual)
Page 5
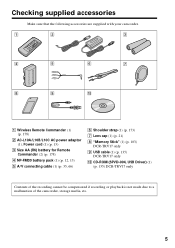
Getting started Checking supplied accessories Make sure that the following accessories are supplied with your camcorder. 1 2 3 4 5 6 7 8 9 0 1 Wireless Remote Commander (1) (p. 178) 2 AC-L10A/L10B/L10C AC power adaptor (1), Power cord (1) (p. 13) 3 Size AA (R6) ... (1) (p. 35, 66) 6 Shoulder strap (1) (p. 173) 7 Lens cap (1) (p. 21) 8 "Memory Stick" (1) (p. 103) DCR-TRV17 only 9 USB cable (1) (p. 135) DCR-TRV17 only 0 CD-ROM (SPVD-004, USB Driver) (1) (p. 135) DCR-TRV17 only Contents of the recording cannot be compensated if recording or playback is not made due to a malfunction...
Getting started Checking supplied accessories Make sure that the following accessories are supplied with your camcorder. 1 2 3 4 5 6 7 8 9 0 1 Wireless Remote Commander (1) (p. 178) 2 AC-L10A/L10B/L10C AC power adaptor (1), Power cord (1) (p. 13) 3 Size AA (R6) ... (1) (p. 35, 66) 6 Shoulder strap (1) (p. 173) 7 Lens cap (1) (p. 21) 8 "Memory Stick" (1) (p. 103) DCR-TRV17 only 9 USB cable (1) (p. 135) DCR-TRV17 only 0 CD-ROM (SPVD-004, USB Driver) (1) (p. 135) DCR-TRV17 only Contents of the recording cannot be compensated if recording or playback is not made due to a malfunction...

Operating Instructions (primary manual)
Page 6
... from a VCR - Insert editing 83 Audio dubbing 85 Superimposing a title 89 Making your own titles 92 Labeling a cassette 94 Customizing Your Camcorder Changing the menu settings 96 "Memory Stick" Operations (DCR-TRV17 only) Using a "Memory Stick" - Signal convert function 79 Recording video or TV programs ....... 80 Inserting a scene from a tape as a still...
... from a VCR - Insert editing 83 Audio dubbing 85 Superimposing a title 89 Making your own titles 92 Labeling a cassette 94 Customizing Your Camcorder Changing the menu settings 96 "Memory Stick" Operations (DCR-TRV17 only) Using a "Memory Stick" - Signal convert function 79 Recording video or TV programs ....... 80 Inserting a scene from a tape as a still...
Operating Instructions (primary manual)
Page 7
... 149 Self-diagnosis display 155 Warning indicators and messages .... 156 Additional Information Usable cassettes 158 About "InfoLITHIUM" battery pack 160 About i.LINK 162 Using your camcorder abroad .......... 164 Maintenance information and precautions 165 Specifications 169 Quick Reference Identifying the parts and controls .... 171 Index Back cover 7 Memory photo playback .......... 129 Viewing...
... 149 Self-diagnosis display 155 Warning indicators and messages .... 156 Additional Information Usable cassettes 158 About "InfoLITHIUM" battery pack 160 About i.LINK 162 Using your camcorder abroad .......... 164 Maintenance information and precautions 165 Specifications 169 Quick Reference Identifying the parts and controls .... 171 Index Back cover 7 Memory photo playback .......... 129 Viewing...

Operating Instructions (primary manual)
Page 8
Quick Start Guide This chapter introduces you to insert. Connecting the power cord (p. 17) Use the battery pack when using your camcorder. Inserting a cassette (p. 20) 1 Slide OPEN/ EJECT in the direction of your camcorder outdoors (p. 12). Insert the cassette in parentheses "( )" for more information. Quick Start Guide AC power adaptor (supplied) Connect the...
Quick Start Guide This chapter introduces you to insert. Connecting the power cord (p. 17) Use the battery pack when using your camcorder. Inserting a cassette (p. 20) 1 Slide OPEN/ EJECT in the direction of your camcorder outdoors (p. 12). Insert the cassette in parentheses "( )" for more information. Quick Start Guide AC power adaptor (supplied) Connect the...
Operating Instructions (primary manual)
Page 9
... rewind the tape. Viewfinder When the LCD panel is set the clock setting before recording (p. 18). If you purchase your camcorder, the clock setting is closed, use the viewfinder placing your camcorder by holding the viewfinder, the LCD panel, or the battery pack. 9 PLAY NOTE Do not pick up your eye against... on the LCD screen (p. 31) 1 Set the POWER switch to CAMERA while pressing the small green button. Monitoring the playback picture on the screen. Your camcorder starts recording. When you want to record the date and time for a picture, set to off.
... rewind the tape. Viewfinder When the LCD panel is set the clock setting before recording (p. 18). If you purchase your camcorder, the clock setting is closed, use the viewfinder placing your camcorder by holding the viewfinder, the LCD panel, or the battery pack. 9 PLAY NOTE Do not pick up your eye against... on the LCD screen (p. 31) 1 Set the POWER switch to CAMERA while pressing the small green button. Monitoring the playback picture on the screen. Your camcorder starts recording. When you want to record the date and time for a picture, set to off.
Operating Instructions (primary manual)
Page 10
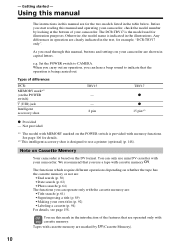
...a tape with memory functions. Not provided *1) The model with the cassette memory are shown in the illustrations. Tapes with your camcorder, check the model number by (Cassette Memory). 10 You can operate only with MEMORY marked on the POWER switch) (USB)... jack Intelligent accessory shoe TRV15 - - 8 pin TRV17 z z 15 pin*2) z Provided - Using this manual The instructions in this manual, buttons and settings on your camcorder are : • Title search (p. 61) • Superimposing a title (p. 89) • Making ...
...a tape with memory functions. Not provided *1) The model with the cassette memory are shown in the illustrations. Tapes with your camcorder, check the model number by (Cassette Memory). 10 You can operate only with MEMORY marked on the POWER switch) (USB)... jack Intelligent accessory shoe TRV15 - - 8 pin TRV17 z z 15 pin*2) z Provided - Using this manual The instructions in this manual, buttons and settings on your camcorder are : • Title search (p. 61) • Superimposing a title (p. 89) • Making ...

Operating Instructions (primary manual)
Page 11
... over 99.99 % of the sun in low light conditions such as in a car parked in any way. •Do not let your camcorder get wet may cause malfunctions [c]. •Do not directly shoot the sun. Take pictures of the pixels are normal in the manufacturing process and ... sea water. Sometimes this manual Note on a TV, you need an NTSC system-based TV. These points are operational for long periods may cause your camcorder to malfunction. Exposing the LCD screen, the finder or the lens to temperatures above 60 °C (140 °F), such as dusk [d]. [a] [b] [c] [d] 11 ...
... over 99.99 % of the sun in low light conditions such as in a car parked in any way. •Do not let your camcorder get wet may cause malfunctions [c]. •Do not directly shoot the sun. Take pictures of the pixels are normal in the manufacturing process and ... sea water. Sometimes this manual Note on a TV, you need an NTSC system-based TV. These points are operational for long periods may cause your camcorder to malfunction. Exposing the LCD screen, the finder or the lens to temperatures above 60 °C (140 °F), such as dusk [d]. [a] [b] [c] [d] 11 ...

Operating Instructions (primary manual)
Page 12
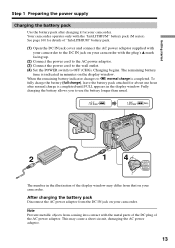
Step 1 Preparing the power supply Installing the battery pack Install the battery pack to use your camcorder outdoors. (1) Lift up the viewfinder. (2) Slide the battery pack down until it clicks. 1 2 To remove the battery pack (1) Lift up the viewfinder. (2) Slide the battery pack out in the direction of the arrow while pressing BATT down. 1 2 2 BATT release button If you use the large capacity battery pack If you install the NP-FM70/FM90/FM91 battery pack on your camcorder, extend its viewfinder. 12
Step 1 Preparing the power supply Installing the battery pack Install the battery pack to use your camcorder outdoors. (1) Lift up the viewfinder. (2) Slide the battery pack down until it clicks. 1 2 To remove the battery pack (1) Lift up the viewfinder. (2) Slide the battery pack out in the direction of the arrow while pressing BATT down. 1 2 2 BATT release button If you use the large capacity battery pack If you install the NP-FM70/FM90/FM91 battery pack on your camcorder, extend its viewfinder. 12
Operating Instructions (primary manual)
Page 13
... adaptor. (3) Connect the power cord to the wall outlet. (4) Set the POWER switch to the DC IN jack on your camcorder. Your camcorder operates only with your camcorder to OFF (CHG). Getting started Step 1 Preparing the power supply Charging the battery pack Use the battery pack after normal charge ...normal charge is completed until FULL appears in the display window. Note Prevent metallic objects from the DC IN jack on your camcorder. See page 160 for your camcorder with the metal parts of the DC plug of the AC power adaptor. To fully charge the battery (full charge), leave...
... adaptor. (3) Connect the power cord to the wall outlet. (4) Set the POWER switch to the DC IN jack on your camcorder. Your camcorder operates only with your camcorder to OFF (CHG). Getting started Step 1 Preparing the power supply Charging the battery pack Use the battery pack after normal charge ...normal charge is completed until FULL appears in the display window. Note Prevent metallic objects from the DC IN jack on your camcorder. See page 160 for your camcorder with the metal parts of the DC plug of the AC power adaptor. To fully charge the battery (full charge), leave...
Operating Instructions (primary manual)
Page 14
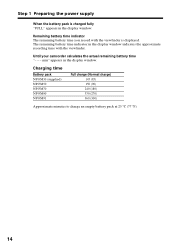
... an empty battery pack at 25 °C (77 °F). 14 Remaining battery time indicator The remaining battery time you record with the viewfinder. Until your camcorder calculates the actual remaining battery time "- - - The remaining battery time indicator in the display window indicates the approximate recording time with the viewfinder is charged...
... an empty battery pack at 25 °C (77 °F). 14 Remaining battery time indicator The remaining battery time you record with the viewfinder. Until your camcorder calculates the actual remaining battery time "- - - The remaining battery time indicator in the display window indicates the approximate recording time with the viewfinder is charged...
Operating Instructions (primary manual)
Page 15
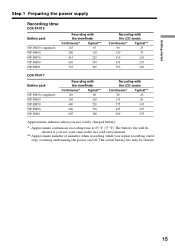
...110 415 225 630 345 725 395 Recording with the LCD screen Continuous* Typical** 90 45 150 75 310 165 475 255 550 290 DCR-TRV17 Battery pack NP-FM30 (supplied) NP-FM50 NP-FM70 NP-FM90 NP-FM91 Recording with the viewfinder Continuous* Typical** 120 60 195 105 ..., zooming and turning the power on/off. The battery life will be shorter. 15 The actual battery life may be shorter if you use your camcorder in a cold environment. ** Approximate number of minutes when recording while you use a fully charged battery * Approximate continuous recording time at 25 °C (...
...110 415 225 630 345 725 395 Recording with the LCD screen Continuous* Typical** 90 45 150 75 310 165 475 255 550 290 DCR-TRV17 Battery pack NP-FM30 (supplied) NP-FM50 NP-FM70 NP-FM90 NP-FM91 Recording with the viewfinder Continuous* Typical** 120 60 195 105 ..., zooming and turning the power on/off. The battery life will be shorter. 15 The actual battery life may be shorter if you use your camcorder in a cold environment. ** Approximate number of minutes when recording while you use a fully charged battery * Approximate continuous recording time at 25 °C (...

Operating Instructions (primary manual)
Page 16
Your camcorder operates only with LCD closed 135 220 450 685 785 DCR-TRV17 Battery pack NP-FM30 (supplied) NP-FM50 NP-FM70 NP-... 86 ˚F). 16 The recording and playing times of a normally charged battery are about 90% of those of Sony Corporation. The "InfoLITHIUM" is correct. This unit is "InfoLITHIUM"? What is compatible with compatible electronic equipment. We ... when playing back at 25 °C (77 ºF). The battery life will be shorter if you use your camcorder in an ambient temperature of between 10 ˚C to 30 ˚C (50 ˚F to operate Charge the ...
Your camcorder operates only with LCD closed 135 220 450 685 785 DCR-TRV17 Battery pack NP-FM30 (supplied) NP-FM50 NP-FM70 NP-... 86 ˚F). 16 The recording and playing times of a normally charged battery are about 90% of those of Sony Corporation. The "InfoLITHIUM" is correct. This unit is "InfoLITHIUM"? What is compatible with compatible electronic equipment. We ... when playing back at 25 °C (77 ºF). The battery life will be shorter if you use your camcorder in an ambient temperature of between 10 ˚C to 30 ˚C (50 ˚F to operate Charge the ...

Operating Instructions (primary manual)
Page 17
Notes •Place the AC power adaptor near a wall outlet. Refer to the DC IN jack, even when the power cord is attached to your camcorder. •The DC IN jack has "source priority." While using the AC power adaptor. (1) Open the DC IN jack cover, pulling the cover out a little ... the power. •The AC power adaptor can supply power even if the battery pack is not plugged into a wall outlet. Using a car battery Use Sony DC Adaptor/Charger (optional). Getting started Step 1 Preparing the power supply Connecting to cut off .
Notes •Place the AC power adaptor near a wall outlet. Refer to the DC IN jack, even when the power cord is attached to your camcorder. •The DC IN jack has "source priority." While using the AC power adaptor. (1) Open the DC IN jack cover, pulling the cover out a little ... the power. •The AC power adaptor can supply power even if the battery pack is not plugged into a wall outlet. Using a car battery Use Sony DC Adaptor/Charger (optional). Getting started Step 1 Preparing the power supply Connecting to cut off .
Operating Instructions (primary manual)
Page 18
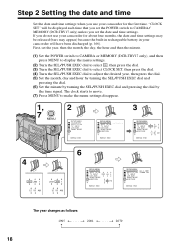
...by the time signal. First, set the POWER switch to CAMERA/ MEMORY (DCR-TRV17 only) unless you use your camcorder for about four months, the date and time settings may appear) because the built-...and time settings. "CLOCK SET" will have been discharged (p. 166). If you do not use your camcorder will be released (bars may be displayed each time that you set the year, then the month, the... day, the hour and then the minute. (1) Set the POWER switch to CAMERA or MEMORY (DCR-TRV17 only), and then press MENU to display the menu settings. (2) Turn the SEL/PUSH EXEC dial to select ...
...by the time signal. First, set the POWER switch to CAMERA/ MEMORY (DCR-TRV17 only) unless you use your camcorder for about four months, the date and time settings may appear) because the built-...and time settings. "CLOCK SET" will have been discharged (p. 166). If you do not use your camcorder will be released (bars may be displayed each time that you set the year, then the month, the... day, the hour and then the minute. (1) Set the POWER switch to CAMERA or MEMORY (DCR-TRV17 only), and then press MENU to display the menu settings. (2) Turn the SEL/PUSH EXEC dial to select ...

Operating Instructions (primary manual)
Page 19
Getting started Step 2 Setting the date and time If you do not set the date and time is recorded on a 12-hour cycle. •12:00 AM stands for midnight. •12:00 PM stands for noon. 19 Note on the time indicator The internal clock of your camcorder operates on the data code of the tape and the "Memory Stick" (DCRTRV17 only).
Getting started Step 2 Setting the date and time If you do not set the date and time is recorded on a 12-hour cycle. •12:00 AM stands for midnight. •12:00 PM stands for noon. 19 Note on the time indicator The internal clock of your camcorder operates on the data code of the tape and the "Memory Stick" (DCRTRV17 only).
Operating Instructions (primary manual)
Page 21
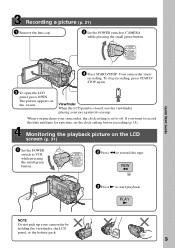
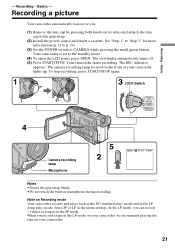
... START/STOP. Basics - Select SP or LP in the SP mode. In the LP mode, you record a tape in microphone during recording. Your camcorder is set to CAMERA while pressing the small green button. To stop recording, press START/STOP again. 1 3 LOCK Switch POWER VCR OFF(CHG) CAMERA...40min REC 0:00:01 Notes •Fasten the grip strap firmly. •Do not touch the built-in the LP mode on your camcorder lights up. Recording a picture Your camcorder automatically focuses for more information (p. 12 to p. 20). (3) Set the POWER switch to the standby mode. (4) To open the LCD ...
... START/STOP. Basics - Select SP or LP in the SP mode. In the LP mode, you record a tape in microphone during recording. Your camcorder is set to CAMERA while pressing the small green button. To stop recording, press START/STOP again. 1 3 LOCK Switch POWER VCR OFF(CHG) CAMERA...40min REC 0:00:01 Notes •Fasten the grip strap firmly. •Do not touch the built-in the LP mode on your camcorder lights up. Recording a picture Your camcorder automatically focuses for more information (p. 12 to p. 20). (3) Set the POWER switch to the standby mode. (4) To open the LCD ...
Operating Instructions (primary manual)
Page 22
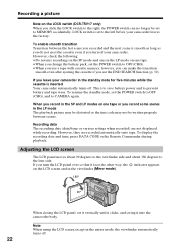
Recording a picture Note on the LOCK switch (DCR-TRV17 only) When you slide the LOCK switch to the right, the POWER ...indicator appears on the Remote Commander during playback. To enable smooth transition Transition between scenes. If you leave your camcorder in the LP mode The playback picture may be distorted or the time code may not be set to MEMORY...Do not mix recordings in the SP mode and ones in the mirror mode, the viewfinder automatically turns off your camcorder leaves the factory. Adjusting the LCD screen The LCD panel moves about 90 degrees to the viewfinder side and about...
Recording a picture Note on the LOCK switch (DCR-TRV17 only) When you slide the LOCK switch to the right, the POWER ...indicator appears on the Remote Commander during playback. To enable smooth transition Transition between scenes. If you leave your camcorder in the LP mode The playback picture may be distorted or the time code may not be set to MEMORY...Do not mix recordings in the SP mode and ones in the mirror mode, the viewfinder automatically turns off your camcorder leaves the factory. Adjusting the LCD screen The LCD panel moves about 90 degrees to the viewfinder side and about...
Operating Instructions (primary manual)
Page 27
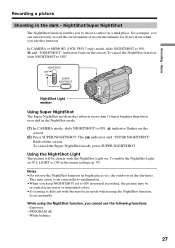
In CAMERA or MEMORY (DCR-TRV17 only) mode, slide NIGHTSHOT to OFF. and "NIGHTSHOT" indicators flash on the screen. The indicator and "SUPER NIGHTSHOT" flash on the screen. To enable the ... a picture Shooting in a dark place. Exposure - PROGRAM AE - Using the NightShot Light The picture will be recorded in normal recording, the picture may cause your camcorder to shoot a subject in the dark - NightShot/Super NightShot The NightShot function enables you to malfunction. •When you use the following functions: - To cancel...
In CAMERA or MEMORY (DCR-TRV17 only) mode, slide NIGHTSHOT to OFF. and "NIGHTSHOT" indicators flash on the screen. The indicator and "SUPER NIGHTSHOT" flash on the screen. To enable the ... a picture Shooting in a dark place. Exposure - PROGRAM AE - Using the NightShot Light The picture will be recorded in normal recording, the picture may cause your camcorder to shoot a subject in the dark - NightShot/Super NightShot The NightShot function enables you to malfunction. •When you use the following functions: - To cancel...
Operating Instructions (primary manual)
Page 30
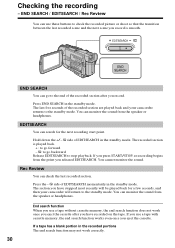
... re-recording begins from the speaker or headphones. If you eject the cassette. Rec Review You can search for a few seconds, and then your camcorder returns to the end of EDITSEARCH in the standby mode. If you use these buttons to check the recorded picture or shoot so that the...forward - 7: to go to the standby mode. You cannot monitor the sound. Press the - 7 side of the recorded section are played back and your camcorder will return to stop playback. The section you use a tape without cassette memory, the end search function does not work correctly. 30 You can monitor...
... re-recording begins from the speaker or headphones. If you eject the cassette. Rec Review You can search for a few seconds, and then your camcorder returns to the end of EDITSEARCH in the standby mode. If you use these buttons to check the recorded picture or shoot so that the...forward - 7: to go to the standby mode. You cannot monitor the sound. Press the - 7 side of the recorded section are played back and your camcorder will return to stop playback. The section you use a tape without cassette memory, the end search function does not work correctly. 30 You can monitor...


