
Limited Warranty (US Only)
Page 1
...or limitation of incidental or consequential damages, or allow limitations on how long an implied warranty lasts does not apply to any authorized Sony service facility. To obtain warranty service, you , or for service assistance or resolution of a service problem, or for all labor ...the labor charges to obtain warranty service. 4-557-172-02 General Stereo/Hifi Components/Tape Decks ® CD Players/Mini Disc Players/Audio Systems Hifi Audio LIMITED WARRANTY Sony Electronics Inc. ("Sony") warrants this Product is determined to be presented to any accessories) against defects in...
...or limitation of incidental or consequential damages, or allow limitations on how long an implied warranty lasts does not apply to any authorized Sony service facility. To obtain warranty service, you , or for service assistance or resolution of a service problem, or for all labor ...the labor charges to obtain warranty service. 4-557-172-02 General Stereo/Hifi Components/Tape Decks ® CD Players/Mini Disc Players/Audio Systems Hifi Audio LIMITED WARRANTY Sony Electronics Inc. ("Sony") warrants this Product is determined to be presented to any accessories) against defects in...

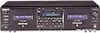
Operating Instructions (primary manual)
Page 2
...within the product's enclosure that interference will not occur in this manual are cautioned that to them whenever you call upon your tape deck. About this manual The instructions in a particular installation. In this equipment does cause harmful interference to radio or television reception,... dealer or an experienced radio/TV technician for example, "TC-WE675 only." 2 To prevent fire or shock hazard, do not cover the ventilation of your Sony dealer regarding this equipment. If this manual, the TC-WE675 is clearly indicated in this manual could void your model number...
...within the product's enclosure that interference will not occur in this manual are cautioned that to them whenever you call upon your tape deck. About this manual The instructions in a particular installation. In this equipment does cause harmful interference to radio or television reception,... dealer or an experienced radio/TV technician for example, "TC-WE675 only." 2 To prevent fire or shock hazard, do not cover the ventilation of your Sony dealer regarding this equipment. If this manual, the TC-WE675 is clearly indicated in this manual could void your model number...
Operating Instructions (primary manual)
Page 3
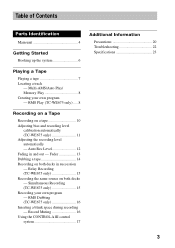
... (TC-WE675 only) ..... 8 Recording on a Tape Recording on both decks - Fader 13 Dubbing a tape 14 Recording on a tape 10 Adjusting bias and recording level calibration automatically (TC-WE675 only 11 Adjusting the recording level automatically - Auto Rec Level 12 Fading in succession - Table of Contents Parts Identification Main unit 4 Getting Started Hooking up the system 6 Playing a Tape Playing a tape 7 Locating...
... (TC-WE675 only) ..... 8 Recording on a Tape Recording on both decks - Fader 13 Dubbing a tape 14 Recording on a tape 10 Adjusting bias and recording level calibration automatically (TC-WE675 only 11 Adjusting the recording level automatically - Auto Rec Level 12 Fading in succession - Table of Contents Parts Identification Main unit 4 Getting Started Hooking up the system 6 Playing a Tape Playing a tape 7 Locating...

Operating Instructions (primary manual)
Page 6
... Be sure to make connections firmly to an AC outlet. Getting Started Hooking up the system This section describes how to hook up the tape deck to an amplifier or a CD player equipped with a voltage selector) Check that the voltage selector on the rear panel of each component ...position using the supplied audio connecting cords. When connecting an audio connecting cord, be sure to match the color-coded cord to White. Connecting the tape deck to a CD player equipped with CONTROL A1II connectors For details, see "Using the CONTROL A1II control system" on page 17. 6 Setting the ...
... Be sure to make connections firmly to an AC outlet. Getting Started Hooking up the system This section describes how to hook up the tape deck to an amplifier or a CD player equipped with a voltage selector) Check that the voltage selector on the rear panel of each component ...position using the supplied audio connecting cords. When connecting an audio connecting cord, be sure to match the color-coded cord to White. Connecting the tape deck to a CD player equipped with CONTROL A1II connectors For details, see "Using the CONTROL A1II control system" on page 17. 6 Setting the ...
Operating Instructions (primary manual)
Page 7
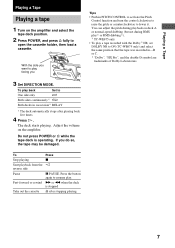
... not during RMS play 2) or RMS dubbing 2)). 2) TC-WE675 only • To play . Do not press POWER or A while the tape deck is stopped Take out the cassette A after playing back five times. 4 Press H. The deck starts playing. Playing a Tape Playing a Tape Playing a tape 1 Turn on the amplifier and select the tape deck position. 2 Press POWER, and press A fully to One...
... not during RMS play 2) or RMS dubbing 2)). 2) TC-WE675 only • To play . Do not press POWER or A while the tape deck is stopped Take out the cassette A after playing back five times. 4 Press H. The deck starts playing. Playing a Tape Playing a Tape Playing a tape 1 Turn on the amplifier and select the tape deck position. 2 Press POWER, and press A fully to One...
Operating Instructions (primary manual)
Page 8
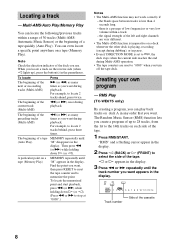
... the next or succeeding tracks (Multi-AMS) Press M (or m) as many times as you turn off the tape deck. Locating a track - For example, to memorize the point. To locate The beginning of the cassette 8 Find the point you want appears in the display. 2 Press h (BACK) or H (FRONT) to... press twice. RMS Play (TC-WE675 only) By creating a program, you use. there is a passage of low frequencies or very low volume within a range of 30 tracks (Multi-AMS: Automatic Music Sensor) or the beginning of the deck you can play back tracks on a tape (Memory Play). Multi-AMS/Auto...
... the next or succeeding tracks (Multi-AMS) Press M (or m) as many times as you turn off the tape deck. Locating a track - For example, to memorize the point. To locate The beginning of the cassette 8 Find the point you want appears in the display. 2 Press h (BACK) or H (FRONT) to... press twice. RMS Play (TC-WE675 only) By creating a program, you use. there is a passage of low frequencies or very low volume within a range of 30 tracks (Multi-AMS: Automatic Music Sensor) or the beginning of the deck you can play back tracks on a tape (Memory Play). Multi-AMS/Auto...

Operating Instructions (primary manual)
Page 9
Note For more information on deck B. • The RMS function may fast-forward a portion of Sony stereo receiver remotes with RMS capability, contact your nearest Sony dealer. 9 To stop RMS Play Press x (CLEAR) once. To resume RMS play the program again after RMS Play ends, press RMS/START. To ...cancel RMS Play Press x (CLEAR) repeatedly until the peak level meters appear in the display or eject the tape in the program Press CHECK. Checking the order of tracks in deck A. Each time you can 't program any more. 6 Press RMS/START to 5 in the display This means that ...
Note For more information on deck B. • The RMS function may fast-forward a portion of Sony stereo receiver remotes with RMS capability, contact your nearest Sony dealer. 9 To stop RMS Play Press x (CLEAR) once. To resume RMS play the program again after RMS Play ends, press RMS/START. To ...cancel RMS Play Press x (CLEAR) repeatedly until the peak level meters appear in the display or eject the tape in the program Press CHECK. Checking the order of tracks in deck A. Each time you can 't program any more. 6 Press RMS/START to 5 in the display This means that ...
Operating Instructions (primary manual)
Page 10
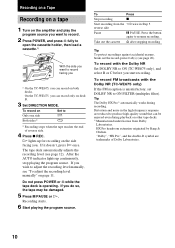
... Dolby NR Set DOLBY NR to ON (TC-WE675 only), and select B or C before you do so, the tape may be enjoyed even during recording. To record with the Dolby NR (TC-WE675 only) If the FM reception is operating. If you can record only on deck B. 3 Set DIRECTION MODE. To Press... Press X PAUSE or H. Recording on a Tape Recording on a tape 1 Turn on the amplifier and play the program source you want to record. 2 Press POWER, and press A fully to open the cassette holder, then load a cassette. 1) With the side you want to record facing you 1) On the TC-WE675, you . If it doesn't, press H...
... Dolby NR Set DOLBY NR to ON (TC-WE675 only), and select B or C before you do so, the tape may be enjoyed even during recording. To record with the Dolby NR (TC-WE675 only) If the FM reception is operating. If you can record only on deck B. 3 Set DIRECTION MODE. To Press... Press X PAUSE or H. Recording on a Tape Recording on a tape 1 Turn on the amplifier and play the program source you want to record. 2 Press POWER, and press A fully to open the cassette holder, then load a cassette. 1) With the side you want to record facing you 1) On the TC-WE675, you . If it doesn't, press H...
Operating Instructions (primary manual)
Page 11
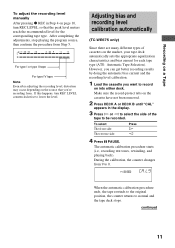
... H or h to select the side of cassettes on the market, your tape deck automatically sets the appropriate equalization characteristics and bias current for the corresponding tape type. Adjusting bias and recording level calibration automatically (TC-WE675 only) Since there are many different types of the tape to normal and the tape deck stops. L9 When the automatic calibration procedure...
... H or h to select the side of cassettes on the market, your tape deck automatically sets the appropriate equalization characteristics and bias current for the corresponding tape type. Adjusting bias and recording level calibration automatically (TC-WE675 only) Since there are many different types of the tape to normal and the tape deck stops. L9 When the automatic calibration procedure...
Operating Instructions (primary manual)
Page 12
... Then start from Step 2 of "Recording on a tape" on the cassette have not been removed. 2 Press z REC. If "A" or "B" flashes continuously The automatic calibration procedure has been interrupted by pressing the DECK A or DECK B button. Before recalibrating, be sure to a new... end of these during normal recording, Relay Recording* or Simultaneous Recording* on the deck you load a new cassette since cassettes of the test tone. • Damaged tape or dirty heads. If you do either deck. * TC-WE675 only 1 Follow Steps 1 to turn REC LEVEL to 3 of the automatic calibration...
... Then start from Step 2 of "Recording on a tape" on the cassette have not been removed. 2 Press z REC. If "A" or "B" flashes continuously The automatic calibration procedure has been interrupted by pressing the DECK A or DECK B button. Before recalibrating, be sure to a new... end of these during normal recording, Relay Recording* or Simultaneous Recording* on the deck you load a new cassette since cassettes of the test tone. • Damaged tape or dirty heads. If you do either deck. * TC-WE675 only 1 Follow Steps 1 to turn REC LEVEL to 3 of the automatic calibration...

Operating Instructions (primary manual)
Page 13
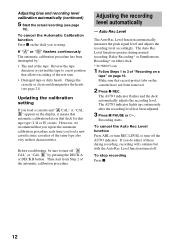
... the following cases: - When the fade-in has completed, the AUTO indicator lights up if the Auto Rec Level function is lit continuously, the deck will set to start . The program source level is expected later on in the track, play the entire program source after recording starts, press z... REC while playing the highest sound level portion of a recording (fade out). The recording level does not decrease for example, when the tape reaches to its end and you play that portion first so that has extremely high-level signals. • To prevent changes in the recording level...
... the following cases: - When the fade-in has completed, the AUTO indicator lights up if the Auto Rec Level function is lit continuously, the deck will set to start . The program source level is expected later on in the track, play the entire program source after recording starts, press z... REC while playing the highest sound level portion of a recording (fade out). The recording level does not decrease for example, when the tape reaches to its end and you play that portion first so that has extremely high-level signals. • To prevent changes in the recording level...
Operating Instructions (primary manual)
Page 14
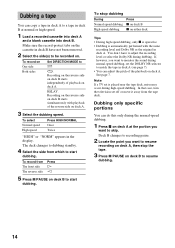
..., set the DOLBY NR selector to match the tape in deck A (see page 7). • You can adjust the pitch of the reverse side on deck A at normal or high speed. 1 Load a recorded cassette into deck A and a blank cassette into deck B. To stop the tape. 3 Press X PAUSE on deck B to start dubbing. Deck B changes to recording pause. 2 Locate the point you...
..., set the DOLBY NR selector to match the tape in deck A (see page 7). • You can adjust the pitch of the reverse side on deck A at normal or high speed. 1 Load a recorded cassette into deck A and a blank cassette into deck B. To stop the tape. 3 Press X PAUSE on deck B to start dubbing. Deck B changes to recording pause. 2 Locate the point you...
Operating Instructions (primary manual)
Page 15
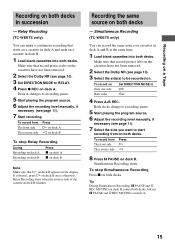
.... Recording on a Tape Recording on both decks - Recording the same source on both decks in deck A and ends on Only one side Both sides Set DIRECTION MODE to g s 4 Press A+B REC. Both decks change to recording pause...cassettes into both decks. To record from on deck A. Deck A changes to be recorded on the cassettes have not been removed. 2 Select the Dolby NR (see page 11). 7 Select the side you want to RELAY. 4 Press z REC on both decks. To record on a cassette in deck A and B at the same time. 1 Load blank cassettes into both decks. Relay Recording (TC-WE675...
.... Recording on a Tape Recording on both decks - Recording the same source on both decks in deck A and ends on Only one side Both sides Set DIRECTION MODE to g s 4 Press A+B REC. Both decks change to recording pause...cassettes into both decks. To record from on deck A. Deck A changes to be recorded on the cassettes have not been removed. 2 Select the Dolby NR (see page 11). 7 Select the side you want to RELAY. 4 Press z REC on both decks. To record on a cassette in deck A and B at the same time. 1 Load blank cassettes into both decks. Relay Recording (TC-WE675...
Operating Instructions (primary manual)
Page 16
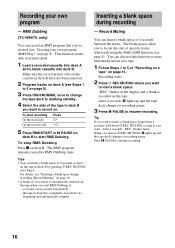
... X PAUSE to resume recording. After 4 seconds, X lights up and the tape deck changes to recording pause. When you load a new cassette into deck B. Recording your own program (RMS Play)" on deck B to start RMS Dubbing. To start of 4 seconds between the tracks. RMS Dubbing (TC-WE675 only) You can insert a blank space of specific tracks afterwards using...
... X PAUSE to resume recording. After 4 seconds, X lights up and the tape deck changes to recording pause. When you load a new cassette into deck B. Recording your own program (RMS Play)" on deck B to start RMS Dubbing. To start of 4 seconds between the tracks. RMS Dubbing (TC-WE675 only) You can insert a blank space of specific tracks afterwards using...
Operating Instructions (primary manual)
Page 17
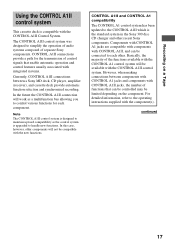
...composed of control signals that can be available with integrated systems. Currently, CONTROL A1II connections between a Sony MD deck, CD player, amplifier (receiver), and cassette deck provide automatic function selection and synchronized recording. However, when making connections between components with CONTROL A1 jacks... compatible with CONTROL A1II, and can be controlled may be limited depending on a Tape Using the CONTROL A1II control system This cassette deck is the standard system in the Sony 300 disc CD changer and other . For detailed information, refer to handle new ...
...composed of control signals that can be available with integrated systems. Currently, CONTROL A1II connections between a Sony MD deck, CD player, amplifier (receiver), and cassette deck provide automatic function selection and synchronized recording. However, when making connections between components with CONTROL A1 jacks... compatible with CONTROL A1II, and can be controlled may be limited depending on a Tape Using the CONTROL A1II control system This cassette deck is the standard system in the Sony 300 disc CD changer and other . For detailed information, refer to handle new ...
Operating Instructions (primary manual)
Page 18
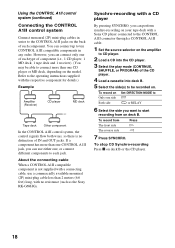
...compatible components in series to the operating instructions supplied with the respective component for details.) Example Amplifier (Receiver) CD player MD deck Tape deck Other component In the CONTROL A1II control system, the control signals flow both ways, so there is not supplied with a... less than 2 meters (6.6 feet) long, with a Sony CD player connected to the CONTROL A1II connector through a CONTROL A1II cable. 1 Set the source selector on your tape deck with no distinction of the CD player. 4 Load a cassette into deck B. 5 Select the side(s) to start recording from Press...
...compatible components in series to the operating instructions supplied with the respective component for details.) Example Amplifier (Receiver) CD player MD deck Tape deck Other component In the CONTROL A1II control system, the control signals flow both ways, so there is not supplied with a... less than 2 meters (6.6 feet) long, with a Sony CD player connected to the CONTROL A1II connector through a CONTROL A1II cable. 1 Set the source selector on your tape deck with no distinction of the CD player. 4 Load a cassette into deck B. 5 Select the side(s) to start recording from Press...
Operating Instructions (primary manual)
Page 19
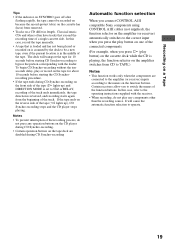
...8226; Certain operation buttons on the tape deck are connected to the amplifier (or receiver) inputs according to the names on the function buttons. In this case, record the tape manually. • A tape that exceed the recording time of a single cassette side. To begin CD Synchro-recording...is assumed by the deck to operate. 19 It will transport the tape for about 10 seconds before starting the CD Synchrorecording procedure. • If the tape ends during CD Synchro-recording Automatic function selection When you connect CONTROL A1II compatible Sony components using CONTROL ...
...8226; Certain operation buttons on the tape deck are connected to the amplifier (or receiver) inputs according to the names on the function buttons. In this case, record the tape manually. • A tape that exceed the recording time of a single cassette side. To begin CD Synchro-recording...is assumed by the deck to operate. 19 It will transport the tape for about 10 seconds before starting the CD Synchrorecording procedure. • If the tape ends during CD Synchro-recording Automatic function selection When you connect CONTROL A1II compatible Sony components using CONTROL ...
Operating Instructions (primary manual)
Page 20
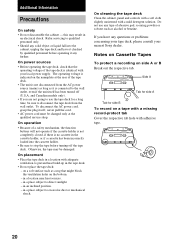
... benzine. On operation • Because of the tape deck is not disconnected from the wall outlet. on a tape with a missing record-protect tab Cover the respective tab hole with your nearest Sony dealer. in the cassette holder, or if a cassette has been incorrectly loaded into the cabinet, unplug the tape deck and have any further. in an inclined...
... benzine. On operation • Because of the tape deck is not disconnected from the wall outlet. on a tape with a missing record-protect tab Cover the respective tab hole with your nearest Sony dealer. in the cassette holder, or if a cassette has been incorrectly loaded into the cabinet, unplug the tape deck and have any further. in an inclined...
Operating Instructions (primary manual)
Page 21
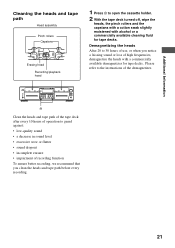
A Clean the heads and tape path of the tape deck after every 10 hours of operation to guard against: • low-quality sound • a decrease in sound level • excessive wow or flutter • sound ... 30 hours of use, or when you clean the heads and tape path before every recording. 21 Additional Information Cleaning the heads and tape path Head assembly Pinch rollers Capstans Erasing head Recording/playback head 1 Press A to open the cassette holder. 2 With the tape deck turned off, wipe the heads, the pinch rollers and the...
A Clean the heads and tape path of the tape deck after every 10 hours of operation to guard against: • low-quality sound • a decrease in sound level • excessive wow or flutter • sound ... 30 hours of use, or when you clean the heads and tape path before every recording. 21 Additional Information Cleaning the heads and tape path Head assembly Pinch rollers Capstans Erasing head Recording/playback head 1 Press A to open the cassette holder. 2 With the tape deck turned off, wipe the heads, the pinch rollers and the...
Operating Instructions (primary manual)
Page 22
... 21). • The recording/playback head is altered. Use another cassette. Load a blank space of 4 seconds using the tape deck, use this troubleshooting guide to help you 've experienced any of the current track. The tape deck does not play or record. • There is closed completely.... or erasing head and tape path are dirty. Troubleshooting If you remedy the problem. Wait until "M" disappears. • The cassette shell is slack. Should the problem persist, consult your nearest Sony dealer. There is placed near a TV or VCR. Move the tape deck away from the amplifier....
... 21). • The recording/playback head is altered. Use another cassette. Load a blank space of 4 seconds using the tape deck, use this troubleshooting guide to help you 've experienced any of the current track. The tape deck does not play or record. • There is closed completely.... or erasing head and tape path are dirty. Troubleshooting If you remedy the problem. Wait until "M" disappears. • The cassette shell is slack. Should the problem persist, consult your nearest Sony dealer. There is placed near a TV or VCR. Move the tape deck away from the amplifier....


