

Operating Instructions
Page 2
... nearest Sony service station. Owner's Record The model and serial numbers are designed to provide reasonable protection against harmful interference in a residential installation. Record these numbers in Canada CAUTION TO PREVENT ELECTRIC SHOCK, DO NOT USE THIS POLARIZED AC PLUG WITH AN EXTENSION CORD, RECEPTACLE OR OTHER OUTLET UNLESS THE BLADES CAN BE FULLY INSERTED TO PREVENT BLADE EXPOSURE. marked with the following instructions. If...
... nearest Sony service station. Owner's Record The model and serial numbers are designed to provide reasonable protection against harmful interference in a residential installation. Record these numbers in Canada CAUTION TO PREVENT ELECTRIC SHOCK, DO NOT USE THIS POLARIZED AC PLUG WITH AN EXTENSION CORD, RECEPTACLE OR OTHER OUTLET UNLESS THE BLADES CAN BE FULLY INSERTED TO PREVENT BLADE EXPOSURE. marked with the following instructions. If...
Operating Instructions
Page 3
... start operating it for models TC-WA8ESA, WA7ESA, WE805S, WE705S, WE605S, WR550Z and WE505. Convention The following icon is used for purchasing the Sony Stereo Cassette Deck. Model Feature Pitch control WA8ESA WE805S WA7ESA WE705S • High-speed fast-forwarding and rewinding •• Dolby S •• CD synchro- • recording Model WE605S WR550Z WE505 Feature Pitch control • Playing a Tape 5 Recording on a Tape 6 Advanced Playback Operations Locating a Track (Multi-AMS/Auto Play/Memory Play) 8 Creating Your Own Program (RMS Play...
... start operating it for models TC-WA8ESA, WA7ESA, WE805S, WE705S, WE605S, WR550Z and WE505. Convention The following icon is used for purchasing the Sony Stereo Cassette Deck. Model Feature Pitch control WA8ESA WE805S WA7ESA WE705S • High-speed fast-forwarding and rewinding •• Dolby S •• CD synchro- • recording Model WE605S WR550Z WE505 Feature Pitch control • Playing a Tape 5 Recording on a Tape 6 Advanced Playback Operations Locating a Track (Multi-AMS/Auto Play/Memory Play) 8 Creating Your Own Program (RMS Play...

Operating Instructions
Page 5
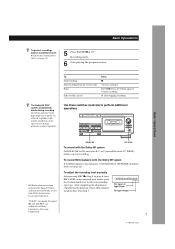
...; BACK PAUSE REC MUTE REC PRr · p FRONT DOLBY NR OFF ON ON FILTER B C S ª· PAUSE REC MUTE REC PRr § § AUTO 4 3 REC LEVEL 5 6 7 2 8 1 0 9 10 FADER ARL π SYNCHRO PHONES • See page 4 for playback. 1 Turn on the amplifier. Basic Operations Playing a Tape 32 4 Basic Operations Basic Operations POWER DIRECTION MODE A a RELAY ØON øOFF PITCH CONTROL - + RESET MEMORY A COUNTER B RESET MEMORY g RMS/START RMS SET CHECK - Press the button again to...
...; BACK PAUSE REC MUTE REC PRr · p FRONT DOLBY NR OFF ON ON FILTER B C S ª· PAUSE REC MUTE REC PRr § § AUTO 4 3 REC LEVEL 5 6 7 2 8 1 0 9 10 FADER ARL π SYNCHRO PHONES • See page 4 for playback. 1 Turn on the amplifier. Basic Operations Playing a Tape 32 4 Basic Operations Basic Operations POWER DIRECTION MODE A a RELAY ØON øOFF PITCH CONTROL - + RESET MEMORY A COUNTER B RESET MEMORY g RMS/START RMS SET CHECK - Press the button again to...

Operating Instructions
Page 6
...; AUTO 4 3 REC LEVEL 5 6 7 2 8 1 0 9 10 FADER ARL π SYNCHRO PHONES 3 • See page 4 for recording on a Tape 2 54 POWER DIRECTION MODE A a RELAY ØON øOFF PITCH CONTROL - + RESET MEMORY A COUNTER B RESET MEMORY g RMS/START RMS SET CHECK - If it doesn't, press · once. If you . To record on Set to Only one side A Both sides* a * Recording stops when the tape reaches the end of the tape. 1 Turn on the amplifier and play the program...
...; AUTO 4 3 REC LEVEL 5 6 7 2 8 1 0 9 10 FADER ARL π SYNCHRO PHONES 3 • See page 4 for recording on a Tape 2 54 POWER DIRECTION MODE A a RELAY ØON øOFF PITCH CONTROL - + RESET MEMORY A COUNTER B RESET MEMORY g RMS/START RMS SET CHECK - If it doesn't, press · once. If you . To record on Set to Only one side A Both sides* a * Recording stops when the tape reaches the end of the tape. 1 Turn on the amplifier and play the program...
Operating Instructions
Page 7
... perform additional operations ESET MEMORY A COUNTER B RESET MEMORY g RMS/START RMS SET CHECK - Press the button again to resume recording. § after stopping recording z The Dolby HX PRO* system automatically works during playback on page 6, turn REC LEVEL so that can be enjoyed even during recording Distortion and noise in Step 5 PAUSE P. To adjust the recording level manually After pressing REC rin Step 4 on other tape decks. Basic Operations z To protect recordings against accidental...
... perform additional operations ESET MEMORY A COUNTER B RESET MEMORY g RMS/START RMS SET CHECK - Press the button again to resume recording. § after stopping recording z The Dolby HX PRO* system automatically works during playback on page 6, turn REC LEVEL so that can be enjoyed even during recording Distortion and noise in Step 5 PAUSE P. To adjust the recording level manually After pressing REC rin Step 4 on other tape decks. Basic Operations z To protect recordings against accidental...

Operating Instructions
Page 8
.... For example, to locate 2 tracks ahead, press twice. Advanced Playback Operations Locating a Track (Multi-AMS/ Auto Play/Memory Play) You can even locate a specific point anywhere on a tape (Memory Play). RESET MEMORY RESET POWER DIRECTION MODE A a RELAY ØON øOFF PITCH CONTROL - + RESET MEMORY A COUNTER B RESET MEMORY g RMS/START RMS SET CHECK - Then press 0 (or )) while holding down · (or ª). Find the point you use. To locate the memorized point and start playback, press 0 (or )) while...
.... For example, to locate 2 tracks ahead, press twice. Advanced Playback Operations Locating a Track (Multi-AMS/ Auto Play/Memory Play) You can even locate a specific point anywhere on a tape (Memory Play). RESET MEMORY RESET POWER DIRECTION MODE A a RELAY ØON øOFF PITCH CONTROL - + RESET MEMORY A COUNTER B RESET MEMORY g RMS/START RMS SET CHECK - Then press 0 (or )) while holding down · (or ª). Find the point you use. To locate the memorized point and start playback, press 0 (or )) while...

Operating Instructions
Page 9
... peak level meters appear in the display. 9 3-810-716-11(1) The Random Music Sensor (RMS) function lets you create a program of up to 28 tracks, from the 1st to the 14th tracks on the program 5 Repeat Steps 2 to 4 to program more tracks. RMS buttons (RMS/START, SET, CHECK, DISPLAY) POWER DIRECTION MODE A a RELAY ØON øOFF PITCH CONTROL - + RESET MEMORY A COUNTER B RESET MEMORY g RMS/START RMS SET CHECK - Advanced Playback Operations Creating Your Own Program (RMS Play...
... peak level meters appear in the display. 9 3-810-716-11(1) The Random Music Sensor (RMS) function lets you create a program of up to 28 tracks, from the 1st to the 14th tracks on the program 5 Repeat Steps 2 to 4 to program more tracks. RMS buttons (RMS/START, SET, CHECK, DISPLAY) POWER DIRECTION MODE A a RELAY ØON øOFF PITCH CONTROL - + RESET MEMORY A COUNTER B RESET MEMORY g RMS/START RMS SET CHECK - Advanced Playback Operations Creating Your Own Program (RMS Play...
Operating Instructions
Page 11
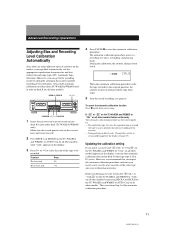
... models appears in the display, it means that automatic calibration data in their characteristics. Reverse the tape direction or rewind the tape to normal and the tape deck stops. 5 Start the actual recording (see page 19). Change the cassette or clean and demagnetize the heads (see page 6). Before recalibrating, be recorded. DECK A / DECK B ª / · POWER DIRECTION MODE A a RELAY ØON øOFF PITCH CONTROL - + RESET MEMORY A COUNTER B RESET MEMORY g RMS/START...
... models appears in the display, it means that automatic calibration data in their characteristics. Reverse the tape direction or rewind the tape to normal and the tape deck stops. 5 Start the actual recording (see page 19). Change the cassette or clean and demagnetize the heads (see page 6). Before recalibrating, be recorded. DECK A / DECK B ª / · POWER DIRECTION MODE A a RELAY ØON øOFF PITCH CONTROL - + RESET MEMORY A COUNTER B RESET MEMORY g RMS/START...
Operating Instructions
Page 12
... the TC-WA8ESA and WE805S, the Auto Rec Level function operates during recording, recording will set the recording level for some time. Make sure that has extremely high-level signals. If you have not been removed. 2 Press REC r. To stop recording Press p. z How the Auto Rec Level function adjusts the recording level While the AUTO indicator is a more natural-sounding recording. • If you try to excessive noise in the recording level after the start of "Recording on a Tape" on the TCWE7ESA, WE705S, WE605S, WR550Z...
... the TC-WA8ESA and WE805S, the Auto Rec Level function operates during recording, recording will set the recording level for some time. Make sure that has extremely high-level signals. If you have not been removed. 2 Press REC r. To stop recording Press p. z How the Auto Rec Level function adjusts the recording level While the AUTO indicator is a more natural-sounding recording. • If you try to excessive noise in the recording level after the start of "Recording on a Tape" on the TCWE7ESA, WE705S, WE605S, WR550Z...

Operating Instructions
Page 13
... is not working. DIRECTION MODE ª / · HIGH / NORMAL POWER DIRECTION MODE A a RELAY ØON øOFF PITCH CONTROL - + RESET MEMORY A COUNTER B RESET MEMORY g RMS/START RMS SET CHECK - Recording on the reverse side on the cassette in deck B have used REC LEVEL to manually set the recording level to start dubbing. It is working, or goes off abruptly. When the fade-in has completed, the AUTO indicator lights up if the Auto Rec Level function is convenient to use this function, for...
... is not working. DIRECTION MODE ª / · HIGH / NORMAL POWER DIRECTION MODE A a RELAY ØON øOFF PITCH CONTROL - + RESET MEMORY A COUNTER B RESET MEMORY g RMS/START RMS SET CHECK - Recording on the reverse side on the cassette in deck B have used REC LEVEL to manually set the recording level to start dubbing. It is working, or goes off abruptly. When the fade-in has completed, the AUTO indicator lights up if the Auto Rec Level function is convenient to use this function, for...
Operating Instructions
Page 14
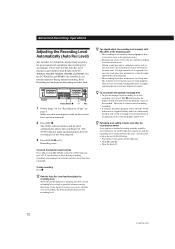
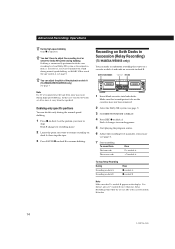
... want to skip. Recording on deck B to recording pause. 5 Start playing the program source. 6 Adjust the recording level manually, if necessary (see page 7). 3 Set DIRECTION MODE to match the tape in deck B. z You don't have not been removed. 2 Select the Dolby NR system (see page 7). 7 Start recording. DIRECTION MODE ª / · REC r POWER DIRECTION MODE A a RELAY ØON øOFF PITCH CONTROL - + RESET MEMORY A COUNTER B RESET MEMORY g RMS/START RMS SET CHECK - Make sure that starts on a cassette in deck A and...
... want to skip. Recording on deck B to recording pause. 5 Start playing the program source. 6 Adjust the recording level manually, if necessary (see page 7). 3 Set DIRECTION MODE to match the tape in deck B. z You don't have not been removed. 2 Select the Dolby NR system (see page 7). 7 Start recording. DIRECTION MODE ª / · REC r POWER DIRECTION MODE A a RELAY ØON øOFF PITCH CONTROL - + RESET MEMORY A COUNTER B RESET MEMORY g RMS/START RMS SET CHECK - Make sure that starts on a cassette in deck A and...
Operating Instructions
Page 15
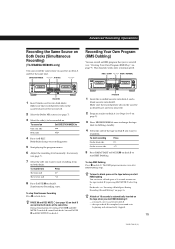
... p on Set DIRECTION MODE to recording pause. 5 Start playing the program source. 6 Adjust the recording level manually, if necessary (see "Inserting a Blank Space During Recording (Record Muting)" on page 16. the tape in deck B you want to its beginning and automatically stopped. Simultaneous Recording starts. Make sure that you start recording from Press To stop Simultaneous Recording Press p on both decks at the same time During Simultaneous Recording, PAUSE P and REC - RMS + DISPLAY 0(AMS) (AMS)) AUTO CAL...
... p on Set DIRECTION MODE to recording pause. 5 Start playing the program source. 6 Adjust the recording level manually, if necessary (see "Inserting a Blank Space During Recording (Record Muting)" on page 16. the tape in deck B you want to its beginning and automatically stopped. Simultaneous Recording starts. Make sure that you start recording from Press To stop Simultaneous Recording Press p on both decks at the same time During Simultaneous Recording, PAUSE P and REC - RMS + DISPLAY 0(AMS) (AMS)) AUTO CAL...
Operating Instructions
Page 16
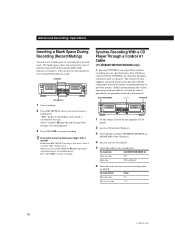
... models. After 4 seconds, P lights up and the tape deck changes to erase unwanted portions on the amplifier to this function to recording pause. The control A1 cable supports advanced functions not possible with a Sony CD player connected to locate the start recording from Press The front side · The reverse side ª 16 3-810-716-11(1) DIRECTION MODE ª / · SYNCHRO POWER DIRECTION MODE A a RELAY ØON øOFF PITCH CONTROL - + RESET MEMORY A COUNTER B RESET MEMORY...
... models. After 4 seconds, P lights up and the tape deck changes to erase unwanted portions on the amplifier to this function to recording pause. The control A1 cable supports advanced functions not possible with a Sony CD player connected to locate the start recording from Press The front side · The reverse side ª 16 3-810-716-11(1) DIRECTION MODE ª / · SYNCHRO POWER DIRECTION MODE A a RELAY ØON øOFF PITCH CONTROL - + RESET MEMORY A COUNTER B RESET MEMORY...

Operating Instructions
Page 17
... button indicator goes off after flashing three times The tape cannot be a new tape, even if the present location is assumed by the deck to start CD play pause and deck B to operate the CD player To start Synchro-Recording. Notes • To prevent interruption of tape used for recording Tracks on deck B or the CD player. In this case, record the tape manually. When the recording level adjustment is set to pause CD play...
... button indicator goes off after flashing three times The tape cannot be a new tape, even if the present location is assumed by the deck to start CD play pause and deck B to operate the CD player To start Synchro-Recording. Notes • To prevent interruption of tape used for recording Tracks on deck B or the CD player. In this case, record the tape manually. When the recording level adjustment is set to pause CD play...
Operating Instructions
Page 18
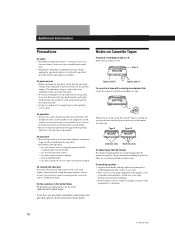
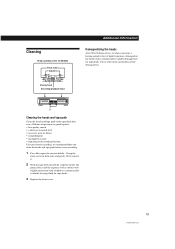
... qualified personnel before turning off the tape deck. this may cause tape distortion or erase the recordings. • Do not expose cassettes to stretch easily. To disconnect the AC power cord, grasp the plug itself; On operation • Because of the tape deck is no cassette in an electrical shock. On cleaning the tape deck Clean the cabinet, panel and controls with a soft cloth...
... qualified personnel before turning off the tape deck. this may cause tape distortion or erase the recordings. • Do not expose cassettes to stretch easily. To disconnect the AC power cord, grasp the plug itself; On operation • Because of the tape deck is no cassette in an electrical shock. On cleaning the tape deck Clean the cabinet, panel and controls with a soft cloth...
Operating Instructions
Page 19
... every recording. 1 Press § to open the cassette holder. Erasing head Recording/playback head POWER DIRECTION MODE A a RELAY ØON øOFF PITCH CONTROL - + RESET MEMORY A COUNTER B RESET MEMORY g RMS/START RMS SET CHECK - Please refer to the instructions of high frequencies, demagnetize the heads with alcohol or a commercially available cleaning fluid for tape decks. RMS + DISPLAY 0(AMS) (AMS)) AUTO CAL(STARTP) DECK A DECK B 0(AMS) DUBBING A B A+B REC HIGH/NORMAL START(DECK...
... every recording. 1 Press § to open the cassette holder. Erasing head Recording/playback head POWER DIRECTION MODE A a RELAY ØON øOFF PITCH CONTROL - + RESET MEMORY A COUNTER B RESET MEMORY g RMS/START RMS SET CHECK - Please refer to the instructions of high frequencies, demagnetize the heads with alcohol or a commercially available cleaning fluid for tape decks. RMS + DISPLAY 0(AMS) (AMS)) AUTO CAL(STARTP) DECK A DECK B 0(AMS) DUBBING A B A+B REC HIGH/NORMAL START(DECK...
Operating Instructions
Page 20
... (see page 18). / Make sure the amplifier setting is bent. There is hum or noise. / The tape deck is placed near a TV or VCR. Push the PITCH CONTROL button again to stop playback or recording before the beginning of the next track or immediately after the beginning of the current track. The High-Speed Fast-Forwarding and Rewinding functions do not work (TC-WA8ESA/WA7ESA/WE805S...
... (see page 18). / Make sure the amplifier setting is bent. There is hum or noise. / The tape deck is placed near a TV or VCR. Push the PITCH CONTROL button again to stop playback or recording before the beginning of the next track or immediately after the beginning of the current track. The High-Speed Fast-Forwarding and Rewinding functions do not work (TC-WA8ESA/WA7ESA/WE805S...
Operating Instructions
Page 21
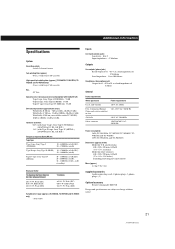
... inches) Model for U.K. Additional Information Specifications System Recording system 4-track 2-channel stereo Fast-winding time (approx.) 90 sec. (with Sony C-60 cassette) High-speed fast-winding time (approx.) (TC-WA8ESA, TC-WA7ESA, TCWE805S and TC-WE705S only) 45 sec. (with Sony C-60 cassette) Bias AC bias Signal-to-noise ratio (at peak level and weighted with Dolby NR off ) Tape type Type I tape, Sony Type I (NORMAL): 55 dB Type II tape, Sony Type II (HIGH): 57 dB Type IV tape, Sony Type IV (METAL...
... inches) Model for U.K. Additional Information Specifications System Recording system 4-track 2-channel stereo Fast-winding time (approx.) 90 sec. (with Sony C-60 cassette) High-speed fast-winding time (approx.) (TC-WA8ESA, TC-WA7ESA, TCWE805S and TC-WE705S only) 45 sec. (with Sony C-60 cassette) Bias AC bias Signal-to-noise ratio (at peak level and weighted with Dolby NR off ) Tape type Type I tape, Sony Type I (NORMAL): 55 dB Type II tape, Sony Type II (HIGH): 57 dB Type IV tape, Sony Type IV (METAL...
Operating Instructions
Page 22
... produces the same high-quality sound even when played on the TC-WE505). Type A is for bias current and recording level calibration. Multiplex filter A filter for the inserted tape. A, B Adjusting recording level automatically. See Auto rec level recording level manually 7 volume 5 Accessories optional 21 supplied 4, 21 ATS 11, 22 Audio connecting cord 4, 21 Auto play 8 Automatic Music Sensor. See Hooking up hookups 4 overview 4 Insert blank space 16 cassette 5, 6 L Locating beginning of tape inserted in . See Fader...
... produces the same high-quality sound even when played on the TC-WE505). Type A is for bias current and recording level calibration. Multiplex filter A filter for the inserted tape. A, B Adjusting recording level automatically. See Auto rec level recording level manually 7 volume 5 Accessories optional 21 supplied 4, 21 ATS 11, 22 Audio connecting cord 4, 21 Auto play 8 Automatic Music Sensor. See Hooking up hookups 4 overview 4 Insert blank space 16 cassette 5, 6 L Locating beginning of tape inserted in . See Fader...

Operating Instructions
Page 23
... and rewinding/AMS/ RMS +/-) 8, 9 Switches DIRECTION MODE 5, 6, 13 - 16 DOLBY NR 7 POWER 5, 6 Controls PITCH CONTROL 5 REC (recording) LEVEL 6 Jacks CONTROL A1 4 LINE IN 4 LINE OUT 4 PHONES 5 Others AUTO indicator 6 Cassette holder 5, 6, 19 Peak level meters 7 23 3-810-716-11(1) See Relay recording the same source on both decks. See RMS play 9 R Random Music Sensor. Additional InformInadtieoxn M, N, O Memory play 8 Multi-AMS 8, 22 Multiplex filter 7, 22 P, Q Pitch control function 5 Playing auto play 8 basic play 5 memory play 8 RMS play or dubbing Recording basic recording 6 CD...
... and rewinding/AMS/ RMS +/-) 8, 9 Switches DIRECTION MODE 5, 6, 13 - 16 DOLBY NR 7 POWER 5, 6 Controls PITCH CONTROL 5 REC (recording) LEVEL 6 Jacks CONTROL A1 4 LINE IN 4 LINE OUT 4 PHONES 5 Others AUTO indicator 6 Cassette holder 5, 6, 19 Peak level meters 7 23 3-810-716-11(1) See Relay recording the same source on both decks. See RMS play 9 R Random Music Sensor. Additional InformInadtieoxn M, N, O Memory play 8 Multi-AMS 8, 22 Multiplex filter 7, 22 P, Q Pitch control function 5 Playing auto play 8 basic play 5 memory play 8 RMS play or dubbing Recording basic recording 6 CD...


