

Operating Instructions
Page 1
SONY 3-754-877-21(1) AS Integrated StereoAVAmplifier Operating Instructions TA-AV521 0 1992 by Sony Corporation
SONY 3-754-877-21(1) AS Integrated StereoAVAmplifier Operating Instructions TA-AV521 0 1992 by Sony Corporation

Operating Instructions
Page 2
... operating and maintenance (servicing) instructions in a particular installation. CAUTION RISK OF ELECTRIC SHOCK 00 NOT OPEN CAUTION: TO REDUCE THE RISK OF ELECTRIC SHOCK, DO NOT REMOVE COVER (OR BACK). OWNER'S RECORD The model and serial numbers are on different branch circuits. NO USER-SERVICEABLEPARTS INSIDE. It has been type tested and found to persons. Model No.TA-AV521 Serial No. The user...
... operating and maintenance (servicing) instructions in a particular installation. CAUTION RISK OF ELECTRIC SHOCK 00 NOT OPEN CAUTION: TO REDUCE THE RISK OF ELECTRIC SHOCK, DO NOT REMOVE COVER (OR BACK). OWNER'S RECORD The model and serial numbers are on different branch circuits. NO USER-SERVICEABLEPARTS INSIDE. It has been type tested and found to persons. Model No.TA-AV521 Serial No. The user...
Operating Instructions
Page 3
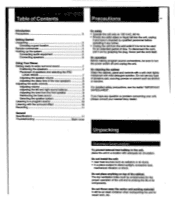
... be sure to turn the power switch off and unplug the unit. Table ofi contents,, Precautions As Introduction Precautions 3 Getting Started Unpacking 3 Choosing a good location 3 Remote commander 4 Hooking up the system 5 Connecting audio equipment 5 Connecting speakers 6 Using Your Stereo Getting ready to enjoy surround sound 7 Positioning the speakers 7 Placement of speakers and selecting the PRO LOGIC MODE 7 Adjusting the speaker volume 8 Adjusting the delay time of the rear speakers 9 Adjusting the audio controls 9 Adjusting volume 9 Adjusting the left and...
... be sure to turn the power switch off and unplug the unit. Table ofi contents,, Precautions As Introduction Precautions 3 Getting Started Unpacking 3 Choosing a good location 3 Remote commander 4 Hooking up the system 5 Connecting audio equipment 5 Connecting speakers 6 Using Your Stereo Getting ready to enjoy surround sound 7 Positioning the speakers 7 Placement of speakers and selecting the PRO LOGIC MODE 7 Adjusting the speaker volume 8 Adjusting the delay time of the rear speakers 9 Adjusting the audio controls 9 Adjusting volume 9 Adjusting the left and...
Operating Instructions
Page 4
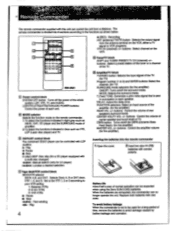
... be used for the amplifier) REAR VOL +/- buttons: Select channel on /off the power of the amplifier. (for a long period of normal operation can no longer operate the unit. LDP/VTR1/VTR2NTR3fTV/AUDIO POWER buttons: Control the power of each speaker. 'DELAY: Adjust the delay time. T.(Test) TONE: Generates a pink noise signal that is not to each unit. [11 MODE selector Selects the function mode on the remote commander. 1:To select the functions indicated in light gray such as DECK, DAT, CD player...
... be used for the amplifier) REAR VOL +/- buttons: Select channel on /off the power of the amplifier. (for a long period of normal operation can no longer operate the unit. LDP/VTR1/VTR2NTR3fTV/AUDIO POWER buttons: Control the power of each speaker. 'DELAY: Adjust the delay time. T.(Test) TONE: Generates a pink noise signal that is not to each unit. [11 MODE selector Selects the function mode on the remote commander. 1:To select the functions indicated in light gray such as DECK, DAT, CD player...
Operating Instructions
Page 5
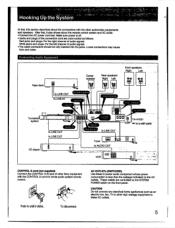
... Tuner to these to power audio component whose power consumption is off. • Jacks arid plugs of the connection cord are controlled by the SYSTEM POWER switch on the AC outlets. After that, it clicks. Make sure power is less than the wattage indicated on the front panel. CAUTION Do not connect any electrical home appliances such as follows: Red jacks and plugs: For the right channel of audio signals White jacks and plugs...
... Tuner to these to power audio component whose power consumption is off. • Jacks arid plugs of the connection cord are controlled by the SYSTEM POWER switch on the AC outlets. After that, it clicks. Make sure power is less than the wattage indicated on the front panel. CAUTION Do not connect any electrical home appliances such as follows: Red jacks and plugs: For the right channel of audio signals White jacks and plugs...

Operating Instructions
Page 6
... from 4 to the CENTER SPEAKER terminal for enjoying surround sound. Front speaker (R) speaker (L) O© O© R,R10 (.--) 0 Center speaker 0 0 Ivol ret i Rear Rear speaker (R) speaker (L) TA-AV521 :11:11:1 SO'Sg•" P 1 to the second front speaker systems Front speakers Connect the front speaker systems to work best with adequate power handling capability. They can connect a center speaker to 16 ohms). Note on speaker impedance and power capacity This amplifier is reversed at either speaker, the sound will be selected individually or simultaneously...
... from 4 to the CENTER SPEAKER terminal for enjoying surround sound. Front speaker (R) speaker (L) O© O© R,R10 (.--) 0 Center speaker 0 0 Ivol ret i Rear Rear speaker (R) speaker (L) TA-AV521 :11:11:1 SO'Sg•" P 1 to the second front speaker systems Front speakers Connect the front speaker systems to work best with adequate power handling capability. They can connect a center speaker to 16 ohms). Note on speaker impedance and power capacity This amplifier is reversed at either speaker, the sound will be selected individually or simultaneously...
Operating Instructions
Page 7
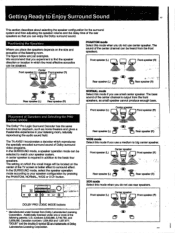
... TA-AV521 incorporates a decoder which the most effective acoustics can enjoy the Dolby surround sound. In the SURROUND mode, select the speaker operation mode according to your listening room, naturally reproducing the audio sound field. The bass sound of the center channel is required in your speaker configuration by pressing the PHANTOM, NORMAL, WIDE or 3 CH button. 0 • 0 NORMAL mode Select this mode when you place the speakers depends on the center of Dolby surround video programs. In the SURROUND mode, a speaker operation mode...
... TA-AV521 incorporates a decoder which the most effective acoustics can enjoy the Dolby surround sound. In the SURROUND mode, select the speaker operation mode according to your listening room, naturally reproducing the audio sound field. The bass sound of the center channel is required in your speaker configuration by pressing the PHANTOM, NORMAL, WIDE or 3 CH button. 0 • 0 NORMAL mode Select this mode when you place the speakers depends on the center of Dolby surround video programs. In the SURROUND mode, a speaker operation mode...

Operating Instructions
Page 8
... SURROUND button on the front panel or SURROUND OWOFF button on the remote commander to set to the SURROUND ON mode. 2 Select a program source with the function selector and start playback. 3 Select the NORMAL mode with the CENTER LEVEL + or - 40 4, _.4 •.!al LS Getting Ready toEnjoy Surround Sound Adjusting the Speaker Volume To adjust the surround sound to the maximum on the remote commander. Sequence of rear speakers with a center speaker: The test tone will be output automatically from the front speakers and rear speakers...
... SURROUND button on the front panel or SURROUND OWOFF button on the remote commander to set to the SURROUND ON mode. 2 Select a program source with the function selector and start playback. 3 Select the NORMAL mode with the CENTER LEVEL + or - 40 4, _.4 •.!al LS Getting Ready toEnjoy Surround Sound Adjusting the Speaker Volume To adjust the surround sound to the maximum on the remote commander. Sequence of rear speakers with a center speaker: The test tone will be output automatically from the front speakers and rear speakers...

Operating Instructions
Page 9
... decrease it, turn the TREBLE or BASS control counterclockwise. Adjusting the Left and Right Sound Balance To change relative strength of the Rear Speakers The delay time is a time between the surround sound from the front and that from the front speakers, turn off the surround effect Press the SURROUND button on the front panel or the SURROUND ON/OFF button on the remote commander. To drive both speaker systems A and B (series connection): Set the SPEAKERS selector to...
... decrease it, turn the TREBLE or BASS control counterclockwise. Adjusting the Left and Right Sound Balance To change relative strength of the Rear Speakers The delay time is a time between the surround sound from the front and that from the front speakers, turn off the surround effect Press the SURROUND button on the front panel or the SURROUND ON/OFF button on the remote commander. To drive both speaker systems A and B (series connection): Set the SPEAKERS selector to...

Operating Instructions
Page 10
SURROUND 4 Select the surround mode with the SURROUND MODE buttons. SIMULATED (Simulated surround): Gives a simulated stereo effect to monaural sound. I Tape deck i VCR a i 1 Select the program source to be heard from the rear and center speakers, unless one of the selected program. 3 Press the SURROUND button to set to on . VIDEO TAPE CD TUNER PHONO 2 Start playback of I O3 0 0 O = ----1 Select the program source. 1VIDEO TAPE CO TUNER PHONO 2 Start playback of the SURROUND PRO LOGIC MODE or SURROUND MODE is produced in a concert hall. COMPR0L00O1/301 ...... 1...
SURROUND 4 Select the surround mode with the SURROUND MODE buttons. SIMULATED (Simulated surround): Gives a simulated stereo effect to monaural sound. I Tape deck i VCR a i 1 Select the program source to be heard from the rear and center speakers, unless one of the selected program. 3 Press the SURROUND button to set to on . VIDEO TAPE CD TUNER PHONO 2 Start playback of I O3 0 0 O = ----1 Select the program source. 1VIDEO TAPE CO TUNER PHONO 2 Start playback of the SURROUND PRO LOGIC MODE or SURROUND MODE is produced in a concert hall. COMPR0L00O1/301 ...... 1...

Operating Instructions
Page 11
... 135 watts per channel minimum RMS power, with less than 0.9% at front off 8 ohms) 30 W (at rated output (Surround OFF) - Accepts speakers of 4 -16 ohms HEADPHONES . Recording Specifications =3 0 0 0 0 0 --ITumtable system) j 3I Tape deck 1-- -I Tuner CD player 2 ----- -VCR 1 I PHONO 2 Start playback of the selected program. 3 Set the tape deck in the recording mode. PHONO: RIAA equalization curve CD, VIDEO, TUNER, TAPE: 10 Hz - 50 kHz ±3dB 15 W + 15 W (at front off 4 ohms) 27 (8 ohms, 1 kHz) Input Input jack Jack type Sensitivity Impedance...
... 135 watts per channel minimum RMS power, with less than 0.9% at front off 8 ohms) 30 W (at rated output (Surround OFF) - Accepts speakers of 4 -16 ohms HEADPHONES . Recording Specifications =3 0 0 0 0 0 --ITumtable system) j 3I Tape deck 1-- -I Tuner CD player 2 ----- -VCR 1 I PHONO 2 Start playback of the selected program. 3 Set the tape deck in the recording mode. PHONO: RIAA equalization curve CD, VIDEO, TUNER, TAPE: 10 Hz - 50 kHz ±3dB 15 W + 15 W (at front off 4 ohms) 27 (8 ohms, 1 kHz) Input Input jack Jack type Sensitivity Impedance...
Operating Instructions
Page 12
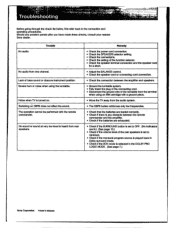
... setting of bass sound or obscure instrument position. Noise when TV is selected in the DOLBY PRO LOGIC MODE (See page 7.) Sony Corporation Printed in Malaysia No sound or sound at very low level is heard from rear speakers. • Adjust the BALANCE control. • Check the speaker cord or connecting cord connection. • Check the connection between the remote commander and the amplifier. • Check if the batteries are exhausted. • Check if the SURROUND button...
... setting of bass sound or obscure instrument position. Noise when TV is selected in the DOLBY PRO LOGIC MODE (See page 7.) Sony Corporation Printed in Malaysia No sound or sound at very low level is heard from rear speakers. • Adjust the BALANCE control. • Check the speaker cord or connecting cord connection. • Check the connection between the remote commander and the amplifier. • Check if the batteries are exhausted. • Check if the SURROUND button...

