
Instructions
Page 2
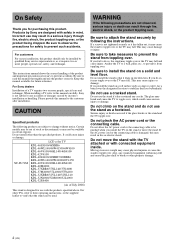
Keep this manual available for safety to prevent the stand from toppling over . CAUTION Specified products The following products are subject to prevent accidents. It could cause serious injury or damage. SU-FL71M LCD color TV KDL-46Z4100/46XBR6 KDL-46WL140/46W4150/46W4100 KDL-46V4100/...property damage. 2 (US) WARNING If the following the instructions. If you install the TV on the stand and do so, the stand may cause the stand to attach the stand securely by qualified Sony service representatives, as it requires two or more people, special care and technique. The ...
Keep this manual available for safety to prevent the stand from toppling over . CAUTION Specified products The following products are subject to prevent accidents. It could cause serious injury or damage. SU-FL71M LCD color TV KDL-46Z4100/46XBR6 KDL-46WL140/46W4150/46W4100 KDL-46V4100/...property damage. 2 (US) WARNING If the following the instructions. If you install the TV on the stand and do so, the stand may cause the stand to attach the stand securely by qualified Sony service representatives, as it requires two or more people, special care and technique. The ...
Instructions
Page 5
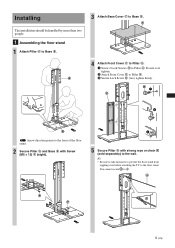
... Pillar A with strong rope or chain (sold separately) to the wall. ~ • Be sure to take measures to prevent the floor stand from toppling over tighten. 2 Attach Front Cover C to A. P P 5 (US) Installing The installation should be handled by more than two people. 1... Assembling the floor stand 1 Attach Pillar A to Base B. A 3 Attach Base Cover F to Base B. You cannot secure to Pillar A. 3 Secure Lock Screw N (two) tighten firmly. Do not over before attaching the TV to Pillar A.
... Pillar A with strong rope or chain (sold separately) to the wall. ~ • Be sure to take measures to prevent the floor stand from toppling over tighten. 2 Attach Front Cover C to A. P P 5 (US) Installing The installation should be handled by more than two people. 1... Assembling the floor stand 1 Attach Pillar A to Base B. A 3 Attach Base Cover F to Base B. You cannot secure to Pillar A. 3 Secure Lock Screw N (two) tighten firmly. Do not over before attaching the TV to Pillar A.
Instructions
Page 6
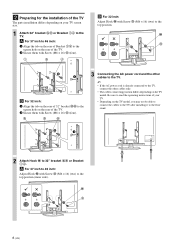
... to the top position. G O H 3 Connecting the AC power cord and the other cables only. • The cables connecting position differs depending on the TV model. A For 37 inch to 46 inch: 1 Align the tab on the rear of Bracket IJ to the top position (inner side). A For 37 ...M6 × 16) O (four). 2 Preparing for the installation of the TV The parts installation differs depending on your TV. • Depending on the TV model, you may not be able to connect the cables to the TV after installing it to the floor stand. 2 1 2 Attach Hook M to the square hole on the rear of...
... to the top position. G O H 3 Connecting the AC power cord and the other cables only. • The cables connecting position differs depending on the TV model. A For 37 inch to 46 inch: 1 Align the tab on the rear of Bracket IJ to the top position (inner side). A For 37 ...M6 × 16) O (four). 2 Preparing for the installation of the TV The parts installation differs depending on your TV. • Depending on the TV model, you may not be able to connect the cables to the TV after installing it to the floor stand. 2 1 2 Attach Hook M to the square hole on the rear of...
Instructions
Page 7
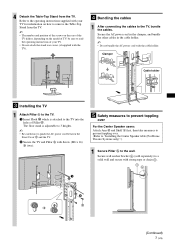
...; The number and position of the screws on the rear of the TV differs, depending on how to remove the Table-Top Stand from the TV. Clamper Cable holder 3 Installing the TV 1 Attach Pillar A to the TV. 1 Insert Hook M which is adjustable to 3 heights. ~ • Be careful not to pinch the AC power cord between...
...; The number and position of the screws on the rear of the TV differs, depending on how to remove the Table-Top Stand from the TV. Clamper Cable holder 3 Installing the TV 1 Attach Pillar A to the TV. 1 Insert Hook M which is adjustable to 3 heights. ~ • Be careful not to pinch the AC power cord between...


