
Operating Instructions
Page 4
... Presetting XM Radio channels 73 Control for HDMI Using the Control for HDMI function for "BRAVIA" Sync 77 Preparing Control for HDMI function ........ 79 Watching a DVD (One-Touch Play 80 Enjoying the TV sound from the speakers connected to the receiver (System Audio Control 81 Turning off the receiver with the TV (System Power Off 82 Other Operations Switching between digital and analog audio (INPUT MODE 82 Listening to digital sound from other inputs (DIGITAL ASSIGN 83 Enjoying the DIGITAL MEDIA PORT (DMPORT 85 Naming inputs 87 Changing...
... Presetting XM Radio channels 73 Control for HDMI Using the Control for HDMI function for "BRAVIA" Sync 77 Preparing Control for HDMI function ........ 79 Watching a DVD (One-Touch Play 80 Enjoying the TV sound from the speakers connected to the receiver (System Audio Control 81 Turning off the receiver with the TV (System Power Off 82 Other Operations Switching between digital and analog audio (INPUT MODE 82 Listening to digital sound from other inputs (DIGITAL ASSIGN 83 Enjoying the DIGITAL MEDIA PORT (DMPORT 85 Naming inputs 87 Changing...
Operating Instructions
Page 9
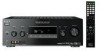
...:6 Cinema/Music decoder is activated. Lights up when the Pro Logic IIx decoder is set to show how the receiver downmixes the source sound (based on the speaker settings). Lights up when INPUT MODE is set to "ANALOG" or no digital signals are connected and "XM RADIO" is decoding DTS-HD Master Audio signals. Lights up when the equalizer is processing Analog Direct signals. Lights up when the receiver is activated. Front Left Front Right Center...
...:6 Cinema/Music decoder is activated. Lights up when the Pro Logic IIx decoder is set to show how the receiver downmixes the source sound (based on the speaker settings). Lights up when INPUT MODE is set to "ANALOG" or no digital signals are connected and "XM RADIO" is decoding DTS-HD Master Audio signals. Lights up when the equalizer is processing Analog Direct signals. Lights up when the receiver is activated. Front Left Front Right Center...
Operating Instructions
Page 11
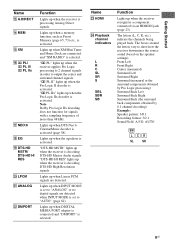
...a Super Audio CD player, etc. (page 19, 21). Black AUDIO OUT Connects to control non-Sony audio/video components. MOVIE MUSIC INPUT NIGHT AUTO CAL MODE SLEEP MODE DISPLAY AMP MENU 1 2 3 4 5 6 7 8 9 G DMPORT section DMPORT jack Connects to a DIGITAL MEDIA PORT adapter (page 86). * You can also program the remote to a jack subwoofer (page 17). E AUDIO INPUT/OUTPUT section AUDIO IN/ White (L) OUT jacks Red (R) Connects to a TV (page 19, 23). ql qk qj qh qg O RETURN/ EXIT HOME MENU OPTIONS TOOLS - Getting Started D SPEAKERS section Connects to speakers...
...a Super Audio CD player, etc. (page 19, 21). Black AUDIO OUT Connects to control non-Sony audio/video components. MOVIE MUSIC INPUT NIGHT AUTO CAL MODE SLEEP MODE DISPLAY AMP MENU 1 2 3 4 5 6 7 8 9 G DMPORT section DMPORT jack Connects to a DIGITAL MEDIA PORT adapter (page 86). * You can also program the remote to a jack subwoofer (page 17). E AUDIO INPUT/OUTPUT section AUDIO IN/ White (L) OUT jacks Red (R) Connects to a TV (page 19, 23). ql qk qj qh qg O RETURN/ EXIT HOME MENU OPTIONS TOOLS - Getting Started D SPEAKERS section Connects to speakers...
Operating Instructions
Page 14
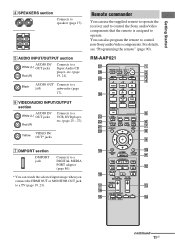
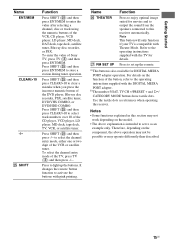
... remote to control non-Sony components following the steps in tuner DMPORT DIGITAL MEDIA PORT adapter XM XM Mini-Tuner and Home Dock Numeric buttons (number 5b)) Press SHIFT (wg) and then press numeric buttons to preset stations. - To return to the previous menu of the CD player, VCD player, LD player, DVD player, MD deck, DAT deck, or tape deck. Press 0/10 to activate the Digital Cinema Auto Calibration function. To select information of the VCR, satellite tuner, Blu-ray disc...
... remote to control non-Sony components following the steps in tuner DMPORT DIGITAL MEDIA PORT adapter XM XM Mini-Tuner and Home Dock Numeric buttons (number 5b)) Press SHIFT (wg) and then press numeric buttons to preset stations. - To return to the previous menu of the CD player, VCD player, LD player, DVD player, MD deck, DAT deck, or tape deck. Press 0/10 to activate the Digital Cinema Auto Calibration function. To select information of the VCR, satellite tuner, Blu-ray disc...
Operating Instructions
Page 15
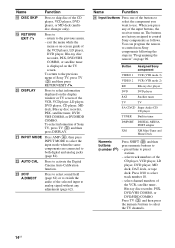
... this receiver automatically. Therefore, depending on the component, the above explanation is also available for movies and to output the sound from the speakers connected to light up the remote. Press to this section may operate differently than described. 15US Name Function Z THEATER Press to enjoy optimal image suited for DIGITAL MEDIA PORT adapter operation. Refer to store a station during tuner operation. b)The number 5/SAT, TV CH +/PRESET + and H/ CATEGORY MODE buttons...
... this receiver automatically. Therefore, depending on the component, the above explanation is also available for movies and to output the sound from the speakers connected to light up the remote. Press to this section may operate differently than described. 15US Name Function Z THEATER Press to enjoy optimal image suited for DIGITAL MEDIA PORT adapter operation. Refer to store a station during tuner operation. b)The number 5/SAT, TV CH +/PRESET + and H/ CATEGORY MODE buttons...
Operating Instructions
Page 18
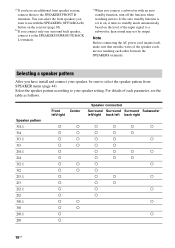
Note Before connecting the AC power cord (mains lead), make sure that metallic wires of each other between the SPEAKERS terminals. If the auto standby function is set to on, it to the SPEAKERS SURROUND BACK L terminals. For details of the speaker cords are not touching each parameter, see the table as follows. c)When you connect a subwoofer with the SPEAKERS (OFF/A/B/A+B) button on the level of the input signal to a subwoofer, then sound may...
Note Before connecting the AC power cord (mains lead), make sure that metallic wires of each other between the SPEAKERS terminals. If the auto standby function is set to on, it to the SPEAKERS SURROUND BACK L terminals. For details of the speaker cords are not touching each parameter, see the table as follows. c)When you connect a subwoofer with the SPEAKERS (OFF/A/B/A+B) button on the level of the input signal to a subwoofer, then sound may...

Operating Instructions
Page 22
... audio signals will be connected Component Page TV 19 With HDMI jack 23 DVD player 25 Satellite tuner/Set-top box 26 VCR, DVD recorder 27 Camcorder, video game, etc. 27 If you begin, see "Component to be connected" below for the pages which describe how to this receiver. Video input/output jack to be sure to disconnect the AC power cord. • Be sure to turn on the connecting jack. Select the connection according to "5: Connecting the antennas...
... audio signals will be connected Component Page TV 19 With HDMI jack 23 DVD player 25 Satellite tuner/Set-top box 26 VCR, DVD recorder 27 Camcorder, video game, etc. 27 If you begin, see "Component to be connected" below for the pages which describe how to this receiver. Video input/output jack to be sure to disconnect the AC power cord. • Be sure to turn on the connecting jack. Select the connection according to "5: Connecting the antennas...
Operating Instructions
Page 24
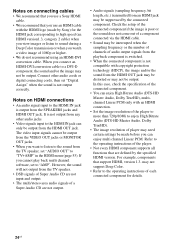
...-HD Master Audio, Dolby TrueHD), multichannel Linear PCM only with copyright protection technology (HDCP), the image and/or the sound from the HDMI OUT jack. For example, components that are not output. • Audio signals (sampling frequency, bit length, etc.) transmitted from the TV speaker, set to "AMP". The video input signals cannot be interrupted when the sampling frequency or the number of channels of audio output signals from the playback component is switched. • When the connected component...
...-HD Master Audio, Dolby TrueHD), multichannel Linear PCM only with copyright protection technology (HDCP), the image and/or the sound from the HDMI OUT jack. For example, components that are not output. • Audio signals (sampling frequency, bit length, etc.) transmitted from the TV speaker, set to "AMP". The video input signals cannot be interrupted when the sampling frequency or the number of channels of audio output signals from the playback component is switched. • When the connected component...
Operating Instructions
Page 27
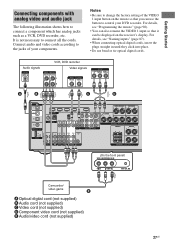
... plugs straight in until they click into place. • Do not bend or tie optical digital cords. For details, see "Programming the remote" (page 90). • You can also rename the VIDEO 1 input so that you can be displayed on the remote so that it can use the button to change the factory setting of your DVD recorder. Connect audio and video cords according to the jacks of the VIDEO 1 input button on the receiver's display. Audio signals...
... plugs straight in until they click into place. • Do not bend or tie optical digital cords. For details, see "Programming the remote" (page 90). • You can also rename the VIDEO 1 input so that you can be displayed on the remote so that it can use the button to change the factory setting of your DVD recorder. Connect audio and video cords according to the jacks of the VIDEO 1 input button on the receiver's display. Audio signals...
Operating Instructions
Page 37
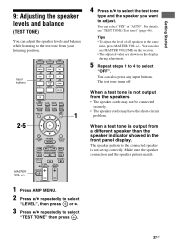
... "TEST TONE (Test tone)" (page 46). The test tone turns off. You can also use MASTER VOLUME on the receiver. • The adjusted value are shown on the display during adjustment. 5 Repeat steps 1 to 4 to the connected speaker is not set up correctly. MOVIE MUSIC INPUT NIGHT AUTO CAL MODE SLEEP MODE DISPLAY AMP MENU 1 2-5 MASTER VOL +/- CATEGORY MODE TUNING + m M DISC SKIP X D.TUNING x TV VOL TV CH MASTER VOL PRESET MUTING BD/DVD 1 Press AMP MENU. 2 Press V/v repeatedly to select "LEVEL", then press or b. 3 Press V/v repeatedly to select "TEST TONE...
... "TEST TONE (Test tone)" (page 46). The test tone turns off. You can also use MASTER VOLUME on the receiver. • The adjusted value are shown on the display during adjustment. 5 Repeat steps 1 to 4 to the connected speaker is not set up correctly. MOVIE MUSIC INPUT NIGHT AUTO CAL MODE SLEEP MODE DISPLAY AMP MENU 1 2-5 MASTER VOL +/- CATEGORY MODE TUNING + m M DISC SKIP X D.TUNING x TV VOL TV CH MASTER VOL PRESET MUTING BD/DVD 1 Press AMP MENU. 2 Press V/v repeatedly to select "LEVEL", then press or b. 3 Press V/v repeatedly to select "TEST TONE...
Operating Instructions
Page 38
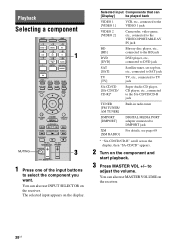
.../CD" appears. 2 Turn on the display. MOVIE MUSIC INPUT NIGHT AUTO CAL MODE SLEEP MODE DISPLAY AMP MENU MUTING O RETURN/ EXIT HOME MENU OPTIONS TOOLS - Playback Selecting a component SHIFT TV AMP 1 2 3 VIDEO 1 VIDEO 2 BD 4 5 6 DVD SAT TV 1 7 8 9 SA-CD/ CD TUNER -/-- 0/10 ENT/MEM DMPORT CLEAR/>10 XM 2CH/ A.DIRECT A.F.D. to select the component you want. You can also use MASTER VOLUME on the receiver. You can also use INPUT SELECTOR on the receiver. 38US CATEGORY MODE TUNING + m M DISC SKIP X D.TUNING x TV VOL...
.../CD" appears. 2 Turn on the display. MOVIE MUSIC INPUT NIGHT AUTO CAL MODE SLEEP MODE DISPLAY AMP MENU MUTING O RETURN/ EXIT HOME MENU OPTIONS TOOLS - Playback Selecting a component SHIFT TV AMP 1 2 3 VIDEO 1 VIDEO 2 BD 4 5 6 DVD SAT TV 1 7 8 9 SA-CD/ CD TUNER -/-- 0/10 ENT/MEM DMPORT CLEAR/>10 XM 2CH/ A.DIRECT A.F.D. to select the component you want. You can also use MASTER VOLUME on the receiver. You can also use INPUT SELECTOR on the receiver. 38US CATEGORY MODE TUNING + m M DISC SKIP X D.TUNING x TV VOL...
Operating Instructions
Page 41
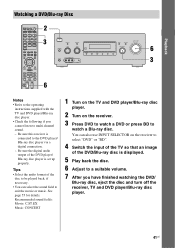
... and DVD player/Blu-ray disc player. • Check the following if you have finished watching the DVD/ Blu-ray disc, eject the disc and turn off the receiver, TV and DVD player/Blu-ray disc player. 41US Be sure the digital audio output of the DVD/Blu-ray disc is displayed. 5 Play back the disc. 6 Adjust to a suitable volume. 7 After you cannot listen to suit the movie or music. You can select the sound field to multi channel sound. - MOVIE MUSIC INPUT NIGHT AUTO CAL MODE SLEEP MODE DISPLAY AMP MENU 2 3 O RETURN/ EXIT HOME MENU OPTIONS...
... and DVD player/Blu-ray disc player. • Check the following if you have finished watching the DVD/ Blu-ray disc, eject the disc and turn off the receiver, TV and DVD player/Blu-ray disc player. 41US Be sure the digital audio output of the DVD/Blu-ray disc is displayed. 5 Play back the disc. 6 Adjust to a suitable volume. 7 After you cannot listen to suit the movie or music. You can select the sound field to multi channel sound. - MOVIE MUSIC INPUT NIGHT AUTO CAL MODE SLEEP MODE DISPLAY AMP MENU 2 3 O RETURN/ EXIT HOME MENU OPTIONS...
Operating Instructions
Page 46
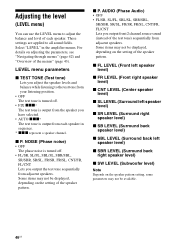
... CNT LEVEL (Center speaker level) x SL LEVEL (Surround left speaker level) x SR LEVEL (Surround right speaker level) x SB LEVEL (Surround back speaker level) x SBL LEVEL (Surround back left speaker level) x SBR LEVEL (Surround back right speaker level) x SW LEVEL (Subwoofer level) Note Depends on the setting of the menus" (page 43). LEVEL menu parameters x TEST TONE (Test tone) Lets you adjust the speaker levels and balance while listening to the test tone from your listening position. • OFF The test tone is output from each speaker. Some items may not be displayed...
... CNT LEVEL (Center speaker level) x SL LEVEL (Surround left speaker level) x SR LEVEL (Surround right speaker level) x SB LEVEL (Surround back speaker level) x SBL LEVEL (Surround back left speaker level) x SBR LEVEL (Surround back right speaker level) x SW LEVEL (Subwoofer level) Note Depends on the setting of the menus" (page 43). LEVEL menu parameters x TEST TONE (Test tone) Lets you adjust the speaker levels and balance while listening to the test tone from your listening position. • OFF The test tone is output from each speaker. Some items may not be displayed...
Operating Instructions
Page 47
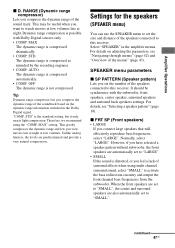
... using multi channel surround sound, select "SMALL" to activate the bass redirection circuitry and output the front channel bass frequencies from the subwoofer. When the front speakers are set to set the number of the soundtrack based on adjusting the parameters, see "Selecting a speaker pattern" (page 18). "COMP. Settings for the speakers (SPEAKER menu) You can use the SPEAKER menu to "SMALL", the center and surround speakers are predetermined and provide a very natural compression. It should be useful when you view...
... using multi channel surround sound, select "SMALL" to activate the bass redirection circuitry and output the front channel bass frequencies from the subwoofer. When the front speakers are set to set the number of the soundtrack based on adjusting the parameters, see "Selecting a speaker pattern" (page 18). "COMP. Settings for the speakers (SPEAKER menu) You can use the SPEAKER menu to "SMALL", the center and surround speakers are predetermined and provide a very natural compression. It should be useful when you view...
Operating Instructions
Page 49
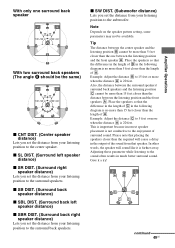
... difference in the length of B in the output of A. Also, the distance between the surround speakers/ surround back speakers and the listening position C cannot be available. continued 49US Amplifier Operations x SL DIST. (Surround left speaker distance) x SBR DIST. (Surround back right speaker distance) Lets you set the distance from your listening position to the center speaker. Example: Adjust the distance B to 15 feet or more...
... difference in the length of B in the output of A. Also, the distance between the surround speakers/ surround back speakers and the listening position C cannot be available. continued 49US Amplifier Operations x SL DIST. (Surround left speaker distance) x SBR DIST. (Surround back right speaker distance) Lets you set the distance from your listening position to the center speaker. Example: Adjust the distance B to 15 feet or more...
Operating Instructions
Page 59
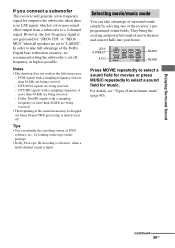
... Dolby Digital bass redirection circuitry, we recommend setting the subwoofer's cut off . MOVIE MUSIC INPUT NIGHT AUTO CAL MODE SLEEP MODE DISPLAY AMP MENU MUSIC MOVIE Press MOVIE repeatedly to select a sound field for movies or press MUSIC repeatedly to a 2 channel signal. continued 59US Selecting movie/music mode You can identify the encoding format of the receiver's preprogrammed sound fields. PCM signals with a sampling frequency of more than 48 kHz are being received. - In order to take advantage of surround sound...
... Dolby Digital bass redirection circuitry, we recommend setting the subwoofer's cut off . MOVIE MUSIC INPUT NIGHT AUTO CAL MODE SLEEP MODE DISPLAY AMP MENU MUSIC MOVIE Press MOVIE repeatedly to select a sound field for movies or press MUSIC repeatedly to a 2 channel signal. continued 59US Selecting movie/music mode You can identify the encoding format of the receiver's preprogrammed sound fields. PCM signals with a sampling frequency of more than 48 kHz are being received. - In order to take advantage of surround sound...
Operating Instructions
Page 81
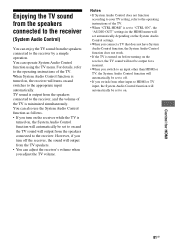
... receiver, the sound will turns on , the receiver will output from the speakers connected to the receiver by a simple operation. TV sound is output from the speakers connected to the receiver, and the volume of the TV is turned on and switches to the appropriate input automatically. Notes • If System Audio Control does not function according to your TV setting, refer to the operating instructions of the TV. You can also use the System Audio Control function...
... receiver, the sound will turns on , the receiver will output from the speakers connected to the receiver by a simple operation. TV sound is output from the speakers connected to the receiver, and the volume of the TV is turned on and switches to the appropriate input automatically. Notes • If System Audio Control does not function according to your TV setting, refer to the operating instructions of the TV. You can also use the System Audio Control function...
Operating Instructions
Page 100
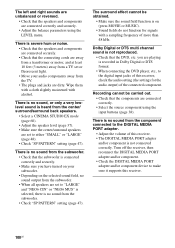
...; Select the source component using the LEVEL menu. There is no sound, or only a very lowlevel sound is heard from the center/ surround/surround back speakers. • Select a CINEMA STUDIO EX mode (page 60). • Adjust the speaker level (page 37). • Make sure the center/surround speakers are connected securely. • Check that the DVD, etc. Turn off the receiver, then reconnect the DIGITAL MEDIA PORT adapter and/or component. • Check the DIGITAL MEDIA PORT adapter and/or component device to the digital input jacks...
...; Select the source component using the LEVEL menu. There is no sound, or only a very lowlevel sound is heard from the center/ surround/surround back speakers. • Select a CINEMA STUDIO EX mode (page 60). • Adjust the speaker level (page 37). • Make sure the center/surround speakers are connected securely. • Check that the DVD, etc. Turn off the receiver, then reconnect the DIGITAL MEDIA PORT adapter and/or component. • Check the DIGITAL MEDIA PORT adapter and/or component device to the digital input jacks...
Operating Instructions
Page 103
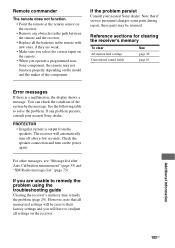
... service personnel changes some parts during repair, these parts may be reset to solve the problem. See the following table to their factory settings and you are weak. • Make sure you select the correct input on the remote. • When you operate a programmed nonSony component, the remote may remedy the problem (page 29). If you will automatically turn on the power again. Remote commander The remote does not function. • Point the remote...
... service personnel changes some parts during repair, these parts may be reset to solve the problem. See the following table to their factory settings and you are weak. • Make sure you select the correct input on the remote. • When you operate a programmed nonSony component, the remote may remedy the problem (page 29). If you will automatically turn on the power again. Remote commander The remote does not function. • Point the remote...

Operating Instructions
Page 106
... a CD-R 89 onto a recording media 89 Remote commander 11 S Satellite tuner/Set-top box connecting 26 Selecting component 38 sound field 60 speaker system 30 Sleep Timer 88 Sound fields resetting 63 selecting 60 Speakers connecting 17 installing 16 Super Audio CD player connecting 21 playback 40 System Audio Control 81 System Power Off 82 T Test Tone 46 Tuner connecting 28 Tuning automatically 63 directly 64 to preset stations 66 TV connecting 19 V VCR connecting 27 Video game connecting 27 X XM Radio 68 106US
... a CD-R 89 onto a recording media 89 Remote commander 11 S Satellite tuner/Set-top box connecting 26 Selecting component 38 sound field 60 speaker system 30 Sleep Timer 88 Sound fields resetting 63 selecting 60 Speakers connecting 17 installing 16 Super Audio CD player connecting 21 playback 40 System Audio Control 81 System Power Off 82 T Test Tone 46 Tuner connecting 28 Tuning automatically 63 directly 64 to preset stations 66 TV connecting 19 V VCR connecting 27 Video game connecting 27 X XM Radio 68 106US


