
Operating Instructions
Page 4
... 4a: Connecting the audio components.........18 4b: Connecting the video components ........19 5: Connecting the antennas (aerials 26 6: Preparing the receiver and the remote .....27 7: Selecting the speaker system 28 8: Calibrating the appropriate settings automatically (AUTO CALIBRATION 29 9: Adjusting the speaker levels and balance (TEST TONE 32 Playback Selecting a component 34 Listening/Watching...
... 4a: Connecting the audio components.........18 4b: Connecting the video components ........19 5: Connecting the antennas (aerials 26 6: Preparing the receiver and the remote .....27 7: Selecting the speaker system 28 8: Calibrating the appropriate settings automatically (AUTO CALIBRATION 29 9: Adjusting the speaker levels and balance (TEST TONE 32 Playback Selecting a component 34 Listening/Watching...

Operating Instructions
Page 6
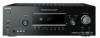
N MEMORY/ ENTER Press to the supplied optimizer microphone for the Auto Calibration function (page 29). P AUTO CAL MIC jack Connects to store a station or enter the selection when selecting the settings (page 27, 59, 67). Press to headphones (page 85). 6US Q PHONES jack Connects to select a sound field (page 51). CATEGORY +/- Name Function L 2CH A.F.D. MOVIE MUSIC M CATEGORY Used when listening to a portable audio/ PORTABLE AV video component such as a IN jacks camcorder or video game (page 24, 34). O VIDEO 2 IN/ Connects to XM MODE Radio (page 61).
N MEMORY/ ENTER Press to the supplied optimizer microphone for the Auto Calibration function (page 29). P AUTO CAL MIC jack Connects to store a station or enter the selection when selecting the settings (page 27, 59, 67). Press to headphones (page 85). 6US Q PHONES jack Connects to select a sound field (page 51). CATEGORY +/- Name Function L 2CH A.F.D. MOVIE MUSIC M CATEGORY Used when listening to a portable audio/ PORTABLE AV video component such as a IN jacks camcorder or video game (page 24, 34). O VIDEO 2 IN/ Connects to XM MODE Radio (page 61).
Operating Instructions
Page 7
..." lights up when the Pro Logic II Movie/Music/ Game decoder is decoding Dolby Digital Surround EX signals. Name E ; PLII" lights up when the receiver is activated. PLIIx ;PL OPT DTS -ES 96/24 CAT HDMI COAX NEO:6 MEMORY D.RANGE ST MONO qh qg qf qd qs qa Name A SW... when the disc being played back contains an LFE (Low Frequency Effect) channel and the LFE channel signal is turned off or if headphones are set to output the center and surround channel signals. Getting Started About the indicators on the display 12 3 4 5 6 7 89 q; PLIIx F OPT Function "; Note ...
..." lights up when the Pro Logic II Movie/Music/ Game decoder is decoding Dolby Digital Surround EX signals. Name E ; PLII" lights up when the receiver is activated. PLIIx ;PL OPT DTS -ES 96/24 CAT HDMI COAX NEO:6 MEMORY D.RANGE ST MONO qh qg qf qd qs qa Name A SW... when the disc being played back contains an LFE (Low Frequency Effect) channel and the LFE channel signal is turned off or if headphones are set to output the center and surround channel signals. Getting Started About the indicators on the display 12 3 4 5 6 7 89 q; PLIIx F OPT Function "; Note ...

Operating Instructions
Page 8
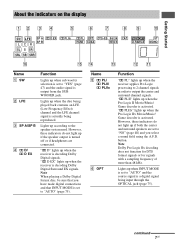
..., such as Preset Memory (page 59), etc., is decoding DTS 96/24 (96 kHz/24 bit) signals. Lights up when the receiver is activated. Lights up when dynamic range compression is set to "NO" (page 40) Sound Field: A.F.D. Lights up when INPUT MODE is activated (page 38). The boxes around the letters... and that you have preset. Note When playing a DTS format disc, be sure that INPUT MODE is decoding DTS-ES signals. Lights up when the receiver is set to show how the receiver downmixes the source sound (based on presetting radio stations, see page 58.
..., such as Preset Memory (page 59), etc., is decoding DTS 96/24 (96 kHz/24 bit) signals. Lights up when the receiver is activated. Lights up when dynamic range compression is set to "NO" (page 40) Sound Field: A.F.D. Lights up when INPUT MODE is activated (page 38). The boxes around the letters... and that you have preset. Note When playing a DTS format disc, be sure that INPUT MODE is decoding DTS-ES signals. Lights up when the receiver is set to show how the receiver downmixes the source sound (based on presetting radio stations, see page 58.
Operating Instructions
Page 12
...and the button with components in recording standby.) Press to enable TV operation. Press also to select the settings. Press to select the FM monaural or stereo reception. preset stations. - FM MODE Press to display ... TV's menu. Press MENU/HOME and TV (M) at the same time to stop playback of the receiver, VCR, satellite tuner, CD player, DVD player or Bluray disc player. return to select the category...and TV (M) at the same time to perform menu operations. XM Radio (page 65). Press to the Sony TV. 12US Name Ha)b) Xb) xb) TV CH +/- Press RETURN/EXIT O and TV (M) at the...
...and the button with components in recording standby.) Press to enable TV operation. Press also to select the settings. Press to select the FM monaural or stereo reception. preset stations. - FM MODE Press to display ... TV's menu. Press MENU/HOME and TV (M) at the same time to stop playback of the receiver, VCR, satellite tuner, CD player, DVD player or Bluray disc player. return to select the category...and TV (M) at the same time to perform menu operations. XM Radio (page 65). Press to the Sony TV. 12US Name Ha)b) Xb) xb) TV CH +/- Press RETURN/EXIT O and TV (M) at the...

Operating Instructions
Page 16
... only one surround back speaker, connect it turns to standby mode automatically based on the front panel (page 28). If the auto standby function is set to on, it to the SPEAKERS SURROUND BACK L terminals. c)When you want to a sub woofer, then sound may not be output. 16US You can select...
... only one surround back speaker, connect it turns to standby mode automatically based on the front panel (page 28). If the auto standby function is set to on, it to the SPEAKERS SURROUND BACK L terminals. c)When you want to a sub woofer, then sound may not be output. 16US You can select...
Operating Instructions
Page 19
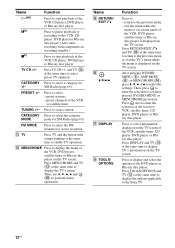
...the jacks on , neither video nor audio signals will be connected The image quality depends on the receiver when the video and audio signals of a playback component are being output to a TV via the receiver. Getting Started 4b: Connecting the video components How to connect your components This section describes how ...to disconnect the AC power cord (mains lead). Component to be connected Component Page TV 17 With HDMI jack 20 DVD player 22 Satellite tuner/Set-top box 23 DVD recorder, VCR 24 Camcorder, video game, etc. 24 If you begin, refer to "Component to be sure to this...
...the jacks on , neither video nor audio signals will be connected The image quality depends on the receiver when the video and audio signals of a playback component are being output to a TV via the receiver. Getting Started 4b: Connecting the video components How to connect your components This section describes how ...to disconnect the AC power cord (mains lead). Component to be connected Component Page TV 17 With HDMI jack 20 DVD player 22 Satellite tuner/Set-top box 23 DVD recorder, VCR 24 Camcorder, video game, etc. 24 If you begin, refer to "Component to be sure to this...

Operating Instructions
Page 21
... cable to a DVI-D component, the sound and/or the image may be output. 21US It is not compatible with an HDMI connection. • Set the image resolution of the playback component to 720p,1080i or 1080p when you output 96 kHz multi-channel sound over an HDMI connection. •... of each component connected for details. • We do not recommend using an HDMI-DVI conversion cable. When you cannot play back multi channel software, set "AUDIO FOR HDMI" to "TV+AMP" in the VIDEO menu (page 39). Getting Started Notes on the image resolution of the connected component. •...
... cable to a DVI-D component, the sound and/or the image may be output. 21US It is not compatible with an HDMI connection. • Set the image resolution of the playback component to 720p,1080i or 1080p when you output 96 kHz multi-channel sound over an HDMI connection. •... of each component connected for details. • We do not recommend using an HDMI-DVI conversion cable. When you cannot play back multi channel software, set "AUDIO FOR HDMI" to "TV+AMP" in the VIDEO menu (page 39). Getting Started Notes on the image resolution of the connected component. •...

Operating Instructions
Page 22
.... Tip All the digital audio jacks are compatible with the DVD player. Note To input multi channel digital audio from the DVD player, set the digital audio output setting on the DVD player. It is not necessary to connect a DVD player. Audio signals DVD player Video signals A B C D TV OPTICAL IN ANTENNA AM...
.... Tip All the digital audio jacks are compatible with the DVD player. Note To input multi channel digital audio from the DVD player, set the digital audio output setting on the DVD player. It is not necessary to connect a DVD player. Audio signals DVD player Video signals A B C D TV OPTICAL IN ANTENNA AM...

Operating Instructions
Page 23
... connecting optical digital cords, insert the plugs straight in until they click into place. • Do not bend or tie optical digital cords. Satellite tuner/Set-top box Audio signals Video signals A B C D TV OPTICAL IN ANTENNA AM SAT IN OPTICAL DVD IN COAXIAL DIGITAL (ASSIGNABLE) OUT IN IN DC5V 0.7A MAX... cord (not supplied) D Component video cord (not supplied) 23US Connect audio and video cords according to connect all the cords. Getting Started Connecting a satellite tuner/ Set-top box The following illustration shows how to connect a satellite tuner or...
... connecting optical digital cords, insert the plugs straight in until they click into place. • Do not bend or tie optical digital cords. Satellite tuner/Set-top box Audio signals Video signals A B C D TV OPTICAL IN ANTENNA AM SAT IN OPTICAL DVD IN COAXIAL DIGITAL (ASSIGNABLE) OUT IN IN DC5V 0.7A MAX... cord (not supplied) D Component video cord (not supplied) 23US Connect audio and video cords according to connect all the cords. Getting Started Connecting a satellite tuner/ Set-top box The following illustration shows how to connect a satellite tuner or...

Operating Instructions
Page 25
For details, see "Changing button assignments" (page 81). • You can also rename the VIDEO 1 input so that it can be displayed on the remote so that you can use the button to control your DVD recorder. For details, see "Naming inputs" (page 78). 25US Getting Started Notes • Be sure to change the factory setting of the VIDEO 1 input button on the receiver's display.
For details, see "Changing button assignments" (page 81). • You can also rename the VIDEO 1 input so that it can be displayed on the remote so that you can use the button to control your DVD recorder. For details, see "Naming inputs" (page 78). 25US Getting Started Notes • Be sure to change the factory setting of the VIDEO 1 input button on the receiver's display.
Operating Instructions
Page 27
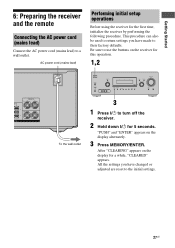
..."CLEARED" appears. MOVIE MUSIC ANALOG DIRECT MUTING 3 1 Press ?/1 to their factory defaults. This procedure can also be used to return settings you have made to turn off the receiver. 2 Hold down ?/1 for this operation. 1,2 FRONT A L NT B L R To the wall outlet ?/1 SPEAKERS (OFF/A/B) AUTO ...TUNING DISPLAY INPUT MODE INPUT SELECTOR MASTER VOLUME VIDEO 2 IN/PORTABLE AV IN VIDEO L AUDIO R MEMORY/ CATEGORY ENTER MODE CATEGORY 2CH A.F.D. Be sure to a wall outlet. Getting Started 6: Preparing the receiver and the remote Connecting the AC power cord (mains lead) Connect...
..."CLEARED" appears. MOVIE MUSIC ANALOG DIRECT MUTING 3 1 Press ?/1 to their factory defaults. This procedure can also be used to return settings you have made to turn off the receiver. 2 Hold down ?/1 for this operation. 1,2 FRONT A L NT B L R To the wall outlet ?/1 SPEAKERS (OFF/A/B) AUTO ...TUNING DISPLAY INPUT MODE INPUT SELECTOR MASTER VOLUME VIDEO 2 IN/PORTABLE AV IN VIDEO L AUDIO R MEMORY/ CATEGORY ENTER MODE CATEGORY 2CH A.F.D. Be sure to a wall outlet. Getting Started 6: Preparing the receiver and the remote Connecting the AC power cord (mains lead) Connect...
Operating Instructions
Page 28
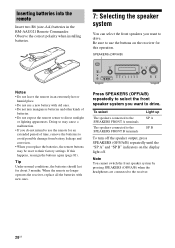
... press SPEAKERS (OFF/A/B) repeatedly until the "SP A" and "SP B" indicators on the receiver for this happens, reassign the buttons again (page 81). SPEAKERS (OFF/A/B) ?/1 SPEAKERS (OFF/A/B)...AUTO CAL MIC PHONES TUNING MODE TUNING DISPLAY INPUT MODE INPUT SELECTOR MASTER VOLUME VIDEO 2 IN/PORTABLE AV IN VIDEO L AUDIO R MEMORY/ CATEGORY ENTER MODE CATEGORY 2CH A.F.D. Doing so may cause a ... period of batteries. • Do not expose the remote sensor to their factory settings. Observe the correct polarity when installing batteries. 7: Selecting the speaker system You can...
... press SPEAKERS (OFF/A/B) repeatedly until the "SP A" and "SP B" indicators on the receiver for this happens, reassign the buttons again (page 81). SPEAKERS (OFF/A/B) ?/1 SPEAKERS (OFF/A/B)...AUTO CAL MIC PHONES TUNING MODE TUNING DISPLAY INPUT MODE INPUT SELECTOR MASTER VOLUME VIDEO 2 IN/PORTABLE AV IN VIDEO L AUDIO R MEMORY/ CATEGORY ENTER MODE CATEGORY 2CH A.F.D. Doing so may cause a ... period of batteries. • Do not expose the remote sensor to their factory settings. Observe the correct polarity when installing batteries. 7: Selecting the speaker system You can...

Operating Instructions
Page 29
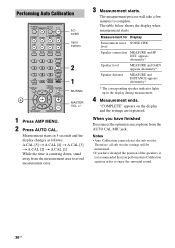
Remove any obstacles in the path between each speaker and the receiver. • Adjusting the speaker level. • Measuring the distance of the sound cannot be set to the AUTO CAL MIC jack. 2 Set up the optimizer microphone. For details, see "9: Adjusting the speaker levels and ...off automatically. ?/1 SPEAKERS (OFF/A/B) AUTO CAL MIC PHONES TUNING MODE TUNING DISPLAY INPUT MODE INPUT SELECTOR MASTER VOLUME VIDEO 2 IN/PORTABLE AV IN VIDEO L AUDIO R MEMORY/ CATEGORY ENTER MODE CATEGORY 2CH A.F.D. The volume of each speaker from the measurement area to avoid ...
Remove any obstacles in the path between each speaker and the receiver. • Adjusting the speaker level. • Measuring the distance of the sound cannot be set to the AUTO CAL MIC jack. 2 Set up the optimizer microphone. For details, see "9: Adjusting the speaker levels and ...off automatically. ?/1 SPEAKERS (OFF/A/B) AUTO CAL MIC PHONES TUNING MODE TUNING DISPLAY INPUT MODE INPUT SELECTOR MASTER VOLUME VIDEO 2 IN/PORTABLE AV IN VIDEO L AUDIO R MEMORY/ CATEGORY ENTER MODE CATEGORY 2CH A.F.D. The volume of each speaker from the measurement area to avoid ...
Operating Instructions
Page 30
...measurement starts. Notes • Auto Calibration cannot detect the sub woofer. "COMPLETE" appears on the display and the settings are registered. Therefore, all sub woofer settings will take a few minutes to complete. When you have changed the position of the speakers, it is counting down.... • If you perform Auto Calibration again in the display during measurement. 4 Measurement ends. Performing Auto Calibration TV INPUT TV ?/1 SLEEP DMPORT AV ?/1 ?/1 SYSTEM STANDBY VIDEO1 VIDEO2 BD DVD SAT TV SA-CD/CD TUNER 2CH A.F.D. MOVIE MUSIC ?/1 switch Input buttons 1 4 7 >10 ...
...measurement starts. Notes • Auto Calibration cannot detect the sub woofer. "COMPLETE" appears on the display and the settings are registered. Therefore, all sub woofer settings will take a few minutes to complete. When you have changed the position of the speakers, it is counting down.... • If you perform Auto Calibration again in the display during measurement. 4 Measurement ends. Performing Auto Calibration TV INPUT TV ?/1 SLEEP DMPORT AV ?/1 ?/1 SYSTEM STANDBY VIDEO1 VIDEO2 BD DVD SAT TV SA-CD/CD TUNER 2CH A.F.D. MOVIE MUSIC ?/1 switch Input buttons 1 4 7 >10 ...
Operating Instructions
Page 31
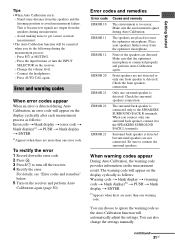
... are more than one surround speaker is connected only to turn the INPUT SELECTOR on the receiver and perform Auto Calibration again (page 30). You can also change the settings manually. continued 31US Press ?/1 or MUTING. - Place your speakers further away from the speakers...speakers are detected. Be sure to avoid measurement failure. For details, see "Error codes and remedies" below. 5 Turn on the receiver. - When warning codes appear During Auto Calibration, the warning code provides information on the display cyclically as the Auto Calibration function will...
... are more than one surround speaker is connected only to turn the INPUT SELECTOR on the receiver and perform Auto Calibration again (page 30). You can also change the settings manually. continued 31US Press ?/1 or MUTING. - Place your speakers further away from the speakers...speakers are detected. Be sure to avoid measurement failure. For details, see "Error codes and remedies" below. 5 Turn on the receiver. - When warning codes appear During Auto Calibration, the warning code provides information on the display cyclically as the Auto Calibration function will...
Operating Instructions
Page 32
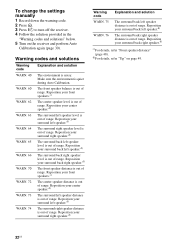
... your surround right speaker.d) WARN. 65 The surround back left speaker distance is out of range. To change the settings manually 1 Record down the warning code. 2 Press . 3 Press ?/1 to turn off the receiver. 4 Follow the solution provided in the "Warning codes and solutions" below. 5 Turn on page 49. 32US Warning codes ... is out of range. Reposition your surround back right speaker.d) c)For details, refer "Front speaker distance" (page 48). d)For details, refer "Tip" on the receiver and perform Auto Calibration again (page 30). Make sure the environment is out of range.
... your surround right speaker.d) WARN. 65 The surround back left speaker distance is out of range. To change the settings manually 1 Record down the warning code. 2 Press . 3 Press ?/1 to turn off the receiver. 4 Follow the solution provided in the "Warning codes and solutions" below. 5 Turn on page 49. 32US Warning codes ... is out of range. Reposition your surround back right speaker.d) c)For details, refer "Front speaker distance" (page 48). d)For details, refer "Tip" on the receiver and perform Auto Calibration again (page 30). Make sure the environment is out of range.

Operating Instructions
Page 33
...For details, see "Adjusting the level (LEVEL menu)" (page 41). You can also use MASTER VOLUME on the receiver. • The adjusted value is not output from each speaker in sequence as follows: Front left t Center ... that the level of all speakers at 800 Hz. 2-5 TV INPUT TV ?/1 SLEEP DMPORT AV ?/1 ?/1 SYSTEM STANDBY VIDEO1 VIDEO2 BD DVD SAT TV SA-CD/CD TUNER Input buttons 2CH... A.F.D. surround back left and right speakers when surround back speakers are set to "DUAL". - TONE N". The test tone is selected. 33US Getting Started 9: Adjusting ...
...For details, see "Adjusting the level (LEVEL menu)" (page 41). You can also use MASTER VOLUME on the receiver. • The adjusted value is not output from each speaker in sequence as follows: Front left t Center ... that the level of all speakers at 800 Hz. 2-5 TV INPUT TV ?/1 SLEEP DMPORT AV ?/1 ?/1 SYSTEM STANDBY VIDEO1 VIDEO2 BD DVD SAT TV SA-CD/CD TUNER Input buttons 2CH... A.F.D. surround back left and right speakers when surround back speakers are set to "DUAL". - TONE N". The test tone is selected. 33US Getting Started 9: Adjusting ...
Operating Instructions
Page 36
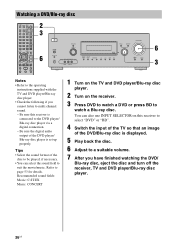
... m H M TV FM MODE X x 2 3 6 ?/1 SPEAKERS (OFF/A/B) AUTO CAL MIC PHONES TUNING MODE TUNING DISPLAY INPUT MODE INPUT SELECTOR MASTER VOLUME VIDEO 2 IN/PORTABLE AV IN VIDEO L AUDIO R MEMORY/ CATEGORY ENTER MODE CATEGORY 2CH A.F.D. Recommended sound fields: Movie: C.ST.EX Music: CONCERT 1 Turn on the TV and DVD player/Blu-...VOL MASTER VOL O RETURN/EXIT MENU/HOME TV CH - - Be sure this receiver to select "DVD" or "BD". 4 Switch the input of the TV so that an image of the DVD/Blu-ray disc is set up properly. Tips • Select the sound format of the DVD player/ Blu...
... m H M TV FM MODE X x 2 3 6 ?/1 SPEAKERS (OFF/A/B) AUTO CAL MIC PHONES TUNING MODE TUNING DISPLAY INPUT MODE INPUT SELECTOR MASTER VOLUME VIDEO 2 IN/PORTABLE AV IN VIDEO L AUDIO R MEMORY/ CATEGORY ENTER MODE CATEGORY 2CH A.F.D. Recommended sound fields: Movie: C.ST.EX Music: CONCERT 1 Turn on the TV and DVD player/Blu-...VOL MASTER VOL O RETURN/EXIT MENU/HOME TV CH - - Be sure this receiver to select "DVD" or "BD". 4 Switch the input of the TV so that an image of the DVD/Blu-ray disc is set up properly. Tips • Select the sound format of the DVD player/ Blu...
Operating Instructions
Page 37
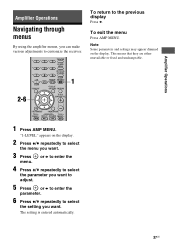
...amplifier menus, you can make various adjustments to the previous display Press B. "1-LEVEL" appears on the display. To return to customize the receiver. 2-6 THEATER 123 DVD/BD MENU 456 AUTO CAL D.TUNING 789 D.SKIP >10 MEMORY AMP MENU 0/10 ENTER 1 CLEAR DISPLAY TOOLS/...CH - - This means that they are either unavailable or fixed and unchangeable. 37US The setting is entered automatically. Note Some parameters and settings may appear dimmed on the display. 2 Press V/v repeatedly to select the setting you want . CATEGORY + TV CH + PRESET - or b to enter the 4 ...
...amplifier menus, you can make various adjustments to the previous display Press B. "1-LEVEL" appears on the display. To return to customize the receiver. 2-6 THEATER 123 DVD/BD MENU 456 AUTO CAL D.TUNING 789 D.SKIP >10 MEMORY AMP MENU 0/10 ENTER 1 CLEAR DISPLAY TOOLS/...CH - - This means that they are either unavailable or fixed and unchangeable. 37US The setting is entered automatically. Note Some parameters and settings may appear dimmed on the display. 2 Press V/v repeatedly to select the setting you want . CATEGORY + TV CH + PRESET - or b to enter the 4 ...


