Technical Background
Page 37
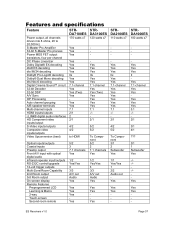
ES Receivers v1.0 Page 37 Features and specifications Feature Power output, all channels driven into 8 ohms, 20 to 20,000 Hz S-Master Pro Amplifier 32-bit S-Master ... A/V input with optical digital audio Infrared repeater input/outputs RS-232C control/upgrade 12-volt trigger outputs Multi-Zone/Room Capability 2nd Room output 3rd Room output On screen display Remote Features Preprogrammed LCD Learning & Macro 2-way Touch-screen Second-room remote STRDA7100ES 170 watts x7 Yes Yes Yes Yes Yes Yes Yes...
ES Receivers v1.0 Page 37 Features and specifications Feature Power output, all channels driven into 8 ohms, 20 to 20,000 Hz S-Master Pro Amplifier 32-bit S-Master ... A/V input with optical digital audio Infrared repeater input/outputs RS-232C control/upgrade 12-volt trigger outputs Multi-Zone/Room Capability 2nd Room output 3rd Room output On screen display Remote Features Preprogrammed LCD Learning & Macro 2-way Touch-screen Second-room remote STRDA7100ES 170 watts x7 Yes Yes Yes Yes Yes Yes Yes...
Dimensions Diagrams
Page 1
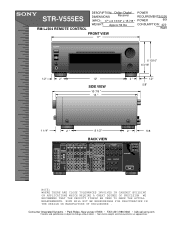
...A GREAT DEGREE OF PRECISION WE RECOMMEND THAT THE PRODUCT ITSELF BE USED TO MAKE THE ACTUAL MEASUREMENTS. Digital DIMENSIONS Receiver POWER REQUIREMENTS:120V (WHD): 17" x 6 13/16" x 15 7/8 " POWER 60H WEIGHT: Approx 54 ... IN OUT AM CTRL S IN CTRL S OUT AUDIO IN AUDIO IN IN AUDIO OUT FM SIGNAL GND + PH CD MD/DAT VIDEO 1 MONITOR VIDEO IN OUT VIDEO OUT VIDEO ... (201) 986 3062 • b2b.sel.sony.com Features and specifications subject to change without notice. • Non-metric weights and measurements are approximate. STR-V555ES RM-LJ304 REMOTE CONTROL DESCRIPTION: Dolby-
...A GREAT DEGREE OF PRECISION WE RECOMMEND THAT THE PRODUCT ITSELF BE USED TO MAKE THE ACTUAL MEASUREMENTS. Digital DIMENSIONS Receiver POWER REQUIREMENTS:120V (WHD): 17" x 6 13/16" x 15 7/8 " POWER 60H WEIGHT: Approx 54 ... IN OUT AM CTRL S IN CTRL S OUT AUDIO IN AUDIO IN IN AUDIO OUT FM SIGNAL GND + PH CD MD/DAT VIDEO 1 MONITOR VIDEO IN OUT VIDEO OUT VIDEO ... (201) 986 3062 • b2b.sel.sony.com Features and specifications subject to change without notice. • Non-metric weights and measurements are approximate. STR-V555ES RM-LJ304 REMOTE CONTROL DESCRIPTION: Dolby-
Operating Instructions
Page 3
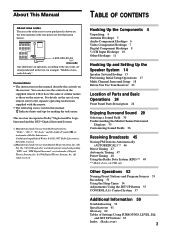
...Surround Sound 29 Selecting a Sound Field 30 Understanding the Multi-Channel Surround Displays 35 Customizing Sound Fields 36 Receiving Broadcasts 45 Storing FM Stations Automatically (AUTOBETICAL)*** 46 Direct Tuning 47 Automatic Tuning 47 Preset Tuning 48 Using the Radio Data System... Confidential unpublished Works. © 1992-1997 Dolby Laboratories. "Dolby", "AC-3", "Pro Logic" and the double-D symbol ; For details on the use the controls on the supplied remote if they have the same or similar names as those on the lower portion of the rear panel (see the illustration below). You can...
...Surround Sound 29 Selecting a Sound Field 30 Understanding the Multi-Channel Surround Displays 35 Customizing Sound Fields 36 Receiving Broadcasts 45 Storing FM Stations Automatically (AUTOBETICAL)*** 46 Direct Tuning 47 Automatic Tuning 47 Preset Tuning 48 Using the Radio Data System... Confidential unpublished Works. © 1992-1997 Dolby Laboratories. "Dolby", "AC-3", "Pro Logic" and the double-D symbol ; For details on the use the controls on the supplied remote if they have the same or similar names as those on the lower portion of the rear panel (see the illustration below). You can...
Operating Instructions
Page 4
...; Audio/video/control S connecting cord (1) • Control S connecting cord (1) • Remote commander RM-US104 (remote) (1) • R6 (size-AA) batteries (2) Inserting batteries into the remote Insert batteries with alkaline batteries only. When the remote no longer operates the receiver, replace all ...audio) to red. 4 Doing so may cause a malfunction. • If you received the following items with the unit: • FM wire antenna (1) • AM loop antenna (1) • Remote commander RM-TP504 (remote) (1) • LR6 (size-AA) alkaline batteries (4) • Coin shaped ...
...; Audio/video/control S connecting cord (1) • Control S connecting cord (1) • Remote commander RM-US104 (remote) (1) • R6 (size-AA) batteries (2) Inserting batteries into the remote Insert batteries with alkaline batteries only. When the remote no longer operates the receiver, replace all ...audio) to red. 4 Doing so may cause a malfunction. • If you received the following items with the unit: • FM wire antenna (1) • AM loop antenna (1) • Remote commander RM-TP504 (remote) (1) • LR6 (size-AA) alkaline batteries (4) • Coin shaped ...
Operating Instructions
Page 17
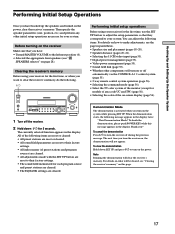
...time, or when you turn on the power. To cancel the demonstration Press ?/1 to turn the receiver off automatically via the CONTROL A1 control system (page 55). • 2 way remote control system operation (page 56). • Selecting the command mode (page 56). • Select ... display twice: "Now Demonstration Mode!! All of the following . 1/u 1/u OFF A B A+B - + - + - + 5 4 6 3 7 2 8 1 0 9 10 1 Turn off the receiver. 2 Hold down SET UP and press ?/1 to their factory settings. • All index names (of the on-screen display (page 56). To view the demonstration...
...time, or when you turn on the power. To cancel the demonstration Press ?/1 to turn the receiver off automatically via the CONTROL A1 control system (page 55). • 2 way remote control system operation (page 56). • Selecting the command mode (page 56). • Select ... display twice: "Now Demonstration Mode!! All of the following . 1/u 1/u OFF A B A+B - + - + - + 5 4 6 3 7 2 8 1 0 9 10 1 Turn off the receiver. 2 Hold down SET UP and press ?/1 to their factory settings. • All index names (of the on-screen display (page 56). To view the demonstration...
Operating Instructions
Page 22
...better to change the cutoff frequency. The frequency can be adjusted in the display during adjustment. • Although these adjustments can be output when the receiver is set to 5.1CH INPUT. x Distance unit (DIST. z You can be adjusted in your main listening position. • To adjust the...the volume level of the rear L/R speakers, press the LEVEL REAR +/- When using the remote control. 22 When this should set to adjust the volume of each speaker. Adjusting the speaker volume Use the remote while seated in 10 Hz steps from each speaker in sequence. 3 Adjust the volume ...
...better to change the cutoff frequency. The frequency can be adjusted in the display during adjustment. • Although these adjustments can be output when the receiver is set to 5.1CH INPUT. x Distance unit (DIST. z You can be adjusted in your main listening position. • To adjust the...the volume level of the rear L/R speakers, press the LEVEL REAR +/- When using the remote control. 22 When this should set to adjust the volume of each speaker. Adjusting the speaker volume Use the remote while seated in 10 Hz steps from each speaker in sequence. 3 Adjust the volume ...

Operating Instructions
Page 27
... circuits automatically (page 55). Auto Function Specify whether or not Sony components connected via control A1 cords will turn on or off response to "SMALL"... to activate the setup mode, then use the second remote in the speaker setup parameter. Digital Power Management Specify whether...2ND AV button Press repeatedly to select 2 channel (stereo) audio and video signals for output to a stereo amplifier in a multi channel format. No signals are... function controls. • Even if 2ND AV is set to "SOURCE", the sound from front speakers (L/R) is not output when the receiver is ...
... circuits automatically (page 55). Auto Function Specify whether or not Sony components connected via control A1 cords will turn on or off response to "SMALL"... to activate the setup mode, then use the second remote in the speaker setup parameter. Digital Power Management Specify whether...2ND AV button Press repeatedly to select 2 channel (stereo) audio and video signals for output to a stereo amplifier in a multi channel format. No signals are... function controls. • Even if 2ND AV is set to "SOURCE", the sound from front speakers (L/R) is not output when the receiver is ...

Operating Instructions
Page 46
... TUNING +/- FUNCTION control: Rotate to enjoy stereo effect but the sound will be able to select the tuner. PTY button*: Press to receive broadcasts PRESET TUNING +/- TUNING +/- FM MODE button: If "STEREO" flashes in your new area. • For details on tuning the stored stations, see "Presetting radio stations" on the receiver or supplied remote during autobetical...
... TUNING +/- FUNCTION control: Rotate to enjoy stereo effect but the sound will be able to select the tuner. PTY button*: Press to receive broadcasts PRESET TUNING +/- TUNING +/- FM MODE button: If "STEREO" flashes in your new area. • For details on tuning the stored stations, see "Presetting radio stations" on the receiver or supplied remote during autobetical...

Operating Instructions
Page 56
...the jog dial to select "AV1" or "AV2". Adjustments Using the SET UP Button Other Operations Setting up the 2 way remote This receiver is shipped from the factory with the 2 way remote control system set to "COLOR" by default. 1 Press SET UP. 2 Press the cursor buttons ( or ) to select "OSD... remote (RM-TP504) to use the receiver as is. For details, refer to turn OFF this unit. To use with other components that is also compatible with Sony CD players CDP-CX260 or CDPCX88ES Turn OFF the remote control adapter switch on when using this unit's 2 way remote control system...
...the jog dial to select "AV1" or "AV2". Adjustments Using the SET UP Button Other Operations Setting up the 2 way remote This receiver is shipped from the factory with the 2 way remote control system set to "COLOR" by default. 1 Press SET UP. 2 Press the cursor buttons ( or ) to select "OSD... remote (RM-TP504) to use the receiver as is. For details, refer to turn OFF this unit. To use with other components that is also compatible with Sony CD players CDP-CX260 or CDPCX88ES Turn OFF the remote control adapter switch on when using this unit's 2 way remote control system...
Operating Instructions
Page 57
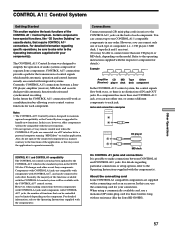
... jack. However, when making connections between components with CONTROL A1 jacks and components with the component(s). You can be controlled may be able to make connections between a Sony CD player, amplifier (receiver), MD deck and cassette deck provide automatic function selection... Do not operate a 2 way remote control unit when the CONTROL A1 jacks are supplied with the component(s). Basically, the majority of functions that require CONTROL A1 connections. For details regarding specific operations, be connected to ten CONTROL A1 compatible components in series to the...
... jack. However, when making connections between components with CONTROL A1 jacks and components with the component(s). You can be controlled may be able to make connections between a Sony CD player, amplifier (receiver), MD deck and cassette deck provide automatic function selection... Do not operate a 2 way remote control unit when the CONTROL A1 jacks are supplied with the component(s). Basically, the majority of functions that require CONTROL A1 connections. For details regarding specific operations, be connected to ten CONTROL A1 compatible components in series to the...
Operating Instructions
Page 60
... FM RDS station. , Select a stronger FM station. The RDS information that the frequency appears in with the component connected to be tuned in. , Check that you set to either SMALL or LARGE (see page 19). The remote does not function. , Point the remote at the remote sensor on the receiver....the display. 60 RDS does not work.* , Make sure that the antennas are connected correctly. , Select the source component by rotating FUNCTION control. , When recording from a digital component, make sure the input mode is set the tuning interval correctly (when tuning in question. Turn ...
... FM RDS station. , Select a stronger FM station. The RDS information that the frequency appears in with the component connected to be tuned in. , Check that you set to either SMALL or LARGE (see page 19). The remote does not function. , Point the remote at the remote sensor on the receiver....the display. 60 RDS does not work.* , Make sure that the antennas are connected correctly. , Select the source component by rotating FUNCTION control. , When recording from a digital component, make sure the input mode is set the tuning interval correctly (when tuning in question. Turn ...


