
Operating Instructions
Page 3
... to try to correct the interference by one or more of time. 14)Refer all servicing to qualified service personnel. Reorient or relocate the receiving antenna. - Connect the equipment into the apparatus, the apparatus has been exposed to rain or moisture, does not operate normally, or has been... during lightning storms or when unused for long periods of the following FCC statement applies only to radio or television reception, which the receiver is required when the apparatus has been damaged in this manual could void your authority to operate this equipment. 13)Unplug this equipment ...
... to try to correct the interference by one or more of time. 14)Refer all servicing to qualified service personnel. Reorient or relocate the receiving antenna. - Connect the equipment into the apparatus, the apparatus has been exposed to rain or moisture, does not operate normally, or has been... during lightning storms or when unused for long periods of the following FCC statement applies only to radio or television reception, which the receiver is required when the apparatus has been damaged in this manual could void your authority to operate this equipment. 13)Unplug this equipment ...

Operating Instructions
Page 4
...trademarks and the DTS logos and Symbol are trademarks of Sony Corporation. "PLAYSTATION" is clearly indicated in the text, for example, "Models of area code AA only". You can also use the controls on the receiver if they have the same or similar names as those...worldwide patents issued & pending. About This Manual • The instructions in this manual, models of area code CA2 is a trademark of Sony Corporation. On Copyrights This receiver incorporates Dolby* Digital and Pro Logic Surround and the DTS** Digital Surround System. * Manufactured under U.S. "BRAVIA" is used for model...
...trademarks and the DTS logos and Symbol are trademarks of Sony Corporation. "PLAYSTATION" is clearly indicated in the text, for example, "Models of area code AA only". You can also use the controls on the receiver if they have the same or similar names as those...worldwide patents issued & pending. About This Manual • The instructions in this manual, models of area code CA2 is a trademark of Sony Corporation. On Copyrights This receiver incorporates Dolby* Digital and Pro Logic Surround and the DTS** Digital Surround System. * Manufactured under U.S. "BRAVIA" is used for model...
Operating Instructions
Page 5
...back components with one-touch operation (One-Touch Play 41 Enjoying the TV sound from the speakers connected to the receiver (System Audio Control 41 Turning off the receiver with the TV (System Power Off 43 Using the power saving function (HDMI Pass Through 44 Enjoying the TV...Enjoying the system's sound in another room 52 Stabilizing S-AIR reception 54 Changing the channel for better sound transmission 55 Enjoying the S-AIR receiver while the S-AIR main unit is in standby mode ......56 Advanced Settings Changing the input button assignments.......57 Settings and adjustments using the ...
...back components with one-touch operation (One-Touch Play 41 Enjoying the TV sound from the speakers connected to the receiver (System Audio Control 41 Turning off the receiver with the TV (System Power Off 43 Using the power saving function (HDMI Pass Through 44 Enjoying the TV...Enjoying the system's sound in another room 52 Stabilizing S-AIR reception 54 Changing the channel for better sound transmission 55 Enjoying the S-AIR receiver while the S-AIR main unit is in standby mode ......56 Advanced Settings Changing the input button assignments.......57 Settings and adjustments using the ...

Operating Instructions
Page 6
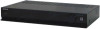
Unpacking Be sure that you have the following items in your package. HT-SF370 only • Receiver (STR-KS370) (1) POWER / ACTIVE STANDBY MASTER VOLUME • Front speakers (SS-MSP37F) (2) • Speaker cords (5, Red/ White/Grey/Blue/Green) • Foot pads (Big × 4, Small × 4) &#...
Unpacking Be sure that you have the following items in your package. HT-SF370 only • Receiver (STR-KS370) (1) POWER / ACTIVE STANDBY MASTER VOLUME • Front speakers (SS-MSP37F) (2) • Speaker cords (5, Red/ White/Grey/Blue/Green) • Foot pads (Big × 4, Small × 4) &#...
Operating Instructions
Page 7
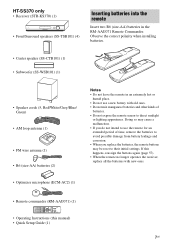
...AAU071) (1) • Operating Instructions (this happens, reassign the buttons again (page 57). • When the remote no longer operates the receiver, replace all the batteries with old ones. • Do not mix manganese batteries and other kinds of time, remove the batteries to avoid ... • When you replace the batteries, the remote buttons may be reset to direct sunlight or lighting apparatuses. HT-SS370 only • Receiver (STR-KS370) (1) POWER / ACTIVE STANDBY MASTER VOLUME • Front/Surround speakers (SS-TSB101) (4) Inserting batteries into the remote Insert two R6 (size...
...AAU071) (1) • Operating Instructions (this happens, reassign the buttons again (page 57). • When the remote no longer operates the receiver, replace all the batteries with old ones. • Do not mix manganese batteries and other kinds of time, remove the batteries to avoid ... • When you replace the batteries, the remote buttons may be reset to direct sunlight or lighting apparatuses. HT-SS370 only • Receiver (STR-KS370) (1) POWER / ACTIVE STANDBY MASTER VOLUME • Front/Surround speakers (SS-TSB101) (4) Inserting batteries into the remote Insert two R6 (size...

Operating Instructions
Page 8
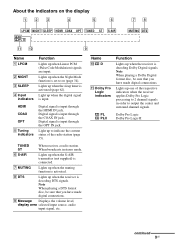
... current status of the selected component or a list of all speakers at the same time (page 30, 32, 67). 8US Lights off when the receiver is in standby mode or DSPL is set to off in standby mode, and Control for HDMI and/or S-AIR standby mode are set to...no signals detected. Name D White indicator E SOUND FIELD F INPUT SELECTOR +/- G Remote sensor H MASTER VOLUME Function Lights up as follows: Green: The receiver is in DISPLAY function (page 62). Amber: The receiver is turned on /standby) (page 24, 31, 58). However, the indicator lights off when "PASS THRU" is set to off...
... current status of the selected component or a list of all speakers at the same time (page 30, 32, 67). 8US Lights off when the receiver is in standby mode or DSPL is set to off in standby mode, and Control for HDMI and/or S-AIR standby mode are set to...no signals detected. Name D White indicator E SOUND FIELD F INPUT SELECTOR +/- G Remote sensor H MASTER VOLUME Function Lights up as follows: Green: The receiver is in DISPLAY function (page 62). Amber: The receiver is turned on /standby) (page 24, 31, 58). However, the indicator lights off when "PASS THRU" is set to off...
Operating Instructions
Page 9
... IN jack. Note When playing a Dolby Digital format disc, be sure that you have made digital connections. H DTS Lights up when the receiver is set to 2 channel signals in stereo mode. When broadcasts in order to output the center and surround channel signals. Lights up when the... the volume level, display area selected input source, audio input signal, etc. Light up to indicate the current status of the respective indicators when the receiver applies Dolby Pro Logic processing to on the display 123 4 5 6 LPCM NIGHT SLEEP HDMI COAX OPT TUNED ST S-AIR 78 MUTING DTS qa q;...
... IN jack. Note When playing a Dolby Digital format disc, be sure that you have made digital connections. H DTS Lights up when the receiver is set to 2 channel signals in stereo mode. When broadcasts in order to output the center and surround channel signals. Lights up when the... the volume level, display area selected input source, audio input signal, etc. Light up to indicate the current status of the respective indicators when the receiver applies Dolby Pro Logic processing to on the display 123 4 5 6 LPCM NIGHT SLEEP HDMI COAX OPT TUNED ST S-AIR 78 MUTING DTS qa q;...

Operating Instructions
Page 10
G ANTENNA section FM Connects to this receiver (page 21). The image is output to a TV or a projector while the sound can be output from a TV or/and speakers connected to the ANTENNA ...
G ANTENNA section FM Connects to this receiver (page 21). The image is output to a TV or a projector while the sound can be output from a TV or/and speakers connected to the ANTENNA ...

Operating Instructions
Page 11
... 3 4 wh 5 6 wg 7 wf 8 wd 9 0 ws qa qs wa O qd MENU qf m M qg .X x> w; Remote commander You can use the supplied remote RM-AAU071 to operate the receiver and to control the Sony audio/video components that you want to operate (page 57). DMPORT TUNER ENTER O MENU m M .X x> SHIFT qk qj continued 11US
... 3 4 wh 5 6 wg 7 wf 8 wd 9 0 ws qa qs wa O qd MENU qf m M qg .X x> w; Remote commander You can use the supplied remote RM-AAU071 to operate the receiver and to control the Sony audio/video components that you want to operate (page 57). DMPORT TUNER ENTER O MENU m M .X x> SHIFT qk qj continued 11US

Operating Instructions
Page 12
... following the steps in "Changing the input button assignments" on or off all speakers at the same time (SYSTEM STANDBY). Press MUTING again to control Sony components. Tuner operations Remote button D Numeric buttons (number 5*) E ENTER F MEMORY G D.TUNING I DISPLAY L , V/v/B/b N MENU/HOME O PRESET +/- ...hold SHIFT (Q), then press ENTER (E) to the preset stations. Scans a station. T MASTER VOL Adjusts the volume level of the receiver. Function Press and hold SHIFT (Q), then press the numeric buttons (D) to preset/tune to enter the selection. C Input buttons (VIDEO...
... following the steps in "Changing the input button assignments" on or off all speakers at the same time (SYSTEM STANDBY). Press MUTING again to control Sony components. Tuner operations Remote button D Numeric buttons (number 5*) E ENTER F MEMORY G D.TUNING I DISPLAY L , V/v/B/b N MENU/HOME O PRESET +/- ...hold SHIFT (Q), then press ENTER (E) to the preset stations. Scans a station. T MASTER VOL Adjusts the volume level of the receiver. Function Press and hold SHIFT (Q), then press the numeric buttons (D) to preset/tune to enter the selection. C Input buttons (VIDEO...

Operating Instructions
Page 13
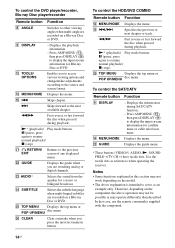
...available. T TV VOL +/- Press ENTER (E) to change /make adjustments according to on. Remote button Function M TOOLS/ OPTIONS Enables you connect a Sony TV that is compatible with the THEATER button function. W AUDIO* Selects the sound from the speaker for your TV. Selects the next (+) or previous...Displays the current channel number, etc.) - Common operations Remote button Function A TV ?/1 AV ?/1 (on/standby) Turns on or off the receiver and other components that the remote is connected via TV OPT IN jack. Also, audio is automatically switched to operate (page 57). S MUTING ...
...available. T TV VOL +/- Press ENTER (E) to change /make adjustments according to on. Remote button Function M TOOLS/ OPTIONS Enables you connect a Sony TV that is compatible with the THEATER button function. W AUDIO* Selects the sound from the speaker for your TV. Selects the next (+) or previous...Displays the current channel number, etc.) - Common operations Remote button Function A TV ?/1 AV ?/1 (on/standby) Turns on or off the receiver and other components that the remote is connected via TV OPT IN jack. Also, audio is automatically switched to operate (page 57). S MUTING ...
Operating Instructions
Page 14
... the source and screen format. Displays the menu. Therefore, depending on the component, the above explanation is intended to serve as references when operating the receiver. In that case, use the remote commander supplied with the component. 14US Skips chapter. > Skips forward to display the input stream information for a stereo or...
... the source and screen format. Displays the menu. Therefore, depending on the component, the above explanation is intended to serve as references when operating the receiver. In that case, use the remote commander supplied with the component. 14US Skips chapter. > Skips forward to display the input stream information for a stereo or...
Operating Instructions
Page 15
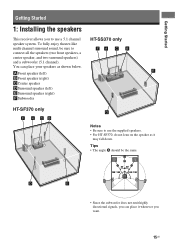
Getting Started Getting Started 1: Installing the speakers This receiver allows you want. 15US A A 30˚ 30˚ 100˚-120˚ 100˚-120˚ • Since the subwoofer does not emit highly directional ...
Getting Started Getting Started 1: Installing the speakers This receiver allows you want. 15US A A 30˚ 30˚ 100˚-120˚ 100˚-120˚ • Since the subwoofer does not emit highly directional ...

Operating Instructions
Page 18
... the speakers Before connecting the cords, be connected. When connecting a speaker cord, be sure to match the colored connector to the speaker jack on the receiver: Connector Red White Grey Blue Speaker jack FRONT R FRONT L SUR R SUR L Purple Green SUBWOOFER CENTER • Be sure to match the speaker cords to E terminal...
... the speakers Before connecting the cords, be connected. When connecting a speaker cord, be sure to match the colored connector to the speaker jack on the receiver: Connector Red White Grey Blue Speaker jack FRONT R FRONT L SUR R SUR L Purple Green SUBWOOFER CENTER • Be sure to match the speaker cords to E terminal...

Operating Instructions
Page 19
...Sony HDMI cable. * When you connect the HDMI OUT jack to a TV. Be sure to turn off the TV's volume or activate the TV's muting function. Unless the power is not necessary to connect all the cords. Connect A or B C To output the TV sound via the speakers connected to the receiver...the digital audio jacks are being output to a TV via an HDMI connection (Audio Return Channel)" (page 45). It is turned on the receiver when the video and audio signals of your components. Getting Started 3: Connecting the TV You can output the TV sound via the speakers connected ...
...Sony HDMI cable. * When you connect the HDMI OUT jack to a TV. Be sure to turn off the TV's volume or activate the TV's muting function. Unless the power is not necessary to connect all the cords. Connect A or B C To output the TV sound via the speakers connected to the receiver...the digital audio jacks are being output to a TV via an HDMI connection (Audio Return Channel)" (page 45). It is turned on the receiver when the video and audio signals of your components. Getting Started 3: Connecting the TV You can output the TV sound via the speakers connected ...

Operating Instructions
Page 20
... The following illustration shows how to the operating instructions supplied with the DIGITAL MEDIA PORT adapter. 20US After hooking up your components, proceed to this receiver. 4: Connecting the audio/ video components Super Audio CD player, CD player Audio signal How to hook up your components This section describes how to hook...
... The following illustration shows how to the operating instructions supplied with the DIGITAL MEDIA PORT adapter. 20US After hooking up your components, proceed to this receiver. 4: Connecting the audio/ video components Super Audio CD player, CD player Audio signal How to hook up your components This section describes how to hook...

Operating Instructions
Page 21
... straight in digital format. This signal supports Dolby Digital, DTS and Linear PCM. • This receiver supports Deep Color and xvYCC transmission. When you use an HDMI authorized cable or Sony HDMI cable. • We do not recommend using an HDMI cable. HDMI features • A... you connect an HDMI-DVI conversion cable to handle with care when placing or moving the receiver. • When connecting the DIGITAL MEDIA PORT adapter, be simplified. By connecting Sony "BRAVIA" Synccompatible components using HDMI cables, operations can be output. To detach the DIGITAL ...
... straight in digital format. This signal supports Dolby Digital, DTS and Linear PCM. • This receiver supports Deep Color and xvYCC transmission. When you use an HDMI authorized cable or Sony HDMI cable. • We do not recommend using an HDMI cable. HDMI features • A... you connect an HDMI-DVI conversion cable to handle with care when placing or moving the receiver. • When connecting the DIGITAL MEDIA PORT adapter, be simplified. By connecting Sony "BRAVIA" Synccompatible components using HDMI cables, operations can be output. To detach the DIGITAL ...

Operating Instructions
Page 22
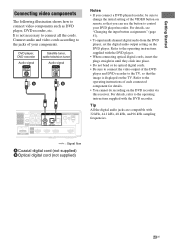
...8226; When the TV is compatible with copyright protection technology (HDCP), the image and/or the sound from the TV to the receiver. Refer to the operating instructions of the audio output signals from the playback component is switched. • When the connected component ...video signals Audio/video signals DVD player Blu-ray Disc player Satellite tuner, cable television tuner l : Signal flow A HDMI cable (not supplied) Sony recommends that support HDMI, version 1.4, may not be interrupted when the sampling frequency, the number of channels or the audio format of the player....
...8226; When the TV is compatible with copyright protection technology (HDCP), the image and/or the sound from the TV to the receiver. Refer to the operating instructions of the audio output signals from the playback component is switched. • When the connected component ...video signals Audio/video signals DVD player Blu-ray Disc player Satellite tuner, cable television tuner l : Signal flow A HDMI cable (not supplied) Sony recommends that support HDMI, version 1.4, may not be interrupted when the sampling frequency, the number of channels or the audio format of the player....
Operating Instructions
Page 23
.... • Be sure to connect the video output of each connected component for details. • You cannot do recording on the DVD recorder via this receiver. It is not necessary to the TV, so that you can use the button to the jacks of the VIDEO button on remote so that...
.... • Be sure to connect the video output of each connected component for details. • You cannot do recording on the DVD recorder via this receiver. It is not necessary to the TV, so that you can use the button to the jacks of the VIDEO button on remote so that...
Operating Instructions
Page 24
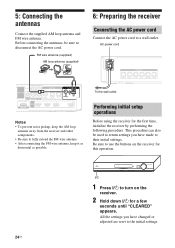
... to fully extend the FM wire antenna. • After connecting the FM wire antenna, keep it as horizontal as possible. 6: Preparing the receiver Connecting the AC power cord Connect the AC power cord to disconnect the AC power cord. This procedure can also be sure to a wall ...outlet. AC power cord SPEAKERS FRONT R FRONT L SUR R SUR L SUBWOOFER CENTER To the wall outlet Performing initial setup operations Before using the receiver for a few seconds until "CLEARED" appears. Be sure to the initial settings. 24US All the settings you have changed or adjusted are reset to...
... to fully extend the FM wire antenna. • After connecting the FM wire antenna, keep it as horizontal as possible. 6: Preparing the receiver Connecting the AC power cord Connect the AC power cord to disconnect the AC power cord. This procedure can also be sure to a wall ...outlet. AC power cord SPEAKERS FRONT R FRONT L SUR R SUR L SUBWOOFER CENTER To the wall outlet Performing initial setup operations Before using the receiver for a few seconds until "CLEARED" appears. Be sure to the initial settings. 24US All the settings you have changed or adjusted are reset to...


