
Operating Instructions (HT-7000DH)
Page 2
... particular, specifies that may cause harmful interference to CATV system installer: This reminder is connected. - If this equipment does cause harmful interference to radio or television reception, which the receiver is provided to call CATV system installer's attention to Article 820-40 of the NEC... that interference will not occur in accordance with the instructions, may be connected to the grounding system of the building, as close to rain or moisture. Reorient or relocate the receiving antenna. - Connect the equipment into an outlet on the apparatus. To prevent fire or ...
... particular, specifies that may cause harmful interference to CATV system installer: This reminder is connected. - If this equipment does cause harmful interference to radio or television reception, which the receiver is provided to call CATV system installer's attention to Article 820-40 of the NEC... that interference will not occur in accordance with the instructions, may be connected to the grounding system of the building, as close to rain or moisture. Reorient or relocate the receiving antenna. - Connect the equipment into an outlet on the apparatus. To prevent fire or ...

Operating Instructions (HT-7000DH)
Page 4
... Contents Getting Started Description and location of parts 5 1: Installing speakers 14 2: Connecting speakers 16 3a: Connecting the audio components.........18 3b: Connecting the video components ........21 4: Connecting the antennas 28 5: Preparing the receiver and the remote .....29 6: Selecting the speaker system 30 7: Calibrating the appropriate... 65 Naming inputs 66 Changing the display 67 Using the Sleep Timer 67 Recording using the receiver 68 Using the Remote Programming the remote 69 Additional Information Glossary 72 Precautions 73 Troubleshooting 75 Specifications 78 Index 82 ...
... Contents Getting Started Description and location of parts 5 1: Installing speakers 14 2: Connecting speakers 16 3a: Connecting the audio components.........18 3b: Connecting the video components ........21 4: Connecting the antennas 28 5: Preparing the receiver and the remote .....29 6: Selecting the speaker system 30 7: Calibrating the appropriate... 65 Naming inputs 66 Changing the display 67 Using the Sleep Timer 67 Recording using the receiver 68 Using the Remote Programming the remote 69 Additional Information Glossary 72 Precautions 73 Troubleshooting 75 Specifications 78 Index 82 ...

Operating Instructions (HT-7000DH)
Page 6
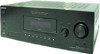
... scan a station (page 54, 55). mode (page 48). Press to both digital and analog jacks (page 64). jacks S AUTO CAL MIC jack Connects to mute the sound (page 35). I MUTING Press to the supplied ECM-AC2 optimizer microphone for the Auto Calibration function (page 31). L MOVIE, ... from remote commander. P TUNING MODE Press to playback (page 35, 37, 38, 54, 56, 64, 66, 68). Name Function E Remote sensor Receives signals from the components connected to adjust the volume level of all speakers at the same time (page 34, 35, 37, 38). K INPUT SELECTOR Turn to select the...
... scan a station (page 54, 55). mode (page 48). Press to both digital and analog jacks (page 64). jacks S AUTO CAL MIC jack Connects to mute the sound (page 35). I MUTING Press to the supplied ECM-AC2 optimizer microphone for the Auto Calibration function (page 31). L MOVIE, ... from remote commander. P TUNING MODE Press to playback (page 35, 37, 38, 54, 56, 64, 66, 68). Name Function E Remote sensor Receives signals from the components connected to adjust the volume level of all speakers at the same time (page 34, 35, 37, 38). K INPUT SELECTOR Turn to select the...

Operating Instructions (HT-7000DH)
Page 7
... INPUT MODE is output from the SUB WOOFER jack. Note Dolby Pro Logic and Dolby Pro Logic II decoding do not light up when the receiver applies Pro Logic processing to output the center and surround channel signals. Lights up when the audio signal is set to "AUTO" and the source... to 2 channel signals in the VIDEO menu (page 65). continued 7US Note When playing a Dolby Digital format disc, be sure that you have made digital connections and that you select "HDMI A." Lights up if the speaker output is turned off or if a headphone is activated. PRO LOGIC II" lights up according...
... INPUT MODE is output from the SUB WOOFER jack. Note Dolby Pro Logic and Dolby Pro Logic II decoding do not light up when the receiver applies Pro Logic processing to output the center and surround channel signals. Lights up when the audio signal is set to "AUTO" and the source... to 2 channel signals in the VIDEO menu (page 65). continued 7US Note When playing a Dolby Digital format disc, be sure that you have made digital connections and that you select "HDMI A." Lights up if the speaker output is turned off or if a headphone is activated. PRO LOGIC II" lights up according...

Operating Instructions (HT-7000DH)
Page 9
... of a VCR or a DVD player (page 22, 23, 24, 26, 27). 4 C COMPONENT VIDEO INPUT/ OUTPUT section Green Blue Red COMPONENT Connects to sub woofer (page 16). The image and the sound are output to a DVD IN jack player, etc. SPEAKERS L L + - + -...FRONT A RL RL FRONT B SPEAKERS 6 5 A DIGITAL INPUT section OPTICAL Connects to a TV or a projector (page 25). D SPEAKER section Connects to a DVD player, or a satellite tuner. HDMI IN/ MONITOR OUT jacka) Connects to speakers (page 16). Connects to a DVD VIDEO player, TV, or a INPUT/ satellite tuner. You...
... of a VCR or a DVD player (page 22, 23, 24, 26, 27). 4 C COMPONENT VIDEO INPUT/ OUTPUT section Green Blue Red COMPONENT Connects to sub woofer (page 16). The image and the sound are output to a DVD IN jack player, etc. SPEAKERS L L + - + -...FRONT A RL RL FRONT B SPEAKERS 6 5 A DIGITAL INPUT section OPTICAL Connects to a TV or a projector (page 25). D SPEAKER section Connects to a DVD player, or a satellite tuner. HDMI IN/ MONITOR OUT jacka) Connects to speakers (page 16). Connects to a DVD VIDEO player, TV, or a INPUT/ satellite tuner. You...

Operating Instructions (HT-7000DH)
Page 10
... antenna (not supplied with this receiver (page 28). If you connect the MONITOR OUT jack to a TV monitor (page 22). 10US Remote commander You can use the supplied remote RM-AAP012 to operate the receiver and to control the Sony audio/video components that the remote is assigned to ...the AM loop antenna supplied with this receiver (page 28). Connects to operate. You can watch the selected input image when you press ?/1...
... antenna (not supplied with this receiver (page 28). If you connect the MONITOR OUT jack to a TV monitor (page 22). 10US Remote commander You can use the supplied remote RM-AAP012 to operate the receiver and to control the Sony audio/video components that the remote is assigned to ...the AM loop antenna supplied with this receiver (page 28). Connects to operate. You can watch the selected input image when you press ?/1...
Operating Instructions (HT-7000DH)
Page 11
...U TOP MENU/ GUIDE Press to the MULTI CH IN jacks. continued 11US Getting Started C MULTI CH Press to select the audio directly from the components connected to display the - F PRESET/ CH/D.SKIP +/- SEARCH MODE Press to display the menu of the DVD player. L AMP MENU Press to select the...(L), TOP MENU/GUIDE (U), or AV MENU (V), press the control button V, v, B or b to activate the Sleep Timer function and the duration which the receiver turns off automatically. menu or on-screen guide of the TV, VCR, VCD player, LD player, DVD player, CD player, MD deck, Blu-ray disc...
...U TOP MENU/ GUIDE Press to the MULTI CH IN jacks. continued 11US Getting Started C MULTI CH Press to select the audio directly from the components connected to display the - F PRESET/ CH/D.SKIP +/- SEARCH MODE Press to display the menu of the DVD player. L AMP MENU Press to select the...(L), TOP MENU/GUIDE (U), or AV MENU (V), press the control button V, v, B or b to activate the Sleep Timer function and the duration which the receiver turns off automatically. menu or on-screen guide of the TV, VCR, VCD player, LD player, DVD player, CD player, MD deck, Blu-ray disc...

Operating Instructions (HT-7000DH)
Page 16
... B A a)If you want to the SPEAKERS FRONT B terminal. You can select the front speakers you have an additional front speaker system, connect them to use with the SPEAKERS (OFF/A/B/A+B) button. For details, see "6: Selecting the speaker system" (page 30). b)Use the long speaker cords to... connect the surround speakers and the short speaker cords to connect the front and center speakers. PB/CB /B-Y SPEAKERS VIDEO IN VIDEO IN VIDEO OUT VIDEO IN VIDEO OUT DVD IN...
... B A a)If you want to the SPEAKERS FRONT B terminal. You can select the front speakers you have an additional front speaker system, connect them to use with the SPEAKERS (OFF/A/B/A+B) button. For details, see "6: Selecting the speaker system" (page 30). b)Use the long speaker cords to... connect the surround speakers and the short speaker cords to connect the front and center speakers. PB/CB /B-Y SPEAKERS VIDEO IN VIDEO IN VIDEO OUT VIDEO IN VIDEO OUT DVD IN...

Operating Instructions (HT-7000DH)
Page 17
Tip Use the supplied speakers to the speaker label* on the rear panel of the speakers. For details on the speaker label. Character on speaker label L R SL SR Speaker type Front left Front right Surround left Surround right * The center speaker and sub woofer do not have any character on the speaker type, see page 3. Getting Started To connect the speakers correctly Check the speaker type by referring to optimize the system's performance. 17US
Tip Use the supplied speakers to the speaker label* on the rear panel of the speakers. For details on the speaker label. Character on speaker label L R SL SR Speaker type Front left Front right Surround left Surround right * The center speaker and sub woofer do not have any character on the speaker type, see page 3. Getting Started To connect the speakers correctly Check the speaker type by referring to optimize the system's performance. 17US

Operating Instructions (HT-7000DH)
Page 18
... the illustration that follows. 3a: Connecting the audio components How to hook up your components This section describes how to hook up all your components to this receiver. Refer to be connected The sound quality depends on the connecting jack. Component to output audio decoded... by the component's internal multi-channel decoder through this receiver. Before you begin, refer to "Component to be connected Component With Page Super ...
... the illustration that follows. 3a: Connecting the audio components How to hook up your components This section describes how to hook up all your components to this receiver. Refer to be connected The sound quality depends on the connecting jack. Component to output audio decoded... by the component's internal multi-channel decoder through this receiver. Before you begin, refer to "Component to be connected Component With Page Super ...

Operating Instructions (HT-7000DH)
Page 19
... or Super Audio CD player is equipped with multi channel output jacks, you will need to adjust the level of this receiver to enjoy multi channel sound. Note When you make connections to the MULTI CH IN jacks, you can be used to the MULTI CH IN jacks of the speakers and... sub woofer using the controls on the connected component. DVD player, Super Audio CD player, etc. A B DIGITAL OPTICAL VIDEO 1 IN VIDEO 2 IN ANTENNA XM AM DVD IN VIDEO 2 IN MONITOR OUT COMPONENT VIDEO...
... or Super Audio CD player is equipped with multi channel output jacks, you will need to adjust the level of this receiver to enjoy multi channel sound. Note When you make connections to the MULTI CH IN jacks, you can be used to the MULTI CH IN jacks of the speakers and... sub woofer using the controls on the connected component. DVD player, Super Audio CD player, etc. A B DIGITAL OPTICAL VIDEO 1 IN VIDEO 2 IN ANTENNA XM AM DVD IN VIDEO 2 IN MONITOR OUT COMPONENT VIDEO...

Operating Instructions (HT-7000DH)
Page 20
... L L R R AUDIO IN AUDIO IN AUDIO OUT AUDIO IN DVD VIDEO 2 VIDEO 1 L AUDIO CENTER OUT R SUB FRONT SURROUND WOOFER SUB MULTI CH IN WOOFER CENTER + - SPEAKERS L L + - + - Connecting components with analog audio jacks The following illustration shows how to connect a component which has analog jacks such as tape deck, etc.
... L L R R AUDIO IN AUDIO IN AUDIO OUT AUDIO IN DVD VIDEO 2 VIDEO 1 L AUDIO CENTER OUT R SUB FRONT SURROUND WOOFER SUB MULTI CH IN WOOFER CENTER + - SPEAKERS L L + - + - Connecting components with analog audio jacks The following illustration shows how to connect a component which has analog jacks such as tape deck, etc.

Operating Instructions (HT-7000DH)
Page 21
... OUTPUT jack HDMI HDMI COMPONENT VIDEO VIDEO COMPONENT VIDEO VIDEO High quality image Notes • Connect image display components such as a TV monitor or a projector to the MONITOR OUT jack on the receiver. • Turn on , neither video nor audio is transmitted. Reassigning video input signals ...to another input (page 65). 21US You can be connected" below for the pages which describe how to another input Component video...
... OUTPUT jack HDMI HDMI COMPONENT VIDEO VIDEO COMPONENT VIDEO VIDEO High quality image Notes • Connect image display components such as a TV monitor or a projector to the MONITOR OUT jack on the receiver. • Turn on , neither video nor audio is transmitted. Reassigning video input signals ...to another input (page 65). 21US You can be connected" below for the pages which describe how to another input Component video...

Operating Instructions (HT-7000DH)
Page 22
...not supplied) 22US It is transmitted. If the power supply of the receiver is not turned on the receiver when the video and audio of a playback component are being output to the jacks of your components. Notes • Connect image display components such as a TV monitor or a projector to the... MONITOR OUT jack on the receiver. • Turn on , neither video nor audio is not necessary to connect all the cables. TV monitor A B DIGITAL OPTICAL VIDEO 1 IN VIDEO 2 IN ANTENNA XM AM DVD IN VIDEO 2 IN MONITOR OUT COMPONENT ...
...not supplied) 22US It is transmitted. If the power supply of the receiver is not turned on the receiver when the video and audio of a playback component are being output to the jacks of your components. Notes • Connect image display components such as a TV monitor or a projector to the... MONITOR OUT jack on the receiver. • Turn on , neither video nor audio is not necessary to connect all the cables. TV monitor A B DIGITAL OPTICAL VIDEO 1 IN VIDEO 2 IN ANTENNA XM AM DVD IN VIDEO 2 IN MONITOR OUT COMPONENT ...
Operating Instructions (HT-7000DH)
Page 23
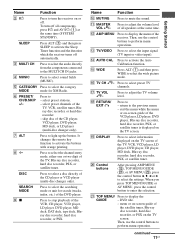
... - + - Getting Started Hooking up a DVD player/DVD recorder The following illustration shows how to the jacks of your components. 1 Connecting audio DVD player Notes • To input multi channel digital audio from the DVD player, set the digital audio output setting on the DVD... SPEAKERS R FRONT A A Coaxial digital cord (supplied) B Audio cord (not supplied) C Optical digital cord (not supplied) continued 23US Connect audio and video cords according to connect a DVD player/DVD recorder. DVD recorder A B C B DIGITAL OPTICAL VIDEO 1 IN VIDEO 2 IN ANTENNA XM AM DVD IN VIDEO...
... - + - Getting Started Hooking up a DVD player/DVD recorder The following illustration shows how to the jacks of your components. 1 Connecting audio DVD player Notes • To input multi channel digital audio from the DVD player, set the digital audio output setting on the DVD... SPEAKERS R FRONT A A Coaxial digital cord (supplied) B Audio cord (not supplied) C Optical digital cord (not supplied) continued 23US Connect audio and video cords according to connect a DVD player/DVD recorder. DVD recorder A B C B DIGITAL OPTICAL VIDEO 1 IN VIDEO 2 IN ANTENNA XM AM DVD IN VIDEO...
Operating Instructions (HT-7000DH)
Page 24
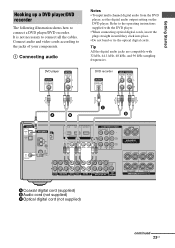
... the factory setting of the VIDEO 1 input button on the receiver's display. For details, see "Programming the remote" (page 69). • You can also rename the VIDEO 1 input so that you connect a DVD recorder • Be sure to control your DVD recorder. SPEAKERS L L + - + - 2 Connecting video DVD player A B DIGITAL OPTICAL VIDEO 1 IN VIDEO 2 IN...
... the factory setting of the VIDEO 1 input button on the receiver's display. For details, see "Programming the remote" (page 69). • You can also rename the VIDEO 1 input so that you connect a DVD recorder • Be sure to control your DVD recorder. SPEAKERS L L + - + - 2 Connecting video DVD player A B DIGITAL OPTICAL VIDEO 1 IN VIDEO 2 IN...
Operating Instructions (HT-7000DH)
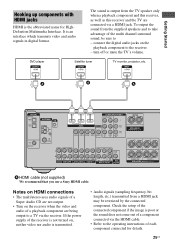
Page 25
...may be sure to the receiver. - DVD player Satellite tuner TV monitor, projector, etc. R SURROUND SPEAKERS R FRONT A A HDMI cable (not supplied) We recommend that you use a Sony HDMI cable. It is poor or the sound does not come out of a component connected via the HDMI cable. ... WOOFER SUB MULTI CH IN WOOFER CENTER + - SPEAKERS L L + - + - Check the setup of each component connected for HighDefinition Multimedia Interface. If the power supply of the receiver is not turned on the receiver when the video and audio of the multi channel surround sound, be restricted by the...
...may be sure to the receiver. - DVD player Satellite tuner TV monitor, projector, etc. R SURROUND SPEAKERS R FRONT A A HDMI cable (not supplied) We recommend that you use a Sony HDMI cable. It is poor or the sound does not come out of a component connected via the HDMI cable. ... WOOFER SUB MULTI CH IN WOOFER CENTER + - SPEAKERS L L + - + - Check the setup of each component connected for HighDefinition Multimedia Interface. If the power supply of the receiver is not turned on the receiver when the video and audio of the multi channel surround sound, be restricted by the...
Operating Instructions (HT-7000DH)
Page 26
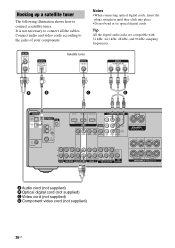
Notes • When connecting optical digital cords, insert the plugs straight in until they click into place. • Do not bend or tie optical digital cords. R SURROUND SPEAKERS R FRONT A A ... AUDIO IN DVD VIDEO 2 VIDEO 1 L AUDIO CENTER OUT R SUB FRONT SURROUND WOOFER SUB MULTI CH IN WOOFER CENTER + - It is not necessary to connect a satellite tuner. SPEAKERS L L + - + - Hooking up a satellite tuner The following illustration shows how to connect all the cables. Connect audio and video cords according to the jacks of your components.
Notes • When connecting optical digital cords, insert the plugs straight in until they click into place. • Do not bend or tie optical digital cords. R SURROUND SPEAKERS R FRONT A A ... AUDIO IN DVD VIDEO 2 VIDEO 1 L AUDIO CENTER OUT R SUB FRONT SURROUND WOOFER SUB MULTI CH IN WOOFER CENTER + - It is not necessary to connect a satellite tuner. SPEAKERS L L + - + - Hooking up a satellite tuner The following illustration shows how to connect all the cables. Connect audio and video cords according to the jacks of your components.
Operating Instructions (HT-7000DH)
Page 27
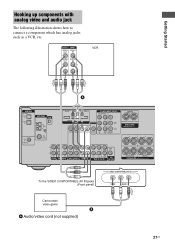
Getting Started Hooking up components with analog video and audio jack The following illustration shows how to connect a component which has analog jacks such as a VCR, etc. SPEAKERS L L + - + - R SURROUND SPEAKERS R FRONT A To the VIDEO 3 IN/PORTABLE AV IN jacks (Front panel) VIDEO 3 IN/...
Getting Started Hooking up components with analog video and audio jack The following illustration shows how to connect a component which has analog jacks such as a VCR, etc. SPEAKERS L L + - + - R SURROUND SPEAKERS R FRONT A To the VIDEO 3 IN/PORTABLE AV IN jacks (Front panel) VIDEO 3 IN/...

Operating Instructions (HT-7000DH)
Page 28
...varies depending on the area code of this receiver. SPEAKERS L L + - + - Notes • To prevent noise pickup, keep the AM loop antenna away from the receiver and other components. • Be sure to fully extend the FM wire antenna. • After connecting the FM wire antenna, keep it as... horizontal as possible. 28US 4: Connecting the antennas Connect the supplied AM loop antenna and FM wire antenna...
...varies depending on the area code of this receiver. SPEAKERS L L + - + - Notes • To prevent noise pickup, keep the AM loop antenna away from the receiver and other components. • Be sure to fully extend the FM wire antenna. • After connecting the FM wire antenna, keep it as... horizontal as possible. 28US 4: Connecting the antennas Connect the supplied AM loop antenna and FM wire antenna...


