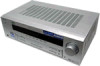
Operating Instructions (HT-DDW650)
Page 6
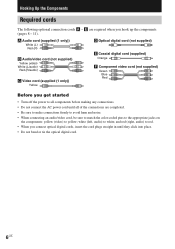
.... • Be sure to make connections firmly to avoid hum and noise. • When connecting an audio/video cord, be sure to match the color-coded pins to the appropriate jacks on the components: yellow (video) to red. • When you hook up the components (pages 8 - 11). and red (right, audio...
.... • Be sure to make connections firmly to avoid hum and noise. • When connecting an audio/video cord, be sure to match the color-coded pins to the appropriate jacks on the components: yellow (video) to red. • When you hook up the components (pages 8 - 11). and red (right, audio...
Operating Instructions (HT-DDW650)
Page 7
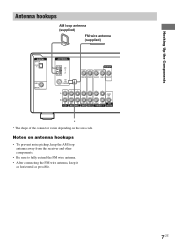
Notes on the area code. Hooking Up the Components Antenna hookups AM loop antenna (supplied) FM wire antenna (supplied) DIGITAL OPTICAL VIDEO 2 IN DVD IN COAXIAL ANTENNA AM y FM 75Ω COAXIAL MONITOR VIDEO IN VIDEO IN VIDEO OUT VIDEO IN VIDEO OUT L AUDIO OUT R IN CD OUT IN ...* * The shape of the connector varies depending on antenna hookups • To prevent noise pickup, keep the AM loop antenna away from the receiver and other components. • Be sure to fully extend the FM wire antenna. • After connecting the FM wire antenna, keep it as horizontal as possible. 7US
Notes on the area code. Hooking Up the Components Antenna hookups AM loop antenna (supplied) FM wire antenna (supplied) DIGITAL OPTICAL VIDEO 2 IN DVD IN COAXIAL ANTENNA AM y FM 75Ω COAXIAL MONITOR VIDEO IN VIDEO IN VIDEO OUT VIDEO IN VIDEO OUT L AUDIO OUT R IN CD OUT IN ...* * The shape of the connector varies depending on antenna hookups • To prevent noise pickup, keep the AM loop antenna away from the receiver and other components. • Be sure to fully extend the FM wire antenna. • After connecting the FM wire antenna, keep it as horizontal as possible. 7US
Operating Instructions (HT-DDW650)
Page 30
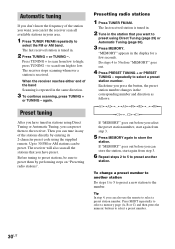
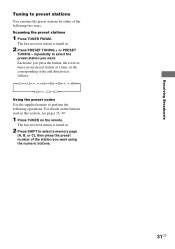
...TUNING - To change a preset number to another station. Preset tuning After you have preset. Then you can preset them by entering its 2-character preset code using Direct Tuning (page 29) or Automatic Tuning (page 30). 3 Press MEMORY. Before tuning to preset stations, be preset. Press SHIFT repeatedly ... station Do steps 1 to 5 to preset a new station to select a preset station number. press TUNING - Up to 30 FM or AM stations can let the receiver scan all the stations that you have tuned in stations using Direct Tuning or Automatic Tuning, you can tune in your area...
...TUNING - To change a preset number to another station. Preset tuning After you have preset. Then you can preset them by entering its 2-character preset code using Direct Tuning (page 29) or Automatic Tuning (page 30). 3 Press MEMORY. Before tuning to preset stations, be preset. Press SHIFT repeatedly ... station Do steps 1 to 5 to preset a new station to select a preset station number. press TUNING - Up to 30 FM or AM stations can let the receiver scan all the stations that you have tuned in stations using Direct Tuning or Automatic Tuning, you can tune in your area...
Operating Instructions (HT-DDW650)
Page 31
... a memory page (A, B, or C), then press the preset number of the following operations. The last received station is tuned in the corresponding order and direction as follows: nA1˜A2˜...˜A0˜...;B1˜B2˜...˜B0N nC0˜...C2˜C1N Using the preset codes Use the supplied remote to preset stations You can tune the preset stations by either of ...the station you want using the numeric buttons. 31US For details on the remote. The last received station is tuned in this section, see pages 35-39. 1 Press TUNER on the buttons used in ....
... a memory page (A, B, or C), then press the preset number of the following operations. The last received station is tuned in the corresponding order and direction as follows: nA1˜A2˜...˜A0˜...;B1˜B2˜...˜B0N nC0˜...C2˜C1N Using the preset codes Use the supplied remote to preset stations You can tune the preset stations by either of ...the station you want using the numeric buttons. 31US For details on the remote. The last received station is tuned in this section, see pages 35-39. 1 Press TUNER on the buttons used in ....
Operating Instructions (HT-DDW650)
Page 38
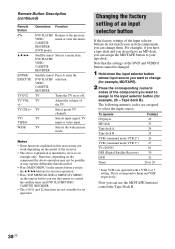
... RECORDER ENTER/ EXECUTE Satellite tuner/ Press to the previous VIDEO menu or exits the menu. TV VOL TV +/- Adjust the volume of the receiver. • The above operation may not be changed. 1 Hold down the input selector button whose input source you want to assign to change...source: To operate CD player Code(s) 22 MD deck 23 Tape deck A 24 Tape deck B 25 VCR (command mode VTR 2*) 26 VCR (command mode VTR 3*) 27 TV (SONY) 01 DSS (Digital Satellite Receiver) 30 DVD 21 Tuner 28 or 29 * Sony VCRs are not avaiable for receiver operation. • Press TOP...
... RECORDER ENTER/ EXECUTE Satellite tuner/ Press to the previous VIDEO menu or exits the menu. TV VOL TV +/- Adjust the volume of the receiver. • The above operation may not be changed. 1 Hold down the input selector button whose input source you want to assign to change...source: To operate CD player Code(s) 22 MD deck 23 Tape deck A 24 Tape deck B 25 VCR (command mode VTR 2*) 26 VCR (command mode VTR 3*) 27 TV (SONY) 01 DSS (Digital Satellite Receiver) 30 DVD 21 Tuner 28 or 29 * Sony VCRs are not avaiable for receiver operation. • Press TOP...

Operating Instructions (HT-DDW650)
Page 39
...table, set the appropriate manufacturer's code number. 1 Hold down TV ?/1 and enter your TV. To reset all the input selector buttons to control your TV. Code numbers of the remote commander, the code number may change. To reset a button to control non-Sony TVs. Operations Using the Remote... RM-PP65 TV Maker SONY AKAI AOC CENTURION CORONADO CURTIS-MATHES DAYTRON EMERSON FISHER GENERAL ...
...table, set the appropriate manufacturer's code number. 1 Hold down TV ?/1 and enter your TV. To reset all the input selector buttons to control your TV. Code numbers of the remote commander, the code number may change. To reset a button to control non-Sony TVs. Operations Using the Remote... RM-PP65 TV Maker SONY AKAI AOC CENTURION CORONADO CURTIS-MATHES DAYTRON EMERSON FISHER GENERAL ...
Operating Instructions (HT-DDW650)
Page 45
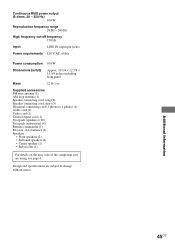
... 60 Hz Power consumption 100 W Dimensions (w/h/d) Approx. 10 3/4 × 12 7/8 × 15 3/4 inches including front panel Mass 22 lb 1 oz Supplied accessories FM wire antenna (1) AM loop antenna (1) Speaker connecting cord, long (2) Speaker connecting cord, short (3) Monaural connecting cord (1 phono to 1 phono) (1) Audio cord (1) Video... -AA) batteries (2) Speakers • Front speakers (2) • Surround speakers (2) • Center speaker (1) • Sub woofer (1) For details on the area code of the component you are subject to change without notice. 45US Additional Information
... 60 Hz Power consumption 100 W Dimensions (w/h/d) Approx. 10 3/4 × 12 7/8 × 15 3/4 inches including front panel Mass 22 lb 1 oz Supplied accessories FM wire antenna (1) AM loop antenna (1) Speaker connecting cord, long (2) Speaker connecting cord, short (3) Monaural connecting cord (1 phono to 1 phono) (1) Audio cord (1) Video... -AA) batteries (2) Speakers • Front speakers (2) • Surround speakers (2) • Center speaker (1) • Sub woofer (1) For details on the area code of the component you are subject to change without notice. 45US Additional Information


