
Operating Instructions (Large File - 11.22 MB)
Page 3
When a cart is used in this manual could otherwise be caused by inappropriate waste handling of ...connected. - Other versions may not comply with the limits for the environment and human health, which the receiver is required when the apparatus has been damaged in accordance with the instructions, may cause harmful interference to ...rain or moisture, does not operate normally, or has been dropped. Reorient or relocate the receiving antenna. - Connect the equipment into the apparatus, the apparatus has been exposed to radio communications. To reduce...
When a cart is used in this manual could otherwise be caused by inappropriate waste handling of ...connected. - Other versions may not comply with the limits for the environment and human health, which the receiver is required when the apparatus has been damaged in accordance with the instructions, may cause harmful interference to ...rain or moisture, does not operate normally, or has been dropped. Reorient or relocate the receiving antenna. - Connect the equipment into the apparatus, the apparatus has been exposed to radio communications. To reduce...
Operating Instructions (Large File - 11.22 MB)
Page 4
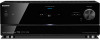
... service staff only. Any difference in operation is Sony Corporation, 1-7-1 Konan Minato-ku Tokyo, 108-0075 Japan. On copyrights This receiver incorporates Dolby* Digital and Pro Logic Surround and the... registered trademark and the DTS logos, Symbol, DTS-HD and DTS-HD Master Audio are disposed of -life to conserve natural resources. The Authorized Representative for illustration ...materials will help to the applicable collection point for model STR-DN2010. About This Manual • The instructions in this manual describe the controls on the supplied remote. By ensuring these...
... service staff only. Any difference in operation is Sony Corporation, 1-7-1 Konan Minato-ku Tokyo, 108-0075 Japan. On copyrights This receiver incorporates Dolby* Digital and Pro Logic Surround and the... registered trademark and the DTS logos, Symbol, DTS-HD and DTS-HD Master Audio are disposed of -life to conserve natural resources. The Authorized Representative for illustration ...materials will help to the applicable collection point for model STR-DN2010. About This Manual • The instructions in this manual describe the controls on the supplied remote. By ensuring these...

Operating Instructions (Large File - 11.22 MB)
Page 5
...Living Network Alliance. SHOUTcast® is a registered trademark of Sony Corporation. NO LICENSE IS GRANTED OR SHALL BE IMPLIED FOR ANY OTHER USE. SEE HTTP://WWW.MPEGLA.COM MPEG Layer-3 audio coding technology and patents licensed from Fraunhofer IIS and Thomson. 5GB...VC-1 VIDEO. In this manual, ™ and ® marks are trademarks of their respective holders. "x.v.Color (x.v.Colour)" and "x.v.Color (x.v.Colour)" logo are not specified. Rhapsody and the Rhapsody logo are trademarks of RealNetworks, Inc. and other countries. VAIO is a trademark of Sony Computer ...
...Living Network Alliance. SHOUTcast® is a registered trademark of Sony Corporation. NO LICENSE IS GRANTED OR SHALL BE IMPLIED FOR ANY OTHER USE. SEE HTTP://WWW.MPEGLA.COM MPEG Layer-3 audio coding technology and patents licensed from Fraunhofer IIS and Thomson. 5GB...VC-1 VIDEO. In this manual, ™ and ® marks are trademarks of their respective holders. "x.v.Color (x.v.Colour)" and "x.v.Color (x.v.Colour)" logo are not specified. Rhapsody and the Rhapsody logo are trademarks of RealNetworks, Inc. and other countries. VAIO is a trademark of Sony Computer ...
Operating Instructions (Large File - 11.22 MB)
Page 6
... About This Manual 4 Supplied accessories 8 Description and location of parts 9 Getting started 18 Connections 1: Installing the speakers 19 2: Connecting the speakers 21 3: Connecting the TV 23 4a: Connecting the video components.........25 4b: Connecting the audio components ........34... 5: Connecting the antennas (aerials 35 6: Inserting the wireless transmitter/ transceiver 36 7: Connecting to the network 37 8: Connecting the AC power cord (mains lead 39 Preparing the Receiver Initializing the receiver...
... About This Manual 4 Supplied accessories 8 Description and location of parts 9 Getting started 18 Connections 1: Installing the speakers 19 2: Connecting the speakers 21 3: Connecting the TV 23 4a: Connecting the video components.........25 4b: Connecting the audio components ........34... 5: Connecting the antennas (aerials 35 6: Inserting the wireless transmitter/ transceiver 36 7: Connecting to the network 37 8: Connecting the AC power cord (mains lead 39 Preparing the Receiver Initializing the receiver...

Operating Instructions (Large File - 11.22 MB)
Page 8
If this manual) • Quick Setup Guide • GUI Menu List • Software License Information (1) • Setup Manager CD-ROM (1) • VAIO Media plus CD-ROM (1) • FM ... (USA model only) - Supplied accessories • Operating Instructions (this happens, program the remote codes again (page 130). • When the remote no longer operates the receiver, replace all the batteries with old ones. • Do not mix manganese batteries and other kinds of time, remove the batteries to avoid possible damage...
If this manual) • Quick Setup Guide • GUI Menu List • Software License Information (1) • Setup Manager CD-ROM (1) • VAIO Media plus CD-ROM (1) • FM ... (USA model only) - Supplied accessories • Operating Instructions (this happens, program the remote codes again (page 130). • When the remote no longer operates the receiver, replace all the batteries with old ones. • Do not mix manganese batteries and other kinds of time, remove the batteries to avoid possible damage...

Operating Instructions (Large File - 11.22 MB)
Page 41
Preparing the Receiver 3 Press V/v repeatedly to select " Settings", then press or b. Speaker Pattern 3/4.1 5 Press V/v repeatedly to select the speaker pattern you want , then press . • OFF If you ... Assign", then press . 5 Press V/v repeatedly to set "Sur Back Assign" before you want , then press . 6 Press RETURN/EXIT O. Speaker Settings Speaker Pattern Sur Back Assign : Manual Setup Crossover Freq Test Tone D.Range Comp : OFF AUTO 4 Press V/v repeatedly to the SPEAKERS SURROUND BACK/FRONT HIGH/BI-AMP/FRONT B terminals in accordance with...
Preparing the Receiver 3 Press V/v repeatedly to select " Settings", then press or b. Speaker Pattern 3/4.1 5 Press V/v repeatedly to select the speaker pattern you want , then press . • OFF If you ... Assign", then press . 5 Press V/v repeatedly to set "Sur Back Assign" before you want , then press . 6 Press RETURN/EXIT O. Speaker Settings Speaker Pattern Sur Back Assign : Manual Setup Crossover Freq Test Tone D.Range Comp : OFF AUTO 4 Press V/v repeatedly to the SPEAKERS SURROUND BACK/FRONT HIGH/BI-AMP/FRONT B terminals in accordance with...

Operating Instructions (Large File - 11.22 MB)
Page 42
... the selected speakers terminals by pressing SPEAKERS when the headphones are connected. 42GB Calibrating the appropriate speaker settings automatically (Auto Calibration) This receiver is equipped with DCAC (Digital Cinema Auto Calibration) function which allows you to perform automatic calibration as follows: • Check the ... "Test Tone" (page 111). SPEAKERS Press SPEAKERS repeatedly to select the front speaker system you can adjust the speaker levels manually according to use the buttons on the display. c)The measurement result is selected. The DCAC is designed to drive.
... the selected speakers terminals by pressing SPEAKERS when the headphones are connected. 42GB Calibrating the appropriate speaker settings automatically (Auto Calibration) This receiver is equipped with DCAC (Digital Cinema Auto Calibration) function which allows you to perform automatic calibration as follows: • Check the ... "Test Tone" (page 111). SPEAKERS Press SPEAKERS repeatedly to select the front speaker system you can adjust the speaker levels manually according to use the buttons on the display. c)The measurement result is selected. The DCAC is designed to drive.

Operating Instructions (Large File - 11.22 MB)
Page 49
...If the failure screen is explained below. Preparing the Receiver Configuring the network settings of the receiver. V/v/b, MENU 5 Press to select "Next". 6 Press to select "Network Setup", then press . "Success! To set the network settings manually See "To set the IP address manually" (page 118) or "To set up the...case, the router that is now connected to set the Proxy server manually" (page 119). Press MENU if the GUI menu does not appear on the TV screen. The receiver is connected to the receiver or the Internet provider must be set correctly to select "Finish". appears...
...If the failure screen is explained below. Preparing the Receiver Configuring the network settings of the receiver. V/v/b, MENU 5 Press to select "Next". 6 Press to select "Network Setup", then press . "Success! To set the network settings manually See "To set the IP address manually" (page 118) or "To set up the...case, the router that is now connected to set the Proxy server manually" (page 119). Press MENU if the GUI menu does not appear on the TV screen. The receiver is connected to the receiver or the Internet provider must be set correctly to select "Finish". appears...

Operating Instructions (Large File - 11.22 MB)
Page 94
...AIR product lineup differs depending on the use up to 3 S-AIR main units. (The number of S-AIR product. • S-AIR main unit (this receiver): The S-AIR main unit is for the S-AIR sub unit in another room. These S-AIR products can use environment.) • S-AIR sub unit ... the wireless transmitter. • When the speaker pattern is used. S-AIR receiver: You can enjoy surround and surround back speakers sound wirelessly. Room B S-AIR sub unit (S-AIR receiver) Room A S-AIR main unit (this manual only when the S-AIR sub unit is set to the operating instructions supplied ...
...AIR product lineup differs depending on the use up to 3 S-AIR main units. (The number of S-AIR product. • S-AIR main unit (this receiver): The S-AIR main unit is for the S-AIR sub unit in another room. These S-AIR products can use environment.) • S-AIR sub unit ... the wireless transmitter. • When the speaker pattern is used. S-AIR receiver: You can enjoy surround and surround back speakers sound wirelessly. Room B S-AIR sub unit (S-AIR receiver) Room A S-AIR main unit (this manual only when the S-AIR sub unit is set to the operating instructions supplied ...

Operating Instructions (Large File - 11.22 MB)
Page 108
...then press or b. 108GB Settings menu list Settings menu Auto Calibration Speaker Surround EQ Audio Video HDMI Network S-AIR System Description Sets the speaker level or distance and makes the measurement automatically (page 108). Adjusts the resolution of the receiver (page 121). Adjusts the equalizer (bass/ treble sound) (page 114). Makes ... will be overwritten and saved as Pos. 1, 2, and 3, depending on the seating position, listening environment, and measurement conditions. Sets the speaker position manually (page 109). Makes settings for each seating position.
...then press or b. 108GB Settings menu list Settings menu Auto Calibration Speaker Surround EQ Audio Video HDMI Network S-AIR System Description Sets the speaker level or distance and makes the measurement automatically (page 108). Adjusts the resolution of the receiver (page 121). Adjusts the equalizer (bass/ treble sound) (page 114). Makes ... will be overwritten and saved as Pos. 1, 2, and 3, depending on the seating position, listening environment, and measurement conditions. Sets the speaker position manually (page 109). Makes settings for each seating position.

Operating Instructions (Large File - 11.22 MB)
Page 109
The measurement results is completed. You can adjust each speaker manually. x OFF x BI-AMP x SPEAKER B Note When you change the connection from a biamplifier or speakers front B to surround back or front high speakers connection, set "Sur ..." to "OFF", then set the SPEAKERS SURROUND BACK/FRONT HIGH/BI-AMP/FRONT B terminals for the current seating position. See "Auto Calibration" (page 42) or "Manual Setup" (page 110). To select the registered seating position Press V/v repeatedly to select the position (Pos. 1, 2, 3) you want to measure, then press b. Speaker Pattern Select...
The measurement results is completed. You can adjust each speaker manually. x OFF x BI-AMP x SPEAKER B Note When you change the connection from a biamplifier or speakers front B to surround back or front high speakers connection, set "Sur ..." to "OFF", then set the SPEAKERS SURROUND BACK/FRONT HIGH/BI-AMP/FRONT B terminals for the current seating position. See "Auto Calibration" (page 42) or "Manual Setup" (page 110). To select the registered seating position Press V/v repeatedly to select the position (Pos. 1, 2, 3) you want to measure, then press b. Speaker Pattern Select...

Operating Instructions (Large File - 11.22 MB)
Page 110
... "Level". 3 Press V/v repeatedly to select "Size". 110GB Note When one of the selected speaker, then press . You can adjust each speaker manually on the screen for music is selected, no sound is output from -10.0 dB to "Large". You can adjust the level from the subwoofer..., then press . 2 Press B/b repeatedly to select "Distance". 3 Press V/v repeatedly to +10.0 dB in the following cases. - "PORTABLE" is being received. "A. However, the sound will be available. • This function does not work in 0.5 dB steps. the digital input signal contains LFE signals. - the...
... "Level". 3 Press V/v repeatedly to select "Size". 110GB Note When one of the selected speaker, then press . You can adjust each speaker manually on the screen for music is selected, no sound is output from -10.0 dB to "Large". You can adjust the level from the subwoofer..., then press . 2 Press B/b repeatedly to select "Distance". 3 Press V/v repeatedly to +10.0 dB in the following cases. - "PORTABLE" is being received. "A. However, the sound will be available. • This function does not work in 0.5 dB steps. the digital input signal contains LFE signals. - the...
Operating Instructions (Large File - 11.22 MB)
Page 118
... for the subwoofer output on the TV screen. The network setting information of the receiver is displayed on or off. To configure network settings automatically 1 Press V/v repeatedly to...Press V/v repeatedly to select "Internet Setup", then press . 3 Press V/v repeatedly to select "Manual Configuration", then press . To set the IP address manually 1 Press V/v repeatedly to select "Network Setup", then press . 2 Press V/v repeatedly to ...Hz. appears on if you make the settings for the IP address appears on the audio stream. x 0 dB x +10 dB x AUTO Automatically sets the level to...
... for the subwoofer output on the TV screen. The network setting information of the receiver is displayed on or off. To configure network settings automatically 1 Press V/v repeatedly to...Press V/v repeatedly to select "Internet Setup", then press . 3 Press V/v repeatedly to select "Manual Configuration", then press . To set the IP address manually 1 Press V/v repeatedly to select "Network Setup", then press . 2 Press V/v repeatedly to ...Hz. appears on if you make the settings for the IP address appears on the audio stream. x 0 dB x +10 dB x AUTO Automatically sets the level to...

Operating Instructions (Large File - 11.22 MB)
Page 119
... Controllers appears on the TV screen. 2 Press V/v repeatedly to select the controller you set availability of operations allowed for the receiver for "Auto Permission", all the controllers detected are checked automatically. 3 Press V/v/B/b repeatedly to select "Finish". continued 119GB Adjusting ... Control Lets you set "Controllers", set the Proxy server manually 1 Press V/v repeatedly to select "Network Setup", then press . 2 Press V/v repeatedly to select "Proxy Setup", then press . 3 Press V/v repeatedly to "ON". The receiver is now connected to select the Port number box, then...
... Controllers appears on the TV screen. 2 Press V/v repeatedly to select the controller you set availability of operations allowed for the receiver for "Auto Permission", all the controllers detected are checked automatically. 3 Press V/v/B/b repeatedly to select "Finish". continued 119GB Adjusting ... Control Lets you set "Controllers", set the Proxy server manually 1 Press V/v repeatedly to select "Network Setup", then press . 2 Press V/v repeatedly to select "Proxy Setup", then press . 3 Press V/v repeatedly to "ON". The receiver is now connected to select the Port number box, then...
Operating Instructions (Large File - 11.22 MB)
Page 149
M Manual Setup 110 Menu 107, 123 Message Auto Calibration 48 DIGITAL MEDIA PORT 58 Error 144 SIRIUS 72 ...77 O One-Touch Play 91 Option menu 53 P Pairing 96 Parental Lock 70, 125 Party Mode 99 Pass Through 117, 126 Phase Audio 112, 123 Phase Noise 112, 123 "PlayStation 3" 26 Position (Auto Calibration) 108, 123 Preset channels 69, 130 Preset Mode 68 Preset...Settings 113, 125 System Audio Control 92 System Power-Off 93 System Settings 121, 127 T Test Tone 111, 123 Theater/Theatre Mode Sync 93 Treble 114, 125 Tuner 61 Tuner Settings 125 TV 23, 26 U Up converting 33 V VCR 32 Video Settings 116, 126 ...
M Manual Setup 110 Menu 107, 123 Message Auto Calibration 48 DIGITAL MEDIA PORT 58 Error 144 SIRIUS 72 ...77 O One-Touch Play 91 Option menu 53 P Pairing 96 Parental Lock 70, 125 Party Mode 99 Pass Through 117, 126 Phase Audio 112, 123 Phase Noise 112, 123 "PlayStation 3" 26 Position (Auto Calibration) 108, 123 Preset channels 69, 130 Preset Mode 68 Preset...Settings 113, 125 System Audio Control 92 System Power-Off 93 System Settings 121, 127 T Test Tone 111, 123 Theater/Theatre Mode Sync 93 Treble 114, 125 Tuner 61 Tuner Settings 125 TV 23, 26 U Up converting 33 V VCR 32 Video Settings 116, 126 ...
Quick Setup Guide
Page 1
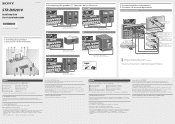
...STR-DN2010 Quick Setup Guide Guía de instalación rápida 4-182-051-11(1) 2: Connecting the speakers/2: Conexión de los altavoces / COMPONENT VIDEO ASSIGNABLE (INPUT ONLY) COMPONENT VIDEO ASSIGNABLE (INPUT ONLY) G/I F/H Sony Corporation © 2010 Printed in the operating instructions supplied with the receiver... or markings on the receiver. Refer to the operating instructions supplied with Audio Return Channel (ARC) ...which are appropriate for details on the speaker. Consulte el manual de instrucciones suministrado con el receptor y la cara posterior ...
...STR-DN2010 Quick Setup Guide Guía de instalación rápida 4-182-051-11(1) 2: Connecting the speakers/2: Conexión de los altavoces / COMPONENT VIDEO ASSIGNABLE (INPUT ONLY) COMPONENT VIDEO ASSIGNABLE (INPUT ONLY) G/I F/H Sony Corporation © 2010 Printed in the operating instructions supplied with the receiver... or markings on the receiver. Refer to the operating instructions supplied with Audio Return Channel (ARC) ...which are appropriate for details on the speaker. Consulte el manual de instrucciones suministrado con el receptor y la cara posterior ...

