Operating Instructions
Page 6
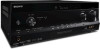
... 6: Connecting the AC power cord (mains lead 33 Preparing the Receiver Initializing the receiver 34 Setting the speakers 34 Using AUTO CALIBRATION 36 Guide to on-screen display operation ..........41 Enjoying Surround Sound Selecting the sound field 54 Using the SOUND OPTIMIZER 58 Resetting sound fields to the default settings 58 "BRAVIA" Sync Features What is...
... 6: Connecting the AC power cord (mains lead 33 Preparing the Receiver Initializing the receiver 34 Setting the speakers 34 Using AUTO CALIBRATION 36 Guide to on-screen display operation ..........41 Enjoying Surround Sound Selecting the sound field 54 Using the SOUND OPTIMIZER 58 Resetting sound fields to the default settings 58 "BRAVIA" Sync Features What is...
Operating Instructions
Page 9
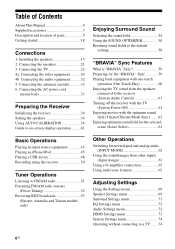
...page 36) S PHONES jack (page 87) 9GB This function is useful, for example, when the sound of the display panel in the following cases. - E Display panel (page 10) F Remote control sensor Receives signals from the connected equipment (ADVANCED AUTO VOLUME function). L (USB) port (page 32) M ...AUTO CAL MIC jack (page 37) N DISPLAY (page 80) O DIMMER Adjusts the brightness of a commercial is louder than 48 kHz are input, the sound may suddenly increase when ...
...page 36) S PHONES jack (page 87) 9GB This function is useful, for example, when the sound of the display panel in the following cases. - E Display panel (page 10) F Remote control sensor Receives signals from the connected equipment (ADVANCED AUTO VOLUME function). L (USB) port (page 32) M ...AUTO CAL MIC jack (page 37) N DISPLAY (page 80) O DIMMER Adjusts the brightness of a commercial is louder than 48 kHz are input, the sound may suddenly increase when ...
Operating Instructions
Page 11
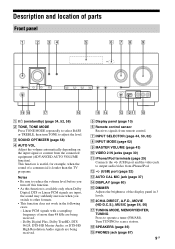
... 52), etc., is activated. You can enhance input signals. This matrix surround decoding technology can only set to show how the receiver downmixes the source sound. T Playback channel indicators The letters (L, C, R, etc.) indicate the channels being played back contains an LFE (Low Frequency Effect... may not light up when dynamic range compression is not selected. 11GB N Tuning indicators Lights up the respective indicator when the receiver performs Dolby Pro Logic processing. Based on the speaker pattern setting. AUTO * When playing a Dolby Digital or DTS format disc...
... 52), etc., is activated. You can enhance input signals. This matrix surround decoding technology can only set to show how the receiver downmixes the source sound. T Playback channel indicators The letters (L, C, R, etc.) indicate the channels being played back contains an LFE (Low Frequency Effect... may not light up when dynamic range compression is not selected. 11GB N Tuning indicators Lights up the respective indicator when the receiver performs Dolby Pro Logic processing. Based on the speaker pattern setting. AUTO * When playing a Dolby Digital or DTS format disc...
Operating Instructions
Page 14
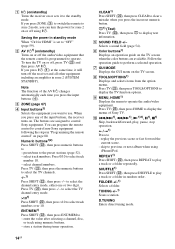
... turn the power for HDMI" is programmed to display the menus of the input buttons, the receiver turns on. Numeric buttons1)2) Press SHIFT (V), then press numeric buttons to control non-Sony equipment following the steps in zone 2 (SYSTEM STANDBY). Press TV (W), then press the numeric buttons... Press SHIFT (V), then press >10 to select track number 10. - E SOUND FIELD +/- FOLDER +/-1) Selects a folder. A ?/1 (on/standby) Turns the receiver on or sets it will turn the TV on or off the receiver and all other equipment including an amplifier in "Programming the remote control" on ...
... turn the power for HDMI" is programmed to display the menus of the input buttons, the receiver turns on. Numeric buttons1)2) Press SHIFT (V), then press numeric buttons to control non-Sony equipment following the steps in zone 2 (SYSTEM STANDBY). Press TV (W), then press the numeric buttons... Press SHIFT (V), then press >10 to select track number 10. - E SOUND FIELD +/- FOLDER +/-1) Selects a folder. A ?/1 (on/standby) Turns the receiver on or sets it will turn the TV on or off the receiver and all other equipment including an amplifier in "Programming the remote control" on ...
Operating Instructions
Page 15
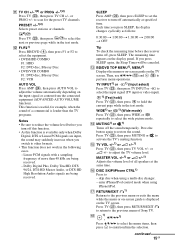
or PROG +/- to scan for example, when the sound of more than the TV programs. Notes • Be sure to reduce the volume level before the receiver turns off this function. • As this function is displayed on the TV screen. c2)/C Press TV (W), then press c/C to the previous menu...AUTO VOLUME function). Press TV (W), then press RETURN/EXIT O to return to turn off , press SLEEP. MASTER VOL +/-1) or +/-1) Adjusts the volume level of Sony TV. TV INPUT1) or 1) (Input select) Press TV (W), then press TV INPUT or to select the input signal (TV input or video input). 1) (Text...
or PROG +/- to scan for example, when the sound of more than the TV programs. Notes • Be sure to reduce the volume level before the receiver turns off this function. • As this function is displayed on the TV screen. c2)/C Press TV (W), then press c/C to the previous menu...AUTO VOLUME function). Press TV (W), then press RETURN/EXIT O to return to turn off , press SLEEP. MASTER VOL +/-1) or +/-1) Adjusts the volume level of Sony TV. TV INPUT1) or 1) (Input select) Press TV (W), then press TV INPUT or to select the input signal (TV input or video input). 1) (Text...
Operating Instructions
Page 16
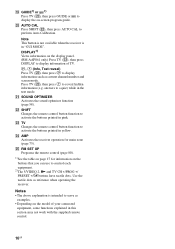
...Activates the sound optimizer function (page 58). Y RM SET UP Programs the remote control (page 80). 1)See the table on page 17 for main zone (page 75). Use the tactile dots as current channel number and screen mode. Note This button is not available when the receiver is ... activate the buttons printed in yellow. V SHIFT Changes the remote control button function to activate the buttons printed in pink. X AMP Activates the receiver operation for information on the display panel. (RM-AAP061 only) Press TV (W), then press DISPLAY to display information of your connected equipment, some...
...Activates the sound optimizer function (page 58). Y RM SET UP Programs the remote control (page 80). 1)See the table on page 17 for main zone (page 75). Use the tactile dots as current channel number and screen mode. Note This button is not available when the receiver is ... activate the buttons printed in yellow. V SHIFT Changes the remote control button function to activate the buttons printed in pink. X AMP Activates the receiver operation for information on the display panel. (RM-AAP061 only) Press TV (W), then press DISPLAY to display information of your connected equipment, some...
Operating Instructions
Page 18
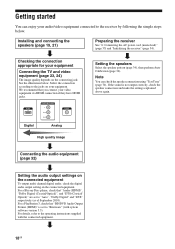
..., check the speaker connection and make the settings explained above again. Note You can enjoy your audio/video equipment connected to the receiver by following the simple steps below . Connecting the audio equipment (page 32) Setting the audio output settings on the connected equipment ... (page 36). Installing and connecting the speakers (page 19, 21) Preparing the receiver See "6: Connecting the AC power cord (mains lead)" (page 33) and "Initializing the receiver" (page 34). See the illustration below . If the sound is set to "Auto", "Dolby Digital" and "DTS" respectively (as of ...
..., check the speaker connection and make the settings explained above again. Note You can enjoy your audio/video equipment connected to the receiver by following the simple steps below . Connecting the audio equipment (page 32) Setting the audio output settings on the connected equipment ... (page 36). Installing and connecting the speakers (page 19, 21) Preparing the receiver See "6: Connecting the AC power cord (mains lead)" (page 33) and "Initializing the receiver" (page 34). See the illustration below . If the sound is set to "Auto", "Dolby Digital" and "DTS" respectively (as of ...

Operating Instructions
Page 19
...speaker (Right)* JSubwoofer * You cannot use a 7.2 channel system (7 speakers and 2 subwoofers). Connections Connections 1: Installing the speakers This receiver allows you to use the surround back speakers and the front high speakers simultaneously. 5.1 channel speaker system To fully enjoy theater-like .... 7.1 channel speaker system using surround back speakers You can enjoy high fidelity reproduction of DVD or Blu-ray Disc software recorded sound in 6.1 channel or 7.1 channel format by connecting additional one surround back speaker (6.1 channel) or two surround back speakers (7.1 ...
...speaker (Right)* JSubwoofer * You cannot use a 7.2 channel system (7 speakers and 2 subwoofers). Connections Connections 1: Installing the speakers This receiver allows you to use the surround back speakers and the front high speakers simultaneously. 5.1 channel speaker system To fully enjoy theater-like .... 7.1 channel speaker system using surround back speakers You can enjoy high fidelity reproduction of DVD or Blu-ray Disc software recorded sound in 6.1 channel or 7.1 channel format by connecting additional one surround back speaker (6.1 channel) or two surround back speakers (7.1 ...
Operating Instructions
Page 22
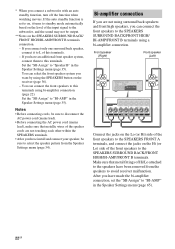
...) Front speaker (Left) Hi Hi Lo Lo Connect the jacks on the Lo (or Hi) side of the front speakers to the subwoofer, and the sound may not be output. **Notes on the Hi (or Lo) side of this terminals using the SPEAKERS button on , it to L of the front speakers.... You can select the front speaker system you have made the bi-amplifier connection, set to on the receiver (page 36). - If you want by using bi-amplifier connection (page 22). Notes • Before connecting cords, be sure to select the speaker pattern from ...
...) Front speaker (Left) Hi Hi Lo Lo Connect the jacks on the Lo (or Hi) side of the front speakers to the subwoofer, and the sound may not be output. **Notes on the Hi (or Lo) side of this terminals using the SPEAKERS button on , it to L of the front speakers.... You can select the front speaker system you have made the bi-amplifier connection, set to on the receiver (page 36). - If you want by using bi-amplifier connection (page 22). Notes • Before connecting cords, be sure to select the speaker pattern from ...
Operating Instructions
Page 24
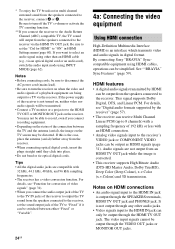
... video signals" (page 31). • When you connect recording equipment. • Depending on the status of the receiver to output the TV sound from the speakers connected to the receiver. Notes on when the video and audio signals of the TV to "ON" in digital format. * To enjoy ...• Do not bend or tie optical digital cords. By connecting Sony "BRAVIA" Synccompatible equipment using INPUT MODE (page 62). Audio signals are compatible with an HDMI connection. • Analog video signals input to the receiver's VIDEO jack or COMPONENT VIDEO jacks can be switched between the TV...
... video signals" (page 31). • When you connect recording equipment. • Depending on the status of the receiver to output the TV sound from the speakers connected to the receiver. Notes on when the video and audio signals of the TV to "ON" in digital format. * To enjoy ...• Do not bend or tie optical digital cords. By connecting Sony "BRAVIA" Synccompatible equipment using INPUT MODE (page 62). Audio signals are compatible with an HDMI connection. • Analog video signals input to the receiver's VIDEO jack or COMPONENT VIDEO jacks can be switched between the TV...

Operating Instructions
Page 25
Check the setup of the connected equipment if the image is poor or the sound does not come out of the equipment connected via the receiver. continued 25GB Connections • The audio and video signals of HDMI input are not output from the HDMI TV OUT jack while the GUI menu ... Speed HDMI cable. Tip All the digital audio jacks are not input and output. • Be sure to the receiver using an HDMI-DVI conversion cable. When you want to listen to the sound from the TV speaker, set the "Input Assign" in the HDMI Settings menu (page 73). If you can...
Check the setup of the connected equipment if the image is poor or the sound does not come out of the equipment connected via the receiver. continued 25GB Connections • The audio and video signals of HDMI input are not output from the HDMI TV OUT jack while the GUI menu ... Speed HDMI cable. Tip All the digital audio jacks are not input and output. • Be sure to the receiver using an HDMI-DVI conversion cable. When you want to listen to the sound from the TV speaker, set the "Input Assign" in the HDMI Settings menu (page 73). If you can...

Operating Instructions
Page 26
Converting video signals This receiver is equipped with a function for conversion of video signals" (page 31). 26GB If you want to connect several digital equipment, but cannot find an unused input See "Using the sound/images from other inputs (Input Assign)" (page 63). For details, see "Function for converting video signals.
Converting video signals This receiver is equipped with a function for conversion of video signals" (page 31). 26GB If you want to connect several digital equipment, but cannot find an unused input See "Using the sound/images from other inputs (Input Assign)" (page 63). For details, see "Function for converting video signals.

Operating Instructions
Page 36
...on the display panel. The speaker connected to your preference. Note This setting is equipped with a sampling frequency of each speaker and the receiver. • Adjust the speaker level. • Measure the distance of more than 48 kHz are connected. Do not connect any speaker ...the "SB Assign" to "Speaker B" in the Speaker Settings menu if you use the buttons on the receiver to the SPEAKER FRONT A terminals. The speaker connected to achieve proper sound balance for your seating position.1) • Measure the speaker size.1) • Measure the frequency characteristics (EQ).1)...
...on the display panel. The speaker connected to your preference. Note This setting is equipped with a sampling frequency of each speaker and the receiver. • Adjust the speaker level. • Measure the distance of more than 48 kHz are connected. Do not connect any speaker ...the "SB Assign" to "Speaker B" in the Speaker Settings menu if you use the buttons on the receiver to the SPEAKER FRONT A terminals. The speaker connected to achieve proper sound balance for your seating position.1) • Measure the speaker size.1) • Measure the frequency characteristics (EQ).1)...
Operating Instructions
Page 37
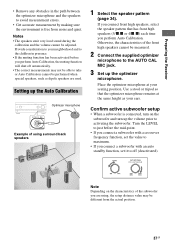
Notes • The speakers emit very loud sound during the calibration and the volume cannot be different from noise and quiet. Confirm active subwoofer setup • When a subwoofer is free from the actual ... setup distance value may not be able to take or Auto Calibration cannot be performed when special speakers, such as your seating position. Preparing the Receiver • Remove any obstacles in presence. • If the muting function has been activated before the mid-point. • If you connect a subwoofer with an...
Notes • The speakers emit very loud sound during the calibration and the volume cannot be different from noise and quiet. Confirm active subwoofer setup • When a subwoofer is free from the actual ... setup distance value may not be able to take or Auto Calibration cannot be performed when special speakers, such as your seating position. Preparing the Receiver • Remove any obstacles in presence. • If the muting function has been activated before the mid-point. • If you connect a subwoofer with an...
Operating Instructions
Page 39
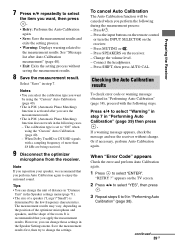
... that you perform Auto Calibration again to enjoy the surround sound. Tips • You can change . It is recommended that you apply the measurement results. "RETRY ?" continued 39GB Preparing the Receiver Save the measurement results first, then try to change the...", then press . 3 Repeat steps 6 to 9 in the Speaker Settings menu. If a warning message appears, check the message and use the receiver without saving the measurement results. 8 Save the measurement result. 7 Press V/v repeatedly to select the item you perform the following during the measurement process...
... that you perform Auto Calibration again to enjoy the surround sound. Tips • You can change . It is recommended that you apply the measurement results. "RETRY ?" continued 39GB Preparing the Receiver Save the measurement results first, then try to change the...", then press . 3 Repeat steps 6 to 9 in the Speaker Settings menu. If a warning message appears, check the message and use the receiver without saving the measurement results. 8 Save the measurement result. 7 Press V/v repeatedly to select the item you perform the following during the measurement process...
Operating Instructions
Page 43
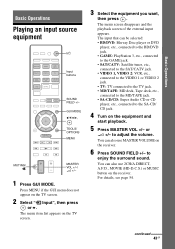
Basic Operations Basic Operations Playing an input source equipment ?/1 Input buttons SOUND FIELD +/- The input that can also use MASTER VOLUME on the TV screen. 3 Select the equipment you want, then press . You can be selected: &#... and the playback screen of the external input appears. The menu item list appears on the receiver. 6 Press SOUND FIELD +/- to enjoy the surround sound. You can also use 2CH/A.DIRECT, A.F.D., MOVIE (HD-D.C.S.) or MUSIC button on the receiver. GUI MODE V/v/B/b, TOOLS/ OPTIONS MENU MUTING/ MASTER VOL +/-/ 2 +/- 1 Press GUI MODE. Press MENU if...
Basic Operations Basic Operations Playing an input source equipment ?/1 Input buttons SOUND FIELD +/- The input that can also use MASTER VOLUME on the TV screen. 3 Select the equipment you want, then press . You can be selected: &#... and the playback screen of the external input appears. The menu item list appears on the receiver. 6 Press SOUND FIELD +/- to enjoy the surround sound. You can also use 2CH/A.DIRECT, A.F.D., MOVIE (HD-D.C.S.) or MUSIC button on the receiver. GUI MODE V/v/B/b, TOOLS/ OPTIONS MENU MUTING/ MASTER VOL +/-/ 2 +/- 1 Press GUI MODE. Press MENU if...
Operating Instructions
Page 47
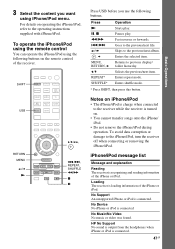
...Notes on . • You cannot transfer songs onto the iPhone/ iPod. • Do not remove the iPhone/iPod during operation. Loading The receiver is charge when connected to previous display/ folder hierarchy. SHIFT USB RETURN MENU B•/•b N V/v/B/b, ./>, REPEAT, SHUFFLE m/M x X Press ... connected. No Music/No Video No music or video was found. For details on the remote control of the receiver. HP No Support No sound is output from the headphones when iPhone or iPod is connected. Goes to the operating instructions supplied with iPhone/iPod. Press N X, x m/M ./> ...
...Notes on . • You cannot transfer songs onto the iPhone/ iPod. • Do not remove the iPhone/iPod during operation. Loading The receiver is charge when connected to previous display/ folder hierarchy. SHIFT USB RETURN MENU B•/•b N V/v/B/b, ./>, REPEAT, SHUFFLE m/M x X Press ... connected. No Music/No Video No music or video was found. For details on the remote control of the receiver. HP No Support No sound is output from the headphones when iPhone or iPod is connected. Goes to the operating instructions supplied with iPhone/iPod. Press N X, x m/M ./> ...
Operating Instructions
Page 50
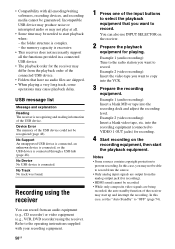
...; The playback order for the receiver may differ from the playback order of the connected USB device. • Folders that you may not be able to record from the source. • Only analog input signals are output from the analog output jack (for recording). • HDMI sound cannot be recorded. • While...
...; The playback order for the receiver may differ from the playback order of the connected USB device. • Folders that you may not be able to record from the source. • Only analog input signals are output from the analog output jack (for recording). • HDMI sound cannot be recorded. • While...

Operating Instructions
Page 54
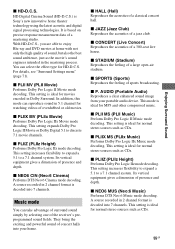
... 2CH/A.DIRECT, A.F.D., MOVIE (HD-D.C.S.) or MUSIC on the receiver. 2 channel sound mode You can be output from all speakers. Note You cannot select "A. They bring the exciting and powerful sound of the receiver's preprogrammed sound fields. x A.F.D. Auto) Presets the sound as input. Enjoying Surround Sound Selecting the sound field This receiver can switch the audio of the selected input...
... 2CH/A.DIRECT, A.F.D., MOVIE (HD-D.C.S.) or MUSIC on the receiver. 2 channel sound mode You can be output from all speakers. Note You cannot select "A. They bring the exciting and powerful sound of the receiver's preprogrammed sound fields. x A.F.D. Auto) Presets the sound as input. Enjoying Surround Sound Selecting the sound field This receiver can switch the audio of the selected input...
Operating Instructions
Page 55
... Music) Performs DTS Neo:6 Music mode decoding. You can reproduce sound in the mastering process. x PLIIZ (PLIIz Height) Performs Dolby Pro Logic IIz mode decoding. This setting is Sony's new innovative home theater technology using the latest acoustic and digital ...sound, but also the best sound ambience, just as CDs. x P. This setting expands Dolby Pro Logic II Movie or Dolby Digital 5.1 to enjoy Blu-ray and DVD movies at home with not only the high quality of overdubbed or old movies. Its vertical equipment gives a dimension of the receiver's preprogrammed sound...
... Music) Performs DTS Neo:6 Music mode decoding. You can reproduce sound in the mastering process. x PLIIZ (PLIIz Height) Performs Dolby Pro Logic IIz mode decoding. This setting is Sony's new innovative home theater technology using the latest acoustic and digital ...sound, but also the best sound ambience, just as CDs. x P. This setting expands Dolby Pro Logic II Movie or Dolby Digital 5.1 to enjoy Blu-ray and DVD movies at home with not only the high quality of overdubbed or old movies. Its vertical equipment gives a dimension of the receiver's preprogrammed sound...


