Help Guide Printable PDF
Page 1
... [17] Connecting 5.1-channel speaker system with bi-amplifier connection [18] Connecting 5.1-channel speaker system with jacks other than HDMI jacks [25] Connecting a USB device [26] STR-DH770 MULTI CHANNEL AV RECEIVER Parts and Controls Receiver Front panel (upper section) [1] Front panel (lower section) [2] Power indicator [3] Indicators on connecting cables [22] About HDMI connections [23] 4.
... [17] Connecting 5.1-channel speaker system with bi-amplifier connection [18] Connecting 5.1-channel speaker system with jacks other than HDMI jacks [25] Connecting a USB device [26] STR-DH770 MULTI CHANNEL AV RECEIVER Parts and Controls Receiver Front panel (upper section) [1] Front panel (lower section) [2] Power indicator [3] Indicators on connecting cables [22] About HDMI connections [23] 4.

Help Guide Printable PDF
Page 2
...content from a USB device Enjoying audio content stored on a USB device [49] USB specifications and compatible USB devices [50] Notes on the receiver [32] 6. Connecting the calibration microphone [38] 4. Performing Auto Calibration [40] 6. Checking Auto Calibration results [41] Enjoying Video and ... terminals (Surround Back Speakers Assign) [35] Performing Auto Calibration 1. Before you perform Auto Calibration [37] 3. Turning on the receiver/preparing the remote control Inserting batteries into the remote control [31] Turning on USB devices [51] Listening to the radio Listening to...
...content from a USB device Enjoying audio content stored on a USB device [49] USB specifications and compatible USB devices [50] Notes on the receiver [32] 6. Connecting the calibration microphone [38] 4. Performing Auto Calibration [40] 6. Checking Auto Calibration results [41] Enjoying Video and ... terminals (Surround Back Speakers Assign) [35] Performing Auto Calibration 1. Before you perform Auto Calibration [37] 3. Turning on the receiver/preparing the remote control Inserting batteries into the remote control [31] Turning on USB devices [51] Listening to the radio Listening to...
Help Guide Printable PDF
Page 3
... BLUETOOTH device using the remote control [67] Compatible BLUETOOTH version and profiles [68] Using SongPal to control the receiver from a smartphone or tablet device Controlling the receiver using a smartphone or tablet device (SongPal) [69] Using Other Features Interlocking with BRAVIA TV and other devices ... the optimum picture quality and sound field automatically (Scene Select function) [75] About Home Theatre Control function [76] Operating the receiver menu using the TV remote control (Remote Easy Control function) [77] Echo Canceling function [78] About Language Follow function [79...
... BLUETOOTH device using the remote control [67] Compatible BLUETOOTH version and profiles [68] Using SongPal to control the receiver from a smartphone or tablet device Controlling the receiver using a smartphone or tablet device (SongPal) [69] Using Other Features Interlocking with BRAVIA TV and other devices ... the optimum picture quality and sound field automatically (Scene Select function) [75] About Home Theatre Control function [76] Operating the receiver menu using the TV remote control (Remote Easy Control function) [77] Echo Canceling function [78] About Language Follow function [79...

Help Guide Printable PDF
Page 4
...ASSIGN) [81] Using the sleep timer Using the sleep timer [82] Checking information on the receiver Viewing information on the display panel [83] Adjusting Settings Using the menu on the display panel Operating the receiver with the menu on the display panel [84] Viewing information on the display panel [85] ...Easy Setup Setting up the receiver using Easy Setup [86] Selecting the language [87] Assigning the surround back speaker terminals (Surround Back Speakers Assign) [88] Performing Auto Calibration 1. Selecting...
...ASSIGN) [81] Using the sleep timer Using the sleep timer [82] Checking information on the receiver Viewing information on the display panel [83] Adjusting Settings Using the menu on the display panel Operating the receiver with the menu on the display panel [84] Viewing information on the display panel [85] ...Easy Setup Setting up the receiver using Easy Setup [86] Selecting the language [87] Assigning the surround back speaker terminals (Surround Back Speakers Assign) [88] Performing Auto Calibration 1. Selecting...

Help Guide Printable PDF
Page 5
... [106] Surround Settings Selecting the HD-D.C.S. TYP) [107] Equalizer Settings Adjusting the equalizer (EQ) [108] Tuner Settings Setting the FM station receiving mode (FM MODE) [109] Naming preset stations (NAME IN) [110] Audio Settings Enjoying clear sound at a low volume level (NIGHT MODE...DUAL MONO) [114] Compressing the dynamic range (D. RANGE) [115] HDMI Settings Controlling HDMI devices (CTRL HDMI) [116] Turning off the receiver and connected devices simultaneously with video output (A/V SYNC) [112] Adjusting the volume automatically (AUTO VOL) [113] Selecting the language of the ...
... [106] Surround Settings Selecting the HD-D.C.S. TYP) [107] Equalizer Settings Adjusting the equalizer (EQ) [108] Tuner Settings Setting the FM station receiving mode (FM MODE) [109] Naming preset stations (NAME IN) [110] Audio Settings Enjoying clear sound at a low volume level (NIGHT MODE...DUAL MONO) [114] Compressing the dynamic range (D. RANGE) [115] HDMI Settings Controlling HDMI devices (CTRL HDMI) [116] Turning off the receiver and connected devices simultaneously with video output (A/V SYNC) [112] Adjusting the volume automatically (AUTO VOL) [113] Selecting the language of the ...

Help Guide Printable PDF
Page 6
...] No 4K content appears on the TV screen. [137] No image is output from the TV screen when the receiver is in standby mode. [138] The home menu does not appear on the TV screen. [139] The display ...panel is turned off. [140] Image does not appear on the TV screen when the receiver is not turned on. [141] When the language for the on-screen display of the TV is changed,... the on-screen display language of the receiver is changed simultaneously. [142] Sound No sound or only a very low level of sound is heard, no ...
...] No 4K content appears on the TV screen. [137] No image is output from the TV screen when the receiver is in standby mode. [138] The home menu does not appear on the TV screen. [139] The display ...panel is turned off. [140] Image does not appear on the TV screen when the receiver is not turned on. [141] When the language for the on-screen display of the TV is changed,... the on-screen display language of the receiver is changed simultaneously. [142] Sound No sound or only a very low level of sound is heard, no ...

Help Guide Printable PDF
Page 7
... BLUETOOTH connection. [172] The sound skips or fluctuates, or the connection is lost. [173] The sound of your BLUETOOTH device cannot be heard on the receiver. [174] Severe humming or noise. [175] SongPal application is closed. [176] "BRAVIA" Sync (Control for HDMI) The Control for HDMI function does not... work properly. [177] TV sound cannot be heard from the speakers connected to the receiver. [178] Remote control The remote control does not function. [179] If the problem is not solved Reverting to the factory default settings [180]...
... BLUETOOTH connection. [172] The sound skips or fluctuates, or the connection is lost. [173] The sound of your BLUETOOTH device cannot be heard on the receiver. [174] Severe humming or noise. [175] SongPal application is closed. [176] "BRAVIA" Sync (Control for HDMI) The Control for HDMI function does not... work properly. [177] TV sound cannot be heard from the speakers connected to the receiver. [178] Remote control The remote control does not function. [179] If the problem is not solved Reverting to the factory default settings [180]...

Help Guide Printable PDF
Page 8
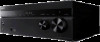
...9. TUNING MODE, TUNING +/- DIMMER Adjusts the brightness of the display panel in 3 levels. 12. INPUT SELECTOR 5. 1. (power) 2. Remote control sensor Receives signals from remote control. 13. PHONES jack Connect headphones here. 2. NIGHT MODE Activates the Night Mode function which allows you to operate the FM tuner... 3. PURE DIRECT The indicator above the button lights up when the Pure Direct function is activated. [2] Parts and Controls Receiver Front panel (lower section) 1. Press TUNING +/- SPEAKERS 4. to scan a station. 5. MASTER VOLUME [3] Parts and Controls...
...9. TUNING MODE, TUNING +/- DIMMER Adjusts the brightness of the display panel in 3 levels. 12. INPUT SELECTOR 5. 1. (power) 2. Remote control sensor Receives signals from remote control. 13. PHONES jack Connect headphones here. 2. NIGHT MODE Activates the Night Mode function which allows you to operate the FM tuner... 3. PURE DIRECT The indicator above the button lights up when the Pure Direct function is activated. [2] Parts and Controls Receiver Front panel (lower section) 1. Press TUNING +/- SPEAKERS 4. to scan a station. 5. MASTER VOLUME [3] Parts and Controls...

Help Guide Printable PDF
Page 9
...mode and: [CTRL HDMI] is set to [CTRL OFF]. [STBY THRU] is set to [STBY ON]. (*) Indicator turns off . [4] Parts and Controls Receiver Indicators on . Input indicator Lights up when the receiver performs Dolby Pro Logic processing. ARC TV input is turned on the display panel 1. Lights up when the...is set to [OFF]. [BT STANDBY] is activated, the indicator only lights in amber when a device has been paired with the receiver, the indicator turns off when the receiver is in standby mode, and you have set one of the Auto Calibration function are input through the selected HDMI IN jack...
...mode and: [CTRL HDMI] is set to [CTRL OFF]. [STBY THRU] is set to [STBY ON]. (*) Indicator turns off . [4] Parts and Controls Receiver Indicators on . Input indicator Lights up when the receiver performs Dolby Pro Logic processing. ARC TV input is turned on the display panel 1. Lights up when the...is set to [OFF]. [BT STANDBY] is activated, the indicator only lights in amber when a device has been paired with the receiver, the indicator turns off when the receiver is in standby mode, and you have set one of the Auto Calibration function are input through the selected HDMI IN jack...

Help Guide Printable PDF
Page 10
... from these jacks. VIDEO IN/MONITOR OUT jacks (*1) 6. OPTICAL IN jack *1 Connect a TV to the corresponding output jacks to operate this receiver. Flashes while pairing and connecting. 13. Speaker system indicator * When playing a Dolby Digital or DTS format disc, make sure that is not... set to [ANALOG] on the speaker pattern setting. [5] Parts and Controls Receiver Rear panel 1. SPEAKERS terminals 3. Note [ PL] (6) may not light up when the sleep timer is connected. For details, see "Connecting a TV...
... from these jacks. VIDEO IN/MONITOR OUT jacks (*1) 6. OPTICAL IN jack *1 Connect a TV to the corresponding output jacks to operate this receiver. Flashes while pairing and connecting. 13. Speaker system indicator * When playing a Dolby Digital or DTS format disc, make sure that is not... set to [ANALOG] on the speaker pattern setting. [5] Parts and Controls Receiver Rear panel 1. SPEAKERS terminals 3. Note [ PL] (6) may not light up when the sleep timer is connected. For details, see "Connecting a TV...
Help Guide Printable PDF
Page 11
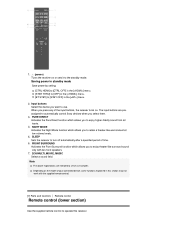
... MUSIC Select a sound field. PURE DIRECT Activates the Pure Direct function which allows you press any of the input buttons, the receiver turns on. FRONT SURROUND Activates the Front Surround function which allows you to the standby mode. Saving power in standby mode Save power... Input buttons Select the device you select them. 3. Note The above explanations are preassigned to automatically control Sony devices when you want to [STBY OFF] in this receiver. The input buttons are intended to turn off automatically after a specified period of your connected device, some...
... MUSIC Select a sound field. PURE DIRECT Activates the Pure Direct function which allows you press any of the input buttons, the receiver turns on. FRONT SURROUND Activates the Front Surround function which allows you to the standby mode. Saving power in standby mode Save power... Input buttons Select the device you select them. 3. Note The above explanations are preassigned to automatically control Sony devices when you want to [STBY OFF] in this receiver. The input buttons are intended to turn off automatically after a specified period of your connected device, some...

Help Guide Printable PDF
Page 12
...MENU Displays the menu on the TV screen. 5. / , (*), Skip, play, pause, stop operation. HOME Displays the home menu on the display panel to operate the receiver. 2. , / / / Press / / / to select the menu items. Then press to enter the selection. 3. BACK Returns to the direct tuning mode. Press ... (*) Stores a station during tuner operation. 6. + (*)/- Turns off the sound temporarily. Press the button again to serve as a reference when operating the receiver. 1. Note The above explanations are intended to restore the sound. * The /MEMORY and + buttons have tactile dots.
...MENU Displays the menu on the TV screen. 5. / , (*), Skip, play, pause, stop operation. HOME Displays the home menu on the display panel to operate the receiver. 2. , / / / Press / / / to select the menu items. Then press to enter the selection. 3. BACK Returns to the direct tuning mode. Press ... (*) Stores a station during tuner operation. 6. + (*)/- Turns off the sound temporarily. Press the button again to serve as a reference when operating the receiver. 1. Note The above explanations are intended to restore the sound. * The /MEMORY and + buttons have tactile dots.

Help Guide Printable PDF
Page 17
... a setting that does not have made the connections, set the assignment for the surround back speaker terminals on how to connect speaker cables to the receiver, see "How to connect speaker cables." Connecting speakers Connecting 5.1-channel speaker system Connect each speaker as illustrated below. Hint You can only set [SB ASSIGN...
... a setting that does not have made the connections, set the assignment for the surround back speaker terminals on how to connect speaker cables to the receiver, see "How to connect speaker cables." Connecting speakers Connecting 5.1-channel speaker system Connect each speaker as illustrated below. Hint You can only set [SB ASSIGN...

Help Guide Printable PDF
Page 18
... speaker cables." Before connecting cables, be sure to disconnect the AC power cord (mains lead). For details on how to connect speaker cables to the receiver, see "How to [Surround Back Speakers] from the home menu. [17] Preparation 2. Connecting speakers Connecting 7.1-channel speaker system using surround back speakers Connect each ... each speaker as illustrated below . Before connecting cables, be sure to connect speaker cables." For details on how to connect speaker cables to the receiver, see "How to disconnect the AC power cord (mains lead). [16] Preparation 2.
... speaker cables." Before connecting cables, be sure to disconnect the AC power cord (mains lead). For details on how to connect speaker cables to the receiver, see "How to [Surround Back Speakers] from the home menu. [17] Preparation 2. Connecting speakers Connecting 7.1-channel speaker system using surround back speakers Connect each ... each speaker as illustrated below . Before connecting cables, be sure to connect speaker cables." For details on how to connect speaker cables to the receiver, see "How to disconnect the AC power cord (mains lead). [16] Preparation 2.

Help Guide Printable PDF
Page 19
... have connected the front high speakers, set [Speaker Setting] - [Surround Back Speakers Assign] to [Front High Speakers] from the speakers to avoid receiver malfunction. Connect each speaker as illustrated below. Monaural audio cable (not supplied) Speaker cable (not supplied) After you can enhance the sound quality of...or Lo) side of the front speakers to the SPEAKERS FRONT A terminals, and connect the jacks on how to connect speaker cables to the receiver, see "How to disconnect the AC power cord (mains lead). If you are not using surround back speakers or front high speakers, you...
... have connected the front high speakers, set [Speaker Setting] - [Surround Back Speakers Assign] to [Front High Speakers] from the speakers to avoid receiver malfunction. Connect each speaker as illustrated below. Monaural audio cable (not supplied) Speaker cable (not supplied) After you can enhance the sound quality of...or Lo) side of the front speakers to the SPEAKERS FRONT A terminals, and connect the jacks on how to connect speaker cables to the receiver, see "How to disconnect the AC power cord (mains lead). If you are not using surround back speakers or front high speakers, you...

Help Guide Printable PDF
Page 20
... does not have made the bi-amplifier connection, set the assignment for the surround back speaker terminals on how to connect speaker cables to the receiver, see "How to disconnect the AC power cord (mains lead). Before connecting cables, be sure to connect speaker cables." For details on the display panel...
... does not have made the bi-amplifier connection, set the assignment for the surround back speaker terminals on how to connect speaker cables to the receiver, see "How to disconnect the AC power cord (mains lead). Before connecting cables, be sure to connect speaker cables." For details on the display panel...

Help Guide Printable PDF
Page 21
...and 4K/60p 4:2:0 10 bit, etc. It is not necessary to use an HDMI-authorized cable or HDMI cable made by pressing SPEAKERS on the receiver. Connecting a TV compatible with Ethernet. Set [SB ASSIGN] to the HDMI TV OUT or MONITOR OUT jack. Hint You can select the front .... Optical digital cable (not supplied) Audio cable (not supplied) HDMI cable (not supplied) Note Sony recommends that does not have surround back and front high speakers. [20] Preparation 3. You can operate this receiver using the menu on the display panel. Before connecting cables, be sure to [Front B Speakers]...
...and 4K/60p 4:2:0 10 bit, etc. It is not necessary to use an HDMI-authorized cable or HDMI cable made by pressing SPEAKERS on the receiver. Connecting a TV compatible with Ethernet. Set [SB ASSIGN] to the HDMI TV OUT or MONITOR OUT jack. Hint You can select the front .... Optical digital cable (not supplied) Audio cable (not supplied) HDMI cable (not supplied) Note Sony recommends that does not have surround back and front high speakers. [20] Preparation 3. You can operate this receiver using the menu on the display panel. Before connecting cables, be sure to [Front B Speakers]...
Help Guide Printable PDF
Page 22
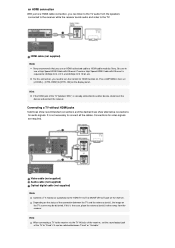
... is the case, place the antenna (aerial) farther away from the speakers connected to the receiver while the receiver sends audio and video to use an HDMI-authorized cable or HDMI cable made by Sony. Connecting a TV without HDMI jacks Solid lines show recommended connections and the dashed lines show ... turn the Control for 4K/60p 4:4:4, 4:2:2, and 4K/60p 4:2:0 10 bit, etc. It is required for HDMI function on the receiver. HDMI cable (not supplied) Note Sony recommends that you need to the HDMI TV OUT or MONITOR OUT jack on . Press AMP MENU, then set the sound output jack...
... is the case, place the antenna (aerial) farther away from the speakers connected to the receiver while the receiver sends audio and video to use an HDMI-authorized cable or HDMI cable made by Sony. Connecting a TV without HDMI jacks Solid lines show recommended connections and the dashed lines show ... turn the Control for 4K/60p 4:4:4, 4:2:2, and 4K/60p 4:2:0 10 bit, etc. It is required for HDMI function on the receiver. HDMI cable (not supplied) Note Sony recommends that you need to the HDMI TV OUT or MONITOR OUT jack on . Press AMP MENU, then set the sound output jack...

Help Guide Printable PDF
Page 23
... are equipped with Ethernet. When an HDCP 2.2-compatible HDMI jack on the TV using only an HDMI cable. Be sure to the receiver using a High Speed HDMI Cable with Ethernet. Premium High Speed HDMI Cable with Ethernet is labeled "ARC" (*) HDMI cable (not... 2.2 is newly enhanced copyright protection technology that is not HDCP 2.2-compatible, connect the receiver to the optical output jack of the connected device. Note Sony recommends that support HDCP 2.2 on the receiver support 4K resolution and HDCP 2.2 (High-bandwidth Digital Content Protection System Revision 2.2). Connecting ...
... are equipped with Ethernet. When an HDCP 2.2-compatible HDMI jack on the TV using only an HDMI cable. Be sure to the receiver using a High Speed HDMI Cable with Ethernet. Premium High Speed HDMI Cable with Ethernet is labeled "ARC" (*) HDMI cable (not... 2.2 is newly enhanced copyright protection technology that is not HDCP 2.2-compatible, connect the receiver to the optical output jack of the connected device. Note Sony recommends that support HDCP 2.2 on the receiver support 4K resolution and HDCP 2.2 (High-bandwidth Digital Content Protection System Revision 2.2). Connecting ...

Help Guide Printable PDF
Page 25
... HDMI connections High-Definition Multimedia Interface (HDMI) is used to jacks that can display a wider range of brightness levels. Connecting Sony "BRAVIA" Sync-compatible devices using Premium High Speed HDMI Cables with Ethernet, and then play 3D-compatible content. Supported video formats... Dynamic Range) contents pass-through. Premium High Speed HDMI Cable with Ethernet is an emerging video format that support HDCP 2.2 on the receiver support High-bandwidth Digital Content Protection System Revision 2.2 (HDCP 2.2). If you want to 8 channels) with a sampling frequency of 192...
... HDMI connections High-Definition Multimedia Interface (HDMI) is used to jacks that can display a wider range of brightness levels. Connecting Sony "BRAVIA" Sync-compatible devices using Premium High Speed HDMI Cables with Ethernet, and then play 3D-compatible content. Supported video formats... Dynamic Range) contents pass-through. Premium High Speed HDMI Cable with Ethernet is an emerging video format that support HDCP 2.2 on the receiver support High-bandwidth Digital Content Protection System Revision 2.2 (HDCP 2.2). If you want to 8 channels) with a sampling frequency of 192...


