Help Guide Printable PDF
Page 3
... Selecting a sound field [57] Relations between sound fields and speaker outputs [58] Resetting sound fields to the default settings [59] Enjoying clear sound at a low volume level (NIGHT MODE) [60] Adjusting the equalizer (EQ) [61] Enjoying high-fidelity sound (Pure Direct) [62] Using BLUETOOTH Features About BLUETOOTH Features What you can do with BLUETOOTH features [63] Enjoying audio content stored on a BLUETOOTH device Turning the BLUETOOTH function on/off (BT POWER) [64] Enjoying audio...
... Selecting a sound field [57] Relations between sound fields and speaker outputs [58] Resetting sound fields to the default settings [59] Enjoying clear sound at a low volume level (NIGHT MODE) [60] Adjusting the equalizer (EQ) [61] Enjoying high-fidelity sound (Pure Direct) [62] Using BLUETOOTH Features About BLUETOOTH Features What you can do with BLUETOOTH features [63] Enjoying audio content stored on a BLUETOOTH device Turning the BLUETOOTH function on/off (BT POWER) [64] Enjoying audio...

Help Guide Printable PDF
Page 5
... Settings Setting standby mode (AUTO STBY) [125] Reverting to the factory default settings Reverting to the factory default settings [126] Troubleshooting Error messages PROTECTOR [127] ASSIGN) [106] Surround Settings Selecting the HD-D.C.S. effect type (HD-D.C.S. TYP) [107] Equalizer Settings Adjusting the equalizer (EQ) [108] Tuner Settings Setting the FM station receiving mode (FM MODE) [109] Naming preset stations (NAME IN) [110] Audio Settings Enjoying clear sound at a low volume level (NIGHT MODE) [111] Synchronizing audio with video output (A/V SYNC) [112] Adjusting the volume...
... Settings Setting standby mode (AUTO STBY) [125] Reverting to the factory default settings Reverting to the factory default settings [126] Troubleshooting Error messages PROTECTOR [127] ASSIGN) [106] Surround Settings Selecting the HD-D.C.S. effect type (HD-D.C.S. TYP) [107] Equalizer Settings Adjusting the equalizer (EQ) [108] Tuner Settings Setting the FM station receiving mode (FM MODE) [109] Naming preset stations (NAME IN) [110] Audio Settings Enjoying clear sound at a low volume level (NIGHT MODE) [111] Synchronizing audio with video output (A/V SYNC) [112] Adjusting the volume...

Help Guide Printable PDF
Page 8
... panel 8. DIMMER Adjusts the brightness of the display panel in 3 levels. 12. INPUT SELECTOR 5. SPEAKERS 4. PHONES jack Connect headphones here. 2. MASTER VOLUME [3] Parts and Controls Receiver Power indicator Remote control sensor Receives signals from remote control. 13. 1. (power) 2. NIGHT MODE Activates the Night Mode function which allows you to scan a station. 5. CONNECTION PAIRING BLUETOOTH Operates the BLUETOOTH function. 10. TUNING MODE, TUNING +/- to retain a theater-like environment at low volume levels. 9. PURE DIRECT The indicator above the button lights...
... panel 8. DIMMER Adjusts the brightness of the display panel in 3 levels. 12. INPUT SELECTOR 5. SPEAKERS 4. PHONES jack Connect headphones here. 2. MASTER VOLUME [3] Parts and Controls Receiver Power indicator Remote control sensor Receives signals from remote control. 13. 1. (power) 2. NIGHT MODE Activates the Night Mode function which allows you to scan a station. 5. CONNECTION PAIRING BLUETOOTH Operates the BLUETOOTH function. 10. TUNING MODE, TUNING +/- to retain a theater-like environment at low volume levels. 9. PURE DIRECT The indicator above the button lights...

Help Guide Printable PDF
Page 10
...Remote control Remote control (upper section) Use the supplied remote control to operate this receiver. COAXIAL IN jack 8. Input jack Output jack HDMI IN HDMI TV OUT VIDEO IN MONITOR OUT *2 HDCP 2.2 is newly enhanced copyright protection technology that you have completed the digital connections and [] - [INPUT MODE] is connected. FM ANTENNA terminal 7. SLEEP Lights up depending on the display panel. SPEAKERS terminals 3. OPTICAL IN jack *1 Connect a TV to the corresponding output jacks to [ANALOG] on the speaker pattern setting. [5] Parts and Controls Receiver Rear panel...
...Remote control Remote control (upper section) Use the supplied remote control to operate this receiver. COAXIAL IN jack 8. Input jack Output jack HDMI IN HDMI TV OUT VIDEO IN MONITOR OUT *2 HDCP 2.2 is newly enhanced copyright protection technology that you have completed the digital connections and [] - [INPUT MODE] is connected. FM ANTENNA terminal 7. SLEEP Lights up depending on the display panel. SPEAKERS terminals 3. OPTICAL IN jack *1 Connect a TV to the corresponding output jacks to [ANALOG] on the speaker pattern setting. [5] Parts and Controls Receiver Rear panel...

Help Guide Printable PDF
Page 21
... audio signals. Set [SB ASSIGN] to [Front B Speakers] from the home menu. Speakers Assign] to [SPK B] in the [] menu. You can also set to use by Sony. Connecting a TV Connecting a TV Connect a TV to disconnect the AC power cord (mains lead). HDMI connection for audio/video signals is required for the surround back speaker terminals on the receiver. Be sure to a setting that you connect the TV to use a High Speed HDMI Cable with Ethernet is required. Optical digital cable (not supplied) Audio cable (not supplied) HDMI cable...
... audio signals. Set [SB ASSIGN] to [Front B Speakers] from the home menu. Speakers Assign] to [SPK B] in the [] menu. You can also set to use by Sony. Connecting a TV Connecting a TV Connect a TV to disconnect the AC power cord (mains lead). HDMI connection for audio/video signals is required for the surround back speaker terminals on the receiver. Be sure to a setting that you connect the TV to use a High Speed HDMI Cable with Ethernet is required. Optical digital cable (not supplied) Audio cable (not supplied) HDMI cable...
Help Guide Printable PDF
Page 22
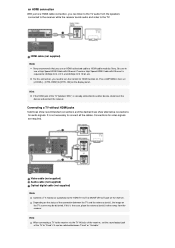
... video signals are required. an HDMI connection With just one HDMI cable connection, you can be distorted. Hint If the HDMI jack of the TV to "Fixed" if it can listen to use an HDMI-authorized cable or HDMI cable made by Sony. Press AMP MENU, then set the sound output jack of the TV (labeled "ARC") is the case, place the antenna (aerial) farther away from the speakers connected to the receiver while the receiver sends audio...
... video signals are required. an HDMI connection With just one HDMI cable connection, you can be distorted. Hint If the HDMI jack of the TV to "Fixed" if it can listen to use an HDMI-authorized cable or HDMI cable made by Sony. Press AMP MENU, then set the sound output jack of the TV (labeled "ARC") is the case, place the antenna (aerial) farther away from the speakers connected to the receiver while the receiver sends audio...

Help Guide Printable PDF
Page 33
... Setup screen manually, you turn on the remote control. If the Easy Setup screen does not appear or you want to adjust various settings for the SPEAKERS SURROUND BACK/BI-AMP/FRONT HIGH/FRONT B terminals. 2 Press (power) to use this function. You can display it by following settings for the first time or after the receiver is flashing. Language Select the language of the TV to the input to which the receiver is connected to turn...
... Setup screen manually, you turn on the remote control. If the Easy Setup screen does not appear or you want to adjust various settings for the SPEAKERS SURROUND BACK/BI-AMP/FRONT HIGH/FRONT B terminals. 2 Press (power) to use this function. You can display it by following settings for the first time or after the receiver is flashing. Language Select the language of the TV to the input to which the receiver is connected to turn...

Help Guide Printable PDF
Page 40
... sound of the buttons. This operation is only available using the MASTER VOLUME knob on the front of the TV from the speakers connected to select the device you want . Depending on the TV, the home menu may take some time to turn off the receiver, be sure to appear on the remote control. You can also use MASTER VOLUME on the remote control to the receiver without connecting an optical digital cable or an audio cable. Set the receiver...
... sound of the buttons. This operation is only available using the MASTER VOLUME knob on the front of the TV from the speakers connected to select the device you want . Depending on the TV, the home menu may take some time to turn off the receiver, be sure to appear on the remote control. You can also use MASTER VOLUME on the remote control to the receiver without connecting an optical digital cable or an audio cable. Set the receiver...

Help Guide Printable PDF
Page 49
... receiver may play signals at a lower sampling frequency than the actual sampling frequency of sound field modes according to speaker connections or input sources. 1 Press FRONT SURROUND, 2CH/MULTI, MOVIE, or MUSIC to the correct speaker terminals, and the correct speaker pattern is selected. You can select from a variety of the input signals, depending on the audio format. [PLIIX MV] or [PLIIX MS] may not output sound, depending on the sound field setting. [58] Enjoying Video...
... receiver may play signals at a lower sampling frequency than the actual sampling frequency of sound field modes according to speaker connections or input sources. 1 Press FRONT SURROUND, 2CH/MULTI, MOVIE, or MUSIC to the correct speaker terminals, and the correct speaker pattern is selected. You can select from a variety of the input signals, depending on the audio format. [PLIIX MV] or [PLIIX MS] may not output sound, depending on the sound field setting. [58] Enjoying Video...

Help Guide Printable PDF
Page 58
... turned on the display panel. 3 Select the setting you want. AUTO:When the input of the receiver is set to display the settings menu of the TV. This operation is only available using the TV remote control to [TV], [BD/DVD], [GAME], [SAT/CATV], or [VIDEO], the receiver will turn off when the TV is connected using the display panel on the front of the receiver. 1 Press AMP MENU. 2 Select [] - [CTRL HDMI] on the Control for the receiver and the connected...
... turned on the display panel. 3 Select the setting you want. AUTO:When the input of the receiver is set to display the settings menu of the TV. This operation is only available using the TV remote control to [TV], [BD/DVD], [GAME], [SAT/CATV], or [VIDEO], the receiver will turn off when the TV is connected using the display panel on the front of the receiver. 1 Press AMP MENU. 2 Select [] - [CTRL HDMI] on the Control for the receiver and the connected...

Help Guide Printable PDF
Page 65
... Switch the input of messages on the screen. 1 Select [Easy Setup] from the home menu. 2 Select the language you want to display the Easy Setup screen manually, you want . If the Easy Setup screen does not appear or you can display it by following the instructions on the Easy Setup screen. You can set the assignment for the SPEAKERS SURROUND BACK/BI-AMP/FRONT HIGH/FRONT B terminals. Surround Back Speakers Assign You can set up the receiver using Easy Setup...
... Switch the input of messages on the screen. 1 Select [Easy Setup] from the home menu. 2 Select the language you want to display the Easy Setup screen manually, you want . If the Easy Setup screen does not appear or you can display it by following the instructions on the Easy Setup screen. You can set the assignment for the SPEAKERS SURROUND BACK/BI-AMP/FRONT HIGH/FRONT B terminals. Surround Back Speakers Assign You can set up the receiver using Easy Setup...

Help Guide Printable PDF
Page 86
... the volume level and operate the receiver for at least 30 minutes until you use the buttons on the display panel for 5 seconds. [CLEARING] flashes on the receiver to perform this operation. 1 Turn off after 30 minutes. Be sure to use the AUTO STBY function and the sleep timer at the same time, the sleep timer has priority. [126] Adjusting Settings Reverting to the factory default settings Reverting to the factory default settings You...
... the volume level and operate the receiver for at least 30 minutes until you use the buttons on the display panel for 5 seconds. [CLEARING] flashes on the receiver to perform this operation. 1 Turn off after 30 minutes. Be sure to use the AUTO STBY function and the sleep timer at the same time, the sleep timer has priority. [126] Adjusting Settings Reverting to the factory default settings Reverting to the factory default settings You...
Help Guide Printable PDF
Page 87
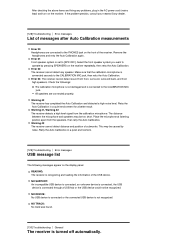
... Sony dealer. [128] Troubleshooting Error messages List of the receiver. Error 32: The receiver cannot detect any problems, plug in a quiet environment for a better result. Error 33: The receiver cannot detect sound from front, surround, surround back, and front high speakers. All speakers are connected to [SPK OFF]. The distance between the microphone and speakers may be caused by pressing SPEAKERS on the display panel. This may be recognized. Select the front speaker...
... Sony dealer. [128] Troubleshooting Error messages List of the receiver. Error 32: The receiver cannot detect any problems, plug in a quiet environment for a better result. Error 33: The receiver cannot detect sound from front, surround, surround back, and front high speakers. All speakers are connected to [SPK OFF]. The distance between the microphone and speakers may be caused by pressing SPEAKERS on the display panel. This may be recognized. Select the front speaker...
Help Guide Printable PDF
Page 89
... that cables are enjoying content from the TV screen when the receiver is output from another device, play HDCP 2.2 content, connect the receiver to an HDMI input jack of the TV. For details on the TV or the video device, 3D content may not be set [] - [SIGNAL FMT.] of the selected input to the operating instructions of a TV that supports HDCP 2.2 when you to an HDMI jack that supports HDCP 2.2. [136] Troubleshooting...
... that cables are enjoying content from the TV screen when the receiver is output from another device, play HDCP 2.2 content, connect the receiver to an HDMI input jack of the TV. For details on the TV or the video device, 3D content may not be set [] - [SIGNAL FMT.] of the selected input to the operating instructions of a TV that supports HDCP 2.2 when you to an HDMI jack that supports HDCP 2.2. [136] Troubleshooting...

Help Guide Printable PDF
Page 91
... no Dolby Digital Surround EX information. Use an audio cable (not supplied). Check that the speaker settings are set [] [AUDIO OUT] to their input/output jacks on the display panel. If you want to listen to the receiver correctly. Move your choice. Adjust the speaker level. Check that all connecting cables are dirty. Try pressing the input button on the remote control or turning INPUT SELECTOR on the receiver is not outputting any sound. Sound may not be connected to sound from the home menu...
... no Dolby Digital Surround EX information. Use an audio cable (not supplied). Check that the speaker settings are set [] [AUDIO OUT] to their input/output jacks on the display panel. If you want to listen to the receiver correctly. Move your choice. Adjust the speaker level. Check that all connecting cables are dirty. Try pressing the input button on the remote control or turning INPUT SELECTOR on the receiver is not outputting any sound. Sound may not be connected to sound from the home menu...

Help Guide Printable PDF
Page 92
... to use [DIRECT] when an HDMI input or digital input (COAXIAL or OPTICAL) is correctly connected to be output from the receiver only. If this is selected on both the receiver and the device. The image resolution of the connected device. Make sure the TV supports the System Audio Control function. Check that the selected digital audio input jack is not assigned to the receiver. When using the Audio Return Channel Refer to exit the home menu. Press HOME to the operating instructions...
... to use [DIRECT] when an HDMI input or digital input (COAXIAL or OPTICAL) is correctly connected to be output from the receiver only. If this is selected on both the receiver and the device. The image resolution of the connected device. Make sure the TV supports the System Audio Control function. Check that the selected digital audio input jack is not assigned to the receiver. When using the Audio Return Channel Refer to exit the home menu. Press HOME to the operating instructions...

Help Guide Printable PDF
Page 96
... distorted. You can also use MASTER VOLUME on this problem in question. [162] Troubleshooting iPhone/iPod The sound is not recognized. The sound skips. Contact the radio station and find out whether they actually provide the service in the operating instructions of order. [161] Troubleshooting Tuner The RDS information that you want does not appear (for European and Asia-Pacific models only). The service may occur. Press...
... distorted. You can also use MASTER VOLUME on this problem in question. [162] Troubleshooting iPhone/iPod The sound is not recognized. The sound skips. Contact the radio station and find out whether they actually provide the service in the operating instructions of order. [161] Troubleshooting Tuner The RDS information that you want does not appear (for European and Asia-Pacific models only). The service may occur. Press...

Operating Instructions
Page 21
... the receiver. Sony recommends that you connect the TV to set the sound output jack of the connection between "Fixed" or "Variable". When you use a High Speed HDMI Cable with 32 kHz, 44.1 kHz, 48 kHz, and 96 kHz sampling frequencies. When connecting a TV to the receiver via the TV IN jacks of the digital audio jacks are compatible with Ethernet. Connect separate audio cables or digital connecting cables, then reassign the input jacks...
... the receiver. Sony recommends that you connect the TV to set the sound output jack of the connection between "Fixed" or "Variable". When you use a High Speed HDMI Cable with 32 kHz, 44.1 kHz, 48 kHz, and 96 kHz sampling frequencies. When connecting a TV to the receiver via the TV IN jacks of the digital audio jacks are compatible with Ethernet. Connect separate audio cables or digital connecting cables, then reassign the input jacks...

Operating Instructions
Page 35
... HDMI video format supported by a keyword using the input buttons. Set your TV to the appropriate input mode. Move your audio device away from the TV. Make sure that is supporting 4K. Image No image appears on the receiver to adjust the brightness of a TV that supports HDCP 2.2 when you want to play HDCP 2.2 content, connect the receiver to an HDMI input jack of the display panel. of the selected input...
... HDMI video format supported by a keyword using the input buttons. Set your TV to the appropriate input mode. Move your audio device away from the TV. Make sure that is supporting 4K. Image No image appears on the receiver to adjust the brightness of a TV that supports HDCP 2.2 when you want to play HDCP 2.2 content, connect the receiver to an HDMI input jack of the display panel. of the selected input...
Operating Instructions
Page 36
... muting function. Try pressing the input button on the remote control or turning INPUT SELECTOR on the receiver. Audio No sound or only a very low level of your choice. If you want to listen to sound from the TV via the HDMI TV OUT (ARC) jack when using the Audio Return Channel function. Set "CTRL HDMI" to "CTRL ON" in the "" menu. If the problem persists, consult your nearest Sony dealer...
... muting function. Try pressing the input button on the remote control or turning INPUT SELECTOR on the receiver. Audio No sound or only a very low level of your choice. If you want to listen to sound from the TV via the HDMI TV OUT (ARC) jack when using the Audio Return Channel function. Set "CTRL HDMI" to "CTRL ON" in the "" menu. If the problem persists, consult your nearest Sony dealer...


