
Operating Instructions
Page 7
... (aerials 29 6: Connecting the AC power cord (mains lead 29 Preparing the Receiver Turning on the receiver 30 Setting up the receiver using the Easy Setup 30 Guide to on-screen display (OSD) operation 33 Basic Operations Playing an input source equipment 34 Playing an iPod/iPhone 36 Playing a USB device...
... (aerials 29 6: Connecting the AC power cord (mains lead 29 Preparing the Receiver Turning on the receiver 30 Setting up the receiver using the Easy Setup 30 Guide to on-screen display (OSD) operation 33 Basic Operations Playing an input source equipment 34 Playing an iPod/iPhone 36 Playing a USB device...

Operating Instructions
Page 8
Adjusting Settings Using the Settings menu 57 Easy Setup 59 Speaker Settings menu 59 Audio Settings menu 63 HDMI Settings menu 64 Input Settings menu 65 System Settings menu 65 Operating without using the OSD 66 Using the Remote Control Reassigning the input button .......71 Resetting the input buttons ..........72 Additional Information Precautions 73 Troubleshooting 74 Specifications 81 Index 83 8GB
Adjusting Settings Using the Settings menu 57 Easy Setup 59 Speaker Settings menu 59 Audio Settings menu 63 HDMI Settings menu 64 Input Settings menu 65 System Settings menu 65 Operating without using the OSD 66 Using the Remote Control Reassigning the input button .......71 Resetting the input buttons ..........72 Additional Information Precautions 73 Troubleshooting 74 Specifications 81 Index 83 8GB
Operating Instructions
Page 9
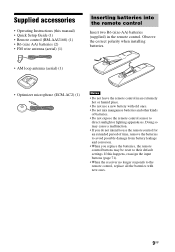
... loop antenna (aerial) (1) • Optimizer microphone (ECM-AC2) (1) Notes • Do not leave the remote control in the remote control. If this manual) • Quick Setup Guide (1) • Remote control (RM-AAU168) (1) • R6 (size AA) batteries (2) • FM wire antenna (aerial) (1) Inserting batteries into the remote control Insert two R6...
... loop antenna (aerial) (1) • Optimizer microphone (ECM-AC2) (1) Notes • Do not leave the remote control in the remote control. If this manual) • Quick Setup Guide (1) • Remote control (RM-AAU168) (1) • R6 (size AA) batteries (2) • FM wire antenna (aerial) (1) Inserting batteries into the remote control Insert two R6...

Operating Instructions
Page 17
... the connection according to the jacks on the connecting jack. See the illustration below . Setting the receiver See "Setting up the receiver using the Easy Setup" (page 30). We recommend that "Audio (HDMI)", "BD Audio MIX Setting", "Dolby Digital/DTS", "Dolby Digital", and "DTS" are set to ...the receiver by following the simple steps below . For a Sony Blu-ray Disc player, check that you connect your equipment Connecting the TV and video equipment (page 23, 24) The image quality depends on your...
... the connection according to the jacks on the connecting jack. See the illustration below . Setting the receiver See "Setting up the receiver using the Easy Setup" (page 30). We recommend that "Audio (HDMI)", "BD Audio MIX Setting", "Dolby Digital/DTS", "Dolby Digital", and "DTS" are set to ...the receiver by following the simple steps below . For a Sony Blu-ray Disc player, check that you connect your equipment Connecting the TV and video equipment (page 23, 24) The image quality depends on your...

Operating Instructions
Page 30
... malfunction. Note This setting is only available if the "Speaker Pattern" is flashing. To set up the following functions using the Easy Setup You can confirm the selected speakers terminals by operating the receiver in accordance with the instructions on the display panel. Switch the input of...SURROUND BACK/BI-AMP/FRONT HIGH/FRONT B terminals. 30GB Preparing the Receiver Turning on the receiver ?/1 Press ?/1 to turn on the Easy Setup screen. SP B* The speaker connected to the SPEAKERS FRONT A terminals. Proceed to set the surround back speakers You can select the front ...
... malfunction. Note This setting is only available if the "Speaker Pattern" is flashing. To set up the following functions using the Easy Setup You can confirm the selected speakers terminals by operating the receiver in accordance with the instructions on the display panel. Switch the input of...SURROUND BACK/BI-AMP/FRONT HIGH/FRONT B terminals. 30GB Preparing the Receiver Turning on the receiver ?/1 Press ?/1 to turn on the Easy Setup screen. SP B* The speaker connected to the SPEAKERS FRONT A terminals. Proceed to set the surround back speakers You can select the front ...

Operating Instructions
Page 32
...a subwoofer with a crossover frequency function, set the value to activating the subwoofer. For details, see "Manual Setup" in the Speaker Settings menu (page 61). Change the volume level. - Confirm active subwoofer setup • When a subwoofer is often on the back of the speaker.) • When you connect front ... it at your seating position and set it to the receiver If you cannot obtain measurement results of the subwoofer you are using, the setup distance value may be canceled when you are not sure of the impedances of 6 ohms or higher. When you connect two subwoofers to ...
...a subwoofer with a crossover frequency function, set the value to activating the subwoofer. For details, see "Manual Setup" in the Speaker Settings menu (page 61). Change the volume level. - Confirm active subwoofer setup • When a subwoofer is often on the back of the speaker.) • When you connect front ... it at your seating position and set it to the receiver If you cannot obtain measurement results of the subwoofer you are using, the setup distance value may be canceled when you are not sure of the impedances of 6 ohms or higher. When you connect two subwoofers to ...

Operating Instructions
Page 50
.... The Control for HDMI (High-Definition Multimedia Interface). Wait until "COMPLETE" appears. The setup is "BRAVIA" Sync? They cannot operate with non-Sony equipment. • Equipment not compatible with non-Sony equipment. that supports the Control for HDMI function on simultaneously. The "BRAVIA" Sync function ...HDMI-Easy Setting" function, set the Control for HDMI function.) 2 Turn on the receiver, TV and playback equipment. 3 Turn on setup of the TV, refer to products featuring "BRAVIA" Sync. If your TV is compatible with the Control for HDMI function of your ...
.... The Control for HDMI (High-Definition Multimedia Interface). Wait until "COMPLETE" appears. The setup is "BRAVIA" Sync? They cannot operate with non-Sony equipment. • Equipment not compatible with non-Sony equipment. that supports the Control for HDMI function on simultaneously. The "BRAVIA" Sync function ...HDMI-Easy Setting" function, set the Control for HDMI function.) 2 Turn on the receiver, TV and playback equipment. 3 Turn on setup of the TV, refer to products featuring "BRAVIA" Sync. If your TV is compatible with the Control for HDMI function of your ...
Operating Instructions
Page 58
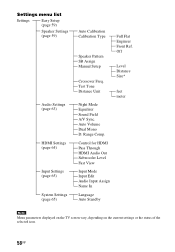
... Level Fast View Input Mode Input Edit Audio Input Assign Name In Language Auto Standby Full Flat Engineer Front Ref. Settings menu list Settings Easy Setup (page 59) Speaker Settings (page 59) Audio Settings (page 63) HDMI Settings (page 64) Input Settings (page 65) System Settings (page 65) Auto Calibration Calibration...
... Level Fast View Input Mode Input Edit Audio Input Assign Name In Language Auto Standby Full Flat Engineer Front Ref. Settings menu list Settings Easy Setup (page 59) Speaker Settings (page 59) Audio Settings (page 63) HDMI Settings (page 64) Input Settings (page 65) System Settings (page 65) Auto Calibration Calibration...

Operating Instructions
Page 59
... Auto Calibration again. • Save&Exit: Save the measurement results and exits the setting process. • WRN Check: Displays warning related to 3 in step 3. Easy Setup Re-runs the Easy Setup to change the settings.
... Auto Calibration again. • Save&Exit: Save the measurement results and exits the setting process. • WRN Check: Displays warning related to 3 in step 3. Easy Setup Re-runs the Easy Setup to change the settings.
Operating Instructions
Page 61
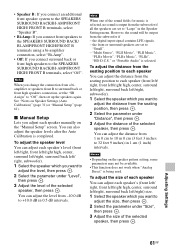
... Select the parameter under "Size", then press . 3 Adjust the size of the sound fields for music is selected, no sound is being used. x Manual Setup Lets you adjust each speaker (front left/ right, front left/right high, center, surround left/right, surround back left / right, subwoofer). 1 Select the...menu. To adjust the size of the selected speaker, then press . See "Notes on Speaker Settings (Auto Calibration)" (page 31) or "Manual Setup" (page 61). You can also adjust the speaker levels after the Auto Calibration is selected. • Speaker B: If you connect an additional front...
... Select the parameter under "Size", then press . 3 Adjust the size of the sound fields for music is selected, no sound is being used. x Manual Setup Lets you adjust each speaker (front left/ right, front left/right high, center, surround left/right, surround back left / right, subwoofer). 1 Select the...menu. To adjust the size of the selected speaker, then press . See "Notes on Speaker Settings (Auto Calibration)" (page 31) or "Manual Setup" (page 61). You can also adjust the speaker levels after the Auto Calibration is selected. • Speaker B: If you connect an additional front...

Operating Instructions
Page 75
... is selected, or only a very low-level sound is heard. • Check that all connecting cords are inserted to their input/output jacks for the setup using "Test Tone" in the Speaker Settings menu. • Some discs have connected to both the L and R jacks of an analog equipment, analog equipment requires...
... is selected, or only a very low-level sound is heard. • Check that all connecting cords are inserted to their input/output jacks for the setup using "Test Tone" in the Speaker Settings menu. • Some discs have connected to both the L and R jacks of an analog equipment, analog equipment requires...

Operating Instructions
Page 76
... and receiver. - Change the TV channel when you want when you want to select the correct equipment or input you watch a TV broadcast. - Check the setup of the connected equipment if the image is not compatible with each equipment. • Be sure to sound, especially for the connection is (are) fully...
... and receiver. - Change the TV channel when you want when you want to select the correct equipment or input you watch a TV broadcast. - Check the setup of the connected equipment if the image is not compatible with each equipment. • Be sure to sound, especially for the connection is (are) fully...

Operating Instructions
Page 84
I Input 34 INPUT MODE 54 Input Settings 65 iPod/iPhone Charging 38 Compatible models 36 L Language 65 Level Settings 67 M Manual Setup 61 Menu 57, 67 Message Auto Calibration 60 Error 80 iPod/iPhone 38 USB 41 Movie mode 45 Music mode 46 Muting 35 N Name Input ...
I Input 34 INPUT MODE 54 Input Settings 65 iPod/iPhone Charging 38 Compatible models 36 L Language 65 Level Settings 67 M Manual Setup 61 Menu 57, 67 Message Auto Calibration 60 Error 80 iPod/iPhone 38 USB 41 Movie mode 45 Music mode 46 Muting 35 N Name Input ...

Quick Setup Guide
Page 1
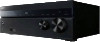
STR-DH740 Quick Setup Guide/ Guide d'installation rapide/ Guía de instalación rápida Sony Corporation © 2013 Printed in Malaysia 4-448-430-11(1) For details, refer to the Operating Instructions./ Pour plus d'informations, reportez-vous au mode d'emploi./ Para ...
STR-DH740 Quick Setup Guide/ Guide d'installation rapide/ Guía de instalación rápida Sony Corporation © 2013 Printed in Malaysia 4-448-430-11(1) For details, refer to the Operating Instructions./ Pour plus d'informations, reportez-vous au mode d'emploi./ Para ...


