
Operating Instructions
Page 1
4-168-043-12(1) Multi Channel AV Receiver Operating Instructions STR-DH510 ©2010 Sony Corporation
4-168-043-12(1) Multi Channel AV Receiver Operating Instructions STR-DH510 ©2010 Sony Corporation

Operating Instructions
Page 3
...interference in a residential installation. continued 3GB Servicing is no guarantee that interference will help . Increase the separation between the equipment and receiver. - CAUTION You are designed to conserve natural resources. To reduce the risk of electric shock, the speaker cord should be ... if not installed and used , use caution when moving the cart/apparatus combination to qualified service personnel. Reorient or relocate the receiving antenna. - NOTE: This equipment has been tested and found to comply with the instructions, may not comply with separate collection ...
...interference in a residential installation. continued 3GB Servicing is no guarantee that interference will help . Increase the separation between the equipment and receiver. - CAUTION You are designed to conserve natural resources. To reduce the risk of electric shock, the speaker cord should be ... if not installed and used , use caution when moving the cart/apparatus combination to qualified service personnel. Reorient or relocate the receiving antenna. - NOTE: This equipment has been tested and found to comply with the instructions, may not comply with separate collection ...

Operating Instructions
Page 5
... under license under license from Dolby Laboratories. "x.v.Colour (x.v.Color)" and "x.v.Colour (x.v.Color)" logo are trademarks of Sony Corporation. You can also use the controls on the receiver if they have the same or similar names as those on the remote. All Rights Reserved. About area codes...only". HDMI, the HDMI Logo, and High-Definition Multimedia Interface are for example, "Models of HDMI Licensing LLC in the text, for model STR-DH510. "PLAYSTATION" is a trademark of DTS, Inc. © 1996-2008 DTS, Inc. DTS and DTS Digital Surround are registered trademarks and ...
... under license under license from Dolby Laboratories. "x.v.Colour (x.v.Color)" and "x.v.Colour (x.v.Color)" logo are trademarks of Sony Corporation. You can also use the controls on the receiver if they have the same or similar names as those on the remote. All Rights Reserved. About area codes...only". HDMI, the HDMI Logo, and High-Definition Multimedia Interface are for example, "Models of HDMI Licensing LLC in the text, for model STR-DH510. "PLAYSTATION" is a trademark of DTS, Inc. © 1996-2008 DTS, Inc. DTS and DTS Digital Surround are registered trademarks and ...

Operating Instructions
Page 6
... Connecting the video components ........23 5: Connecting the antennas (aerials 29 6: Connecting the AC power cord (mains lead 29 Preparing the Receiver Initializing the receiver 30 Calibrating the appropriate speaker settings automatically (AUTO CALIBRATION 30 (Models of area code ECE, CEK, AU1 only) Adjusting the speaker ... with one-touch operation (One-Touch Play 48 Enjoying the TV sound from the speakers connected to the receiver (System Audio Control 49 Turning off the receiver with the TV (System Power Off 50 Enjoying movies with the optimum sound field (Theater/Theatre Mode Sync...
... Connecting the video components ........23 5: Connecting the antennas (aerials 29 6: Connecting the AC power cord (mains lead 29 Preparing the Receiver Initializing the receiver 30 Calibrating the appropriate speaker settings automatically (AUTO CALIBRATION 30 (Models of area code ECE, CEK, AU1 only) Adjusting the speaker ... with one-touch operation (One-Touch Play 48 Enjoying the TV sound from the speakers connected to the receiver (System Audio Control 49 Turning off the receiver with the TV (System Power Off 50 Enjoying movies with the optimum sound field (Theater/Theatre Mode Sync...

Operating Instructions
Page 8
... 71) 8 76 8GB MOVIE MUSIC DISPLAY DIMMER MUTING qs qa q; 9 A ?/1 (on/standby) (page 30, 39, 46, 67) B INPUT SELECTOR (page 35) C Display (page 9) D Remote sensor Receives signals from remote commander.
... 71) 8 76 8GB MOVIE MUSIC DISPLAY DIMMER MUTING qs qa q; 9 A ?/1 (on/standby) (page 30, 39, 46, 67) B INPUT SELECTOR (page 35) C Display (page 9) D Remote sensor Receives signals from remote commander.
Operating Instructions
Page 9
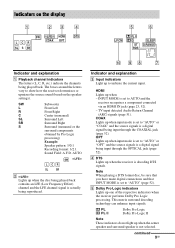
...around the letters vary to "AUTO" or "COAX" and the source signals is a digital signal being played back. HDMI Lights up to AUTO and the receiver recognizes a component connected via an HDMI IN jack (page 23, 52). - Note When playing a DTS format disc, be sure that you have made digital... speaker is not selected. continued 9GB PL PL II Dolby Pro Logic Dolby Pro Logic II Note These indicators do not light up when the receiver is actually being reproduced. E Dolby Pro Logic indicators Lights up when the disc being input through the OPTICAL jack (page 52). TV input ...
...around the letters vary to "AUTO" or "COAX" and the source signals is a digital signal being played back. HDMI Lights up to AUTO and the receiver recognizes a component connected via an HDMI IN jack (page 23, 52). - Note When playing a DTS format disc, be sure that you have made digital... speaker is not selected. continued 9GB PL PL II Dolby Pro Logic Dolby Pro Logic II Note These indicators do not light up when the receiver is actually being reproduced. E Dolby Pro Logic indicators Lights up when the disc being input through the OPTICAL jack (page 52). TV input ...

Operating Instructions
Page 10
H Tuning indicators Lights up when the receiver tunes in . Note When playing a Dolby Digital format disc, be sure that you select. J LPCM Lights up when Linear PCM signals are detected. 10GB G D.RANGE ... Note The preset station number will change according to "ANALOG" (page 52). For details on presetting radio stations, see page 40. I D Lights up when the receiver is activated (page 59). Indicator and explanation F SLEEP Lights up when the sleep timer is not set to the preset station you have made digital...
H Tuning indicators Lights up when the receiver tunes in . Note When playing a Dolby Digital format disc, be sure that you select. J LPCM Lights up when Linear PCM signals are detected. 10GB G D.RANGE ... Note The preset station number will change according to "ANALOG" (page 52). For details on presetting radio stations, see page 40. I D Lights up when the receiver is activated (page 59). Indicator and explanation F SLEEP Lights up when the sleep timer is not set to the preset station you have made digital...

Operating Instructions
Page 12
... ECE, CEK, AU1 only) AUTO CAL MIC jack F DMPORT section (page 22) DMPORT jack * You can use the supplied remote to operate the receiver and to control the Sony audio/video components that the remote is assigned to a TV (page 20, 23). wk 1 wj 2 BD DVD TV VIDEO DMPORT TUNER SAT/ CATV...
... ECE, CEK, AU1 only) AUTO CAL MIC jack F DMPORT section (page 22) DMPORT jack * You can use the supplied remote to operate the receiver and to control the Sony audio/video components that the remote is assigned to a TV (page 20, 23). wk 1 wj 2 BD DVD TV VIDEO DMPORT TUNER SAT/ CATV...

Operating Instructions
Page 13
... (Q), then press the button with yellow printing to standby mode. Saving the power in standby mode When "CTRL.HDMI" is set to operate the receiver. K AMP MENU Displays the menu to "CTRL OFF" (page 58). When you want to preset stations. L , V/v/B/b Press V/v/B /b to... select the settings, then press to control Sony components. The buttons are initial assigned to enter the selection. F MEMORY Stores a station. continued 13GB D Numeric buttonsc) (number 5a)) Presets or tunes ...
... (Q), then press the button with yellow printing to standby mode. Saving the power in standby mode When "CTRL.HDMI" is set to operate the receiver. K AMP MENU Displays the menu to "CTRL OFF" (page 58). When you want to preset stations. L , V/v/B/b Press V/v/B /b to... select the settings, then press to control Sony components. The buttons are initial assigned to enter the selection. F MEMORY Stores a station. continued 13GB D Numeric buttonsc) (number 5a)) Presets or tunes ...
Operating Instructions
Page 14
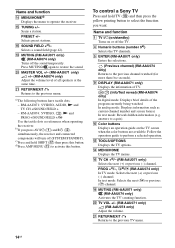
... the selections. (Previous channel) (RM-AAU074 only) Returns to the previous menu. In analog mode: Displays information such as references when operating the receiver. J Color buttons Displays an operation guide on or off (SYSTEM STANDBY). M TOOLS/OPTIONS Displays the TV options. In text mode: Selects the ... channels. U RETURN/EXIT O Returns to a quiz). PRESET +/- T TV VOL +/- (RM-AAU071 only) (RM-AAU074 only) Adjust the volume. To control a Sony TV Press and hold SHIFT (Q) then press this button. P TV CH +a)/- (RM-AAU071 only) Selects the next (+) or previous (-) channel.
... the selections. (Previous channel) (RM-AAU074 only) Returns to the previous menu. In analog mode: Displays information such as references when operating the receiver. J Color buttons Displays an operation guide on or off (SYSTEM STANDBY). M TOOLS/OPTIONS Displays the TV options. In text mode: Selects the ... channels. U RETURN/EXIT O Returns to a quiz). PRESET +/- T TV VOL +/- (RM-AAU071 only) (RM-AAU074 only) Adjust the volume. To control a Sony TV Press and hold SHIFT (Q) then press this button. P TV CH +a)/- (RM-AAU071 only) Selects the next (+) or previous (-) channel.

Operating Instructions
Page 15
...the input signal (TV or video). RM-AAU074: 5/VIDEO, , N and PROG +/SOUND FIELD +/c Use the tactile dots as references when operating the receiver. ANALOG (RM-AAU074 only) Changes to digital mode. In analog text mode: Holds the current page. a)The following buttons have tactile dots: - Name... and function V GUIDE (RM-AAU071 only) (RM-AAU074 only) Displays the guide when you connect a Sony TV that is compatible with the THEATER/ THEATRE button function (page 51). W AUDIOa) (RM-AAU071 only) a) (RM-AAU074 only) Selects the desired audio...
...the input signal (TV or video). RM-AAU074: 5/VIDEO, , N and PROG +/SOUND FIELD +/c Use the tactile dots as references when operating the receiver. ANALOG (RM-AAU074 only) Changes to digital mode. In analog text mode: Holds the current page. a)The following buttons have tactile dots: - Name... and function V GUIDE (RM-AAU071 only) (RM-AAU074 only) Displays the guide when you connect a Sony TV that is compatible with the THEATER/ THEATRE button function (page 51). W AUDIOa) (RM-AAU071 only) a) (RM-AAU074 only) Selects the desired audio...
Operating Instructions
Page 16
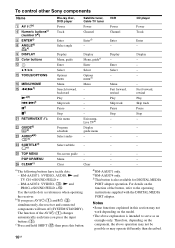
... On-screen guide - - Clear Clear - The function of the button, refer to serve as references when operating the receiver. f) This button is intended to the operating instructions supplied with the DIGITAL MEDIA PORT adapter. Fast forward, rewind Play ...Skip track Pause Stop - - - - - - - To control other Sony components Name A AV ?/1b) D Numeric buttonsc) (number 5a)) E ENTERc) H ANGLEd) e) I DISPLAY J Color buttons L V/v/B/b M TOOLS/OPTIONS N MENU/HOME...
... On-screen guide - - Clear Clear - The function of the button, refer to serve as references when operating the receiver. f) This button is intended to the operating instructions supplied with the DIGITAL MEDIA PORT adapter. Fast forward, rewind Play ...Skip track Pause Stop - - - - - - - To control other Sony components Name A AV ?/1b) D Numeric buttonsc) (number 5a)) E ENTERc) H ANGLEd) e) I DISPLAY J Color buttons L V/v/B/b M TOOLS/OPTIONS N MENU/HOME...
Operating Instructions
Page 17
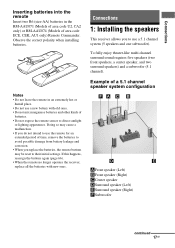
...to use the remote for an extended period of area code ECE, CEK, AU1 only) Remote Commander. Connections 1: Installing the speakers This receiver allows you replace the batteries, the remote buttons may cause a malfunction. • If you do not intend to their initial settings. ...the correct polarity when installing batteries. If this happens, reassign the buttons again (page 66). • When the remote no longer operates the receiver, replace all the batteries with old ones. • Do not mix manganese batteries and other kinds of a 5.1 channel speaker system configuration AFront ...
...to use the remote for an extended period of area code ECE, CEK, AU1 only) Remote Commander. Connections 1: Installing the speakers This receiver allows you replace the batteries, the remote buttons may cause a malfunction. • If you do not intend to their initial settings. ...the correct polarity when installing batteries. If this happens, reassign the buttons again (page 66). • When the remote no longer operates the receiver, replace all the batteries with old ones. • Do not mix manganese batteries and other kinds of a 5.1 channel speaker system configuration AFront ...

Operating Instructions
Page 20
Recommended connection Alternative connection a)To enjoy TV multi channel surround sound broadcasting from the speakers connected to the receiver via HDMI TV OUT connection. Be sure to "ARC ON" in HDMI menu (page 51). 20GB b)If your TV is compatible with the Audio Return ... (not supplied) B Optical digital cord (not supplied) C Component video cord (not supplied) D Video cord (not supplied) E HDMI cable (not supplied) We recommend that you use a Sony HDMI cable. 3: Connecting the TV Before connecting cords, be sure to the receiver, connect either B or E.
Recommended connection Alternative connection a)To enjoy TV multi channel surround sound broadcasting from the speakers connected to the receiver via HDMI TV OUT connection. Be sure to "ARC ON" in HDMI menu (page 51). 20GB b)If your TV is compatible with the Audio Return ... (not supplied) B Optical digital cord (not supplied) C Component video cord (not supplied) D Video cord (not supplied) E HDMI cable (not supplied) We recommend that you use a Sony HDMI cable. 3: Connecting the TV Before connecting cords, be sure to the receiver, connect either B or E.

Operating Instructions
Page 21
... kHz, and 96 kHz sampling frequencies. 21GB Tip All the digital audio jacks are being output to a TV via the receiver. In this case, place the antenna (aerial) farther away from the receiver. • When connecting optical digital cords, insert the plugs straight in until they click into place. • Do not... the HDMI TV OUT or MONITOR OUT jack on the TV screen may not be distorted. Connections Notes • Be sure to turn on the receiver when the video and audio signals of the connection between the TV and the antenna (aerial), the image on the...
... kHz, and 96 kHz sampling frequencies. 21GB Tip All the digital audio jacks are being output to a TV via the receiver. In this case, place the antenna (aerial) farther away from the receiver. • When connecting optical digital cords, insert the plugs straight in until they click into place. • Do not... the HDMI TV OUT or MONITOR OUT jack on the TV screen may not be distorted. Connections Notes • Be sure to turn on the receiver when the video and audio signals of the connection between the TV and the antenna (aerial), the image on the...
Operating Instructions
Page 22
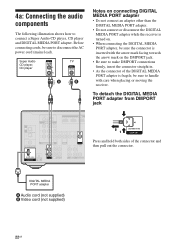
... connect an adapter other than the DIGITAL MEDIA PORT adapter. • Do not connect or disconnect the DIGITAL MEDIA PORT adapter while the receiver is turned on. • When connecting the DIGITAL MEDIA PORT adapter, be sure the connector is inserted with the arrow mark facing towards...B Video cord (not supplied) 22GB 4a: Connecting the audio components The following illustration shows how to handle with care when placing or moving the receiver. To detach the DIGITAL MEDIA PORT adapter from DMPORT jack IN TV OPTICAL SAT/ CATV IN OPTICAL DVD IN COAXIAL DIGITAL (ASSIGNABLE) AM ANTENNA...
... connect an adapter other than the DIGITAL MEDIA PORT adapter. • Do not connect or disconnect the DIGITAL MEDIA PORT adapter while the receiver is turned on. • When connecting the DIGITAL MEDIA PORT adapter, be sure the connector is inserted with the arrow mark facing towards...B Video cord (not supplied) 22GB 4a: Connecting the audio components The following illustration shows how to handle with care when placing or moving the receiver. To detach the DIGITAL MEDIA PORT adapter from DMPORT jack IN TV OPTICAL SAT/ CATV IN OPTICAL DVD IN COAXIAL DIGITAL (ASSIGNABLE) AM ANTENNA...
Operating Instructions
Page 23
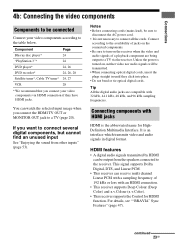
...insert the plugs straight in digital format. If you want to a TV (page 20). Connecting components with HDMI jacks HDMI is turned on the receiver when the video and audio signals of 192 kHz or less with 32 kHz, 44.1 kHz, 48 kHz, and 96 kHz sampling frequencies. continued ...For details, see ""BRAVIA" Sync Features" (page 47). Connections 4b: Connecting the video components Components to be connected Connect your video components via the receiver. Tip All the digital audio jacks are being output to a TV via HDMI connection if they click into place. • Do not bend or ...
...insert the plugs straight in digital format. If you want to a TV (page 20). Connecting components with HDMI jacks HDMI is turned on the receiver when the video and audio signals of 192 kHz or less with 32 kHz, 44.1 kHz, 48 kHz, and 96 kHz sampling frequencies. continued ...For details, see ""BRAVIA" Sync Features" (page 47). Connections 4b: Connecting the video components Components to be connected Connect your video components via the receiver. Tip All the digital audio jacks are being output to a TV via HDMI connection if they click into place. • Do not bend or ...

Operating Instructions
Page 24
...). 24GB Notes • The initial setting for the audio connection of the DVD input button on the receiver's display. RM-AAU074: DVD recorder Be sure to change the initial setting of the TV to the receiver. DVD player, DVD recorder Audio/video signals Blu-ray disc player, "PlayStation 3" Audio/video signals Satellite... OUT ARC CENTER SURROUND R L FRONT L R SPEAKERS A A HDMI cable (not supplied) We recommend that you can be displayed on the remote so that it can use a Sony HDMI cable.
...). 24GB Notes • The initial setting for the audio connection of the DVD input button on the receiver's display. RM-AAU074: DVD recorder Be sure to change the initial setting of the TV to the receiver. DVD player, DVD recorder Audio/video signals Blu-ray disc player, "PlayStation 3" Audio/video signals Satellite... OUT ARC CENTER SURROUND R L FRONT L R SPEAKERS A A HDMI cable (not supplied) We recommend that you can be displayed on the remote so that it can use a Sony HDMI cable.

Operating Instructions
Page 25
Connections Notes on the receiver when video and audio signals of the player. • Not every HDMI component supports all functions that you use a Standard HDMI cable, 1080p or Deep Colour (Deep Color) images may not be displayed properly. • Sony recommends that are defined by the connected component... that support HDMI, version 1.4, may need certain settings be suppressed by the specified HDMI version. If you can only be output. In this receiver. Connect other audio jacks. • Video signals input to "TV+AMP" in AUDIO menu (page 63) when the sound is output from...
Connections Notes on the receiver when video and audio signals of the player. • Not every HDMI component supports all functions that you use a Standard HDMI cable, 1080p or Deep Colour (Deep Color) images may not be displayed properly. • Sony recommends that are defined by the connected component... that support HDMI, version 1.4, may need certain settings be suppressed by the specified HDMI version. If you can only be output. In this receiver. Connect other audio jacks. • Video signals input to "TV+AMP" in AUDIO menu (page 63) when the sound is output from...

Operating Instructions
Page 26
... the DVD player or DVD recorder, set "A. Refer to the operating instructions supplied with an OPTICAL jack, set the digital audio output setting on the receiver's display.
... the DVD player or DVD recorder, set "A. Refer to the operating instructions supplied with an OPTICAL jack, set the digital audio output setting on the receiver's display.


