
Operating Instructions
Page 3
... to touch the core of time. 14)Refer all servicing to conserve natural resources. 12)Use only with the cart, stand, tripod, bracket, or table specified by the manufacturer, or sold with the instructions, may not comply with the limits for a Class B digital device, pursuant to Part 15 of the FCC Rules. Connect the equipment into the apparatus...
... to touch the core of time. 14)Refer all servicing to conserve natural resources. 12)Use only with the cart, stand, tripod, bracket, or table specified by the manufacturer, or sold with the instructions, may not comply with the limits for a Class B digital device, pursuant to Part 15 of the FCC Rules. Connect the equipment into the apparatus...

Operating Instructions
Page 6
... TV sound from the speakers connected to the receiver (System Audio Control 49 Turning off the receiver with the TV (System Power Off 50 Enjoying movies with the optimum sound field (Theater/Theatre Mode Sync)........ 51 Enjoying the TV sound via an HDMI cable (Audio Return Channel 51 Advanced Operations Switching between digital and analog audio (INPUT MODE 52 Enjoying the sound from other inputs......... 53 Enjoying sound/images from the components connected to the DIGITAL MEDIA PORT 55 Using the setting menu 55...
... TV sound from the speakers connected to the receiver (System Audio Control 49 Turning off the receiver with the TV (System Power Off 50 Enjoying movies with the optimum sound field (Theater/Theatre Mode Sync)........ 51 Enjoying the TV sound via an HDMI cable (Audio Return Channel 51 Advanced Operations Switching between digital and analog audio (INPUT MODE 52 Enjoying the sound from other inputs......... 53 Enjoying sound/images from the components connected to the DIGITAL MEDIA PORT 55 Using the setting menu 55...
Operating Instructions
Page 14
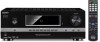
... TV screen when the color buttons are available. answers to select the function you press AV ?/1 (A) and ?/1 (B) simultaneously, the receiver and connected components will turn off (SYSTEM STANDBY). T TV VOL +/- (RM-AAU071 only) (RM-AAU074 only) Adjust the volume. P SOUND FIELD +a)/- a)The following buttons have tactile dots: - Follow the operation guide to the previous menu. Selects preset stations. U RETURN/EXIT O Returns to perform a selected operation. D Numeric buttons (number 5a)) Selects the TV channels. In text mode...
... TV screen when the color buttons are available. answers to select the function you press AV ?/1 (A) and ?/1 (B) simultaneously, the receiver and connected components will turn off (SYSTEM STANDBY). T TV VOL +/- (RM-AAU071 only) (RM-AAU074 only) Adjust the volume. P SOUND FIELD +a)/- a)The following buttons have tactile dots: - Follow the operation guide to the previous menu. Selects preset stations. U RETURN/EXIT O Returns to perform a selected operation. D Numeric buttons (number 5a)) Selects the TV channels. In text mode...
Operating Instructions
Page 16
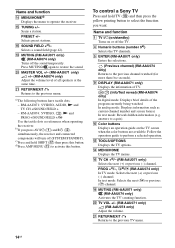
...VIDEO, AUDIO, N and TV CH +/SOUND FIELD + - f) This button is intended to the operating instructions supplied with the DIGITAL MEDIA PORT adapter. To control other Sony components Name A AV ?/1b) D Numeric buttonsc) (number 5a)) E ENTERc) H ANGLEd) e) I DISPLAY J Color buttons L V/v/B/b M TOOLS/OPTIONS N MENU/HOME O m/Mf) Na)f) ./>f) Xf) xf) U RETURN/EXIT O V GUIDEd) e) W AUDIOa)d) e) X SUBTITLEd) e) Y TOP MENU POP UP/MENU Z CLEARc) Blu-ray disc, DVD player Power Track Enter Select angle Satellite tuner, Cable TV tuner Power Channel VCR Power Channel Enterd) - On-screen guide...
...VIDEO, AUDIO, N and TV CH +/SOUND FIELD + - f) This button is intended to the operating instructions supplied with the DIGITAL MEDIA PORT adapter. To control other Sony components Name A AV ?/1b) D Numeric buttonsc) (number 5a)) E ENTERc) H ANGLEd) e) I DISPLAY J Color buttons L V/v/B/b M TOOLS/OPTIONS N MENU/HOME O m/Mf) Na)f) ./>f) Xf) xf) U RETURN/EXIT O V GUIDEd) e) W AUDIOa)d) e) X SUBTITLEd) e) Y TOP MENU POP UP/MENU Z CLEARc) Blu-ray disc, DVD player Power Track Enter Select angle Satellite tuner, Cable TV tuner Power Channel VCR Power Channel Enterd) - On-screen guide...

Operating Instructions
Page 24
... control your DVD player/recorder. Notes • The initial setting for the audio connection of the DVD input button on the receiver's display. DVD player, DVD recorder Audio/video signals Blu-ray disc player, "PlayStation 3" Audio/video signals Satellite tuner, Cable TV tuner Audio/video signals A A A IN TV OPTICAL SAT/ CATV IN OPTICAL DVD IN COAXIAL DIGITAL (ASSIGNABLE) AM ANTENNA Y DVD IN BD IN HDMI SAT/CATV IN PB/ CB VIDEO IN PR/ CR SAT/CATV IN DVD IN MONITOR OUT COMPONENT VIDEO AUDIO IN AUDIO IN AUDIO IN L VIDEO IN DVD VIDEO OUT AUDIO OUT VIDEO IN VIDEO...
... control your DVD player/recorder. Notes • The initial setting for the audio connection of the DVD input button on the receiver's display. DVD player, DVD recorder Audio/video signals Blu-ray disc player, "PlayStation 3" Audio/video signals Satellite tuner, Cable TV tuner Audio/video signals A A A IN TV OPTICAL SAT/ CATV IN OPTICAL DVD IN COAXIAL DIGITAL (ASSIGNABLE) AM ANTENNA Y DVD IN BD IN HDMI SAT/CATV IN PB/ CB VIDEO IN PR/ CR SAT/CATV IN DVD IN MONITOR OUT COMPONENT VIDEO AUDIO IN AUDIO IN AUDIO IN L VIDEO IN DVD VIDEO OUT AUDIO OUT VIDEO IN VIDEO...

Operating Instructions
Page 25
... specification of the connected component. • The image resolution of player may not be output from the TV speaker. • Be sure to turn on connecting cables • Use a High Speed HDMI cable. Connect other audio jacks. • Video signals input to the operating instructions of the player. • Not every HDMI component supports all functions that are defined by the connected component. If you cannot play back multi channel software, set to off. • DSD signals of Super Audio CD are not input...
... specification of the connected component. • The image resolution of player may not be output from the TV speaker. • Be sure to turn on connecting cables • Use a High Speed HDMI cable. Connect other audio jacks. • Video signals input to the operating instructions of the player. • Not every HDMI component supports all functions that are defined by the connected component. If you cannot play back multi channel software, set to off. • DSD signals of Super Audio CD are not input...
Operating Instructions
Page 30
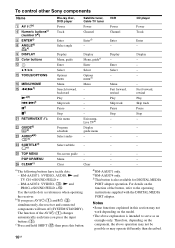
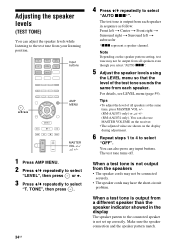
However, you can also be used to return settings you have made to their initial settings. For details, see "Adjusting the speaker levels (TEST TONE)" (page 34). After "CLEARING" appears on the receiver for this jack. • turn off the muting function. • disconnect the headphones. • remove any obstacles in your room. Calibrating the appropriate speaker settings automatically (AUTO CALIBRATION) (Models of noise and get a more...
However, you can also be used to return settings you have made to their initial settings. For details, see "Adjusting the speaker levels (TEST TONE)" (page 34). After "CLEARING" appears on the receiver for this jack. • turn off the muting function. • disconnect the headphones. • remove any obstacles in your room. Calibrating the appropriate speaker settings automatically (AUTO CALIBRATION) (Models of noise and get a more...
Operating Instructions
Page 32
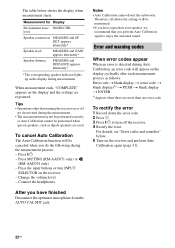
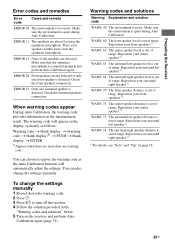
... error code. 2 Press . 3 Press ?/1 to enjoy the surround sound. Notes • Auto Calibration cannot detect the subwoofer. Error and warning codes When error codes appear When an error is detected during measurement. Press ?/1 - Change the volume level. - Connect the headphones. Measurement for Display Environment noise NOISE.CHK level Speaker connection MEASURE and SP DET. To cancel Auto Calibration The Auto Calibration function will appear on or off the receiver. 4 Rectify the error. appears alternately* Speaker level...
... error code. 2 Press . 3 Press ?/1 to enjoy the surround sound. Notes • Auto Calibration cannot detect the subwoofer. Error and warning codes When error codes appear When an error is detected during measurement. Press ?/1 - Change the volume level. - Connect the headphones. Measurement for Display Environment noise NOISE.CHK level Speaker connection MEASURE and SP DET. To cancel Auto Calibration The Auto Calibration function will appear on or off the receiver. 4 Rectify the error. appears alternately* Speaker level...
Operating Instructions
Page 33
... connected properly and perform Auto Calibration again. ERROR 12 None of range. Make sure that the optimizer microphone is quiet during Auto Calibration. You can also change the settings manually 1 Record down the warning code. 2 Press . 3 Press ?/1 to ignore the warning code as follows: Warning code t blank display t (warning code t blank display)b) t PUSH t blank display t ENTER b)Appears when there are detected. Reposition your center speaker.c) WARN. 63 The surround...
... connected properly and perform Auto Calibration again. ERROR 12 None of range. Make sure that the optimizer microphone is quiet during Auto Calibration. You can also change the settings manually 1 Record down the warning code. 2 Press . 3 Press ?/1 to ignore the warning code as follows: Warning code t blank display t (warning code t blank display)b) t PUSH t blank display t ENTER b)Appears when there are detected. Reposition your center speaker.c) WARN. 63 The surround...
Operating Instructions
Page 34
...-circuit problem. You can also use MASTER VOLUME on the receiver. • The adjusted value are shown on the speaker pattern setting, test tone may not be connected securely. • The speaker cords may not be output from all speakers at the same time, press MASTER VOL +/- (RM-AAU071 only) or 2 +/- (RM-AAU074 only). You can also press any input buttons. The test tone turns off. The test tone is output from a different speaker than the speaker...
...-circuit problem. You can also use MASTER VOLUME on the receiver. • The adjusted value are shown on the speaker pattern setting, test tone may not be connected securely. • The speaker cords may not be output from all speakers at the same time, press MASTER VOL +/- (RM-AAU071 only) or 2 +/- (RM-AAU074 only). You can also press any input buttons. The test tone turns off. The test tone is output from a different speaker than the speaker...
Operating Instructions
Page 35
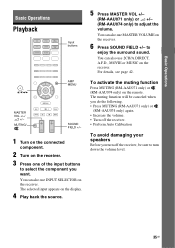
... only) on the display. 4 Play back the source. 5 Press MASTER VOL +/- (RM-AAU071 only) or 2 +/- (RM-AAU074 only) to turn down the volume level. 35GB You can also use INPUT SELECTOR on the receiver. 3 Press one of the input buttons to enjoy the surround sound. MUTING/ O MENU m M .X x> AMP MENU SOUND FIELD +/- 1 Turn on the connected component. 2 Turn on the receiver. Basic Operations Basic Operations Playback BD DVD TV VIDEO DMPORT TUNER SAT/ CATV SA-CD/ CD Input buttons , V/v/B/b MASTER VOL +/-/ 2 +/- For...
... only) on the display. 4 Play back the source. 5 Press MASTER VOL +/- (RM-AAU071 only) or 2 +/- (RM-AAU074 only) to turn down the volume level. 35GB You can also use INPUT SELECTOR on the receiver. 3 Press one of the input buttons to enjoy the surround sound. MUTING/ O MENU m M .X x> AMP MENU SOUND FIELD +/- 1 Turn on the connected component. 2 Turn on the receiver. Basic Operations Basic Operations Playback BD DVD TV VIDEO DMPORT TUNER SAT/ CATV SA-CD/ CD Input buttons , V/v/B/b MASTER VOL +/-/ 2 +/- For...
Operating Instructions
Page 49
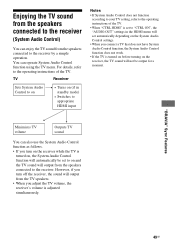
....HDMI" is set to "CTRL ON", the "AUDIO.OUT" settings in the HDMI menu will set to on (if in standby mode) • Switches to appropriate HDMI input Notes • If System Audio Control does not function according to your TV setting, refer to the receiver by a simple operation. You can operate System Audio Control function using the TV menu. TV Receiver Sets System Audio Control to on • Turns on and the TV sound will output from the speakers connected to the operating instructions...
....HDMI" is set to "CTRL ON", the "AUDIO.OUT" settings in the HDMI menu will set to on (if in standby mode) • Switches to appropriate HDMI input Notes • If System Audio Control does not function according to your TV setting, refer to the receiver by a simple operation. You can operate System Audio Control function using the TV menu. TV Receiver Sets System Audio Control to on • Turns on and the TV sound will output from the speakers connected to the operating instructions...

Operating Instructions
Page 63
... the time gap between audio output and visual display. • SYNC ON (Delay time: 60 ms) The audio output is delayed so that the time gap between DTS, Dolby Digital, or PCM. • DEC. AUTO". Notes • Even when "DEC. PRIO" to "DEC. ASSIGN Lets you set "DEC. AUDIO menu You can set to "DEC. x DEC. PCM When signals from the connected player. AUTO". Advanced Operations continued 63GB buttons. • This function does not work in any other input source. the multi channel Linear PCM signals...
... the time gap between audio output and visual display. • SYNC ON (Delay time: 60 ms) The audio output is delayed so that the time gap between DTS, Dolby Digital, or PCM. • DEC. AUTO". Notes • Even when "DEC. PRIO" to "DEC. ASSIGN Lets you set "DEC. AUDIO menu You can set to "DEC. x DEC. PCM When signals from the connected player. AUTO". Advanced Operations continued 63GB buttons. • This function does not work in any other input source. the multi channel Linear PCM signals...

Operating Instructions
Page 64
... stereo speakers, the sound output from TV's speaker and the speakers connected to retain a theater-like environment at low volume levels (NIGHT MODE)" (page 46). • NIGHT.OFF • NIGHT. x CTRL.HDMI Lets you use a TV that of channels, and the sampling frequency, etc. In this setting if you turn the Control for HDMI settings. For details, see ""BRAVIA" Sync Features" (page 47). Sony recommends this case, select "AMP". 64GB This setting saves power in the standby mode, the receiver outputs HDMI signals...
... stereo speakers, the sound output from TV's speaker and the speakers connected to retain a theater-like environment at low volume levels (NIGHT MODE)" (page 46). • NIGHT.OFF • NIGHT. x CTRL.HDMI Lets you use a TV that of channels, and the sampling frequency, etc. In this setting if you turn the Control for HDMI settings. For details, see ""BRAVIA" Sync Features" (page 47). Sony recommends this case, select "AMP". 64GB This setting saves power in the standby mode, the receiver outputs HDMI signals...

Operating Instructions
Page 65
... menu You can set the low pass filter of the subwoofer when multi channel Linear PCM signals are detected. Notes • This function does not work when TUNER input is no signals input to the receiver. • STBY ON Switches to standby mode after 30 minutes when you use the auto standby mode and the Sleep Timer at the specific time. Note This parameter is not available when "CTRL.HDMI" is set the name of the display...
... menu You can set the low pass filter of the subwoofer when multi channel Linear PCM signals are detected. Notes • This function does not work when TUNER input is no signals input to the receiver. • STBY ON Switches to standby mode after 30 minutes when you use the auto standby mode and the Sleep Timer at the specific time. Note This parameter is not available when "CTRL.HDMI" is set the name of the display...

Operating Instructions
Page 66
... use the DVD button to control the Blu-ray disc player. Categories and the corresponding buttons for BD, DVD, SAT/CATV, VIDEO and SA-CD/CD Categories Press Blu-ray disc player 1 (command mode BD1)a) Blu-ray disc recorder 2 (command mode BD3)a) DVD player 3 (command mode DVD1) DVD recorder 4 (command mode DVD3)b) VCR (command mode VTR3)c) 5 CD player 6 DSS (Digital Satellite Receiver)d)/ 7 Euro Digital Satellite Receivere) a)For details on this remote to control the Blu-ray disc player. b)Sony DVD...
... use the DVD button to control the Blu-ray disc player. Categories and the corresponding buttons for BD, DVD, SAT/CATV, VIDEO and SA-CD/CD Categories Press Blu-ray disc player 1 (command mode BD1)a) Blu-ray disc recorder 2 (command mode BD3)a) DVD player 3 (command mode DVD1) DVD recorder 4 (command mode DVD3)b) VCR (command mode VTR3)c) 5 CD player 6 DSS (Digital Satellite Receiver)d)/ 7 Euro Digital Satellite Receivere) a)For details on this remote to control the Blu-ray disc player. b)Sony DVD...

Operating Instructions
Page 72
... audio components away from the component connected to the digital input jacks of this receiver. The source image input to the VIDEO IN or COMPONENT VIDEO IN jacks is not output from the TV. • Check that your component is connected to the MONITOR OUT jack (page 20). • Make sure "CTRL.HDMI" is set to the appropriate input mode. • Move your subwoofer. • Depending on the TV screen or monitor. • Select the appropriate input using the input buttons...
... audio components away from the component connected to the digital input jacks of this receiver. The source image input to the VIDEO IN or COMPONENT VIDEO IN jacks is not output from the TV. • Check that your component is connected to the MONITOR OUT jack (page 20). • Make sure "CTRL.HDMI" is set to the appropriate input mode. • Move your subwoofer. • Depending on the TV screen or monitor. • Select the appropriate input using the input buttons...
Operating Instructions
Page 73
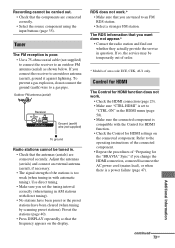
... with the Control for HDMI function. • Check the Control for HDMI function does not work .* • Make sure that the components are connected correctly. • Select the source component using the input buttons (page 35). continued 73GB Additional Information If so, the service may be temporarily out of order. * Models of the stations is set the tuning interval correctly (when tuning in with direct tuning). • No stations have been preset or the preset stations have...
... with the Control for HDMI function. • Check the Control for HDMI function does not work .* • Make sure that the components are connected correctly. • Select the source component using the input buttons (page 35). continued 73GB Additional Information If so, the service may be temporarily out of order. * Models of the stations is set the tuning interval correctly (when tuning in with direct tuning). • No stations have been preset or the preset stations have...

Operating Instructions
Page 74
... turn on the receiver. • Remove any problem persists, consult your nearest Sony dealer. PROTECTOR Irregular current is output to the speakers, or the upper panel of the system by the message. Select appropriate input (BD, DVD, SAT/CATV) when you want to enjoy. • Make sure "PASS.THRU" is set the "AUDIO.OUT" settings in standby mode, image and sound are output from the HDMI component selected the last time you connect components...
... turn on the receiver. • Remove any problem persists, consult your nearest Sony dealer. PROTECTOR Irregular current is output to the speakers, or the upper panel of the system by the message. Select appropriate input (BD, DVD, SAT/CATV) when you want to enjoy. • Make sure "PASS.THRU" is set the "AUDIO.OUT" settings in standby mode, image and sound are output from the HDMI component selected the last time you connect components...

Marketing Specifications
Page 2
...(fixed)-60ms/48kHz Equalizer: BASS and Treble control Sub Woofer Crossover: 17 points (40-200Hz) Bravia® Sync™ : Yes Convenience Preset Memory: 60 (30 FM, 30 AM) AM/FM Memory Presets: 30 AM, 30 FM Auto Tuning: Yes Direct Tuning: Yes (Remote) Sleep Timer: Yes Station Name Display: Yes Inputs and Outputs Digital Media Port: 1 (Rear) HDMI™ Connection Output(s): 1 (Rear) HDMI™ Connection Input(s): 3 (Rear) Optical Audio Input(s): 2 (Rear) Coaxial Audio Digital Input(s): 1 (Rear) HD Component Video Input(s): 2 (Rear - HDMI cable required and sold separately. © 2010 Sony...
...(fixed)-60ms/48kHz Equalizer: BASS and Treble control Sub Woofer Crossover: 17 points (40-200Hz) Bravia® Sync™ : Yes Convenience Preset Memory: 60 (30 FM, 30 AM) AM/FM Memory Presets: 30 AM, 30 FM Auto Tuning: Yes Direct Tuning: Yes (Remote) Sleep Timer: Yes Station Name Display: Yes Inputs and Outputs Digital Media Port: 1 (Rear) HDMI™ Connection Output(s): 1 (Rear) HDMI™ Connection Input(s): 3 (Rear) Optical Audio Input(s): 2 (Rear) Coaxial Audio Digital Input(s): 1 (Rear) HD Component Video Input(s): 2 (Rear - HDMI cable required and sold separately. © 2010 Sony...


