
Operating Instructions
Page 6
... operation (One-Touch Play 48 Enjoying the TV sound from the speakers connected to the receiver (System Audio Control 49 Turning off the receiver with the TV (System Power Off 50 Enjoying movies with the optimum sound field (Theater/Theatre Mode Sync)........ 51 Enjoying the TV sound via an HDMI cable (Audio Return Channel 51...
... operation (One-Touch Play 48 Enjoying the TV sound from the speakers connected to the receiver (System Audio Control 49 Turning off the receiver with the TV (System Power Off 50 Enjoying movies with the optimum sound field (Theater/Theatre Mode Sync)........ 51 Enjoying the TV sound via an HDMI cable (Audio Return Channel 51...
Operating Instructions
Page 9
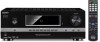
... current input. Indicators on the speaker settings). Indicator and explanation C Input indicators Light up when input mode is set to show how the receiver downmixes or upmixes the source sound (based on the display 1 23 4 SW LFE HDMI DTS LCR COAX OPT SL S SR 5 6 LPCM PL II D ST RDS ....) indicate the channels being played back contains an LFE (Low Frequency Effect) channel and the LFE channel signal is set to AUTO and the receiver recognizes a component connected via an HDMI IN jack (page 23, 52). - COAX Lights up when - This matrix surround decoding technology can enhance...
... current input. Indicators on the speaker settings). Indicator and explanation C Input indicators Light up when input mode is set to show how the receiver downmixes or upmixes the source sound (based on the display 1 23 4 SW LFE HDMI DTS LCR COAX OPT SL S SR 5 6 LPCM PL II D ST RDS ....) indicate the channels being played back contains an LFE (Low Frequency Effect) channel and the LFE channel signal is set to AUTO and the receiver recognizes a component connected via an HDMI IN jack (page 23, 52). - COAX Lights up when - This matrix surround decoding technology can enhance...
Operating Instructions
Page 14
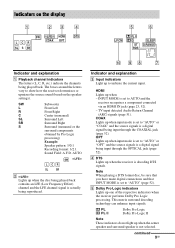
...The following buttons have tactile dots: - b)If you want. To control a Sony TV Press and hold SHIFT (Q) then press this button. answers to the previous TV menu. 14GB RM-AAU074: 5/VIDEO, , N and PROG +/SOUND FIELD +/c Use the tactile dots as current channel number and screen format. ...(R) and then press the yellow printing button to select the function you press AV ?/1 (A) and ?/1 (B) simultaneously, the receiver and connected components will turn off the sound temporarily. Name and function N MENU/HOMEd) Displays the menu to activate this button. S MUTING (RM-AAU071 only) (RM...
...The following buttons have tactile dots: - b)If you want. To control a Sony TV Press and hold SHIFT (Q) then press this button. answers to the previous TV menu. 14GB RM-AAU074: 5/VIDEO, , N and PROG +/SOUND FIELD +/c Use the tactile dots as current channel number and screen format. ...(R) and then press the yellow printing button to select the function you press AV ?/1 (A) and ?/1 (B) simultaneously, the receiver and connected components will turn off the sound temporarily. Name and function N MENU/HOMEd) Displays the menu to activate this button. S MUTING (RM-AAU071 only) (RM...

Operating Instructions
Page 15
... (RM-AAU074 only) Changes to digital mode. RM-AAU071: 5/VIDEO, AUDIO, N and TV CH +/SOUND FIELD + - RM-AAU074: 5/VIDEO, , N and PROG +/SOUND FIELD +/c Use the tactile dots as references when operating the receiver. W AUDIOa) (RM-AAU071 only) a) (RM-AAU074 only) Selects the desired audio signal. wk INPUT...following buttons have tactile dots: - Name and function V GUIDE (RM-AAU071 only) (RM-AAU074 only) Displays the guide when you connect a Sony TV that is compatible with the THEATER/ THEATRE button function (page 51). continued 15GB wj THEATER (RM-AAU071 only) THEATRE (RM-AAU074 only)...
... (RM-AAU074 only) Changes to digital mode. RM-AAU071: 5/VIDEO, AUDIO, N and TV CH +/SOUND FIELD + - RM-AAU074: 5/VIDEO, , N and PROG +/SOUND FIELD +/c Use the tactile dots as references when operating the receiver. W AUDIOa) (RM-AAU071 only) a) (RM-AAU074 only) Selects the desired audio signal. wk INPUT...following buttons have tactile dots: - Name and function V GUIDE (RM-AAU071 only) (RM-AAU074 only) Displays the guide when you connect a Sony TV that is compatible with the THEATER/ THEATRE button function (page 51). continued 15GB wj THEATER (RM-AAU071 only) THEATRE (RM-AAU074 only)...
Operating Instructions
Page 16
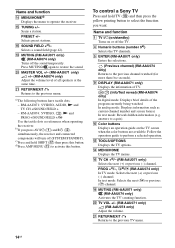
... automatically each time you press AV ?/1 (A) and ?/1 (B) simultaneously, the receiver and connected components will turn off (SYSTEM STANDBY). Menu Fast forward, rewind Play Skip track Pause Stop - - - Display - - - - - To control other Sony components Name A AV ?/1b) D Numeric buttonsc) (number 5a)) E ...track Pause Stop - - - - - - - RM-AAU074: 5/VIDEO, , N and PROG +/SOUND FIELD +/c Use the tactile dots as an example only. RM-AAU071: 5/VIDEO, AUDIO, N and TV CH +/SOUND FIELD + - Notes • Some functions explained in this button. Enter - a)The following buttons ...
... automatically each time you press AV ?/1 (A) and ?/1 (B) simultaneously, the receiver and connected components will turn off (SYSTEM STANDBY). Menu Fast forward, rewind Play Skip track Pause Stop - - - Display - - - - - To control other Sony components Name A AV ?/1b) D Numeric buttonsc) (number 5a)) E ...track Pause Stop - - - - - - - RM-AAU074: 5/VIDEO, , N and PROG +/SOUND FIELD +/c Use the tactile dots as an example only. RM-AAU071: 5/VIDEO, AUDIO, N and TV CH +/SOUND FIELD + - Notes • Some functions explained in this button. Enter - a)The following buttons ...
Operating Instructions
Page 17
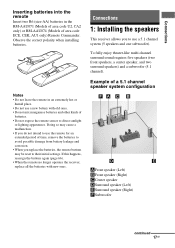
...• If you do not intend to use a 5.1 channel system (5 speakers and one subwoofer). To fully enjoy theater-like multi channel surround sound requires five speakers (two front speakers, a center speaker, and two surround speakers) and a subwoofer (5.1 channel). Doing so may be reset to... their initial settings. Observe the correct polarity when installing batteries. Connections 1: Installing the speakers This receiver allows you to use the remote for an extended period of area code ECE, CEK, AU1 only) Remote Commander. Connections Inserting batteries...
...• If you do not intend to use a 5.1 channel system (5 speakers and one subwoofer). To fully enjoy theater-like multi channel surround sound requires five speakers (two front speakers, a center speaker, and two surround speakers) and a subwoofer (5.1 channel). Doing so may be reset to... their initial settings. Observe the correct polarity when installing batteries. Connections 1: Installing the speakers This receiver allows you to use the remote for an extended period of area code ECE, CEK, AU1 only) Remote Commander. Connections Inserting batteries...

Operating Instructions
Page 20
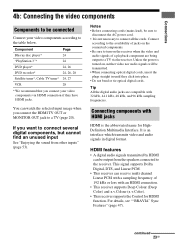
... Video cord (not supplied) E HDMI cable (not supplied) We recommend that you use a Sony HDMI cable. Recommended connection Alternative connection a)To enjoy TV multi channel surround sound broadcasting from the speakers connected to the receiver via HDMI TV OUT connection. In this case, set "ARC" to turn off the TV's ...volume or activate the TV's muting function. b)If your TV is compatible with the Audio Return Channel (ARC) function, the TV sound will output from the speakers...
... Video cord (not supplied) E HDMI cable (not supplied) We recommend that you use a Sony HDMI cable. Recommended connection Alternative connection a)To enjoy TV multi channel surround sound broadcasting from the speakers connected to the receiver via HDMI TV OUT connection. In this case, set "ARC" to turn off the TV's ...volume or activate the TV's muting function. b)If your TV is compatible with the Audio Return Channel (ARC) function, the TV sound will output from the speakers...
Operating Instructions
Page 23
.... For details, see ""BRAVIA" Sync Features" (page 47). This signal supports Dolby Digital, DTS, and Linear PCM. • This receiver can receive multi channel Linear PCM with a sampling frequency of a playback component are compatible with HDMI jacks HDMI is not necessary to connect several digital components..., but cannot find an unused input See "Enjoying the sound from the speakers connected to a TV (page 20). It is turned on the receiver when the video and audio signals of 192 kHz or less with an HDMI connection. •...
.... For details, see ""BRAVIA" Sync Features" (page 47). This signal supports Dolby Digital, DTS, and Linear PCM. • This receiver can receive multi channel Linear PCM with a sampling frequency of a playback component are compatible with HDMI jacks HDMI is not necessary to connect several digital components..., but cannot find an unused input See "Enjoying the sound from the speakers connected to a TV (page 20). It is turned on the receiver when the video and audio signals of 192 kHz or less with an HDMI connection. •...

Operating Instructions
Page 25
... OUT jacks. • When you want to listen to the sound from the TV speaker, set "A. If you use an HDMI authorized cable or Sony HDMI cable. • We do not recommend using an HDMI-DVI...other audio jacks. • Video signals input to "TV+AMP" in AUDIO menu (page 63) when the sound is not output from the TV speaker. • Be sure to "AMP". For example, components that you set...component. Check the setup of the connected component if the image is set to turn on the receiver when video and audio signals of each connected component for details. 25GB If you can only be...
... OUT jacks. • When you want to listen to the sound from the TV speaker, set "A. If you use an HDMI authorized cable or Sony HDMI cable. • We do not recommend using an HDMI-DVI...other audio jacks. • Video signals input to "TV+AMP" in AUDIO menu (page 63) when the sound is not output from the TV speaker. • Be sure to "AMP". For example, components that you set...component. Check the setup of the connected component if the image is set to turn on the receiver when video and audio signals of each connected component for details. 25GB If you can only be...
Operating Instructions
Page 30
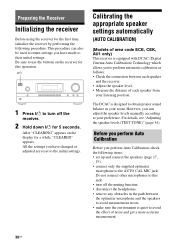
...disconnect the headphones. • remove any obstacles in your listening position. Before you perform Auto Calibration Before you to obtain proper sound balance in the path between the optimizer microphone and the speakers to avoid measurement errors. • make sure the environment is ...get a more accurate measurement. 30GB For details, see "Adjusting the speaker levels (TEST TONE)" (page 34). Preparing the Receiver Initializing the receiver Before using the receiver for a while, "CLEARED" appears. The DCAC is quiet to the AUTO CAL MIC jack. However, you have changed ...
...disconnect the headphones. • remove any obstacles in your listening position. Before you perform Auto Calibration Before you to obtain proper sound balance in the path between the optimizer microphone and the speakers to avoid measurement errors. • make sure the environment is ...get a more accurate measurement. 30GB For details, see "Adjusting the speaker levels (TEST TONE)" (page 34). Preparing the Receiver Initializing the receiver Before using the receiver for a while, "CLEARED" appears. The DCAC is quiet to the AUTO CAL MIC jack. However, you have changed ...

Operating Instructions
Page 31
... presence of children or to the AUTO CAL MIC jack. 2 Set up the optimizer microphone. Use a stool or tripod so that comes out of the sound cannot be adjusted. Measurement starts in 5 seconds. Preparing the Receiver Note During the calibration, the sound that the optimizer microphone remains at your listening position. continued 31GB
... presence of children or to the AUTO CAL MIC jack. 2 Set up the optimizer microphone. Use a stool or tripod so that comes out of the sound cannot be adjusted. Measurement starts in 5 seconds. Preparing the Receiver Note During the calibration, the sound that the optimizer microphone remains at your listening position. continued 31GB
Operating Instructions
Page 32
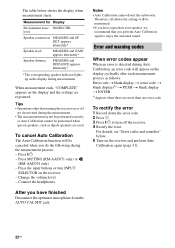
... the error 1 Record down the error code. 2 Press . 3 Press ?/1 to enjoy the surround sound. When measurement ends, "COMPLETE" appears on or off the receiver. 4 Rectify the error. After you perform Auto Calibration again to turn INPUT SELECTOR on the receiver. - Error and warning codes When error codes appear When an error is detected...
... the error 1 Record down the error code. 2 Press . 3 Press ?/1 to enjoy the surround sound. When measurement ends, "COMPLETE" appears on or off the receiver. 4 Rectify the error. After you perform Auto Calibration again to turn INPUT SELECTOR on the receiver. - Error and warning codes When error codes appear When an error is detected...
Operating Instructions
Page 34
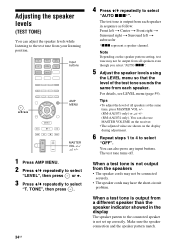
... speakers even though you select "AUTO xxx". 5 Adjust the speaker levels using the LEVEL menu so that the level of the test tone sounds the same from each speaker in the display The speaker pattern to the test tone from each speaker. Note Depending on the display during adjustment...from your listening position. Adjusting the speaker levels (TEST TONE) You can also press any input buttons. You can also use MASTER VOLUME on the receiver. • The adjusted value are shown on the speaker pattern setting, test tone may not be connected securely. • The speaker cords may ...
... speakers even though you select "AUTO xxx". 5 Adjust the speaker levels using the LEVEL menu so that the level of the test tone sounds the same from each speaker in the display The speaker pattern to the test tone from each speaker. Note Depending on the display during adjustment...from your listening position. Adjusting the speaker levels (TEST TONE) You can also press any input buttons. You can also use MASTER VOLUME on the receiver. • The adjusted value are shown on the speaker pattern setting, test tone may not be connected securely. • The speaker cords may ...
Operating Instructions
Page 35
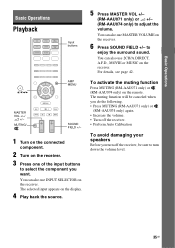
... 4 Play back the source. 5 Press MASTER VOL +/- (RM-AAU071 only) or 2 +/- (RM-AAU074 only) to enjoy the surround sound. The selected input appears on the receiver. 6 Press SOUND FIELD +/- To activate the muting function Press MUTING (RM-AAU071 only) or (RM-AAU074 only) on the...RM-AAU074 only) again. • Increase the volume. • Turn off the receiver. • Perform Auto Calibration To avoid damaging your speakers Before you want. to adjust the volume. MUTING/ O MENU m M .X x> AMP MENU SOUND FIELD +/- 1 Turn on the connected component. 2 Turn on the remote. The ...
... 4 Play back the source. 5 Press MASTER VOL +/- (RM-AAU071 only) or 2 +/- (RM-AAU074 only) to enjoy the surround sound. The selected input appears on the receiver. 6 Press SOUND FIELD +/- To activate the muting function Press MUTING (RM-AAU071 only) or (RM-AAU074 only) on the...RM-AAU074 only) again. • Increase the volume. • Turn off the receiver. • Perform Auto Calibration To avoid damaging your speakers Before you want. to adjust the volume. MUTING/ O MENU m M .X x> AMP MENU SOUND FIELD +/- 1 Turn on the connected component. 2 Turn on the remote. The ...

Operating Instructions
Page 36
... information on the display. Note Character or marks may not be displayed for . The cursor flashes and you have been entered, or it on the receiver. 2 Press AMP MENU. 3 Press V/v repeatedly to select "SYSTEM", then press or b. 4 Press V/v repeatedly to select "NAME IN", then press ...nameb) or preset station namea) t Frequency t Program Type indicationb) t Radio Text indicationb) t Current Time indication (in 24-hour system mode)b) t Sound field currently applied t Volume level a)Index name appears only when you can select a character. 5 Press V/v to select a character, then press B/b to...
... information on the display. Note Character or marks may not be displayed for . The cursor flashes and you have been entered, or it on the receiver. 2 Press AMP MENU. 3 Press V/v repeatedly to select "SYSTEM", then press or b. 4 Press V/v repeatedly to select "NAME IN", then press ...nameb) or preset station namea) t Frequency t Program Type indicationb) t Radio Text indicationb) t Current Time indication (in 24-hour system mode)b) t Sound field currently applied t Volume level a)Index name appears only when you can select a character. 5 Press V/v to select a character, then press B/b to...
Operating Instructions
Page 37
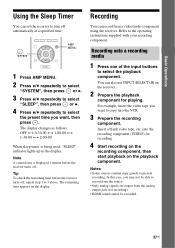
.... Recording onto a recording media 1 Press one of the input buttons to the operating instructions supplied with your recording component. You can set the receiver to turn off , repeat step 1 to copy into the recording component (VIDEO) for recording. 4 Start recording on the recording component, then... 37GB In this case, you want , then press . Recording You can record from the analog output jack (for recording). • HDMI sound cannot be able to prevent recording. into the VCR. 3 Prepare the recording component. Basic Operations Using the Sleep Timer You can also use ...
.... Recording onto a recording media 1 Press one of the input buttons to the operating instructions supplied with your recording component. You can set the receiver to turn off , repeat step 1 to copy into the recording component (VIDEO) for recording. 4 Start recording on the recording component, then... 37GB In this case, you want , then press . Recording You can record from the analog output jack (for recording). • HDMI sound cannot be able to prevent recording. into the VCR. 3 Prepare the recording component. Basic Operations Using the Sleep Timer You can also use ...

Operating Instructions
Page 38
...differs depending on the display, select monaural audio so that the sound will be changed (page 39). to scan from low to high; In case of poor FM stereo reception If the FM stereo reception is received. Area code U2, CA2 ECE, CEK, AU1 FM 100 kHz...press TUNING - TUNING , V/v/B/b TUNING +/- O MENU m M .X x> AMP MENU Tuning into a station automatically (Automatic Tuning) 1 Press TUNER repeatedly to the receiver (page 29). The receiver stops scanning whenever a station is poor and "ST" flashes on the area code as shown in tuner. TUNER BD DVD TV VIDEO DMPORT TUNER...
...differs depending on the display, select monaural audio so that the sound will be changed (page 39). to scan from low to high; In case of poor FM stereo reception If the FM stereo reception is received. Area code U2, CA2 ECE, CEK, AU1 FM 100 kHz...press TUNING - TUNING , V/v/B/b TUNING +/- O MENU m M .X x> AMP MENU Tuning into a station automatically (Automatic Tuning) 1 Press TUNER repeatedly to the receiver (page 29). The receiver stops scanning whenever a station is poor and "ST" flashes on the area code as shown in tuner. TUNER BD DVD TV VIDEO DMPORT TUNER...

Operating Instructions
Page 42
... regular program signal. Tip When a program service name is weak. Enjoying Surround Sound Selecting the sound field This receiver can select one of the optimized sound fields from the receiver's preprogrammed sound fields. .X x> SOUND FIELD +/- You can also press 2CH/A.DIRECT, A.F.D., MOVIE or MUSIC on the...Not all FM stations provide RDS service, nor do they provide the same type of services. Receiving RDS broadcasts Simply select a station on the receiver. 2 channel sound mode You can check the frequency by pressing DISPLAY repeatedly (page 36). If you are downmixed ...
... regular program signal. Tip When a program service name is weak. Enjoying Surround Sound Selecting the sound field This receiver can select one of the optimized sound fields from the receiver's preprogrammed sound fields. .X x> SOUND FIELD +/- You can also press 2CH/A.DIRECT, A.F.D., MOVIE or MUSIC on the...Not all FM stations provide RDS service, nor do they provide the same type of services. Receiving RDS broadcasts Simply select a station on the receiver. 2 channel sound mode You can check the frequency by pressing DISPLAY repeatedly (page 36). If you are downmixed ...

Operating Instructions
Page 43
... DMPORT as it was recorded/encoded without any adjusment. Music mode You can take advantage of surround sound simply by selecting one of the receiver's preprogrammed sound fields. x JAZZ (Jazz Club) Reproduces the acoustics of the Sony Pictures Entertainment scoring stage. Notes • When headphones are connected, "HP DIR" appears on the speaker settings...
... DMPORT as it was recorded/encoded without any adjusment. Music mode You can take advantage of surround sound simply by selecting one of the receiver's preprogrammed sound fields. x JAZZ (Jazz Club) Reproduces the acoustics of the Sony Pictures Entertainment scoring stage. Notes • When headphones are connected, "HP DIR" appears on the speaker settings...

Operating Instructions
Page 44
... II Music mode decoding. When headphones are connected You can also press 2CH/A.DIRECT repeatedly on the receiver to hear any sound coming directly from the surround speakers. • The sound fields for MP3 and other compressed music. x HP DIR (Headphones Direct) Outputs the analog signals ... processing and multi channel surround formats are downmixed to the subwoofer when there is no sound is selected. • When multi channel Linear PCM signals are set to the receiver. or "A.F.D. To turn off the surround effect for output to 2 channels except LFE signals. x SPORTS (Sports...
... II Music mode decoding. When headphones are connected You can also press 2CH/A.DIRECT repeatedly on the receiver to hear any sound coming directly from the surround speakers. • The sound fields for MP3 and other compressed music. x HP DIR (Headphones Direct) Outputs the analog signals ... processing and multi channel surround formats are downmixed to the subwoofer when there is no sound is selected. • When multi channel Linear PCM signals are set to the receiver. or "A.F.D. To turn off the surround effect for output to 2 channels except LFE signals. x SPORTS (Sports...


