Operating Instructions
Page 4
.... About This Manual • The instructions in this manual describe the controls on the supplied remote. Any difference in operation is shown on the remote. About area codes The area code of the receiver you purchased is clearly indicated in the text, for example, "Models of HDMI Licensing LLC.... instructions in this manual are for model STR-DH500. DTS and DTS Digital Surround are registered trademarks and the DTS logos and Symbol are trademarks of DTS, Inc. © 1996-2008 DTS, Inc. You can also use the controls on the receiver if they have the same or similar names...
.... About This Manual • The instructions in this manual describe the controls on the supplied remote. Any difference in operation is shown on the remote. About area codes The area code of the receiver you purchased is clearly indicated in the text, for example, "Models of HDMI Licensing LLC.... instructions in this manual are for model STR-DH500. DTS and DTS Digital Surround are registered trademarks and the DTS logos and Symbol are trademarks of DTS, Inc. © 1996-2008 DTS, Inc. You can also use the controls on the receiver if they have the same or similar names...
Operating Instructions
Page 5
...4a: Connecting the audio components ........ 16 4b: Connecting the video components ........ 17 5: Connecting the antennas (aerials 22 6: Preparing the receiver and the remote..... 23 7: Adjusting the speaker levels and balance (TEST TONE 24 Playback Selecting a component 25 Listening/Watching a component 27 Amplifier Operations ...MEDIA PORT (DMPORT 49 Changing the display 52 Using the Sleep Timer 52 Recording using the receiver 53 Using the Remote Changing button assignments 53 Additional Information Glossary 54 Precautions 56 Troubleshooting 57 Specifications 61 Index 63 5US
...4a: Connecting the audio components ........ 16 4b: Connecting the video components ........ 17 5: Connecting the antennas (aerials 22 6: Preparing the receiver and the remote..... 23 7: Adjusting the speaker levels and balance (TEST TONE 24 Playback Selecting a component 25 Listening/Watching a component 27 Amplifier Operations ...MEDIA PORT (DMPORT 49 Changing the display 52 Using the Sleep Timer 52 Recording using the receiver 53 Using the Remote Changing button assignments 53 Additional Information Glossary 54 Precautions 56 Troubleshooting 57 Specifications 61 Index 63 5US
Operating Instructions
Page 6
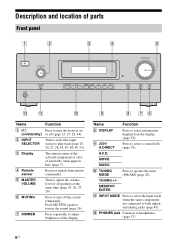
... (page 52). A.F.D. MEMORY/ ENTER K INPUT MODE Press to select the input mode when the same components are connected to restore the sound (page 26). Receives signals from remote commander. Press MUTING again to both digital and analog jacks (page 49). Turn to select a sound field (page 39). Turn to select the input...
... (page 52). A.F.D. MEMORY/ ENTER K INPUT MODE Press to select the input mode when the same components are connected to restore the sound (page 26). Receives signals from remote commander. Press MUTING again to both digital and analog jacks (page 49). Turn to select a sound field (page 39). Turn to select the input...
Operating Instructions
Page 10
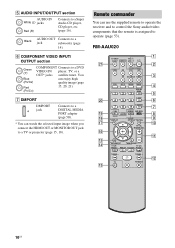
...D.TUNING 789 >10/ - TUNING + m H M TV FM MODE X x 1 2 3 4 5 6 7 8 9 q; You can use the supplied remote to operate the receiver and to control the Sony audio/video components that the remote is assigned to operate (page 53). G DMPORT DMPORT jack Connects to a DIGITAL MEDIA PORT adapter (page 50). * You can...Red (R) Connects to a jack subwoofer (page 14). Black AUDIO OUT Connects to a Super Audio CD player, CD player, etc. (page 16). Remote commander You can enjoy high quality image (page 15, 20, 21). ql qk qj qh qg qf qd TV INPUT TV ?/1 SLEEP DMPORT AV ...
...D.TUNING 789 >10/ - TUNING + m H M TV FM MODE X x 1 2 3 4 5 6 7 8 9 q; You can use the supplied remote to operate the receiver and to control the Sony audio/video components that the remote is assigned to operate (page 53). G DMPORT DMPORT jack Connects to a DIGITAL MEDIA PORT adapter (page 50). * You can...Red (R) Connects to a jack subwoofer (page 14). Black AUDIO OUT Connects to a Super Audio CD player, CD player, etc. (page 16). Remote commander You can enjoy high quality image (page 15, 20, 21). ql qk qj qh qg qf qd TV INPUT TV ?/1 SLEEP DMPORT AV ...
Operating Instructions
Page 11
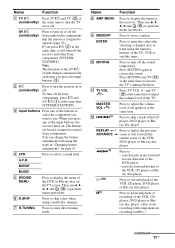
...use. You can change the button assignments following the steps in "Changing button assignments" on or off the sound temporarily. Press to turn the receiver on or off all speakers at the same time to enter direct tuning mode. Press to enter the value after selecting a channel, disc or... ?/1 and TV (M) at (on/standby) the same time to operate (page 53). AV ?/1 (on/standby) Press to turn on or off the Sony audio/video components that the remote is assigned to turn off . Press to restore the sound. Then, use V, v, B, b and (P) to start fast forward/rewind of the TV,...
...use. You can change the button assignments following the steps in "Changing button assignments" on or off the sound temporarily. Press to turn the receiver on or off all speakers at the same time to enter direct tuning mode. Press to enter the value after selecting a channel, disc or... ?/1 and TV (M) at (on/standby) the same time to operate (page 53). AV ?/1 (on/standby) Press to turn on or off the Sony audio/video components that the remote is assigned to turn off . Press to restore the sound. Then, use V, v, B, b and (P) to start fast forward/rewind of the TV,...
Operating Instructions
Page 22
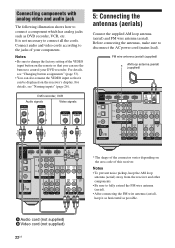
... video cords according to the jacks of the VIDEO input button on the remote so that you can use the button to fully extend the FM wire ...assignments" (page 53). • You can be displayed on the area code of the connector varies depending on the receiver's display. Before connecting the antennas, make sure to connect all the cords. FM wire antenna (aerial) (supplied) AM... MONITOR AUDIO IN AUDIO OUT R SA-CD/CD TV SAT VIDEO SUBWOOFER * The shape of this receiver. Connecting components with analog video and audio jack The following illustration shows how to change the factory setting...
... video cords according to the jacks of the VIDEO input button on the remote so that you can use the button to fully extend the FM wire ...assignments" (page 53). • You can be displayed on the area code of the connector varies depending on the receiver's display. Before connecting the antennas, make sure to connect all the cords. FM wire antenna (aerial) (supplied) AM... MONITOR AUDIO IN AUDIO OUT R SA-CD/CD TV SAT VIDEO SUBWOOFER * The shape of this receiver. Connecting components with analog video and audio jack The following illustration shows how to change the factory setting...
Operating Instructions
Page 23
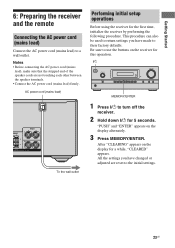
... return settings you have made to a wall outlet. MOVIE MUSIC DISPLAY DIMMER MUTING MEMORY/ENTER 1 Press ?/1 to use the buttons on the receiver for a while, "CLEARED" appears. AC power cord (mains lead) ROUND L FRONT L R AKERS To the wall outlet Performing initial setup operations Before... Connect the AC power cord (mains lead) firmly. After "CLEARING" appears on the display alternately. 3 Press MEMORY/ENTER. Getting Started 6: Preparing the receiver and the remote Connecting the AC power cord (mains lead) Connect the AC power cord (mains lead) to their factory defaults.
... return settings you have made to a wall outlet. MOVIE MUSIC DISPLAY DIMMER MUTING MEMORY/ENTER 1 Press ?/1 to use the buttons on the receiver for a while, "CLEARED" appears. AC power cord (mains lead) ROUND L FRONT L R AKERS To the wall outlet Performing initial setup operations Before... Connect the AC power cord (mains lead) firmly. After "CLEARING" appears on the display alternately. 3 Press MEMORY/ENTER. Getting Started 6: Preparing the receiver and the remote Connecting the AC power cord (mains lead) Connect the AC power cord (mains lead) to their factory defaults.
Operating Instructions
Page 24
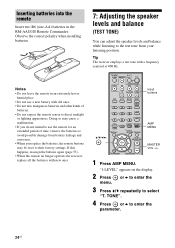
.../HOME Input buttons AMP MENU MASTER VOL +/- 1 Press AMP MENU. If this happens, reassign the buttons again (page 53). • When the remote no longer operates the receiver, replace all the batteries with a frequency centered at 800 Hz. "1-LEVEL" appears on the display. 2 Press menu. Tip The... can adjust the speaker levels and balance while listening to the test tone from battery leakage and corrosion. • When you replace the batteries, the remote buttons may cause a malfunction. • If you do not intend to use a new battery with old ones. • Do not mix manganese...
.../HOME Input buttons AMP MENU MASTER VOL +/- 1 Press AMP MENU. If this happens, reassign the buttons again (page 53). • When the remote no longer operates the receiver, replace all the batteries with a frequency centered at 800 Hz. "1-LEVEL" appears on the display. 2 Press menu. Tip The... can adjust the speaker levels and balance while listening to the test tone from battery leakage and corrosion. • When you replace the batteries, the remote buttons may cause a malfunction. • If you do not intend to use a new battery with old ones. • Do not mix manganese...
Operating Instructions
Page 44
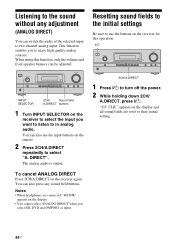
...you select BD, DVD and DMPORT as input. appears on the display and all sound fields are connected, "HP DIR" appears on the receiver again. When using this operation. ?/1 ?/1 INPUT SELECTOR MASTER VOLUME PHONES INPUT MODE TUNING MODE TUNING MEMORY/ 2CH/ ENTER A.DIRECT A.F.D. CLR."... INPUT SELECTOR MASTER VOLUME PHONES INPUT MODE TUNING MODE TUNING MEMORY/ 2CH/ ENTER A.DIRECT A.F.D. You can also use the buttons on the remote. 2 Press 2CH/A.DIRECT repeatedly to select "A. You can also press any adjustment (ANALOG DIRECT) You can switch the audio of the ...
...you select BD, DVD and DMPORT as input. appears on the display and all sound fields are connected, "HP DIR" appears on the receiver again. When using this operation. ?/1 ?/1 INPUT SELECTOR MASTER VOLUME PHONES INPUT MODE TUNING MODE TUNING MEMORY/ 2CH/ ENTER A.DIRECT A.F.D. CLR."... INPUT SELECTOR MASTER VOLUME PHONES INPUT MODE TUNING MODE TUNING MEMORY/ 2CH/ ENTER A.DIRECT A.F.D. You can also use the buttons on the remote. 2 Press 2CH/A.DIRECT repeatedly to select "A. You can also press any adjustment (ANALOG DIRECT) You can switch the audio of the ...
Operating Instructions
Page 49
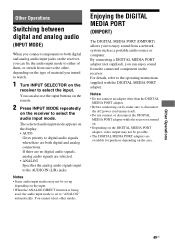
... and analog audio (INPUT MODE) When you connect components to both digital and analog connections. You can also use the input buttons on the remote. 2 Press INPUT MODE repeatedly on the input. • When the ANALOG DIRECT function is being used, the audio input mode is turned on...analog audio signals input to select the input. If there are no digital audio signals, analog audio signals are available for purchase depending on the receiver to the AUDIO IN (L/R) jacks. For details, refer to enjoy sound from a network system such as a portable audio source or computer. ...
... and analog audio (INPUT MODE) When you connect components to both digital and analog connections. You can also use the input buttons on the remote. 2 Press INPUT MODE repeatedly on the input. • When the ANALOG DIRECT function is being used, the audio input mode is turned on...analog audio signals input to select the input. If there are no digital audio signals, analog audio signals are available for purchase depending on the receiver to the AUDIO IN (L/R) jacks. For details, refer to enjoy sound from a network system such as a portable audio source or computer. ...
Operating Instructions
Page 51
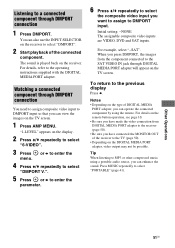
... you press DMPORT, the images from DIGITAL MEDIA PORT adapter to the receiver (page 50). • Be sure you have made the video connection from the component connected to MP3 or other compressed music using the remote. Tip When listening to the SAT VIDEO IN jack through DIGITAL MEDIA ...PORT adapter, video output may not be possible. The sound is played back on the receiver to DMPORT input. "1-LEVEL" appears on the display. 2 Press V/v repeatedly to the TV (page 50). • Depending on the remote button operation, see page 10. • Be sure you can operate the connected ...
... you press DMPORT, the images from DIGITAL MEDIA PORT adapter to the receiver (page 50). • Be sure you have made the video connection from the component connected to MP3 or other compressed music using the remote. Tip When listening to the SAT VIDEO IN jack through DIGITAL MEDIA ...PORT adapter, video output may not be possible. The sound is played back on the receiver to DMPORT input. "1-LEVEL" appears on the display. 2 Press V/v repeatedly to the TV (page 50). • Depending on the remote button operation, see page 10. • Be sure you can operate the connected ...
Operating Instructions
Page 53
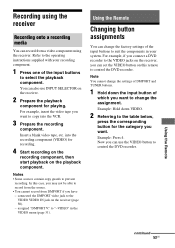
...case, you may not be able to copy into the recording component (VIDEO) for the category you have - Using the Remote continued 53US Recording using the receiver Recording onto a recording media You can change the factory settings of the input buttons to suit the components in the VIDEO ... copy guards to "-VIDEO" in your recording component. 1 Press one of which you can use INPUT SELECTOR on the receiver (page 50). - to prevent recording. Using the Remote Changing button assignments You can record from DMPORT if you want to record from the source. • You cannot record ...
...case, you may not be able to copy into the recording component (VIDEO) for the category you have - Using the Remote continued 53US Recording using the receiver Recording onto a recording media You can change the factory settings of the input buttons to suit the components in the VIDEO ... copy guards to "-VIDEO" in your recording component. 1 Press one of which you can use INPUT SELECTOR on the receiver (page 50). - to prevent recording. Using the Remote Changing button assignments You can record from DMPORT if you want to record from the source. • You cannot record ...
Operating Instructions
Page 54
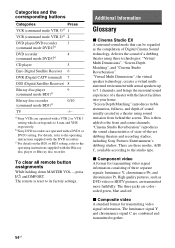
...DVD player/DVD recorder 3 (command mode DVD1)b) DVD recorder 4 (command mode DVD3)b) CD player 5 Euro Digital Satellite Receiver 6 DVR (Digital CATV terminal) 7 DSS (Digital Satellite Receiver) 8 Blu-ray disc player 9 (command mode BD1)c) Blu-ray disc recorder 0/10 (command mode BD3)c) TV ...". The luminance signal Y and chrominance signal C are operated with a DVD1 or DVD3 setting. a)Sony VCRs are combined and transmitted together. 54US To clear all remote button assignments While holding down MASTER VOL -, press ?/1 and DMPORT. "Virtual Multi Dimensions", the ...
...DVD player/DVD recorder 3 (command mode DVD1)b) DVD recorder 4 (command mode DVD3)b) CD player 5 Euro Digital Satellite Receiver 6 DVR (Digital CATV terminal) 7 DSS (Digital Satellite Receiver) 8 Blu-ray disc player 9 (command mode BD1)c) Blu-ray disc recorder 0/10 (command mode BD3)c) TV ...". The luminance signal Y and chrominance signal C are operated with a DVD1 or DVD3 setting. a)Sony VCRs are combined and transmitted together. 54US To clear all remote button assignments While holding down MASTER VOL -, press ?/1 and DMPORT. "Virtual Multi Dimensions", the ...
Operating Instructions
Page 60
... batteries in the path between the remote and the receiver. • Replace all settings on the receiver. If any obstacles in the remote with something. The receiver will automatically turn on the remote. However, note that if service...receiver's memory may be reset to the speakers, or the upper panel of the system by the message. Note that all memorized settings will have to solve the problem. Remote commander The remote does not function. • Point the remote at the remote sensor on the receiver. • Remove any problem persists, consult your nearest Sony...
... batteries in the path between the remote and the receiver. • Replace all settings on the receiver. If any obstacles in the remote with something. The receiver will automatically turn on the remote. However, note that if service...receiver's memory may be reset to the speakers, or the upper panel of the system by the message. Note that all memorized settings will have to solve the problem. Remote commander The remote does not function. • Point the remote at the remote sensor on the receiver. • Remove any problem persists, consult your nearest Sony...
Operating Instructions
Page 62
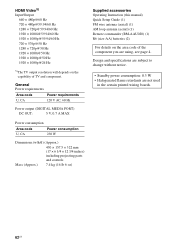
... and controls Mass (Approx.) 7.4 kg (16 lb 6 oz) Supplied accessories Operating Instruction (this manual) Quick Setup Guide (1) FM wire antenna (aerial) (1) AM loop antenna (aerial) (1) Remote commander (RM-AAU020) (1) R6 (size-AA) batteries (2) For details on the capability of the component you are not used in the certain printed wiring boards...
... and controls Mass (Approx.) 7.4 kg (16 lb 6 oz) Supplied accessories Operating Instruction (this manual) Quick Setup Guide (1) FM wire antenna (aerial) (1) AM loop antenna (aerial) (1) Remote commander (RM-AAU020) (1) R6 (size-AA) batteries (2) For details on the capability of the component you are not used in the certain printed wiring boards...
Operating Instructions
Page 63
... SUR 33 SYSTEM 36 TONE 33 TUNER 34 VIDEO 35 Muting 26 N Naming inputs 26 preset stations 48 P PROTECT 60 R Recording onto a recording media 53 Remote commander 10 S Satellite tuner connecting 21 Selecting component 25 sound field 41 Set-top box connecting 21 Sleep Timer 52 Sound fields resetting 44 selecting...
... SUR 33 SYSTEM 36 TONE 33 TUNER 34 VIDEO 35 Muting 26 N Naming inputs 26 preset stations 48 P PROTECT 60 R Recording onto a recording media 53 Remote commander 10 S Satellite tuner connecting 21 Selecting component 25 sound field 41 Set-top box connecting 21 Sleep Timer 52 Sound fields resetting 44 selecting...


