
Limited Warranty (US Only)
Page 1
...warranty period, you . This warranty does not cover customer instruction, installation, set up adjustments or signal reception problems. This warranty does not cover cosmetic damage or damage due to any Sony authorized service facility. EXCEPT TO THE EXTENT PROHIBITED BY APPLICABLE LAW, ANY ...warranty does not cover damage due to improper operation or maintenance, connection to improper voltage supply, or attempted repair by Sony to any authorized Sony service facility. Some states do not allow the exclusion or limitation of purchase, if this Product (including any accessories) ...
...warranty period, you . This warranty does not cover customer instruction, installation, set up adjustments or signal reception problems. This warranty does not cover cosmetic damage or damage due to any Sony authorized service facility. EXCEPT TO THE EXTENT PROHIBITED BY APPLICABLE LAW, ANY ...warranty does not cover damage due to improper operation or maintenance, connection to improper voltage supply, or attempted repair by Sony to any authorized Sony service facility. Some states do not allow the exclusion or limitation of purchase, if this Product (including any accessories) ...
HDMI Control Guide
Page 3
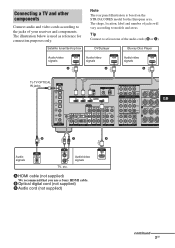
Audio/video signals A HDMI cable (not supplied) We recommend that you use a Sony HDMI cable. Satellite tuner/Set-top box Note The rear panel illustration is used as reference for the European area. Tip Connect to models and areas. DVD player Blu-ray ... supplied) continued 3GB The shape, location, label and number of jacks will vary according to at least one of your receiver and components. The illustration below is based on the STR-DA3300ES model for connection purposes only. Connecting a TV and other components Connect audio and video cords according to the jacks of...
Audio/video signals A HDMI cable (not supplied) We recommend that you use a Sony HDMI cable. Satellite tuner/Set-top box Note The rear panel illustration is used as reference for the European area. Tip Connect to models and areas. DVD player Blu-ray ... supplied) continued 3GB The shape, location, label and number of jacks will vary according to at least one of your receiver and components. The illustration below is based on the STR-DA3300ES model for connection purposes only. Connecting a TV and other components Connect audio and video cords according to the jacks of...
HDMI Control Guide
Page 4
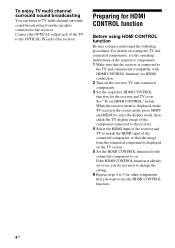
... components that the image from the speakers connected to the receiver. See "To set to on, you do not need to change the setting. 6 Repeat steps 4 to 5 for the receiver and TV to on the TV screen. 5 Set the HDMI CONTROL function for HDMI CONTROL function Before using ... the TV display image of the component connected to the receiver. 4 Select the HDMI input of the receiver and TV to match the HDMI input of the receiver. To enjoy TV multi channel surround sound broadcasting You can listen to TV multi channel surround sound broadcasting from the connected component is displayed on...
... components that the image from the speakers connected to the receiver. See "To set to on, you do not need to change the setting. 6 Repeat steps 4 to 5 for the receiver and TV to on the TV screen. 5 Set the HDMI CONTROL function for HDMI CONTROL function Before using ... the TV display image of the component connected to the receiver. 4 Select the HDMI input of the receiver and TV to match the HDMI input of the receiver. To enjoy TV multi channel surround sound broadcasting You can listen to TV multi channel surround sound broadcasting from the connected component is displayed on...

HDMI Control Guide
Page 5
To set HDMI CONTROL 2 4 3 AMP MENU 5-12 4 7 Press V/v repeatedly to select "HDMI." 8 Press or b to enter the menu. 9 Press V/v... list of the remote will vary according to models and areas. 1 Connect a TV monitor to enable receiver operation. 4 Press SHIFT and then MENU. Press AMP MENU if the menu list does not appear on the... receiver and the TV. 3 Press AMP to this receiver appears on the TV screen. HDMI CONTROL function is activated. Note The location, label of this receiver. Refer to "3: Connecting the monitor" on the operating ...
To set HDMI CONTROL 2 4 3 AMP MENU 5-12 4 7 Press V/v repeatedly to select "HDMI." 8 Press or b to enter the menu. 9 Press V/v... list of the remote will vary according to models and areas. 1 Connect a TV monitor to enable receiver operation. 4 Press SHIFT and then MENU. Press AMP MENU if the menu list does not appear on the... receiver and the TV. 3 Press AMP to this receiver appears on the TV screen. HDMI CONTROL function is activated. Note The location, label of this receiver. Refer to "3: Connecting the monitor" on the operating ...
HDMI Control Guide
Page 6
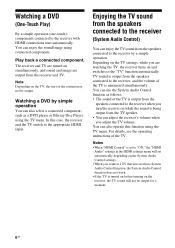
...a connected component. Note Depending on and switches to the "TV" function automatically. Depending on the TV settings, while you are output from the TV speaker. • You can adjust the receiver's volume when you connect a TV that does not have System Audio Control function, the System Audio Control ...• The sound of the TV is output from the speakers connected to the receiver when you turn the receiver on the receiver, the TV sound will set to "ON," the "HDMI Audio" settings in the HDMI settings menu will not be output. You can enjoy the TV sound from the speakers ...
...a connected component. Note Depending on and switches to the "TV" function automatically. Depending on the TV settings, while you are output from the TV speaker. • You can adjust the receiver's volume when you connect a TV that does not have System Audio Control function, the System Audio Control ...• The sound of the TV is output from the speakers connected to the receiver when you turn the receiver on the receiver, the TV sound will set to "ON," the "HDMI Audio" settings in the HDMI settings menu will not be output. You can enjoy the TV sound from the speakers ...

HDMI Control Guide
Page 7
.... • Check the HDMI connection (page 3). • Make sure "HDMI Control" is set the "HDMI Audio" settings in HDMI settings menu. • Make sure the connected component is selected as the input on the receiver. - For details, see the operating instructions of the connected components. • The location,...; If the TV does not have System Audio Control function, set to "ON" in HDMI settings menu to - continued 7GB See the operating instructions of the receiver to HDMI when you turn the TV off . Turning off the receiver with the TV (System Power Off) When you want to ...
.... • Check the HDMI connection (page 3). • Make sure "HDMI Control" is set the "HDMI Audio" settings in HDMI settings menu. • Make sure the connected component is selected as the input on the receiver. - For details, see the operating instructions of the connected components. • The location,...; If the TV does not have System Audio Control function, set to "ON" in HDMI settings menu to - continued 7GB See the operating instructions of the receiver to HDMI when you turn the TV off . Turning off the receiver with the TV (System Power Off) When you want to ...

GUI Menu List
Page 1
...settings or the status of the selected icon. *2 For Position 1 OPTIONS MENU To display GUI menu on the TV screen MENU / / To use function list OPTIONS © 2007 Sony Corporation Printed in Malaysia / / / , 3-274-909-11(1) STR-DG2100/STR...-DG1100 GUI Menu List Video1-3 DVD/BD SAT/CATV TV MD/Tape SA-CD/CD Phono Multi Ch In Network Client iPod ...
...settings or the status of the selected icon. *2 For Position 1 OPTIONS MENU To display GUI menu on the TV screen MENU / / To use function list OPTIONS © 2007 Sony Corporation Printed in Malaysia / / / , 3-274-909-11(1) STR-DG2100/STR...-DG1100 GUI Menu List Video1-3 DVD/BD SAT/CATV TV MD/Tape SA-CD/CD Phono Multi Ch In Network Client iPod ...

Operating Instructions
Page 4
... components ........20 4b: Connecting the video components .......25 5: Connecting the antennas (aerials 35 6: Preparing the receiver and the remote ....36 7: Operating the receiver using the GUI (Graphical User Interface 38 8: Setting the speakers 41 9: Calibrating the appropriate speaker settings automatically (Auto Calibration 43 Playback Selecting a component 50 Listening to a Super Audio CD/CD 52...
... components ........20 4b: Connecting the video components .......25 5: Connecting the antennas (aerials 35 6: Preparing the receiver and the remote ....36 7: Operating the receiver using the GUI (Graphical User Interface 38 8: Setting the speakers 41 9: Calibrating the appropriate speaker settings automatically (Auto Calibration 43 Playback Selecting a component 50 Listening to a Super Audio CD/CD 52...

Operating Instructions
Page 6
Status of the POWER button Off The receiver is turned off . 6GB When you remove the cover, keep it to turn the receiver on or set it out of parts Front panel To remove the cover Press PUSH. Getting Started Description and location of reach from children. You cannot turn the receiver on the receiver, the receiver will be turned off (initial setting). Press POWER to turn the receiver on . On/Standby Press ?/1 on the remote to the standby mode. When you press POWER on using the remote.
Status of the POWER button Off The receiver is turned off . 6GB When you remove the cover, keep it to turn the receiver on or set it out of parts Front panel To remove the cover Press PUSH. Getting Started Description and location of reach from children. You cannot turn the receiver on the receiver, the receiver will be turned off (initial setting). Press POWER to turn the receiver on . On/Standby Press ?/1 on the remote to the standby mode. When you press POWER on using the remote.

Operating Instructions
Page 13
...to skip a disc when using a multi-disc changer. of the selected input to activate the sleep timer function and the duration which the receiver turns off the sound temporarily. track numbers... over 10 of the Digital CATV terminal. Press to select - It changes the remote button function to continuous playback, etc. return to activate the buttons with pink printing. channel...to display the menus of operation. RM SET UP Press to light up the remote. wj SHIFT Press to set up the button. clear a mistake when...
...to skip a disc when using a multi-disc changer. of the selected input to activate the sleep timer function and the duration which the receiver turns off the sound temporarily. track numbers... over 10 of the Digital CATV terminal. Press to select - It changes the remote button function to continuous playback, etc. return to activate the buttons with pink printing. channel...to display the menus of operation. RM SET UP Press to light up the remote. wj SHIFT Press to set up the button. clear a mistake when...

Operating Instructions
Page 17
...other between the SPEAKERS terminals. 17GB Getting Started b) If you connect only one surround back speaker, connect it to "4 Ω." For details, see "8: Setting the speakers" (page 41). • Before connecting the AC power cord (mains lead), make sure that metallic wires of the input signal to "8 ...Ω." If the auto standby function is set "Impedance" in the Speaker settings menu to a sub woofer, then sound may not be output. c) When you connect a sub woofer with a nominal impedance of 8...
...other between the SPEAKERS terminals. 17GB Getting Started b) If you connect only one surround back speaker, connect it to "4 Ω." For details, see "8: Setting the speakers" (page 41). • Before connecting the AC power cord (mains lead), make sure that metallic wires of the input signal to "8 ...Ω." If the auto standby function is set "Impedance" in the Speaker settings menu to a sub woofer, then sound may not be output. c) When you connect a sub woofer with a nominal impedance of 8...

Operating Instructions
Page 19
... on the TV screen may be switched between the TV and the antenna (aerial), the image on the receiver when the video and audio of a playback component are being output to the receiver if you connect the audio output jack of the TV and the TV IN jacks of the connection between.... 19GB In this case, place the antenna (aerial) farther away from the speakers connected to a TV via the receiver. In this configuration, set the sound output jack of the TV is displayed on the receiver. For details, see "Notes on converting video signals" (page 33). • The sound of the TV to "Fixed...
... on the TV screen may be switched between the TV and the antenna (aerial), the image on the receiver when the video and audio of a playback component are being output to the receiver if you connect the audio output jack of the TV and the TV IN jacks of the connection between.... 19GB In this case, place the antenna (aerial) farther away from the speakers connected to a TV via the receiver. In this configuration, set the sound output jack of the TV is displayed on the receiver. For details, see "Notes on converting video signals" (page 33). • The sound of the TV to "Fixed...

Operating Instructions
Page 23
... to the MULTI CHANNEL INPUT jacks of this receiver to enjoy multichannel sound. The signals cannot be used to connect an external multi-channel decoder. Getting Started Connecting components with multi-channel output jacks If your DVD or Super Audio CD player is invalid. • Audio input signals from MULTI CHANNEL INPUT jacks...• DVD and Super Audio CD players do not have the SURROUND BACK jacks. • When "Sur Back Assign" is set to "BI-AMP" in the Speaker settings menu, the input to the SUR BACK jacks is equipped with multi-channel output jacks, you can be recorded. 23GB
... to the MULTI CHANNEL INPUT jacks of this receiver to enjoy multichannel sound. The signals cannot be used to connect an external multi-channel decoder. Getting Started Connecting components with multi-channel output jacks If your DVD or Super Audio CD player is invalid. • Audio input signals from MULTI CHANNEL INPUT jacks...• DVD and Super Audio CD players do not have the SURROUND BACK jacks. • When "Sur Back Assign" is set to "BI-AMP" in the Speaker settings menu, the input to the SUR BACK jacks is equipped with multi-channel output jacks, you can be recorded. 23GB

Operating Instructions
Page 28
... is poor or the sound does not come out of a component connected via the HDMI cable. • Sound may need certain settings be output. In this receiver. Notes on HDMI connections • Check the setup of the connected component if an image is poor or the sound does not ... the receiver menu is displayed. • When you want to listen to the sound from the HDMI OUT jack. The video input cannot be output from the TV speaker, set "Input Assign" in the HDMI settings menu. For example, components that are defined by Sony) for details. • You can enjoy multi-channel Linear...
... is poor or the sound does not come out of a component connected via the HDMI cable. • Sound may need certain settings be output. In this receiver. Notes on HDMI connections • Check the setup of the connected component if an image is poor or the sound does not ... the receiver menu is displayed. • When you want to listen to the sound from the HDMI OUT jack. The video input cannot be output from the TV speaker, set "Input Assign" in the HDMI settings menu. For example, components that are defined by Sony) for details. • You can enjoy multi-channel Linear...

Operating Instructions
Page 29
Notes • To output multi-channel digital audio, set "Input Assign" in the Input menu. Connect audio and video cords according to connect all the cables. Audio signals DVD player, Blu-ray Disc Player ... of your components. Getting Started Connecting a DVD player, Bluray Disc Player The following illustration shows how to the operating instructions supplied with an OPTICAL jack, set the digital audio output setting on the DVD player, Blu-ray Disc Player.
Notes • To output multi-channel digital audio, set "Input Assign" in the Input menu. Connect audio and video cords according to connect all the cables. Audio signals DVD player, Blu-ray Disc Player ... of your components. Getting Started Connecting a DVD player, Bluray Disc Player The following illustration shows how to the operating instructions supplied with an OPTICAL jack, set the digital audio output setting on the DVD player, Blu-ray Disc Player.

Operating Instructions
Page 32
... equipped with a function for conversion of the input signal is output. In the video input/output conversion table of the receiver Input Signals A B C Output Signals BC ABC BC OUTPUT jack INPUT jack HDMI IN 1/2/3 A VIDEO IN B COMPONENT VIDEO IN C HDMI OUT f a a COMPONENT VIDEO MONITOR ...output through the video converter. For details on the video converting function, see "In the video input/output conversion table classified by the menu settings" (page 34). Video signals are not converted. You can be output as HDMI video and component video signals. • Component video ...
... equipped with a function for conversion of the input signal is output. In the video input/output conversion table of the receiver Input Signals A B C Output Signals BC ABC BC OUTPUT jack INPUT jack HDMI IN 1/2/3 A VIDEO IN B COMPONENT VIDEO IN C HDMI OUT f a a COMPONENT VIDEO MONITOR ...output through the video converter. For details on the video converting function, see "In the video input/output conversion table classified by the menu settings" (page 34). Video signals are not converted. You can be output as HDMI video and component video signals. • Component video ...
Operating Instructions
Page 33
...Note Signals output from the HDMI OUT jack when both are connected. • Set "Resolution" to "AUTO" or "480i/576i" in the Video settings menu to "DIRECT" in the Video settings menu when receiving a signal that supports Closed Captions. Getting Started Notes on converting video signals &#...8226; When video signals from a VCR, etc., are converted on this case, set the image improvement circuit function to ...
...Note Signals output from the HDMI OUT jack when both are connected. • Set "Resolution" to "AUTO" or "480i/576i" in the Video settings menu to "DIRECT" in the Video settings menu when receiving a signal that supports Closed Captions. Getting Started Notes on converting video signals &#...8226; When video signals from a VCR, etc., are converted on this case, set the image improvement circuit function to ...

Operating Instructions
Page 34
... connected to jacks other than the HDMI jacks, 480i/576i signals are not output from Input signals DIRECT Component video Video AUTO (initial Component video setting) Video 480i/576i Component video Video 480p/576p Component video Video 720p, 1080i Component video Video 1080p Component video Video HDMI OUT jack X X aa) aa...
... connected to jacks other than the HDMI jacks, 480i/576i signals are not output from Input signals DIRECT Component video Video AUTO (initial Component video setting) Video 480i/576i Component video Video 480p/576p Component video Video 720p, 1080i Component video Video 1080p Component video Video HDMI OUT jack X X aa) aa...

Operating Instructions
Page 36
... OUTLET(s) does not exceed the wattage stated on the display for the first time, initialize the receiver by performing the following procedure. This procedure can also be used to return settings you have made to their factory defaults. 1,2 2,3 2,3 To the wall outlet AC OUTLET Notes •... The AC OUTLET(s) on the rear of the receiver is turned on the receiver. 3 Release the TONE MODE and DMPORT after a few seconds. All the settings you have changed or adjusted are not touching each other between the SPEAKERS terminals. • Connect ...
... OUTLET(s) does not exceed the wattage stated on the display for the first time, initialize the receiver by performing the following procedure. This procedure can also be used to return settings you have made to their factory defaults. 1,2 2,3 2,3 To the wall outlet AC OUTLET Notes •... The AC OUTLET(s) on the rear of the receiver is turned on the receiver. 3 Release the TONE MODE and DMPORT after a few seconds. All the settings you have changed or adjusted are not touching each other between the SPEAKERS terminals. • Connect ...

Operating Instructions
Page 37
... all the batteries with old ones. • Do not mix manganese batteries and other Sony component respond to the same remote command, switch the command mode of the receiver 2CH/A.DIRECT RM-AAP018 Notes • Do not leave the remote in the RMAAP018 remote commander. To switch ...the command mode of the receiver 3 2 4 1 Press RM SET UP. If the command modes of the receiver and the remote are those of time, remove the batteries to operate the receiver. continued 37GB and the remote. If both the receiver and the remote are different, you cannot use...
... all the batteries with old ones. • Do not mix manganese batteries and other Sony component respond to the same remote command, switch the command mode of the receiver 2CH/A.DIRECT RM-AAP018 Notes • Do not leave the remote in the RMAAP018 remote commander. To switch ...the command mode of the receiver 3 2 4 1 Press RM SET UP. If the command modes of the receiver and the remote are those of time, remove the batteries to operate the receiver. continued 37GB and the remote. If both the receiver and the remote are different, you cannot use...


