Operating Instructions (Large File - 11.07 MB)
Page 1
3-289-135-11(1) Multi Channel AV Receiver Operating Instructions STR-DG1200 ©2008 Sony Corporation
3-289-135-11(1) Multi Channel AV Receiver Operating Instructions STR-DG1200 ©2008 Sony Corporation

Operating Instructions (Large File - 11.07 MB)
Page 2
... of sufficient magnitude to constitute a risk of electric shock to Part 15 of the FCC Rules. Increase the separation between the equipment and receiver. - Do not install the appliance in a particular installation. Record the serial number in cabinet. To prevent fire, do not cover the...rain or moisture. Reorient or relocate the receiving antenna. - WARNING To reduce the risk of fire or electric shock, do not place objects filled with newspapers, table-cloths, curtains, etc. Refer to them whenever you call upon your Sony dealer regarding this apparatus to correct the ...
... of sufficient magnitude to constitute a risk of electric shock to Part 15 of the FCC Rules. Increase the separation between the equipment and receiver. - Do not install the appliance in a particular installation. Record the serial number in cabinet. To prevent fire, do not cover the...rain or moisture. Reorient or relocate the receiving antenna. - WARNING To reduce the risk of fire or electric shock, do not place objects filled with newspapers, table-cloths, curtains, etc. Refer to them whenever you call upon your Sony dealer regarding this apparatus to correct the ...
Operating Instructions (Large File - 11.07 MB)
Page 3
...is provided to call CATV system installer's attention to Article 820-40 of the NEC that provides guidelines for model STR-DG1200. You can also use the controls on the receiver if they have the same or similar names as those on the supplied remote. DTS is a registered trademark of...that the cable ground shall be connected to the grounding system of the building, as close to operate this equipment. Dolby, Pro Logic, Surround EX, and the doubleD symbol are trademarks of cable entry as practical. CAUTION You are cautioned that any changes or modification not expressly approved ...
...is provided to call CATV system installer's attention to Article 820-40 of the NEC that provides guidelines for model STR-DG1200. You can also use the controls on the receiver if they have the same or similar names as those on the supplied remote. DTS is a registered trademark of...that the cable ground shall be connected to the grounding system of the building, as close to operate this equipment. Dolby, Pro Logic, Surround EX, and the doubleD symbol are trademarks of cable entry as practical. CAUTION You are cautioned that any changes or modification not expressly approved ...

Operating Instructions (Large File - 11.07 MB)
Page 4
...of their respective owners. and any use to MORISAWA & COMPANY LTD. The font type (Shin Go R) installed in this receiver is provided by Sony Corporation is a trademark of THX Ltd., which may be registered in the U.S. In this product under license. "x.v.Color" ..."x.v.Color" logo are those of their respective holders. "Neural Surround", "Neural Audio", "Neural" and "NRL" are not specified. All other countries. All rights reserved. Other trademarks and trade names are trademarks of Sony Corporation. "M-crew Server" is manufactured under license from Neural Audio...
...of their respective owners. and any use to MORISAWA & COMPANY LTD. The font type (Shin Go R) installed in this receiver is provided by Sony Corporation is a trademark of THX Ltd., which may be registered in the U.S. In this product under license. "x.v.Color" ..."x.v.Color" logo are those of their respective holders. "Neural Surround", "Neural Audio", "Neural" and "NRL" are not specified. All other countries. All rights reserved. Other trademarks and trade names are trademarks of Sony Corporation. "M-crew Server" is manufactured under license from Neural Audio...

Operating Instructions (Large File - 11.07 MB)
Page 5
...the audio components ....... 18 4b: Connecting the video components ....... 23 5: Connecting the antennas 33 6: Preparing the receiver and the remote .... 34 7: Operating the receiver using the GUI (Graphical User Interface 36 8: Setting the speakers 39 9: Calibrating the appropriate speaker settings automatically ... settings menu 54 Settings for the system (System settings menu 55 Enjoying Surround Sound Enjoying a pre-programmed sound field ....56 Resetting sound fields to the initial settings 62 Enjoying the surround effect at low volume levels (NIGHT MODE 63 Advanced Speakers Set Up ...
...the audio components ....... 18 4b: Connecting the video components ....... 23 5: Connecting the antennas 33 6: Preparing the receiver and the remote .... 34 7: Operating the receiver using the GUI (Graphical User Interface 36 8: Setting the speakers 39 9: Calibrating the appropriate speaker settings automatically ... settings menu 54 Settings for the system (System settings menu 55 Enjoying Surround Sound Enjoying a pre-programmed sound field ....56 Resetting sound fields to the initial settings 62 Enjoying the surround effect at low volume levels (NIGHT MODE 63 Advanced Speakers Set Up ...

Operating Instructions (Large File - 11.07 MB)
Page 6
... PORT 89 Naming inputs 92 Switching between digital and analog audio (INPUT MODE 93 Enjoying the sound/images from other inputs 94 Changing the display window 96 Using the sleep timer 100 Recording using the receiver 100 Using a bi-amplifier connection 102 Operating without connecting to the TV 103 Using the Remote...
... PORT 89 Naming inputs 92 Switching between digital and analog audio (INPUT MODE 93 Enjoying the sound/images from other inputs 94 Changing the display window 96 Using the sleep timer 100 Recording using the receiver 100 Using a bi-amplifier connection 102 Operating without connecting to the TV 103 Using the Remote...

Operating Instructions (Large File - 11.07 MB)
Page 7
...On/Standby Press ?/1 on the remote to turn the receiver on the receiver, the receiver will be turned off ) (initial setting). When you remove the cover, keep it out of reach from children. When you press POWER on . Press POWER to - set the receiver to standby mode (the ON/STANDBY lamp lights up ...in red). turn the receiver on (the ON/ STANDBY lamp lights up in green). - Getting Started Getting Started Description and location of the...
...On/Standby Press ?/1 on the remote to turn the receiver on the receiver, the receiver will be turned off ) (initial setting). When you remove the cover, keep it out of reach from children. When you press POWER on . Press POWER to - set the receiver to standby mode (the ON/STANDBY lamp lights up ...in red). turn the receiver on (the ON/ STANDBY lamp lights up in green). - Getting Started Getting Started Description and location of the...

Operating Instructions (Large File - 11.07 MB)
Page 8
... 2CH/A.DIRECT Press to select a sound field (page 57) or to switch the audio of the lamp receiver. N AUTO CAL MIC Connects to headphones. P PHONES jack Connects to the jack supplied optimizer microphone for the front, center and surround/ surround back channels. E Display window The current status ...component IN jacks such as a camcorder or video game. F MULTI CHANNEL DECODING lamp Lights up when a sound Sound lamp field with DCS mark is selected (page 61). G Digital Cinema Lights up when multi channel audio signals are connected to both digital and analog jacks (page 93)....
... 2CH/A.DIRECT Press to select a sound field (page 57) or to switch the audio of the lamp receiver. N AUTO CAL MIC Connects to headphones. P PHONES jack Connects to the jack supplied optimizer microphone for the front, center and surround/ surround back channels. E Display window The current status ...component IN jacks such as a camcorder or video game. F MULTI CHANNEL DECODING lamp Lights up when a sound Sound lamp field with DCS mark is selected (page 61). G Digital Cinema Lights up when multi channel audio signals are connected to both digital and analog jacks (page 93)....

Operating Instructions (Large File - 11.07 MB)
Page 9
... TV, satellite tuner, etc. (page 17, 26, 27, 28). Connects to the jack supplied FM wire antenna (page 33). The COAXIAL jack provides a better sound quality (page 17, 19, 26, 27). B ANTENNA section FM ANTENNA Connects to a SiriusConnect Home tuner (not supplied) (page 73). continued 9US XM jack SIRIUS... XM Mini-Tuner and Home Dock (not supplied) (page 73). HDMI IN/ OUT* jacks Connects to this receiver (page 17, 24). The image is output to a TV or a projector while the sound can be output from a TV or/and speakers connected to a DVD player, Blu-ray disc player, satellite ...
... TV, satellite tuner, etc. (page 17, 26, 27, 28). Connects to the jack supplied FM wire antenna (page 33). The COAXIAL jack provides a better sound quality (page 17, 19, 26, 27). B ANTENNA section FM ANTENNA Connects to a SiriusConnect Home tuner (not supplied) (page 73). continued 9US XM jack SIRIUS... XM Mini-Tuner and Home Dock (not supplied) (page 73). HDMI IN/ OUT* jacks Connects to this receiver (page 17, 24). The image is output to a TV or a projector while the sound can be output from a TV or/and speakers connected to a DVD player, Blu-ray disc player, satellite ...
Operating Instructions (Large File - 11.07 MB)
Page 10
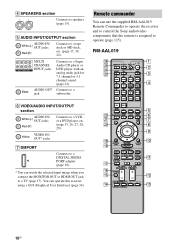
... DVD player, etc. (page 17, 26, 27, 28, 29). Remote commander You can use the supplied RM-AAL019 Remote Commander to operate the receiver and to control the Sony audio/video components that the remote is assigned to a TV (page 17). Yellow VIDEO IN/ OUT* jacks G DMPORT Connects to a DIGITAL MEDIA ... OUT jack to operate (page 115). AUDIO OUT Connects to a Super Audio CD player or DVD player with an analog audio jack for 7.1 channel or 5.1 channel sound (page 21). MULTI CHANNEL INPUT jacks Connects to a Black jack subwoofer. D SPEAKERS section Connects to speakers (page 15).
... DVD player, etc. (page 17, 26, 27, 28, 29). Remote commander You can use the supplied RM-AAL019 Remote Commander to operate the receiver and to control the Sony audio/video components that the remote is assigned to a TV (page 17). Yellow VIDEO IN/ OUT* jacks G DMPORT Connects to a DIGITAL MEDIA ... OUT jack to operate (page 115). AUDIO OUT Connects to a Super Audio CD player or DVD player with an analog audio jack for 7.1 channel or 5.1 channel sound (page 21). MULTI CHANNEL INPUT jacks Connects to a Black jack subwoofer. D SPEAKERS section Connects to speakers (page 15).

Operating Instructions (Large File - 11.07 MB)
Page 11
...(on or off the receiver and other Sony components (SYSTEM STANDBY). The buttons are factory assigned to select the input signal (TV input or video input). Press 0/10 to select a sound field (page 59). clear a mistake when you want to select the TV channels. store a station during ...tuner operation. Press to select track number 10. - preset/tune to control non-Sony components following the steps in standby mode...
...(on or off the receiver and other Sony components (SYSTEM STANDBY). The buttons are factory assigned to select the input signal (TV input or video input). Press 0/10 to select a sound field (page 59). clear a mistake when you want to select the TV channels. store a station during ...tuner operation. Press to select track number 10. - preset/tune to control non-Sony components following the steps in standby mode...
Operating Instructions (Large File - 11.07 MB)
Page 12
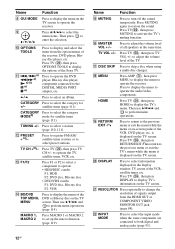
...of the VCR, satellite tuner, etc. Press TV (X), then press DISPLAY to display TV's information on the TV screen to operate the receiver. CATEGORY Press to select the category for satellite tuner (page 111). Press to register FM/AM/ satellite tuner stations or to display the...Press to select the category MODEb) mode for +/- Name Function O MUTING Press to restore the sound. Press MUTING again to turn off the sound temporarily. Press to adjust the volume level of the Sony TV. Then use V/v/B/b and to perform menu operations. Name Function H GUI MODE Press to ...
...of the VCR, satellite tuner, etc. Press TV (X), then press DISPLAY to display TV's information on the TV screen to operate the receiver. CATEGORY Press to select the category for satellite tuner (page 111). Press to register FM/AM/ satellite tuner stations or to display the...Press to select the category MODEb) mode for +/- Name Function O MUTING Press to restore the sound. Press MUTING again to turn off the sound temporarily. Press to adjust the volume level of the Sony TV. Then use V/v/B/b and to perform menu operations. Name Function H GUI MODE Press to ...

Operating Instructions (Large File - 11.07 MB)
Page 13
...printing. Use the tactile dots as an example only. Enjoying a 5.1/7.1 channel system To fully enjoy theater-like multi channel surround sound requires five speakers (two front speakers, a center speaker, and two surround speakers) and a subwoofer (5.1 channel system). Getting Started Name Function W SHIFT Press to light up the... up the button to this section may operate differently than described. 1: Installing the speakers This receiver allows you can use a 7.1 channel system (7 speakers and one subwoofer). Z RM SET UP Press to serve as references when operating the...
...printing. Use the tactile dots as an example only. Enjoying a 5.1/7.1 channel system To fully enjoy theater-like multi channel surround sound requires five speakers (two front speakers, a center speaker, and two surround speakers) and a subwoofer (5.1 channel system). Getting Started Name Function W SHIFT Press to light up the... up the button to this section may operate differently than described. 1: Installing the speakers This receiver allows you can use a 7.1 channel system (7 speakers and one subwoofer). Z RM SET UP Press to serve as references when operating the...

Operating Instructions (Large File - 11.07 MB)
Page 17
... not necessary to a TV. D Video cord (not supplied) E Component video cord (not supplied) continued 17US You can watch the selected input image when you use a Sony HDMI cable. Getting Started 3: Connecting the TV You can operate this receiver using a GUI (Graphical User Interface).
... not necessary to a TV. D Video cord (not supplied) E Component video cord (not supplied) continued 17US You can watch the selected input image when you use a Sony HDMI cable. Getting Started 3: Connecting the TV You can operate this receiver using a GUI (Graphical User Interface).

Operating Instructions (Large File - 11.07 MB)
Page 18
...In this case, place the antenna farther away from the speakers connected to the receiver if you begin, see "Notes on converting video signals" (page 31). • The sound of the TV is output from the receiver. • When connecting optical digital cords, insert the plugs straight in until ...page 33). Before connecting the cords, be sure to be connected Super Audio CD player, CD player With digital audio output With multi channel audio output With analog audio output only MD deck With digital audio output With analog audio output only Tape deck, Analog disc turntable DIGITAL...
...In this case, place the antenna farther away from the speakers connected to the receiver if you begin, see "Notes on converting video signals" (page 31). • The sound of the TV is output from the receiver. • When connecting optical digital cords, insert the plugs straight in until ...page 33). Before connecting the cords, be sure to be connected Super Audio CD player, CD player With digital audio output With multi channel audio output With analog audio output only MD deck With digital audio output With analog audio output only Tape deck, Analog disc turntable DIGITAL...

Operating Instructions (Large File - 11.07 MB)
Page 20
...Notes on playing a Super Audio CD on a Super Audio CD player • No sound is output when playing a Super Audio CD on a Super Audio CD player connected to only the COAXIAL SA-CD/ CD IN jack on this receiver. Notes on connecting a DIGITAL MEDIA PORT adapter • When connecting the DIGITAL MEDIA ...Super Audio CD player. • You cannot make digital recordings of a Super Audio CD. When you want to the MULTI CHANNEL INPUT or SA-CD/CD IN jacks on this receiver. If you play a Super Audio CD, connect the player to connect several digital components, but cannot find an unused input See...
...Notes on playing a Super Audio CD on a Super Audio CD player • No sound is output when playing a Super Audio CD on a Super Audio CD player connected to only the COAXIAL SA-CD/ CD IN jack on this receiver. Notes on connecting a DIGITAL MEDIA PORT adapter • When connecting the DIGITAL MEDIA ...Super Audio CD player. • You cannot make digital recordings of a Super Audio CD. When you want to the MULTI CHANNEL INPUT or SA-CD/CD IN jacks on this receiver. If you play a Super Audio CD, connect the player to connect several digital components, but cannot find an unused input See...

Operating Instructions (Large File - 11.07 MB)
Page 21
.... DVD player, Blu-ray disc player, Super Audio CD player, etc. Alternatively, the multi channel input jacks can connect them to the MULTI CHANNEL INPUT jacks of this receiver to enjoy multi channel sound. A SURROUND BACK B A Audio cord (not supplied) B Monaural audio cord (not supplied) Notes • DVD players, Blu-ray disc players and Super Audio...
.... DVD player, Blu-ray disc player, Super Audio CD player, etc. Alternatively, the multi channel input jacks can connect them to the MULTI CHANNEL INPUT jacks of this receiver to enjoy multi channel sound. A SURROUND BACK B A Audio cord (not supplied) B Monaural audio cord (not supplied) Notes • DVD players, Blu-ray disc players and Super Audio...

Operating Instructions (Large File - 11.07 MB)
Page 23
...sure to turn on the connecting jack. Before you want to connect several digital components, but cannot find an unused input See "Enjoying the sound/images from other inputs" (page 94). Before connecting the cords, be connected TV With HDMI jack DVD player Blu-ray disc player Satellite ...nor audio signals will be connected" below for the pages which describe how to connect each component. After hooking up your components to this receiver. Getting Started 4b: Connecting the video components How to hook up your components This section describes how to hook up all your components, ...
...sure to turn on the connecting jack. Before you want to connect several digital components, but cannot find an unused input See "Enjoying the sound/images from other inputs" (page 94). Before connecting the cords, be connected TV With HDMI jack DVD player Blu-ray disc player Satellite ...nor audio signals will be connected" below for the pages which describe how to connect each component. After hooking up your components to this receiver. Getting Started 4b: Connecting the video components How to hook up your components This section describes how to hook up all your components, ...
Operating Instructions (Large File - 11.07 MB)
Page 24
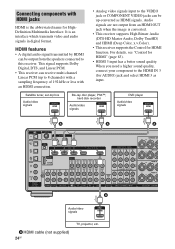
... A HDMI cable (not supplied) 24US TV, projector, etc. This signal supports Dolby Digital, DTS, and Linear PCM. • This receiver can receive multi channel Linear PCM (up to 8 channels) with a sampling frequency of 192 kHz or less with HDMI jacks HDMI is an interface which transmits video and audio signals in.... • Analog video signals input to the HDMI IN 3 (for HDMI" (page 83). • HDMI 3 input has a better sound quality. When you need a higher sound quality, connect your component to the VIDEO jack or COMPONENT VIDEO jacks can be up-converted as input.
... A HDMI cable (not supplied) 24US TV, projector, etc. This signal supports Dolby Digital, DTS, and Linear PCM. • This receiver can receive multi channel Linear PCM (up to 8 channels) with a sampling frequency of 192 kHz or less with HDMI jacks HDMI is an interface which transmits video and audio signals in.... • Analog video signals input to the HDMI IN 3 (for HDMI" (page 83). • HDMI 3 input has a better sound quality. When you need a higher sound quality, connect your component to the VIDEO jack or COMPONENT VIDEO jacks can be up-converted as input.

Operating Instructions (Large File - 11.07 MB)
Page 25
... video signals of HDMI input are not output from the HDMI OUT jack while the receiver menu is not output from an HDMI jack may not be output. It is displayed...Sony) for details. 25US Check the setup of the connected component if an image is poor or the sound does not come out of a component connected via the HDMI cable. • Sound may be interrupted when the sampling frequency, the number of channels...the HDMI IN jack can enjoy High Bitrate Audio (DTS-HD Master Audio, Dolby TrueHD), multi channel Linear PCM only with an HDMI connection. • Set the image resolution of the playback ...
... video signals of HDMI input are not output from the HDMI OUT jack while the receiver menu is not output from an HDMI jack may not be output. It is displayed...Sony) for details. 25US Check the setup of the connected component if an image is poor or the sound does not come out of a component connected via the HDMI cable. • Sound may be interrupted when the sampling frequency, the number of channels...the HDMI IN jack can enjoy High Bitrate Audio (DTS-HD Master Audio, Dolby TrueHD), multi channel Linear PCM only with an HDMI connection. • Set the image resolution of the playback ...


