
Operating Instructions
Page 1
Serial No. Record the serial number in Malaysia 2-697-465-11(2) Multi Channel AV Receiver Operating Instructions Owner's Record The model and serial numbers are located on the rear of the unit. Refer to them whenever you call upon your Sony dealer regarding this product. Model No. Sony Corporation Printed in the space provided below. STR-DG1000 ©2006 Sony Corporation
Serial No. Record the serial number in Malaysia 2-697-465-11(2) Multi Channel AV Receiver Operating Instructions Owner's Record The model and serial numbers are located on the rear of the unit. Refer to them whenever you call upon your Sony dealer regarding this product. Model No. Sony Corporation Printed in the space provided below. STR-DG1000 ©2006 Sony Corporation

Operating Instructions
Page 7
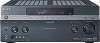
...MEMORY/ Press to XM Radio (page 83). Press to a portable PORTABLE AV audio/video component IN jack such as a camcorder or video game (page 32, 52). N VIDEO 3 IN/ Connect to select sound field (page 72). Getting Started Name Function C TONE MODE TONE Adjusts FRONT... BASS and FRONT TREBLE. CATEGORY +/- Then press SELECT, then INPUT SELECTOR (qh) to play back (page 48, 50, 51, 52, 53, 90, 91, 97). M SPEAKERS Press to the MULTI CHANNEL INPUT jack (page 48). D Remote sensor Receives...
...MEMORY/ Press to XM Radio (page 83). Press to a portable PORTABLE AV audio/video component IN jack such as a camcorder or video game (page 32, 52). N VIDEO 3 IN/ Connect to select sound field (page 72). Getting Started Name Function C TONE MODE TONE Adjusts FRONT... BASS and FRONT TREBLE. CATEGORY +/- Then press SELECT, then INPUT SELECTOR (qh) to play back (page 48, 50, 51, 52, 53, 90, 91, 97). M SPEAKERS Press to the MULTI CHANNEL INPUT jack (page 48). D Remote sensor Receives...

Operating Instructions
Page 13
... (SYSTEM STANDBY). The buttons are factory assigned to enable the receiver operation (page 54). Press to control Sony components (page 48). B ?/1 Press to turn off all components, press ?/1 and AV ?/1 (A) at the same time, it will turn on /standby) video ...Sony audio/video components that the remote is assigned to activate the Sleep Timer function and the duration which the receiver turns off with names in "Programming the remote" (page 104). MOVIE MUSIC continued 13GB Press to select a sound field (page 72). Note The function of the input buttons, the receiver...
... (SYSTEM STANDBY). The buttons are factory assigned to enable the receiver operation (page 54). Press to control Sony components (page 48). B ?/1 Press to turn off all components, press ?/1 and AV ?/1 (A) at the same time, it will turn on /standby) video ...Sony audio/video components that the remote is assigned to activate the Sleep Timer function and the duration which the receiver turns off with names in "Programming the remote" (page 104). MOVIE MUSIC continued 13GB Press to select a sound field (page 72). Note The function of the input buttons, the receiver...

Operating Instructions
Page 32
Connect audio and video cords according to connect a component which has analog jacks such as a VCR, etc. Connecting components with analog video and audio jack The following illustration shows how to the jacks of your components. It is not necessary to connect all the cables. Audio signals VCR Video signals A B To the VIDEO 3 IN/PORTABLE AV IN jacks (Front panel) Camcorder, video game C D A Audio cord (not supplied) B Video cord (not supplied) 32GB C S video cord (not supplied) D Audio/video cord (not supplied)
Connect audio and video cords according to connect a component which has analog jacks such as a VCR, etc. Connecting components with analog video and audio jack The following illustration shows how to the jacks of your components. It is not necessary to connect all the cables. Audio signals VCR Video signals A B To the VIDEO 3 IN/PORTABLE AV IN jacks (Front panel) Camcorder, video game C D A Audio cord (not supplied) B Video cord (not supplied) 32GB C S video cord (not supplied) D Audio/video cord (not supplied)

Operating Instructions
Page 38
... (page 104). If the command modes of the initial setting (AV SYSTEM 2), it is set to reset them. If the command modes of both the receiver and the other kinds of time, remove the batteries to operate the receiver. Doing so may be cleared. Observe the correct polarity when installing...AV1," "COMMAND MODE [AV1]" appears on the display. Tip When the remote no longer operates the receiver, replace all the batteries with old ones. • Do not mix manganese batteries and other Sony component respond to the same remote command, switch the command mode of either the component or the...
... (page 104). If the command modes of the initial setting (AV SYSTEM 2), it is set to reset them. If the command modes of both the receiver and the other kinds of time, remove the batteries to operate the receiver. Doing so may be cleared. Observe the correct polarity when installing...AV1," "COMMAND MODE [AV1]" appears on the display. Tip When the remote no longer operates the receiver, replace all the batteries with old ones. • Do not mix manganese batteries and other Sony component respond to the same remote command, switch the command mode of either the component or the...
Operating Instructions
Page 39
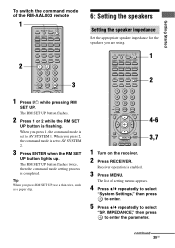
... "SP. When you press RM SET UP, use a thin wire, such as a paper clip. 4-6 3,7 1 Turn on the receiver. 2 Press RECEIVER. Tip When you press 2, the command mode is set to AV SYSTEM 1. The RM SET UP button flashes twice, then the command mode setting process is enabled. 3 Press MENU.... Receiver operation is completed. IMPEDANCE," then press to AV SYSTEM 2. 3 Press ENTER when the RM SET UP button lights up. The list of the RM-AAL003 remote 1 2 3 6: Setting...
... "SP. When you press RM SET UP, use a thin wire, such as a paper clip. 4-6 3,7 1 Turn on the receiver. 2 Press RECEIVER. Tip When you press 2, the command mode is set to AV SYSTEM 1. The RM SET UP button flashes twice, then the command mode setting process is enabled. 3 Press MENU.... Receiver operation is completed. IMPEDANCE," then press to AV SYSTEM 2. 3 Press ENTER when the RM SET UP button lights up. The list of the RM-AAL003 remote 1 2 3 6: Setting...

Operating Instructions
Page 52
... tray and play it back on the video game. 7 Adjust to the VIDEO 3 IN/PORTABLE AV IN jack on the front panel. VIDEO 3 IN/PORTABLE AV IN 1 Turn on the TV and video game. 2 Turn on this receiver to select "VIDEO 3*." * When you connect a TV game to a suitable volume. 8 After you have finished... playing a game, eject the disc and turn off the receiver, the TV, and the video game. 52GB...
... tray and play it back on the video game. 7 Adjust to the VIDEO 3 IN/PORTABLE AV IN jack on the front panel. VIDEO 3 IN/PORTABLE AV IN 1 Turn on the TV and video game. 2 Turn on this receiver to select "VIDEO 3*." * When you connect a TV game to a suitable volume. 8 After you have finished... playing a game, eject the disc and turn off the receiver, the TV, and the video game. 52GB...
Operating Instructions
Page 100
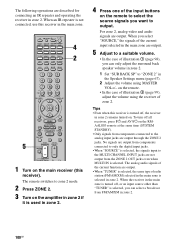
..."SOURCE," the signals of the current input selected in the main zone are output through the ZONE 2 jacks. When the receiver in the main zone is turned off all receivers, press ?/1 and AV ?/1 on the remote to select the source signals you can select a broadcast from FM/AM/XM in zone 2. 4 Press... the volume using MASTER VOL+/- on the amplifier in zone 2 if it is selected, you can only adjust the surround back speaker volume in zone 2. 1 Set "SUR BACK SP" to the MULTI CHANNEL INPUT jacks are output. • When "TUNER" is selected, the same type of zone 2. The analog audio ...
..."SOURCE," the signals of the current input selected in the main zone are output through the ZONE 2 jacks. When the receiver in the main zone is turned off all receivers, press ?/1 and AV ?/1 on the remote to select the source signals you can select a broadcast from FM/AM/XM in zone 2. 4 Press... the volume using MASTER VOL+/- on the amplifier in zone 2 if it is selected, you can only adjust the surround back speaker volume in zone 2. 1 Set "SUR BACK SP" to the MULTI CHANNEL INPUT jacks are output. • When "TUNER" is selected, the same type of zone 2. The analog audio ...
Operating Instructions
Page 103
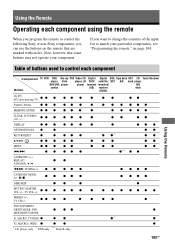
..., Disk player, LD CATV satellite/ BST A/B deck player, DVD/VHS player player terminal terrestrial MD Button combo (US) receiver deck (EURO) AV ?/1, ?/1 (after pressing TV) z z z zz z z zz zz Numeric buttons zz z z z z z MEMORY, ENTER z z z z z z* z z z z zzz z z zzz CLEAR, D.TUNING, z z z zz z z >10, -/- - If you want to change the ... operate your particular components, see "Programming the remote," on page 104. Using the Remote Table of the input list to control the following Sony or non-Sony components, you program the remote to match your component.
..., Disk player, LD CATV satellite/ BST A/B deck player, DVD/VHS player player terminal terrestrial MD Button combo (US) receiver deck (EURO) AV ?/1, ?/1 (after pressing TV) z z z zz z z zz zz Numeric buttons zz z z z z z MEMORY, ENTER z z z z z z* z z z z zzz z z zzz CLEAR, D.TUNING, z z z zz z z >10, -/- - If you want to change the ... operate your particular components, see "Programming the remote," on page 104. Using the Remote Table of the input list to control the following Sony or non-Sony components, you program the remote to match your component.

Operating Instructions
Page 104
... button and input button light up. The input button also turns off. You can even program the remote to control nonSony components and also Sony components that the remote is flashing, press the input button (including TV) for the component you are valid. 4 Press ENTER. Note For...a case in the 500's are going to the VIDEO 2 jacks on the receiver and point the remote towards the receiver when performing the following procedure. 1 2 3 4 1 Press AV ?/1 while pressing RM SET UP. Before you want to your receiver. You cannot change the settings of the component you begin, note that: ...
... button and input button light up. The input button also turns off. You can even program the remote to control nonSony components and also Sony components that the remote is flashing, press the input button (including TV) for the component you are valid. 4 Press ENTER. Note For...a case in the 500's are going to the VIDEO 2 jacks on the receiver and point the remote towards the receiver when performing the following procedure. 1 2 3 4 1 Press AV ?/1 while pressing RM SET UP. Before you want to your receiver. You cannot change the settings of the component you begin, note that: ...

Operating Instructions
Page 111
All the contents of the remote's memory (i.e., all the contents of the remote's memory 1 Using the Remote 1,2 1 Press and hold MASTER VOL - Clearing all the programmed data) are cleared. 111GB The RM SET UP button flashes three times. 2 Release MASTER VOL -. first, then press ?/1 and then AV ?/1.
All the contents of the remote's memory (i.e., all the contents of the remote's memory 1 Using the Remote 1,2 1 Press and hold MASTER VOL - Clearing all the programmed data) are cleared. 111GB The RM SET UP button flashes three times. 2 Release MASTER VOL -. first, then press ?/1 and then AV ?/1.

