
Operating Instructions
Page 3
... is a registered trademark of HDMI Licensing LLC. This receiver incorporates Dolby* Digital and Pro Logic Surround and the DTS** Digital Surround System. * Manufactured under license from Neural Audio Corporation. "Neural" and "Neural Audio" and "Neural Surround" are trademarks of Dolby Laboratories. ** Manufactured under license... Neural Audio Corporation. 3GB Sony Corporation hereby grants the user a nonexclusive, non-transferable, limited license right to use the controls on the receiver if they have the same or similar names as those on the supplied remote. You can also use ...
... is a registered trademark of HDMI Licensing LLC. This receiver incorporates Dolby* Digital and Pro Logic Surround and the DTS** Digital Surround System. * Manufactured under license from Neural Audio Corporation. "Neural" and "Neural Audio" and "Neural Surround" are trademarks of Dolby Laboratories. ** Manufactured under license... Neural Audio Corporation. 3GB Sony Corporation hereby grants the user a nonexclusive, non-transferable, limited license right to use the controls on the receiver if they have the same or similar names as those on the supplied remote. You can also use ...
Operating Instructions
Page 4
... .......24 4: Connecting the antennas (aerials 36 5: Preparing the receiver and the remote ....37 6: Setting the speakers 39 7: Calibrating the appropriate settings automatically (AUTO CALIBRATION 41 Playback Selecting a component 48 Listening to digital sound from other inputs (DIGITAL ASSIGN 92 Watching HDMI images from other... through menus 54 Adjusting the level (Level Settings menu 58 Adjusting the equalizer (EQ Settings menu 59 Settings for the surround sound (Sur Settings menu 61 Settings for the tuner (Tuner Settings menu 63 Settings for the audio (Audio Settings menu 64...
... .......24 4: Connecting the antennas (aerials 36 5: Preparing the receiver and the remote ....37 6: Setting the speakers 39 7: Calibrating the appropriate settings automatically (AUTO CALIBRATION 41 Playback Selecting a component 48 Listening to digital sound from other inputs (DIGITAL ASSIGN 92 Watching HDMI images from other... through menus 54 Adjusting the level (Level Settings menu 58 Adjusting the equalizer (EQ Settings menu 59 Settings for the surround sound (Sur Settings menu 61 Settings for the tuner (Tuner Settings menu 63 Settings for the audio (Audio Settings menu 64...

Operating Instructions
Page 5
Changing the display 95 Using the Sleep Timer 96 Recording using the receiver 96 Listening to the sound in another zone (Zone 2 operations 98 Using a bi-amplifier connection 101 Using the Remote Operating each component using the remote 103 Programming the remote 104 Performing several commands in sequence automatically (Macro Play 107 Setting remote control codes that are not stored in the commander 109 Clearing all the contents of the remote's memory 111 Additional Information Glossary 112 Precautions 114 Troubleshooting 115 Specifications 119 Index 122 5GB
Changing the display 95 Using the Sleep Timer 96 Recording using the receiver 96 Listening to the sound in another zone (Zone 2 operations 98 Using a bi-amplifier connection 101 Using the Remote Operating each component using the remote 103 Programming the remote 104 Performing several commands in sequence automatically (Macro Play 107 Setting remote control codes that are not stored in the commander 109 Clearing all the contents of the remote's memory 111 Additional Information Glossary 112 Precautions 114 Troubleshooting 115 Specifications 119 Index 122 5GB

Operating Instructions
Page 7
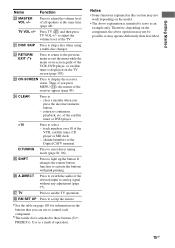
... 98). Press to the HDMI IN jack (page 25). Name Function K HDMI Press to select input source from the component connected to select sound field (page 72). CATEGORY +/- Press TONE MODE repeatedly to select BASS or TREBLE, then turn TONE to a portable PORTABLE AV audio/video ... (page 48, 50, 51, 52, 53). 7GB Press to select the audio input signal from remote commander. O MULTI CHANNEL DECODING lamp Lights up when multichannel audio signals are decoded (page 51). D Remote sensor Receives signals from the component connected to play back (page 48, 50, 51, 52, 53, 90,...
... 98). Press to the HDMI IN jack (page 25). Name Function K HDMI Press to select input source from the component connected to select sound field (page 72). CATEGORY +/- Press TONE MODE repeatedly to select BASS or TREBLE, then turn TONE to a portable PORTABLE AV audio/video ... (page 48, 50, 51, 52, 53). 7GB Press to select the audio input signal from remote commander. O MULTI CHANNEL DECODING lamp Lights up when multichannel audio signals are decoded (page 51). D Remote sensor Receives signals from the component connected to play back (page 48, 50, 51, 52, 53, 90,...
Operating Instructions
Page 12
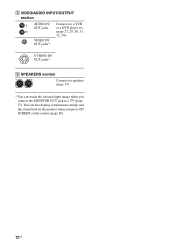
R (page 27, 29, 30, 31, 32, 34). E VIDEO/AUDIO INPUT/OUTPUT section L AUDIO IN/ Connects to a TV (page 27). VIDEO IN/ OUT jacks* S VIDEO IN/ OUT jacks* F SPEAKERS section Connects to speakers (page 17). * You can also display certain menu settings and the sound field on the monitor when you connect the MONITOR OUT jack to a VCR OUT jacks or a DVD player etc. You can watch the selected input image when you press ON SCREEN on the remote (page 89). 12GB
R (page 27, 29, 30, 31, 32, 34). E VIDEO/AUDIO INPUT/OUTPUT section L AUDIO IN/ Connects to a TV (page 27). VIDEO IN/ OUT jacks* S VIDEO IN/ OUT jacks* F SPEAKERS section Connects to speakers (page 17). * You can also display certain menu settings and the sound field on the monitor when you connect the MONITOR OUT jack to a VCR OUT jacks or a DVD player etc. You can watch the selected input image when you press ON SCREEN on the remote (page 89). 12GB

Operating Instructions
Page 13
... and then press the button. Press to select a sound field (page 72). Press to activate the Sleep Timer function and the duration which the receiver turns off the receiver and other Sony components (SYSTEM STANDBY). C Input buttons D ZONE 2 E SLEEP F RECEIVER G 2CH A.F.D. Press to enable zone 2 operation (... continued 13GB RM-AAL003 Name Function A AV ?/1 Press to turn the receiver on or (on . After pressing ZONE 2 (D), only the receiver in zone 2 is turned on /standby) video components that the remote is assigned to operate (page 104). You can use . Press one ...
... and then press the button. Press to select a sound field (page 72). Press to activate the Sleep Timer function and the duration which the receiver turns off the receiver and other Sony components (SYSTEM STANDBY). C Input buttons D ZONE 2 E SLEEP F RECEIVER G 2CH A.F.D. Press to enable zone 2 operation (... continued 13GB RM-AAL003 Name Function A AV ?/1 Press to turn the receiver on or (on . After pressing ZONE 2 (D), only the receiver in zone 2 is turned on /standby) video components that the remote is assigned to operate (page 104). You can use . Press one ...
Operating Instructions
Page 15
... or satellite tuner is displayed on -screen guide of the VCR, satellite tuner, CD player or MD deck. - Press to light up the remote. b)The tactile dot is intended to serve as a mark of the selected input to the previous menu or exit the menu while the menu or... the Digital CATV terminal. clear a mistake when you can use to adjust the volume level of the TV. return to display the receiver status. channel numbers of the receiver appear (page 89). Press to control each component. to these buttons (H, PRESET+). a)See the table on page 103 for information on...
... or satellite tuner is displayed on -screen guide of the VCR, satellite tuner, CD player or MD deck. - Press to light up the remote. b)The tactile dot is intended to serve as a mark of the selected input to the previous menu or exit the menu while the menu or... the Digital CATV terminal. clear a mistake when you can use to adjust the volume level of the TV. return to display the receiver status. channel numbers of the receiver appear (page 89). Press to control each component. to these buttons (H, PRESET+). a)See the table on page 103 for information on...
Operating Instructions
Page 37
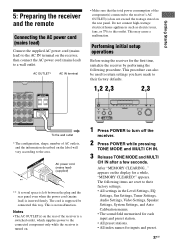
... the receiver is supposed be used to return settings you have made to their factory settings. • All settings in the Level Settings, EQ Settings, Sur Settings, Tuner Settings, Audio Settings, Video Settings, Speaker Settings, System Settings, and Auto Calibration menus. • The sound field ...AC outlets, and the information described on the label will vary according to the receiver's AC OUTLET(s) does not exceed the wattage stated on the rear panel. Getting Started 5: Preparing the receiver and the remote Connecting the AC power cord (mains lead) Connect the supplied AC power cord ...
... the receiver is supposed be used to return settings you have made to their factory settings. • All settings in the Level Settings, EQ Settings, Sur Settings, Tuner Settings, Audio Settings, Video Settings, Speaker Settings, System Settings, and Auto Calibration menus. • The sound field ...AC outlets, and the information described on the label will vary according to the receiver's AC OUTLET(s) does not exceed the wattage stated on the rear panel. Getting Started 5: Preparing the receiver and the remote Connecting the AC power cord (mains lead) Connect the supplied AC power cord ...

Operating Instructions
Page 38
... mode. RM-AAL003 Notes • Do not leave the remote in the RMAAL003 remote commander. Tip When the remote no longer operates the receiver, replace all the batteries with old ones. • Do not mix manganese batteries and other Sony component respond to the same remote command, switch the command mode of the initial setting (AV...
... mode. RM-AAL003 Notes • Do not leave the remote in the RMAAL003 remote commander. Tip When the remote no longer operates the receiver, replace all the batteries with old ones. • Do not mix manganese batteries and other Sony component respond to the same remote command, switch the command mode of the initial setting (AV...
Operating Instructions
Page 39
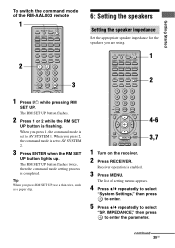
...flashing. The RM SET UP button flashes twice, then the command mode setting process is enabled. 3 Press MENU. The list of the RM-AAL003 remote 1 2 3 6: Setting the speakers Setting the speaker impedance Set the appropriate speaker impedance for the speakers you press RM SET UP, use a ...thin wire, such as a paper clip. 4-6 3,7 1 Turn on the receiver. 2 Press RECEIVER. continued 39GB Tip When you are using. 1 2 1 Press ?/1 while pressing RM SET UP. Getting Started To switch the command mode of setting menus ...
...flashing. The RM SET UP button flashes twice, then the command mode setting process is enabled. 3 Press MENU. The list of the RM-AAL003 remote 1 2 3 6: Setting the speakers Setting the speaker impedance Set the appropriate speaker impedance for the speakers you press RM SET UP, use a ...thin wire, such as a paper clip. 4-6 3,7 1 Turn on the receiver. 2 Press RECEIVER. continued 39GB Tip When you are using. 1 2 1 Press ?/1 while pressing RM SET UP. Getting Started To switch the command mode of setting menus ...

Operating Instructions
Page 49
To cancel, press MUTING on again. Even if you turn the receiver on the remote again or turn MASTER VOLUME clockwise to turn off the receiver, be sure to raise the volume. Playback To activate the muting function Press MUTING on the remote. To avoid damaging your speakers Before you turn off the receiver, the muting function works when you turn down the volume level. 49GB
To cancel, press MUTING on again. Even if you turn the receiver on the remote again or turn MASTER VOLUME clockwise to turn off the receiver, be sure to raise the volume. Playback To activate the muting function Press MUTING on the remote. To avoid damaging your speakers Before you turn off the receiver, the muting function works when you turn down the volume level. 49GB
Operating Instructions
Page 98
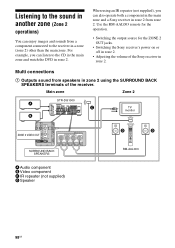
...2 STR-DG1000 A C B TV monitor ZONE 2 VIDEO OUT SURROUND BACK SPEAKERS A Audio component B Video component C IR repeater (not supplied) D Speaker D D RM-AAL003 98GB Use the RM-AAL003 remote for the operation. • Switching the output source for the ZONE 2 OUT jacks. • Switching the Sony receiver's ...; Adjusting the volume of the receiver. For example, you can also operate both a component in the main zone and a Sony receiver in zone 2 from zone 2. Listening to the sound in another zone (Zone 2 operations) You can enjoy images and sounds from a component connected to the...
...2 STR-DG1000 A C B TV monitor ZONE 2 VIDEO OUT SURROUND BACK SPEAKERS A Audio component B Video component C IR repeater (not supplied) D Speaker D D RM-AAL003 98GB Use the RM-AAL003 remote for the operation. • Switching the output source for the ZONE 2 OUT jacks. • Switching the Sony receiver's ...; Adjusting the volume of the receiver. For example, you can also operate both a component in the main zone and a Sony receiver in zone 2 from zone 2. Listening to the sound in another zone (Zone 2 operations) You can enjoy images and sounds from a component connected to the...
Operating Instructions
Page 100
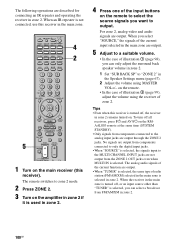
...you want to "ZONE 2" in zone 2. 100GB on the remote to select the source signals you can only adjust the surround back speaker volume in zone 2. 1 Set "SUR BACK SP" to output. Tips • Even when this receiver in zone 2. No signals are output from components connected to the... signals input to only the digital input jacks. • When "SOURCE" is selected in zone 2 remains turned on the RMAAL003 remote at the same time (SYSTEM STANDBY). • Only signals from components connected to the MULTI CHANNEL INPUT jacks are output. To turn off , the receiver in zone 2.
...you want to "ZONE 2" in zone 2. 100GB on the remote to select the source signals you can only adjust the surround back speaker volume in zone 2. 1 Set "SUR BACK SP" to output. Tips • Even when this receiver in zone 2. No signals are output from components connected to the... signals input to only the digital input jacks. • When "SOURCE" is selected in zone 2 remains turned on the RMAAL003 remote at the same time (SYSTEM STANDBY). • Only signals from components connected to the MULTI CHANNEL INPUT jacks are output. To turn off , the receiver in zone 2.

Operating Instructions
Page 101
... SP" to "BI-AMP" in a place where signals from the SURROUND BACK SPEAKERS terminals. STR-DG1000 IR repeater (not supplied) Using a bi-amplifier connection If you are not using an IR repeater You can operate the receiver without pointing the remote toward the IR sensor of the receiver. Use an IR repeater when you install the...
... SP" to "BI-AMP" in a place where signals from the SURROUND BACK SPEAKERS terminals. STR-DG1000 IR repeater (not supplied) Using a bi-amplifier connection If you are not using an IR repeater You can operate the receiver without pointing the remote toward the IR sensor of the receiver. Use an IR repeater when you install the...
Operating Instructions
Page 103
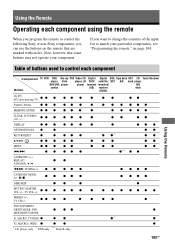
...zz z z z z z zzz z VOL +/-, TV VOL +/- Using the Remote Table of the input list to control each component using the remote When you program the remote to control the following Sony or non-Sony components, you want to change the contents of buttons used to match your particular ... TV VCR DVD Blu-ray PSX Video CD Digital Digital DSS, Tape deck DAT CD Tuner Receiver player, Disk player, LD CATV satellite/ BST A/B deck player, DVD/VHS player player terminal terrestrial MD Button combo (US) receiver deck (EURO) AV ?/1, ?/1 (after pressing TV) z z z zz z z zz zz ...
...zz z z z z z zzz z VOL +/-, TV VOL +/- Using the Remote Table of the input list to control each component using the remote When you program the remote to control the following Sony or non-Sony components, you want to change the contents of buttons used to match your particular ... TV VCR DVD Blu-ray PSX Video CD Digital Digital DSS, Tape deck DAT CD Tuner Receiver player, Disk player, LD CATV satellite/ BST A/B deck player, DVD/VHS player player terminal terrestrial MD Button combo (US) receiver deck (EURO) AV ?/1, ?/1 (after pressing TV) z z z zz z z zz zz ...

Operating Instructions
Page 104
... on the receiver. You can control only components that accept infrared wireless control signals. The procedure below uses as an example a case in the 500's are going to control nonSony components and also Sony components that : - The remote can even program the remote to control ...is normally unable to the VIDEO 2 jacks on the receiver and point the remote towards the receiver when performing the following procedure. 1 2 3 4 1 Press AV ?/1 while pressing RM SET UP. Programming the remote You can customize the remote to match the components connected to control. For example,...
... on the receiver. You can control only components that accept infrared wireless control signals. The procedure below uses as an example a case in the 500's are going to control nonSony components and also Sony components that : - The remote can even program the remote to control ...is normally unable to the VIDEO 2 jacks on the receiver and point the remote towards the receiver when performing the following procedure. 1 2 3 4 1 Press AV ?/1 while pressing RM SET UP. Programming the remote You can customize the remote to match the components connected to control. For example,...
Operating Instructions
Page 105
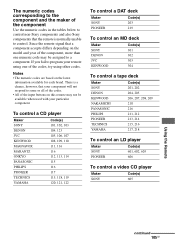
...all of the codes. • All of the input buttons on this remote may be available when used with your remote using one numeric code may not be assigned to a component. To control a CD player Maker SONY DENON JVC KENWOOD MAGNAVOX MARANTZ ONKYO PANASONIC PHILIPS PIONEER TECHNICS YAMAHA Code(s) 101... 211, 212 213, 214 215, 216 217, 218 To control an LD player Maker SONY PIONEER Code(s) 601, 602, 603 606 To control a video CD player Maker SONY Code(s) 605 Using the Remote continued 105GB The numeric codes corresponding to the component and the maker of the component Use the...
...all of the codes. • All of the input buttons on this remote may be available when used with your remote using one numeric code may not be assigned to a component. To control a CD player Maker SONY DENON JVC KENWOOD MAGNAVOX MARANTZ ONKYO PANASONIC PHILIPS PIONEER TECHNICS YAMAHA Code(s) 101... 211, 212 213, 214 215, 216 217, 218 To control an LD player Maker SONY PIONEER Code(s) 601, 602, 603 606 To control a video CD player Maker SONY Code(s) 605 Using the Remote continued 105GB The numeric codes corresponding to the component and the maker of the component Use the...

Operating Instructions
Page 107
...(s) 310, 311, 312 To control a PSX Maker SONY Code(s) 313, 314, 315 Performing several commands in sequence automatically (Macro Play) The Macro Play function lets you link several commands in a sequential order as a single command. The remote provides 2 macro lists (MACRO 1 and MACRO 2). Using the Remote continued 107GB PANASONIC RCA S. You can specify...
...(s) 310, 311, 312 To control a PSX Maker SONY Code(s) 313, 314, 315 Performing several commands in sequence automatically (Macro Play) The Macro Play function lets you link several commands in a sequential order as a single command. The remote provides 2 macro lists (MACRO 1 and MACRO 2). Using the Remote continued 107GB PANASONIC RCA S. You can specify...

Operating Instructions
Page 109
... UP button remains lit.) 3 Press the button (button 1 in the commander Even if a remote control code is possible for which you want to start the macro. The RECEIVER button lights up . Setting remote control codes that are not stored in the example) you want to clear the stored macro. ...Note When setting up . 2 Press the input button (VIDEO 1 in the remote, it is not one of the remote: 1 Press TV while ...
... UP button remains lit.) 3 Press the button (button 1 in the commander Even if a remote control code is possible for which you want to start the macro. The RECEIVER button lights up . Setting remote control codes that are not stored in the example) you want to clear the stored macro. ...Note When setting up . 2 Press the input button (VIDEO 1 in the remote, it is not one of the remote: 1 Press TV while ...

Operating Instructions
Page 110
...UP button remains lit.) 3 Press ?/1 for 60 seconds cancels the settings. To cancel learning Press RM SET UP. While the second remote is receiving the signal, the input button selected in step 1, and the learning process does not start, replace the batteries with new ones. ... learned When selecting a learned input, press the button used to perform process again from . 4 Point the remote code receiver section of the remote toward the receiver/transmitter on the remote control to clear the stored setting. The input button flashes twice, repeatedly. 4 Press the input button to ...
...UP button remains lit.) 3 Press ?/1 for 60 seconds cancels the settings. To cancel learning Press RM SET UP. While the second remote is receiving the signal, the input button selected in step 1, and the learning process does not start, replace the batteries with new ones. ... learned When selecting a learned input, press the button used to perform process again from . 4 Point the remote code receiver section of the remote toward the receiver/transmitter on the remote control to clear the stored setting. The input button flashes twice, repeatedly. 4 Press the input button to ...


