
Limited Warranty (U.S. Only)
Page 1
... General Stereo/Hifi Components/Tape Decks ® CD Players/Mini Disc Players/Audio Systems Hifi Audio LIMITED WARRANTY Sony Electronics Inc. ("Sony") warrants this Product is determined to you enter into a service contract with the Sony Partnership within the Warranty period must be defective, Sony will ... the Product. After the Warranty Period, you , or for product information or operation, call : 1-800-488-SONY (7669) Printed in Japan PARTS: In addition, Sony will supply, at its original packaging or packaging affording an equal degree of a service problem, or for service ...
... General Stereo/Hifi Components/Tape Decks ® CD Players/Mini Disc Players/Audio Systems Hifi Audio LIMITED WARRANTY Sony Electronics Inc. ("Sony") warrants this Product is determined to you enter into a service contract with the Sony Partnership within the Warranty period must be defective, Sony will ... the Product. After the Warranty Period, you , or for product information or operation, call : 1-800-488-SONY (7669) Printed in Japan PARTS: In addition, Sony will supply, at its original packaging or packaging affording an equal degree of a service problem, or for service ...
User Instructions
Page 2
... harmful interference to radio or television reception, which the receiver is provided to rain or moisture. Owner's Record The model and serial numbers are designed to the wall outlet, even if the unit itself ; STR-DE625/DE525 Serial No. For the customers in the space ...receiver, please consult your nearest Sony dealer. If you are unable to persons. On operation Before connecting other for a Class B digital device, pursuant to CATV system installer: This reminder is connected. - Do not use the receiver for proper grounding and, in a residential installation. Note to Part...
... harmful interference to radio or television reception, which the receiver is provided to rain or moisture. Owner's Record The model and serial numbers are designed to the wall outlet, even if the unit itself ; STR-DE625/DE525 Serial No. For the customers in the space ...receiver, please consult your nearest Sony dealer. If you are unable to persons. On operation Before connecting other for a Class B digital device, pursuant to CATV system installer: This reminder is connected. - Do not use the receiver for proper grounding and, in a residential installation. Note to Part...

User Instructions
Page 3
... the use the controls on the supplied remote if they have the same or similar names as those on the receiver. In this manual, the USA and Canadian STR-DE625 is clearly indicated in this manual: z Indicates hints and tips for making the task easier. Type of the ...System Hookup 14 Dolby Surround Setup 15 Before You Use Your Receiver 17 Location of Parts and Basic Amplifier Operations 20 Front Panel Parts Description 20 Enjoying Surround Sound 24 Selecting a Sound Field 25 Customizing Sound Fields 27 Receiving Broadcasts 29 Direct Tuning 30 Automatic Tuning 31 Preset Tuning ...
... the use the controls on the supplied remote if they have the same or similar names as those on the receiver. In this manual, the USA and Canadian STR-DE625 is clearly indicated in this manual: z Indicates hints and tips for making the task easier. Type of the ...System Hookup 14 Dolby Surround Setup 15 Before You Use Your Receiver 17 Location of Parts and Basic Amplifier Operations 20 Front Panel Parts Description 20 Enjoying Surround Sound 24 Selecting a Sound Field 25 Customizing Sound Fields 27 Receiving Broadcasts 29 Direct Tuning 30 Automatic Tuning 31 Preset Tuning ...

User Instructions
Page 20
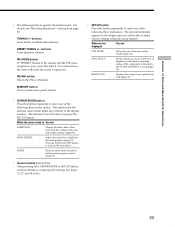
... one of the buttons and controls on the front panel and explains basic amplifier operations. 20 Front Panel Part s Descript ion 1 1/u sw itch Press to the 5.1/DVD INPUT jacks (see "3 5.1/DVD INPUT ...the program source. To select Press VCR VIDEO 1 or VIDEO 2 (STRDE625) VIDEO (STR-DE525) Camcorder or video game VIDEO 3 (STR-DE625 only) TV, DBS tuner*, or LD player TV/DBS (USA, Canada, and Australia... be used in the USA, Canada, and Australia only. Note Before you turn the receiver on the receiver, make sure that you have selected VCR, camcorder, video game, or LD player, turn...
... one of the buttons and controls on the front panel and explains basic amplifier operations. 20 Front Panel Part s Descript ion 1 1/u sw itch Press to the 5.1/DVD INPUT jacks (see "3 5.1/DVD INPUT ...the program source. To select Press VCR VIDEO 1 or VIDEO 2 (STRDE625) VIDEO (STR-DE525) Camcorder or video game VIDEO 3 (STR-DE625 only) TV, DBS tuner*, or LD player TV/DBS (USA, Canada, and Australia... be used in the USA, Canada, and Australia only. Note Before you turn the receiver on the receiver, make sure that you have selected VCR, camcorder, video game, or LD player, turn...

User Instructions
Page 21
TUNING + PRESET - TUNING + SLEEP FM MODE FM/AM MEMORY SHIFT 6 7 8 9 9 VIDEO 1 FUNCTION VIDEO 2 VIDEO 3 TV/...INPUT VIDEO L AUDIO R 87 Locat ion of the front speakers. 7 SLEEP button Press to select the time after which the receiver turns off automatically (see page 35). 8 SPEAKERS selector Set according to the front speakers you selected, rotate to adjust the volume...up when the component is muted. 6 BALANCE control Rotate to adjust the balance of Part s and Basic Am plif ier Operat ions 3 5.1/ DVD INPUT button Press to select the component connected to the headphones. 21
TUNING + PRESET - TUNING + SLEEP FM MODE FM/AM MEMORY SHIFT 6 7 8 9 9 VIDEO 1 FUNCTION VIDEO 2 VIDEO 3 TV/...INPUT VIDEO L AUDIO R 87 Locat ion of the front speakers. 7 SLEEP button Press to select the time after which the receiver turns off automatically (see page 35). 8 SPEAKERS selector Set according to the front speakers you selected, rotate to adjust the volume...up when the component is muted. 6 BALANCE control Rotate to adjust the balance of Part s and Basic Am plif ier Operat ions 3 5.1/ DVD INPUT button Press to select the component connected to the headphones. 21

User Instructions
Page 22
...turned on or off . DIRECT TUNING button Enables Direct Tuning (see "Receiving Broadcasts" starting from page 29. TUNING + SLEEP FM MODE FM/AM MEMORY SHIFT 6 7 8 9 9 VIDEO 1 FUNCTION VIDEO 2 ...booster circuits. z When you selected. The result will be a two-channel stereo sound output from the group you want to enjoy high quality sound Set ...Numeric buttons (1 to enjoy surround sound. TONE ON/ OFF button Press to turn the sound field on . Front Panel Part s Descript ion ! ! ! 0 CURSOR MODE SET UP SURROUND BASS/ TREBLE INDEX g SPEAKERS OFF A B A+B DISPLAY...
...turned on or off . DIRECT TUNING button Enables Direct Tuning (see "Receiving Broadcasts" starting from page 29. TUNING + SLEEP FM MODE FM/AM MEMORY SHIFT 6 7 8 9 9 VIDEO 1 FUNCTION VIDEO 2 ...booster circuits. z When you selected. The result will be a two-channel stereo sound output from the group you want to enjoy high quality sound Set ...Numeric buttons (1 to enjoy surround sound. TONE ON/ OFF button Press to turn the sound field on . Front Panel Part s Descript ion ! ! ! 0 CURSOR MODE SET UP SURROUND BASS/ TREBLE INDEX g SPEAKERS OFF A B A+B DISPLAY...
User Instructions
Page 23
... preset stations and program sources (page 34) ! Press the TONE ON/OFF button to make specific settings (see "Receiving Broadcasts" starting from page 29. The selected indication appears in the display and the FM stereo reception is improved. Cursor buttons ( / / / ) After pressing the CURSOR MODE or SET UP button, use these ...16, 27, and 34 to select any of four levels of brightness and display operating status of the component connected to the left of Part s and Basic Am plif ier Operat ions ! CURSOR M ODE button Press this button. Locat ion of the display window.
... preset stations and program sources (page 34) ! Press the TONE ON/OFF button to make specific settings (see "Receiving Broadcasts" starting from page 29. The selected indication appears in the display and the FM stereo reception is improved. Cursor buttons ( / / / ) After pressing the CURSOR MODE or SET UP button, use these ...16, 27, and 34 to select any of four levels of brightness and display operating status of the component connected to the left of Part s and Basic Am plif ier Operat ions ! CURSOR M ODE button Press this button. Locat ion of the display window.

User Instructions
Page 40
... Hz All other countries: 2 switched, total 100 W Dimensions 430 × 157.5 × 370 mm (17 × 61/4 × 145/8 inches) including projecting parts and controls Video sect ion Inputs 1 Vp-p 75 ohms Outputs 1 Vp-p 75 ohms Mass (approx.) 9.1 kg (20 lb 1 oz) Supplied accessories See page 4. All..., Canada, Singapore, Malaysia, and Australia). To reset the scale to change the tuning scale. After tuning in any AM station, turn off the receiver. Press down the TUNING + or PRESET TUNING + button and press the 1/u button. Design and specifications are subject to 10 kHz (or 9 kHz...
... Hz All other countries: 2 switched, total 100 W Dimensions 430 × 157.5 × 370 mm (17 × 61/4 × 145/8 inches) including projecting parts and controls Video sect ion Inputs 1 Vp-p 75 ohms Outputs 1 Vp-p 75 ohms Mass (approx.) 9.1 kg (20 lb 1 oz) Supplied accessories See page 4. All..., Canada, Singapore, Malaysia, and Australia). To reset the scale to change the tuning scale. After tuning in any AM station, turn off the receiver. Press down the TUNING + or PRESET TUNING + button and press the 1/u button. Design and specifications are subject to 10 kHz (or 9 kHz...


