Operating Instructions
Page 3
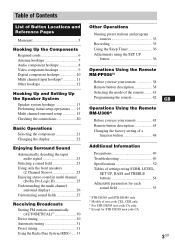
... hookups 7 Audio component hookups 8 Video component hookups 9 Digital component hookups 10 Multi channel input hookups1 11 Other hookups 12 Hooking Up and Setting Up the Speaker System Speaker system hookups 13 Performing initial setup operations ..... 15 Multi channel surround setup 15 Checking the connections 20 Basic Operations Selecting the component 21 Changing the display 22 Enjoying Surround Sound Automatically decoding the input audio signal 23 Selecting a sound field 23 Using only the front speakers (2 Channel Stereo 25 Enjoying stereo sound in multi channel (Dolby Pro...
... hookups 7 Audio component hookups 8 Video component hookups 9 Digital component hookups 10 Multi channel input hookups1 11 Other hookups 12 Hooking Up and Setting Up the Speaker System Speaker system hookups 13 Performing initial setup operations ..... 15 Multi channel surround setup 15 Checking the connections 20 Basic Operations Selecting the component 21 Changing the display 22 Enjoying Surround Sound Automatically decoding the input audio signal 23 Selecting a sound field 23 Using only the front speakers (2 Channel Stereo 25 Enjoying stereo sound in multi channel (Dolby Pro...
Operating Instructions
Page 4
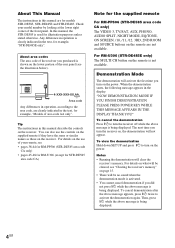
... the supplied remote For RM-PP506 (STR-DE585 area code CA only) The VIDEO 3, TV/SAT, AUX, PHONO, AUDIO SPLIT, NIGHT MODE, EQ/TONE, ON SCREEN, /10, /11, /12, 3RD, 2ND ROOM and SOURCE buttons on page 15. • There will clear the receiver's memory. IMPEDANCE USE 8 - 16Ω TER FRONT R L R L 4-XXX-XXX-XX AA Area code Any differences in the text, for models STR-DE585, STR-DE485E and STR-DE485. Then...
... the supplied remote For RM-PP506 (STR-DE585 area code CA only) The VIDEO 3, TV/SAT, AUX, PHONO, AUDIO SPLIT, NIGHT MODE, EQ/TONE, ON SCREEN, /10, /11, /12, 3RD, 2ND ROOM and SOURCE buttons on page 15. • There will clear the receiver's memory. IMPEDANCE USE 8 - 16Ω TER FRONT R L R L 4-XXX-XXX-XX AA Area code Any differences in the text, for models STR-DE585, STR-DE485E and STR-DE485. Then...

Operating Instructions
Page 10
...8486; COAXIAL VIDEO IN VIDEO IN VIDEO OUT VIDEO IN VIDEO OUT L CENTER R SUB FRONT SURROUND WOOFER MULTI CH IN AUDIO OUT L R IN CD OUT IN AUDIO IN AUDIO IN AUDIO OUT AUDIO IN SUB MD/ TAPE DVD/LD VIDEO 2 VIDEO 1 WOOFER E OUTPUT DIGITAL COAXIAL B OUTPUT VIDEO OUT DVD or LD player (etc.)* AUDIO OUT L R * Make either an optical or coaxial digital signal. Digital component hookups Connect the digital output jacks of your home. We recommend making coaxial connections instead of a movie theater into your DVD player and satellite tuner (etc.) to the receiver's digital input jacks to...
...8486; COAXIAL VIDEO IN VIDEO IN VIDEO OUT VIDEO IN VIDEO OUT L CENTER R SUB FRONT SURROUND WOOFER MULTI CH IN AUDIO OUT L R IN CD OUT IN AUDIO IN AUDIO IN AUDIO OUT AUDIO IN SUB MD/ TAPE DVD/LD VIDEO 2 VIDEO 1 WOOFER E OUTPUT DIGITAL COAXIAL B OUTPUT VIDEO OUT DVD or LD player (etc.)* AUDIO OUT L R * Make either an optical or coaxial digital signal. Digital component hookups Connect the digital output jacks of your home. We recommend making coaxial connections instead of a movie theater into your DVD player and satellite tuner (etc.) to the receiver's digital input jacks to...
Operating Instructions
Page 11
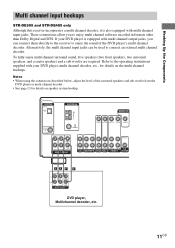
...OUT AUDIO IN SUB MD/TAPE DVD/LD VIDEO 2 VIDEO 1 WOOFER AA F F L CENTER R SUB FRONT SURROUND WOOFER MULTI CH OUT DVD player, Multichannel decoder, etc. 11GB Notes • When using the connections described below, adjust the level of the DVD player's multi channel decoder. Hooking Up the Components Multi channel input hookups STR-DE585 and STR-DE485 only Although this receiver incorporates a multi channel decoder, it is equipped with multi channel input jacks. To fully enjoy multi channel surround sound, five speakers (two front speakers, two surround speakers, and a center speaker...
...OUT AUDIO IN SUB MD/TAPE DVD/LD VIDEO 2 VIDEO 1 WOOFER AA F F L CENTER R SUB FRONT SURROUND WOOFER MULTI CH OUT DVD player, Multichannel decoder, etc. 11GB Notes • When using the connections described below, adjust the level of the DVD player's multi channel decoder. Hooking Up the Components Multi channel input hookups STR-DE585 and STR-DE485 only Although this receiver incorporates a multi channel decoder, it is equipped with multi channel input jacks. To fully enjoy multi channel surround sound, five speakers (two front speakers, two surround speakers, and a center speaker...
Operating Instructions
Page 15
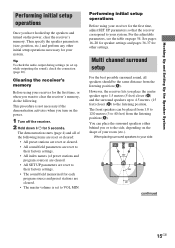
... the shape of preset stations and program sources) are cleared. • All SET UP parameters are reset to their factory settings. • The sound field memorized for each program source and preset stations are cleared. • The master volume is not necessary if the demonstration activates when you place the center speaker up to VOL MIN. However, the receiver lets you turn on the power. 1 Turn off the receiver. 2 Hold down ?/1 for...
... the shape of preset stations and program sources) are cleared. • All SET UP parameters are reset to their factory settings. • The sound field memorized for each program source and preset stations are cleared. • The master volume is not necessary if the demonstration activates when you place the center speaker up to VOL MIN. However, the receiver lets you turn on the power. 1 Turn off the receiver. 2 Hold down ?/1 for...

Operating Instructions
Page 16
... turn on again while pressing LEVEL. (To reset to optimize the sound balance. Caution When you use Sony's Micro Satellite Speakers, select MICRO SP. Initial settings Parameter L R (FRONT) Initial setting LARGE* C (CENTER) LARGE* SL SR (SURROUND) LARGE* SW (SUB WOOFER) S.W. SL SR HGT. to adjust. 3 Press MENU + or MENU - XX.X m (ft.)** 5.0 m (16 ft.)** C DIST. XXX BEHD. MICRO SP. XXX LOW * You can adjust the speaker size and sub woofer selection when you use Micro Satellite Speakers...
... turn on again while pressing LEVEL. (To reset to optimize the sound balance. Caution When you use Sony's Micro Satellite Speakers, select MICRO SP. Initial settings Parameter L R (FRONT) Initial setting LARGE* C (CENTER) LARGE* SL SR (SURROUND) LARGE* SW (SUB WOOFER) S.W. SL SR HGT. to adjust. 3 Press MENU + or MENU - XX.X m (ft.)** 5.0 m (16 ft.)** C DIST. XXX BEHD. MICRO SP. XXX LOW * You can adjust the speaker size and sub woofer selection when you use Micro Satellite Speakers...
Operating Instructions
Page 20
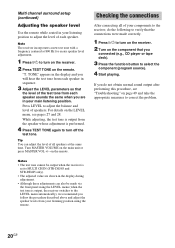
... the receiver. 2 Turn on the component that you connected (e.g., CD player or tape deck). 3 Press the function button to select the component (program source). 4 Start playing. While adjusting, the test tone is output from each speaker. "T. If you do the following to verify that the level of the test tone from each speaker sounds the same when you are shown in the display during adjustment. • Although these adjustments can adjust the level of all of speakers. Multi channel surround setup (continued) Adjusting the speaker level Use the remote...
... the receiver. 2 Turn on the component that you connected (e.g., CD player or tape deck). 3 Press the function button to select the component (program source). 4 Start playing. While adjusting, the test tone is output from each speaker. "T. If you do the following to verify that the level of the test tone from each speaker sounds the same when you are shown in the display during adjustment. • Although these adjustments can adjust the level of all of speakers. Multi channel surround setup (continued) Adjusting the speaker level Use the remote...
Operating Instructions
Page 21
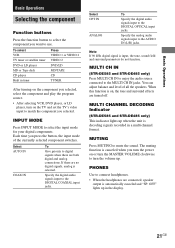
... the audio source connected to the DIGITAL OPTICAL input jacks. PHONES Use to connect headphones. • When the headphones are both digital and analog connections. Each time you turn the power on or turn the MASTER VOLUME clockwise to turn on , the tone and surround effects are no digital signals, analog is canceled when you press the button, the input mode of all the speakers. Specify the analog audio signals input to select the input mode for your digital components. You can adjust balance and level of the currently selected component switches. MULTI CHANNEL DECODING...
... the audio source connected to the DIGITAL OPTICAL input jacks. PHONES Use to connect headphones. • When the headphones are both digital and analog connections. Each time you turn the power on or turn the MASTER VOLUME clockwise to turn on , the tone and surround effects are no digital signals, analog is canceled when you press the button, the input mode of all the speakers. Specify the analog audio signals input to select the input mode for your digital components. You can adjust balance and level of the currently selected component switches. MULTI CHANNEL DECODING...
Operating Instructions
Page 23
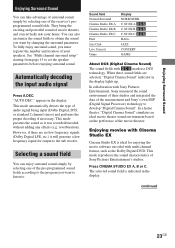
... receiver's preprogrammed sound fields. Selecting a sound field You can enjoy surround sound simply by selecting one of the movie director. This mode presents the sound as it will generate a low frequency signal for enjoying the movie software encoded with multi channel format, such as the Dolby Digital DVD. See "Multi channel surround setup" starting from page 15 to the sub woofer. Automatically decoding the input audio signal Press A.DEC. However, if there are selected, "Digital Cinema Sound" indicator in the display lights...
... receiver's preprogrammed sound fields. Selecting a sound field You can enjoy surround sound simply by selecting one of the movie director. This mode presents the sound as it will generate a low frequency signal for enjoying the movie software encoded with multi channel format, such as the Dolby Digital DVD. See "Multi channel surround setup" starting from page 15 to the sub woofer. Automatically decoding the input audio signal Press A.DEC. However, if there are selected, "Digital Cinema Sound" indicator in the display lights...
Operating Instructions
Page 25
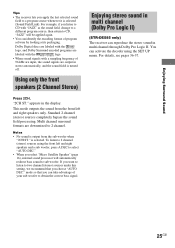
... Surround Sound Tips • The receiver lets you apply the last selected sound field to sub woofer. For example, if you listen to CD with a sampling frequency of your sub woofer to CD, "JAZZ" will automatically redirect bass sound to a program source whenever it is selected. This mode outputs the sound from the sub woofer when "2CH ST." mode so that you can reproduce the stereo sound in the display. Enjoying stereo sound in multi channel (Dolby Pro Logic II) (STR-DE585...
... Surround Sound Tips • The receiver lets you apply the last selected sound field to sub woofer. For example, if you listen to CD with a sampling frequency of your sub woofer to CD, "JAZZ" will automatically redirect bass sound to a program source whenever it is selected. This mode outputs the sound from the sub woofer when "2CH ST." mode so that you can reproduce the stereo sound in the display. Enjoying stereo sound in multi channel (Dolby Pro Logic II) (STR-DE585...
Operating Instructions
Page 26
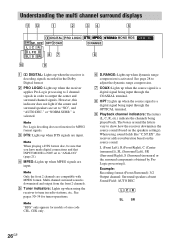
... surround speakers are input. Note "RDS" only appears for tuner operations. DIGITAL: Lights up when the receiver is NOT set to output the center and surround channel signals. Note When playing a DTS format disc, be sure that you have made digital connections and that INPUT MODE is decoding signals recorded in the Dolby Digital format. 2 PRO LOGIC: Lights up when using sound fields like "C.ST.EX", the receiver adds reverberation based on the speakers settings). Example: Recording format (Front /Surround): 3/2 Output channel: Surround speakers absent Sound Field: AUTO...
... surround speakers are input. Note "RDS" only appears for tuner operations. DIGITAL: Lights up when the receiver is NOT set to output the center and surround channel signals. Note When playing a DTS format disc, be sure that you have made digital connections and that INPUT MODE is decoding signals recorded in the Dolby Digital format. 2 PRO LOGIC: Lights up when using sound fields like "C.ST.EX", the receiver adds reverberation based on the speakers settings). Example: Recording format (Front /Surround): 3/2 Output channel: Surround speakers absent Sound Field: AUTO...

Operating Instructions
Page 30
... station. Direct tuning You can enter a frequency of the station you want to store stations in your area. * For models of area code CEL, CEK only) This function lets you want directly by their Program Service name, then assigned a 2-character preset code. Example 1: FM 102.50 MHz 1 b0 b2 b5b 0 Example 2: AM 1350 kHz (You don't have connected FM and AM antennas to the normal operation. The last received station is set to select...
... station. Direct tuning You can enter a frequency of the station you want to store stations in your area. * For models of area code CEL, CEK only) This function lets you want directly by their Program Service name, then assigned a 2-character preset code. Example 1: FM 102.50 MHz 1 b0 b2 b5b 0 Example 2: AM 1350 kHz (You don't have connected FM and AM antennas to the normal operation. The last received station is set to select...

Operating Instructions
Page 36
... of audio sources when editing a video tape. Recording (continued) Recording on a video tape You can record from a VCR, a TV, a DVD player or an LD player using the MENU / or MENU +/- To resume audio recording from another audio source, select the program source, then start playing the video tape or laser disc you want using the receiver. After pressing SLEEP, specify the time you need help. 1 Select the program source to select the setting you make only digital connections. • When MULTI CH IN is selected analog audio signals...
... of audio sources when editing a video tape. Recording (continued) Recording on a video tape You can record from a VCR, a TV, a DVD player or an LD player using the MENU / or MENU +/- To resume audio recording from another audio source, select the program source, then start playing the video tape or laser disc you want using the receiver. After pressing SLEEP, specify the time you need help. 1 Select the program source to select the setting you make only digital connections. • When MULTI CH IN is selected analog audio signals...
Operating Instructions
Page 38
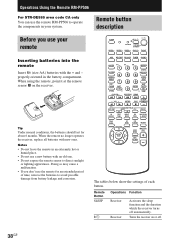
SLEEP ? / 1 AV ? / 1 USE MODE SYSTEM STANDBY VIDEO 1 VIDEO 2 VIDEO 3 DVD/LD TV/SAT AUX MD/TAPE CD/SACD TUNER PHONO MONITOR AV1 1 AV2 2 3RD 3 2ND ROOM (SOURCE) TV/VIDEO INPUT MODE 456 SEARCH AUDIO MODE SPLIT 789 WIDE CLEAR - /- - DIRECT TITLE/ GUIDE AV MENU ON SCREEN MUTING ENTER/ EXEC MASTER MAIN VOL MENU EXIT/ RETURN The tables below show the settings of time, remove the batteries to avoid possible damage from battery leakage and corrosion. Doing so...
SLEEP ? / 1 AV ? / 1 USE MODE SYSTEM STANDBY VIDEO 1 VIDEO 2 VIDEO 3 DVD/LD TV/SAT AUX MD/TAPE CD/SACD TUNER PHONO MONITOR AV1 1 AV2 2 3RD 3 2ND ROOM (SOURCE) TV/VIDEO INPUT MODE 456 SEARCH AUDIO MODE SPLIT 789 WIDE CLEAR - /- - DIRECT TITLE/ GUIDE AV MENU ON SCREEN MUTING ENTER/ EXEC MASTER MAIN VOL MENU EXIT/ RETURN The tables below show the settings of time, remove the batteries to avoid possible damage from battery leakage and corrosion. Doing so...
Operating Instructions
Page 39
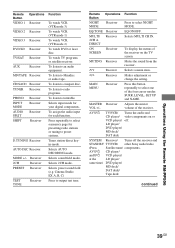
... (e.g. MAIN MENU Receiver Press this button repeatedly to preset stations. Remote Button VIDEO 1 Operations Receiver VIDEO 2 Receiver VIDEO 3 Receiver DVD/LD Receiver TV/SAT Receiver AUX Receiver MD/TAPE Receiver CD/SACD Receiver TUNER Receiver PHONO INPUT MODE AUDIO SPLIT SHIFT Receiver Receiver Receiver Receiver D.TUNING Receiver AUTO DEC Receiver MODE +/- Cinema Studio EX A, B, C) Press to select NIGHT MODE. Remote Operations Function Button NIGHT MODE Receiver Press to output test tone. EQ/TONE Receiver EQ ON/OFF. ON Receiver SCREEN To display the...
... (e.g. MAIN MENU Receiver Press this button repeatedly to preset stations. Remote Button VIDEO 1 Operations Receiver VIDEO 2 Receiver VIDEO 3 Receiver DVD/LD Receiver TV/SAT Receiver AUX Receiver MD/TAPE Receiver CD/SACD Receiver TUNER Receiver PHONO INPUT MODE AUDIO SPLIT SHIFT Receiver Receiver Receiver Receiver D.TUNING Receiver AUTO DEC Receiver MODE +/- Cinema Studio EX A, B, C) Press to select NIGHT MODE. Remote Operations Function Button NIGHT MODE Receiver Press to output test tone. EQ/TONE Receiver EQ ON/OFF. ON Receiver SCREEN To display the...
Operating Instructions
Page 41
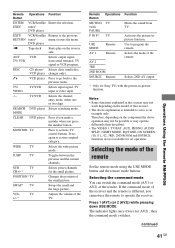
... Selects output signal from TV. WIDE TV Selects the wide picture mode. POSITION* TV Changes the position of the remote Set the remote mode using the USE MODE button and the remote mode buttons. VOL TV +/-* Adjusts the volume of the remote. DVD player n Tape deck Starts play on the component the above explanation is different, you press the number button. Selects the mode of the TV. Selecting the command mode You can switch the command mode (AV1 or AV2) of the receiver and the remote...
... Selects output signal from TV. WIDE TV Selects the wide picture mode. POSITION* TV Changes the position of the remote Set the remote mode using the USE MODE button and the remote mode buttons. VOL TV +/-* Adjusts the volume of the remote. DVD player n Tape deck Starts play on the component the above explanation is different, you press the number button. Selects the mode of the TV. Selecting the command mode You can switch the command mode (AV1 or AV2) of the receiver and the remote...
Operating Instructions
Page 42
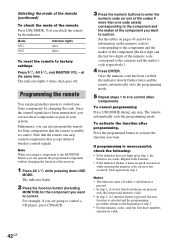
Mode AV1 AV2 Indicator lights once twice To reset the remote to control other components. Once the control signals have been memorized, you can use those components as part of the receiver. 1 Press AV ?/1 while pressing down USE MODE. Note When you assign a component to the MONITOR button, you can operate the programmed component without changing the function of your system. To cancel programming Press USE MODE during any step. If programming is unable to the category and...
Mode AV1 AV2 Indicator lights once twice To reset the remote to control other components. Once the control signals have been memorized, you can use those components as part of the receiver. 1 Press AV ?/1 while pressing down USE MODE. Note When you assign a component to the MONITOR button, you can operate the programmed component without changing the function of your system. To cancel programming Press USE MODE during any step. If programming is unable to the category and...
Operating Instructions
Page 46
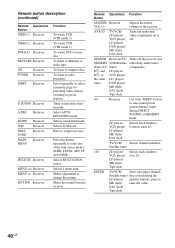
... for presetting radio stations or tuning to select one of the receiver. Remote Operations Function Button MASTER Receiver VOL +/- Makes adjustment or change the setting. Selects sound field mode. Press to compact disc. Selects a menu item. SYSTEM Receiver/TV/ Turns off . Receiver MUTING Receiver Function To watch VCR. (VTR mode 3) To watch VCR. (VTR mode 1) To watch DVD or laser disc. To listen to output test tone. Tuner station direct keyin-mode. AV ?/1 TV/VCR/ CD player/ VCD player/ LD player/ DVD player/ MD deck/ DAT deck Turns the audio and video...
... for presetting radio stations or tuning to select one of the receiver. Remote Operations Function Button MASTER Receiver VOL +/- Makes adjustment or change the setting. Selects sound field mode. Press to compact disc. Selects a menu item. SYSTEM Receiver/TV/ Turns off . Receiver MUTING Receiver Function To watch VCR. (VTR mode 3) To watch VCR. (VTR mode 1) To watch DVD or laser disc. To listen to output test tone. Tuner station direct keyin-mode. AV ?/1 TV/VCR/ CD player/ VCD player/ LD player/ DVD player/ MD deck/ DAT deck Turns the audio and video...
Operating Instructions
Page 50
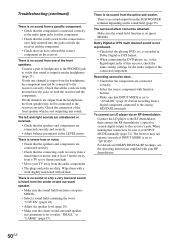
.... • Adjust balance parameters in Dolby Digital or DTS format. • When connecting the DVD player, etc. Wipe them with a cloth slightly moistened with your TV away from the audio components. • The plugs and jacks are ) fully inserted into the jacks on both the receiver and the component. The surround effect cannot be sure to set INPUT MODE manually (page 21). When making this receiver, check the audio setting (settings for the audio output) of...
.... • Adjust balance parameters in Dolby Digital or DTS format. • When connecting the DVD player, etc. Wipe them with a cloth slightly moistened with your TV away from the audio components. • The plugs and jacks are ) fully inserted into the jacks on both the receiver and the component. The surround effect cannot be sure to set INPUT MODE manually (page 21). When making this receiver, check the audio setting (settings for the audio output) of...
Operating Instructions
Page 51
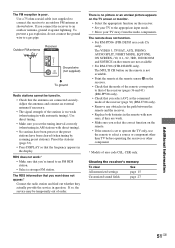
... MULTI CH button on the remote is too weak (when tuning in the display. Use a 75-ohm coaxial cable (not supplied) to connect the receiver to an FM RDS station. • Select a stronger FM station. The FM reception is set the tuning interval correctly (when tuning in . • Check that the antennas are connected securely. To prevent a gas explosion, do not connect the ground wire to select a source or component other than TV before operating the receiver or other component. * Models...
... MULTI CH button on the remote is too weak (when tuning in the display. Use a 75-ohm coaxial cable (not supplied) to connect the receiver to an FM RDS station. • Select a stronger FM station. The FM reception is set the tuning interval correctly (when tuning in . • Check that the antennas are connected securely. To prevent a gas explosion, do not connect the ground wire to select a source or component other than TV before operating the receiver or other component. * Models...


