

Limited Warranty (U.S. Only)
Page 1
...In addition, if you may not apply to you must pay the labor charges to any authorized Sony service facility. This warranty does not cover customer instruction, installation, set up adjustments or signal reception problems. This warranty does not cover cosmetic damage or damage due to ... in exchange for defective parts for one (1) year. 4-557-173-02 General Stereo/Hifi Components/Tape Decks ® CD Players/Mini Disc Players/Audio Systems Hifi Audio LIMITED WARRANTY Sony Electronics Inc. ("Sony") warrants this Product is within 90 days of the date of a service problem...
...In addition, if you may not apply to you must pay the labor charges to any authorized Sony service facility. This warranty does not cover customer instruction, installation, set up adjustments or signal reception problems. This warranty does not cover cosmetic damage or damage due to ... in exchange for defective parts for one (1) year. 4-557-173-02 General Stereo/Hifi Components/Tape Decks ® CD Players/Mini Disc Players/Audio Systems Hifi Audio LIMITED WARRANTY Sony Electronics Inc. ("Sony") warrants this Product is within 90 days of the date of a service problem...
Operating Instructions
Page 3
...STR-DE475 and STR-K402. Conventions • The instructions in operation, according to the area code, are registered trademarks of Parts and Basic Operations 21 Front Panel Parts Descriptions 21 Enjoying Surround Sound 24 Selecting a Sound Field 25 Understanding the Multi-Channel Surround Displays 28 Customizing Sound Fields 30 Receiving... 39 Recording 39 Using the Sleep Timer 40 Adjustment Using the SET UP Button 41 Additional Information 42 Troubleshooting 42 Specifications 44 Glossary 46 Settings Using SURR, LEVEL, and SET UP buttons 47 Remote Button Description 48 Index 51 3 TABLE ...
...STR-DE475 and STR-K402. Conventions • The instructions in operation, according to the area code, are registered trademarks of Parts and Basic Operations 21 Front Panel Parts Descriptions 21 Enjoying Surround Sound 24 Selecting a Sound Field 25 Understanding the Multi-Channel Surround Displays 28 Customizing Sound Fields 30 Receiving... 39 Recording 39 Using the Sleep Timer 40 Adjustment Using the SET UP Button 41 Additional Information 42 Troubleshooting 42 Specifications 44 Glossary 46 Settings Using SURR, LEVEL, and SET UP buttons 47 Remote Button Description 48 Index 51 3 TABLE ...
Operating Instructions
Page 8
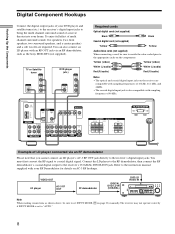
...White (L/audio) Red (R/audio) Red (R/audio) Notes • The optical and coaxial digital input jacks on the receiver are required. TUNING + SET UP - TUNING + MEMORY SHIFT FM MODE FM AM MENU NAME LEVEL SOUND CONTROL SURR SOUND FIELD ENTER A.F.D. TV or Satellite tuner OUTPUT VIDEO OUT OUTPUT DIGITAL OPTICAL... Please note that you cannot connect an LD player's AC-3 RF OUT jack directly to the receiver's digital input jacks. MUTING Note When making connections as the Sony MOD-RF1 (not supplied). MODE 2CH - Hooking Up the Components Digital Component Hookups Connect the ...
...White (L/audio) Red (R/audio) Red (R/audio) Notes • The optical and coaxial digital input jacks on the receiver are required. TUNING + SET UP - TUNING + MEMORY SHIFT FM MODE FM AM MENU NAME LEVEL SOUND CONTROL SURR SOUND FIELD ENTER A.F.D. TV or Satellite tuner OUTPUT VIDEO OUT OUTPUT DIGITAL OPTICAL... Please note that you cannot connect an LD player's AC-3 RF OUT jack directly to the receiver's digital input jacks. MUTING Note When making connections as the Sony MOD-RF1 (not supplied). MODE 2CH - Hooking Up the Components Digital Component Hookups Connect the ...
Operating Instructions
Page 9
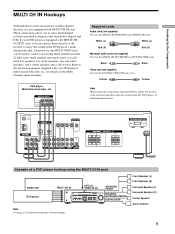
...decoder, etc., for details on speaker system hookup. TREBLE + - Hooking Up the Components MULTI CH IN Hookups Although this receiver incorporates a multi channel decoder, it is equipped with MULTI CH OUTPUT jacks, you can be used to the instruction manual supplied... FM AM MENU NAME LEVEL SOUND CONTROL SURR SOUND FIELD ENTER A.F.D. Front Speaker (L) Front Speaker (R) Surround Speaker (L) Surround Speaker (R) Center Speaker Active Woofer 9 SPEAKERS FRONT ? / 1 PHONES DISPLAY DIMMER MULTI CHANNEL DECODING MULTI CH IN INPUT MODE PRESET - TUNING + SET UP - MUTING...
...decoder, etc., for details on speaker system hookup. TREBLE + - Hooking Up the Components MULTI CH IN Hookups Although this receiver incorporates a multi channel decoder, it is equipped with MULTI CH OUTPUT jacks, you can be used to the instruction manual supplied... FM AM MENU NAME LEVEL SOUND CONTROL SURR SOUND FIELD ENTER A.F.D. Front Speaker (L) Front Speaker (R) Surround Speaker (L) Surround Speaker (R) Center Speaker Active Woofer 9 SPEAKERS FRONT ? / 1 PHONES DISPLAY DIMMER MULTI CHANNEL DECODING MULTI CH IN INPUT MODE PRESET - TUNING + SET UP - MUTING...
Operating Instructions
Page 10
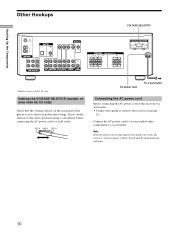
Connect the AC power cord(s) of the player is disconnected for about one week, the receiver's entire memory will be cleared and the demonstration will start. 10 Setting the VOLTAGE SELECTOR (models of area code E2, E3 only) Check that the voltage selector on the rear panel of your audio/video... Connecting the AC power cord Before connecting the AC power cord of area code E2, E3 only. If not, set to a wall outlet. Hooking Up the Components Other Hookups VOLTAGE SELECTOR* FM 75Ω COAXIAL AM ANTENNA ANTENNA L DIGITAL TV/SAT IN DVD/LD IN OPTICAL CENTER L COAXIAL MONITOR VIDEO...
Connect the AC power cord(s) of the player is disconnected for about one week, the receiver's entire memory will be cleared and the demonstration will start. 10 Setting the VOLTAGE SELECTOR (models of area code E2, E3 only) Check that the voltage selector on the rear panel of your audio/video... Connecting the AC power cord Before connecting the AC power cord of area code E2, E3 only. If not, set to a wall outlet. Hooking Up the Components Other Hookups VOLTAGE SELECTOR* FM 75Ω COAXIAL AM ANTENNA ANTENNA L DIGITAL TV/SAT IN DVD/LD IN OPTICAL CENTER L COAXIAL MONITOR VIDEO...
Operating Instructions
Page 11
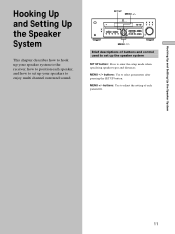
... mode when specifying speaker types and distances. buttons: Use to adjust the setting of buttons and control used to set up your speakers to enjoy multi channel surround sound. TUNING + MEMORY SHIFT FM MODE FM AM MENU NAME LEVEL SOUND CONTROL SURR SOUND FIELD ENTER A.F.D. MUTING MENU ... after pressing the SET UP button. MENU +/- MODE 2CH - TUNING + SET UP - Hooking Up and Setting Up the Speaker System Hooking Up and Setting Up the Speaker System This chapter describes how to hook up your speaker system to the receiver, how to position each parameter. 11 SET UP MENU +/- ...
... mode when specifying speaker types and distances. buttons: Use to adjust the setting of buttons and control used to set up your speakers to enjoy multi channel surround sound. TUNING + MEMORY SHIFT FM MODE FM AM MENU NAME LEVEL SOUND CONTROL SURR SOUND FIELD ENTER A.F.D. MUTING MENU ... after pressing the SET UP button. MENU +/- MODE 2CH - TUNING + SET UP - Hooking Up and Setting Up the Speaker System Hooking Up and Setting Up the Speaker System This chapter describes how to hook up your speaker system to the receiver, how to position each parameter. 11 SET UP MENU +/- ...
Operating Instructions
Page 12
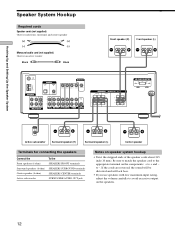
Hooking Up and Setting Up the Speaker System ] Speaker System Hookup Required cords Speaker cords (not supplied) One for each front, surround, and center speaker (+) (+) (-) (-) Monaural audio cord (not supplied) One for an active woofer Black Black } }] Front speaker (R) Front speaker (L) FM 75Ω COAXIAL AM ANTENNA ANTENNA L DIGITAL TV/SAT IN DVD...
Hooking Up and Setting Up the Speaker System ] Speaker System Hookup Required cords Speaker cords (not supplied) One for each front, surround, and center speaker (+) (+) (-) (-) Monaural audio cord (not supplied) One for an active woofer Black Black } }] Front speaker (R) Front speaker (L) FM 75Ω COAXIAL AM ANTENNA ANTENNA L DIGITAL TV/SAT IN DVD...
Operating Instructions
Page 13
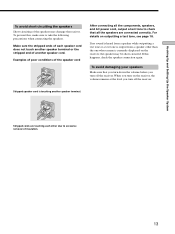
... cords are connected correctly. If this , make sure to check that you turn down the volume before you turn off the receiver. Hooking Up and Setting Up the Speaker System To avoid short-circuiting the speakers Short-circuiting of the speakers may be short-circuited. For details on ...the receiver, the speaker may damage the receiver. To avoid damaging your speakers Make sure that all the components, speakers, and AC power cord, ...
... cords are connected correctly. If this , make sure to check that you turn down the volume before you turn off the receiver. Hooking Up and Setting Up the Speaker System To avoid short-circuiting the speakers Short-circuiting of the speakers may be short-circuited. For details on ...the receiver, the speaker may damage the receiver. To avoid damaging your speakers Make sure that all the components, speakers, and AC power cord, ...
Operating Instructions
Page 14
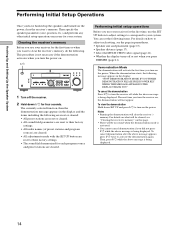
... necessary for four seconds. TUNING + MEMORY SHIFT FM MODE FM AM MENU NAME LEVEL SOUND CONTROL SURR SOUND FIELD ENTER A.F.D. MODE 2CH - TREBLE + - Performing initial setup operations Before you turn on how to turn the receiver off while the above message is being displayed.... distance (page 17). • Select the MULTI CH IN video signal (page 41). • Whether the display turns off the receiver. 2 Hold down SET UP and press ?/1 to activate the demonstration again. Then, press ?/1 while the above message is not necessary if the demonstration activates...
... necessary for four seconds. TUNING + MEMORY SHIFT FM MODE FM AM MENU NAME LEVEL SOUND CONTROL SURR SOUND FIELD ENTER A.F.D. MODE 2CH - TREBLE + - Performing initial setup operations Before you turn on how to turn the receiver off while the above message is being displayed.... distance (page 17). • Select the MULTI CH IN video signal (page 41). • Whether the display turns off the receiver. 2 Hold down SET UP and press ?/1 to activate the demonstration again. Then, press ?/1 while the above message is not necessary if the demonstration activates...

Operating Instructions
Page 15
...receiver. 2 Press SET UP. 3 Press MENU I/i to 12.0 meters) from 3 to 40 feet (1.0 to select the parameter you or to adjust. 4 Press MENU +/- z Normal speaker and Micro Satellite speaker Choose NORM. to MICRO SP. SP. Hooking Up and Setting...setting for NORM. SP. However, if you 're using normal speakers and MICRO SP. If you choose NORM. SP., you can place the surround speakers either behind you use Sony...soundstage. For STR-DE475, the speaker size and sub woofer selection has been preset to the listening position. The following speaker size setup is set all speakers ...
...receiver. 2 Press SET UP. 3 Press MENU I/i to 12.0 meters) from 3 to 40 feet (1.0 to select the parameter you or to adjust. 4 Press MENU +/- z Normal speaker and Micro Satellite speaker Choose NORM. to MICRO SP. SP. Hooking Up and Setting...setting for NORM. SP. However, if you 're using normal speakers and MICRO SP. If you choose NORM. SP., you can place the surround speakers either behind you use Sony...soundstage. For STR-DE475, the speaker size and sub woofer selection has been preset to the listening position. The following speaker size setup is set all speakers ...
Operating Instructions
Page 16
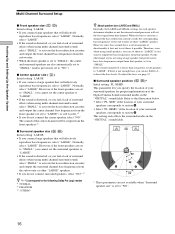
...surround sound, select "SMALL" to activate the bass redirection circuitry and output the center channel bass frequencies from the front speakers (if set to "LARGE". • If the sound is not enough bass, you connect a large speaker that will effectively reproduce bass frequencies,... select "NO".*3 z *1~*3 correspond to the following Dolby Pro Logic modes *1 NORMAL *2 PHANTOM *3 3 STEREO z About speaker sizes (LARGE and SMALL) Internally, the LARGE and SMALL settings for proper implementation of the center channel will be output from that speaker. On the other hand, if ...
...surround sound, select "SMALL" to activate the bass redirection circuitry and output the center channel bass frequencies from the front speakers (if set to "LARGE". • If the sound is not enough bass, you connect a large speaker that will effectively reproduce bass frequencies,... select "NO".*3 z *1~*3 correspond to the following Dolby Pro Logic modes *1 NORMAL *2 PHANTOM *3 3 STEREO z About speaker sizes (LARGE and SMALL) Internally, the LARGE and SMALL settings for proper implementation of the center channel will be output from that speaker. On the other hand, if ...
Operating Instructions
Page 17
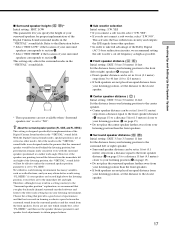
... cohesive space between the surround sound from the surround speakers and the sound from the front speakers. x Sub woofer selection Initial setting : S.W. BEHD.) This setting is not as critical as possible. YES". • If you may result in 1 foot (0.1 meter) steps from a...the front speaker distance (A on your surround speakers corresponds to "NO". x Surround speaker distance ( SL SR ) Initial setting : DIST. 3.5 m (3.5 meter) 11 feet Set the distance from your surround speakers for implementation of your listening position than the front speakers. BEHD." LOW" if the ...
... cohesive space between the surround sound from the surround speakers and the sound from the front speakers. x Sub woofer selection Initial setting : S.W. BEHD.) This setting is not as critical as possible. YES". • If you may result in 1 foot (0.1 meter) steps from a...the front speaker distance (A on your surround speakers corresponds to "NO". x Surround speaker distance ( SL SR ) Initial setting : DIST. 3.5 m (3.5 meter) 11 feet Set the distance from your surround speakers for implementation of your listening position than the front speakers. BEHD." LOW" if the ...
Operating Instructions
Page 18
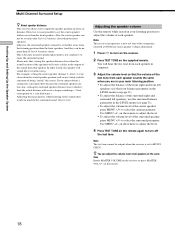
...new test tone with a frequency centered at the same time Rotate MASTER VOLUME on the receiver or press MASTER VOL +/- In other words, the speaker will sound like it a try! For example, setting the center speaker distance 3~6 feet (1~2 m) closer than the actual location of the speakers... speaker. And they can adjust the volume level of distance. Hooking Up and Setting Up the Speaker System Multi Channel Surround Setup z About speaker distances This receiver allows you are too close, setting the surround speaker distance closer (shorter) than the front speakers. However, it ...
...new test tone with a frequency centered at the same time Rotate MASTER VOLUME on the receiver or press MASTER VOL +/- In other words, the speaker will sound like it a try! For example, setting the center speaker distance 3~6 feet (1~2 m) closer than the actual location of the speakers... speaker. And they can adjust the volume level of distance. Hooking Up and Setting Up the Speaker System Multi Channel Surround Setup z About speaker distances This receiver allows you are too close, setting the surround speaker distance closer (shorter) than the front speakers. However, it ...
Operating Instructions
Page 19
... the speakers if the headphones are connected. , Check that the connections were made via the front panel using the remote control. TUNING + SET UP - This is output, the receiver switches to the LEVEL menu automatically), we recommend that you follow the procedure previously described in this lays the foundation for the reason... can also be necessary to make further adjustments while listening to select a component (program source) that you will come from your software. TUNING + MEMORY SHIFT FM MODE FM AM MENU NAME LEVEL SOUND CONTROL SURR SOUND FIELD ENTER A.F.D.
... the speakers if the headphones are connected. , Check that the connections were made via the front panel using the remote control. TUNING + SET UP - This is output, the receiver switches to the LEVEL menu automatically), we recommend that you follow the procedure previously described in this lays the foundation for the reason... can also be necessary to make further adjustments while listening to select a component (program source) that you will come from your software. TUNING + MEMORY SHIFT FM MODE FM AM MENU NAME LEVEL SOUND CONTROL SURR SOUND FIELD ENTER A.F.D.
Operating Instructions
Page 20
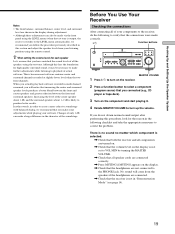
... not included above, see "w; Check that all the cords are fully inserted into the jacks on both the receiver and the component. Hooking Up and Setting Up the Speaker System Before You Use Your Receiver There's no sound from a specific component. , Check that the component is connected correctly to the audio input jacks...
... not included above, see "w; Check that all the cords are fully inserted into the jacks on both the receiver and the component. Hooking Up and Setting Up the Speaker System Before You Use Your Receiver There's no sound from a specific component. , Check that the component is connected correctly to the audio input jacks...
Operating Instructions
Page 21
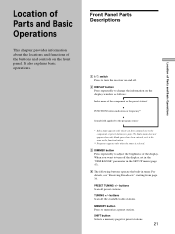
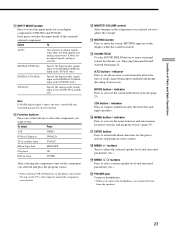
... information on the front panel. For details, see page 39). Front Panel Parts Descriptions 1 ?/1 switch Press to turn the receiver on and off the display, set in the "DIM.RANGE" parameter in the SET UP menu (page 47). 4 The following buttons operate the built-in tuner. MEMORY button Press to the component or...
... information on the front panel. For details, see page 39). Front Panel Parts Descriptions 1 ?/1 switch Press to turn the receiver on and off the display, set in the "DIM.RANGE" parameter in the SET UP menu (page 47). 4 The following buttons operate the built-in tuner. MEMORY button Press to the component or...
Operating Instructions
Page 22
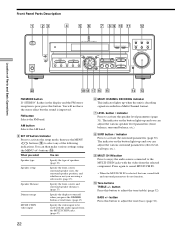
... + SET UP - TUNING + MEMORY SHIFT FM MODE FM AM MENU NAME LEVEL SOUND CONTROL SURR SOUND FIELD ENTER A.F.D. ql qk qj qh qg qf qd FM MODE button If "STEREO" flashes in a Multi Channel format. 7 LEVEL button / indicator Press to activate the speaker level parameters (page 31). FM button Selects the FM band....(page 30). The indicator on the button lights up when the unit is decoding signals recorded in the display and the FM stereo reception is poor, press this button to adjust the tone (treble) (page 32). button Press this button. You will not have the...
... + SET UP - TUNING + MEMORY SHIFT FM MODE FM AM MENU NAME LEVEL SOUND CONTROL SURR SOUND FIELD ENTER A.F.D. ql qk qj qh qg qf qd FM MODE button If "STEREO" flashes in a Multi Channel format. 7 LEVEL button / indicator Press to activate the speaker level parameters (page 31). FM button Selects the FM band....(page 30). The indicator on the button lights up when the unit is decoding signals recorded in the display and the FM stereo reception is poor, press this button to adjust the tone (treble) (page 32). button Press this button. You will not have the...
Operating Instructions
Page 23
...indicator Press to activate the sound field selection mode (page 25). 2CH button / indicator Press to enjoy surround sound. A.F.D button / indicator Press to set the TV's video input to the AUDIO IN (L and R) jack Note If 96 kHz digital signal is selected DIGITAL (OPTICAL) Specify the digital audio...To AUTO Give priority to digital signals when there are no sound will come from page 24. MUTING appears on the TV and set the receiver to adjust the selected speaker level and surround parameters (etc.). qd MASTER VOLUME control After turning on the component you connect the ...
...indicator Press to activate the sound field selection mode (page 25). 2CH button / indicator Press to enjoy surround sound. A.F.D button / indicator Press to set the TV's video input to the AUDIO IN (L and R) jack Note If 96 kHz digital signal is selected DIGITAL (OPTICAL) Specify the digital audio...To AUTO Give priority to digital signals when there are no sound will come from page 24. MUTING appears on the TV and set the receiver to adjust the selected speaker level and surround parameters (etc.). qd MASTER VOLUME control After turning on the component you connect the ...
Operating Instructions
Page 24
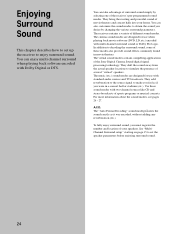
...for use with multi channel surround sound or Dolby Pro Logic. They shift the sound away from the actual speaker locations to set up the receiver to decoding the surround sound, some of these sound modes with Dolby Digital or DTS. See "MultiChannel Surround setup" starting on... concerts. They bring the exciting and powerful sound of the Sony Digital Cinema Sound digital signal processing technology. You can enjoy multi channel surround when playing back software encoded with two-channel sources like CD and stereo broadcasts of several "virtual" speakers. The virtual sound modes ...
...for use with multi channel surround sound or Dolby Pro Logic. They shift the sound away from the actual speaker locations to set up the receiver to decoding the surround sound, some of these sound modes with Dolby Digital or DTS. See "MultiChannel Surround setup" starting on... concerts. They bring the exciting and powerful sound of the Sony Digital Cinema Sound digital signal processing technology. You can enjoy multi channel surround when playing back software encoded with two-channel sources like CD and stereo broadcasts of several "virtual" speakers. The virtual sound modes ...
Operating Instructions
Page 25
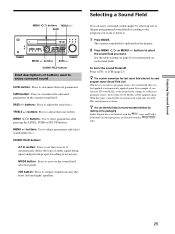
... encoded programs are memorized separately for each sound field. Enjoying Surround Sound MENU / buttons TREBLE +/- TREBLE + - BASS +/- button: Press to set the receiver to automatically detect the type of buttons used to enjoy surround sound LEVEL button: Press to . 1 Press MODE. BASS + VIDEO DVD/LD TV..., SURR or SET UP buttons. See the table starting on page 26 for information on each program source (Sound Field Link) Whenever you want . buttons: Press to CD, HALL will be applied again. z The receiver memorizes the last sound field selected for AM, FM, and all preset...
... encoded programs are memorized separately for each sound field. Enjoying Surround Sound MENU / buttons TREBLE +/- TREBLE + - BASS +/- button: Press to set the receiver to automatically detect the type of buttons used to enjoy surround sound LEVEL button: Press to . 1 Press MODE. BASS + VIDEO DVD/LD TV..., SURR or SET UP buttons. See the table starting on page 26 for information on each program source (Sound Field Link) Whenever you want . buttons: Press to CD, HALL will be applied again. z The receiver memorizes the last sound field selected for AM, FM, and all preset...


