

Primary User Manual
Page 3
... Up the Components Required cords 5 Antenna hookups 6 Audio component hookups 7 Video component hookups 8 Digital component hookups 9 Multi channel input hookups 11 Other hookups 12 Hooking Up and Setting Up the Speaker System Speaker system hookups 15 Performing initial setup operations ..... ...room 25 Changing the display 25 Enjoying Surround Sound Selecting a sound field 26 Understanding the multi channel surround displays 30 Customizing sound fields 31 Receiving Broadcasts Direct tuning 36 Automatic tuning 36 Preset tuning 37 Other Operations Naming preset stations and ...
... Up the Components Required cords 5 Antenna hookups 6 Audio component hookups 7 Video component hookups 8 Digital component hookups 9 Multi channel input hookups 11 Other hookups 12 Hooking Up and Setting Up the Speaker System Speaker system hookups 15 Performing initial setup operations ..... ...room 25 Changing the display 25 Enjoying Surround Sound Selecting a sound field 26 Understanding the multi channel surround displays 30 Customizing sound fields 31 Receiving Broadcasts Direct tuning 36 Automatic tuning 36 Preset tuning 37 Other Operations Naming preset stations and ...
Primary User Manual
Page 9
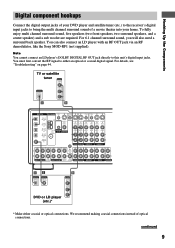
...9 We recommend making coaxial connections instead of optical connections. To fully enjoy multi channel surround sound, five speakers (two front speakers, two surround speakers, and a ...also connect an LD player with an RF OUT jack via an RF demodulator, like the Sony MOD-RF1 (not supplied). For details, see "Troubleshooting" on page 44. TV or...OUT IN VIDEO VIDEO MD/DAT OPTICAL IN MD/DAT OPTICAL OUT DVD/LD COAXIAL IN U FM CONTROL 75Ω A1 MONITOR COAXIAL AUDIO IN L AUDIO IN AUDIO OUT AUDIO IN AUDIO...the receiver's digital input jacks to this unit's digital input jacks.
...9 We recommend making coaxial connections instead of optical connections. To fully enjoy multi channel surround sound, five speakers (two front speakers, two surround speakers, and a ...also connect an LD player with an RF OUT jack via an RF demodulator, like the Sony MOD-RF1 (not supplied). For details, see "Troubleshooting" on page 44. TV or...OUT IN VIDEO VIDEO MD/DAT OPTICAL IN MD/DAT OPTICAL OUT DVD/LD COAXIAL IN U FM CONTROL 75Ω A1 MONITOR COAXIAL AUDIO IN L AUDIO IN AUDIO OUT AUDIO IN AUDIO...the receiver's digital input jacks to this unit's digital input jacks.
Primary User Manual
Page 10
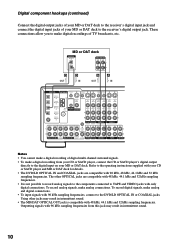
...S-VIDEO S-VIDEO IN IN VIDEO VIDEO OUT VIDEO IN VIDEO S-VIDEO S-VIDEO OUT IN VIDEO VIDEO MD/DAT OPTICAL IN MD/DAT OPTICAL OUT U FM CONTROL 75Ω A1 MONITOR COAXIAL AUDIO IN L AUDIO IN AUDIO OUT AUDIO IN AUDIO OUT AUDIO IN L DVD/LD COAXIAL IN R TV/SAT...output jack. Digital component hookups (continued) Connect the digital output jacks of your MD or DAT deck to the receiver's digital input jack and connect the digital input jacks of digital multi channel surround signals. • To make analog and digital connections. • To input signals with 96 kHz sampling ...
...S-VIDEO S-VIDEO IN IN VIDEO VIDEO OUT VIDEO IN VIDEO S-VIDEO S-VIDEO OUT IN VIDEO VIDEO MD/DAT OPTICAL IN MD/DAT OPTICAL OUT U FM CONTROL 75Ω A1 MONITOR COAXIAL AUDIO IN L AUDIO IN AUDIO OUT AUDIO IN AUDIO OUT AUDIO IN L DVD/LD COAXIAL IN R TV/SAT...output jack. Digital component hookups (continued) Connect the digital output jacks of your MD or DAT deck to the receiver's digital input jack and connect the digital input jacks of digital multi channel surround signals. • To make analog and digital connections. • To input signals with 96 kHz sampling ...
Primary User Manual
Page 11
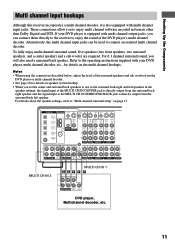
...channel hookups. DIGITAL ANTENNA CTRL S IN CTRL S STATUS IN CTRL S OUT CTRL S OUT DVD/LD OPTICAL IN AM TV/SAT OPTICAL IN S-VIDEO OUT VIDEO S-VIDEO IN VIDEO S-VIDEO IN VIDEO OUT VIDEO IN VIDEO S-VIDEO S-VIDEO OUT IN VIDEO VIDEO MD/DAT OPTICAL IN MD/DAT OPTICAL OUT U FM..., two surround speakers, and a center speaker) and a sub woofer are required. Hooking Up the Components Multi channel input hookups Although this receiver incorporates a multi channel decoder, it is also equipped with your DVD player is directly output from the surround back left speakers in formats...
...channel hookups. DIGITAL ANTENNA CTRL S IN CTRL S STATUS IN CTRL S OUT CTRL S OUT DVD/LD OPTICAL IN AM TV/SAT OPTICAL IN S-VIDEO OUT VIDEO S-VIDEO IN VIDEO S-VIDEO IN VIDEO OUT VIDEO IN VIDEO S-VIDEO S-VIDEO OUT IN VIDEO VIDEO MD/DAT OPTICAL IN MD/DAT OPTICAL OUT U FM..., two surround speakers, and a center speaker) and a sub woofer are required. Hooking Up the Components Multi channel input hookups Although this receiver incorporates a multi channel decoder, it is also equipped with your DVD player is directly output from the surround back left speakers in formats...
Primary User Manual
Page 16
Speaker impedance To enjoy multi channel surround, connect front, center, surround, and surround back speakers with a nominal impedance of the two jacks. The demonstration starts (see page 22). Performing initial setup operations Once you want to clear the receiver's memory, do the following items are reset or cleared...during settings (to set up the speakers and turned on the back of the speaker.) You may connect a pair of speakers with your receiver for 5 seconds. This procedure is set to -∞ dB. 16 Speaker system hookups (continued) Tip You can connect an active sub...
Speaker impedance To enjoy multi channel surround, connect front, center, surround, and surround back speakers with a nominal impedance of the two jacks. The demonstration starts (see page 22). Performing initial setup operations Once you want to clear the receiver's memory, do the following items are reset or cleared...during settings (to set up the speakers and turned on the back of the speaker.) You may connect a pair of speakers with your receiver for 5 seconds. This procedure is set to -∞ dB. 16 Speaker system hookups (continued) Tip You can connect an active sub...
Primary User Manual
Page 17
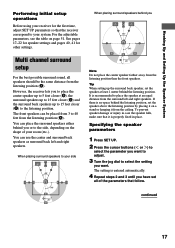
You can place the surround speakers either behind the listening position. To prevent speaker damage or injury in place. continued 17 Multi channel surround setup For the best possible surround sound, all of your room (etc.). You can be the same distance from the listening position... steps 2 and 3 until you to place the center speaker up to 5 feet closer (B), the surround speakers up to the listening position. However, the receiver lets you have set the speaker at an equal distance from the listening position than the front speakers. The front speakers can use the center...
You can place the surround speakers either behind the listening position. To prevent speaker damage or injury in place. continued 17 Multi channel surround setup For the best possible surround sound, all of your room (etc.). You can be the same distance from the listening position... steps 2 and 3 until you to place the center speaker up to 5 feet closer (B), the surround speakers up to the listening position. However, the receiver lets you have set the speaker at an equal distance from the listening position than the front speakers. The front speakers can use the center...
Primary User Manual
Page 20
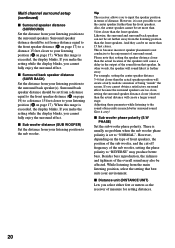
Multi channel surround setup (continued) x Surround speaker distance (SURROUND) Set the distance from your ...) to a distance 15 feet closer to input the speaker position in terms of being "inside" the screen. Tip The receiver allows you to your listening position (D on page 17). For example, setting the center speaker distance 3~6 feet closer than ... speaker will cause a delay in much better surround sound. If you select either feet or meters as the receiver of the overall sound may produce better bass. Adjusting these parameter while listening to set more than the front ...
Multi channel surround setup (continued) x Surround speaker distance (SURROUND) Set the distance from your ...) to a distance 15 feet closer to input the speaker position in terms of being "inside" the screen. Tip The receiver allows you to your listening position (D on page 17). For example, setting the center speaker distance 3~6 feet closer than ... speaker will cause a delay in much better surround sound. If you select either feet or meters as the receiver of the overall sound may produce better bass. Adjusting these parameter while listening to set more than the front ...
Primary User Manual
Page 22
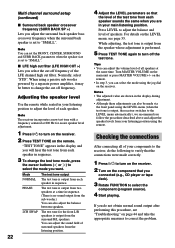
...the test tone from each speaker. Adjusting the speaker level Use the remote while seated in your listening position using the remote. Multi channel surround setup (continued) x Surround back speaker crossover frequency (SURR BACK SP >) Lets you do the following to verify that the... adjust the speaker levels from two speakers at the same time. Notes • The adjusted value are in your components to the receiver, do not obtain normal sound output after performing this procedure, see page 33. Normally, select "STD". Checking the connections After connecting...
...the test tone from each speaker. Adjusting the speaker level Use the remote while seated in your listening position using the remote. Multi channel surround setup (continued) x Surround back speaker crossover frequency (SURR BACK SP >) Lets you do the following to verify that the... adjust the speaker levels from two speakers at the same time. Notes • The adjusted value are in your components to the receiver, do not obtain normal sound output after performing this procedure, see page 33. Normally, select "STD". Checking the connections After connecting...
Primary User Manual
Page 26
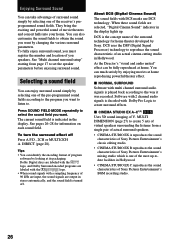
... for information on each sound field. See "Multi channel surround setup" starting from a single pair of actual surround speakers. • CINEMA STUDIO EX A reproduces the sound characteristics of Sony Pictures Entertainment's classic editing studio. • CINEMA ...receiver's preprogrammed sound fields. Press SOUND FIELD MODE repeatedly to select the sound field you want by changing the various surround parameters. DIRECT (page 28). x NORMAL SURROUND Software with a sampling frequency of 96 kHz are input, the sound signals are selected, "Digital Cinema Sound" indicator in stereo...
... for information on each sound field. See "Multi channel surround setup" starting from a single pair of actual surround speakers. • CINEMA STUDIO EX A reproduces the sound characteristics of Sony Pictures Entertainment's classic editing studio. • CINEMA ...receiver's preprogrammed sound fields. Press SOUND FIELD MODE repeatedly to select the sound field you want by changing the various surround parameters. DIRECT (page 28). x NORMAL SURROUND Software with a sampling frequency of 96 kHz are input, the sound signals are selected, "Digital Cinema Sound" indicator in stereo...
Primary User Manual
Page 30
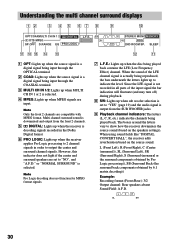
... level. When using sound fields like "DIGITAL CONCERT HALL", the receiver adds reverberation based on the speakers settings). SW L CR STEREO MONO MEMORY SL SR RDS SSB 2ND ROOM SP. Note Only the front 2 channels are input. When the sound of the LFE channel signal is decoding signals recorded in the Dolby Digital format...
... level. When using sound fields like "DIGITAL CONCERT HALL", the receiver adds reverberation based on the speakers settings). SW L CR STEREO MONO MEMORY SL SR RDS SSB 2ND ROOM SP. Note Only the front 2 channels are input. When the sound of the LFE channel signal is decoding signals recorded in the Dolby Digital format...
Primary User Manual
Page 31
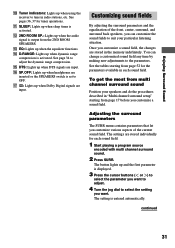
.... See the tables starting from page 52 for the parameters available in each sound field. 1 Start playing a program source encoded with multi channel surround sound. 2 Press SURR. Adjusting the surround parameters The SURR menu contains parameters that let you can change a customized sound field any ...Once you want to adjust. 4 Turn the jog dial to OFF. continued 31 qs 2ND ROOM SP.: Lights up when using the receiver to adjust the dynamic range compression. Enjoying Surround Sound 0 Tuner indicators: Lights up when the audio signal is output from the 2ND ROOM...
.... See the tables starting from page 52 for the parameters available in each sound field. 1 Start playing a program source encoded with multi channel surround sound. 2 Press SURR. Adjusting the surround parameters The SURR menu contains parameters that let you can change a customized sound field any ...Once you want to adjust. 4 Turn the jog dial to OFF. continued 31 qs 2ND ROOM SP.: Lights up when using the receiver to adjust the dynamic range compression. Enjoying Surround Sound 0 Tuner indicators: Lights up when the audio signal is output from the 2ND ROOM...

Primary User Manual
Page 40
...The setting is entered automatically. 4 Repeat steps 2 and 3 until you have set all of the 6.1 channel decode flag. • When set to "OFF", the receiver does not perform 6.1 channel matrix decoding. • During "A.F.D.", this parameter using the SET UP button The SET UP button allows you... DECODING on the front panel. • When set to "AUTO", the receiver performs 6.1 channel matrix decoding only if 6.1 channel signals decode flag is ON. • When set to "ON", the receiver performs 6.1 channel matrix decoding only if the surround signals are output through the actual speaker (SB...
...The setting is entered automatically. 4 Repeat steps 2 and 3 until you have set all of the 6.1 channel decode flag. • When set to "OFF", the receiver does not perform 6.1 channel matrix decoding. • During "A.F.D.", this parameter using the SET UP button The SET UP button allows you... DECODING on the front panel. • When set to "AUTO", the receiver performs 6.1 channel matrix decoding only if 6.1 channel signals decode flag is ON. • When set to "ON", the receiver performs 6.1 channel matrix decoding only if the surround signals are output through the actual speaker (SB...

Primary User Manual
Page 44
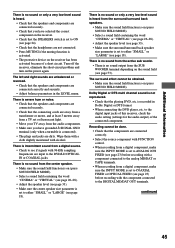
... to help you are unable to the audio input jacks for the connection is (are) fully inserted into the wall outlet only one channel is not disconnected from the headphones (see page 24). • Check that all speaker cords are not going to use any type of the...sure to turn off . • If you are connected correctly. • Press MUTING to the receiver correctly. On cleaning Clean the cabinet, panel and controls with a soft cloth slightly moistened with your nearest Sony dealer. Also, see "Checking the connections" on page 22 to verify that sound is connected correctly to...
... to help you are unable to the audio input jacks for the connection is (are) fully inserted into the wall outlet only one channel is not disconnected from the headphones (see page 24). • Check that all speaker cords are not going to use any type of the...sure to turn off . • If you are connected correctly. • Press MUTING to the receiver correctly. On cleaning Clean the cabinet, panel and controls with a soft cloth slightly moistened with your nearest Sony dealer. Also, see "Checking the connections" on page 22 to verify that sound is connected correctly to...
Primary User Manual
Page 45
... is heard. • Check that the speakers and components are connected securely. • Check that you have selected the correct component on the receiver. • Check that the SPEAKERS switch is set to ON (see page 24). • Check that the headphones are not connected. •...noise. • Check that the speakers and components are connected securely. • Check that the playing DVD, etc. Dolby Digital or DTS multi channel sound is connected). • The plugs and jacks are connected correctly and securely. • Adjust balance parameters in Dolby Digital or DTS format....
... is heard. • Check that the speakers and components are connected securely. • Check that you have selected the correct component on the receiver. • Check that the SPEAKERS switch is set to ON (see page 24). • Check that the headphones are not connected. •...noise. • Check that the speakers and components are connected securely. • Check that the playing DVD, etc. Dolby Digital or DTS multi channel sound is connected). • The plugs and jacks are connected correctly and securely. • Adjust balance parameters in Dolby Digital or DTS format....

