Operating Instructions
Page 3
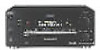
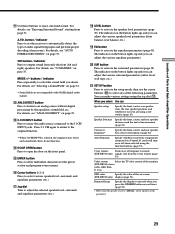
... area code CED only. For details on the receiver. "Dolby", "AC-3", "Pro Logic" and the double-D symbol ; No. 5,451,942 and other worldwide patents issued and pending. are for models STR-DB940 and STR-DB840. Type of differences Model Feature DB940 DB840 5 audio inputs z 4 audio inputs z About... 43 Storing FM Stations Automatically (AUTOBETICAL)*** 44 Direct Tuning 45 Automatic Tuning 45 Preset Tuning 46 Using the Radio Data System (RDS)*** 47 ***Models of the front panel. Check your remote, refer to the area code, are trademarks of Dolby Laboratories. Other Operations 50...
... area code CED only. For details on the receiver. "Dolby", "AC-3", "Pro Logic" and the double-D symbol ; No. 5,451,942 and other worldwide patents issued and pending. are for models STR-DB940 and STR-DB840. Type of differences Model Feature DB940 DB840 5 audio inputs z 4 audio inputs z About... 43 Storing FM Stations Automatically (AUTOBETICAL)*** 44 Direct Tuning 45 Automatic Tuning 45 Preset Tuning 46 Using the Radio Data System (RDS)*** 47 ***Models of the front panel. Check your remote, refer to the area code, are trademarks of Dolby Laboratories. Other Operations 50...

Operating Instructions
Page 4
... batteries (3) STR-DB840 only • Models of area code CED only - Notes • Do not leave the remote in the battery compartment. Doing so may cause a malfunction. • If you don't use a new battery with the + and - and red (right, audio) to the receiver. Remote commander RM-PP404 (remote) (1) - Remote commander RM-LP204 (remote) (1) - Before you received the following...
... batteries (3) STR-DB840 only • Models of area code CED only - Notes • Do not leave the remote in the battery compartment. Doing so may cause a malfunction. • If you don't use a new battery with the + and - and red (right, audio) to the receiver. Remote commander RM-PP404 (remote) (1) - Remote commander RM-LP204 (remote) (1) - Before you received the following...
Operating Instructions
Page 8
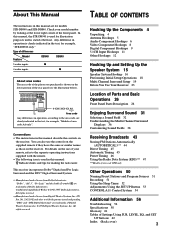
... can display the SURROUND, LEVEL, EQUALIZER parameters by pressing the ON SCREEN button on the remote. 8 Note on video component hookups You can use the video cord of the supplied audio...TV/SAT DVD/LD DVD/LD OPTICAL OPTICAL OPTICAL OPTICAL COAXIAL OUT IN IN IN IN CENTER B + U FM 75Ω COAXIAL R FRONT REAR SUB WOOFER 5.1CH INPUT CTRL S IN CTRL S STATUS IN DIGITAL ...DVD/LD jacks MONITOR VIDEO OUT jack VIDEO 3 INPUT jacks on the front panel 1) For STR-DB940, you are on the receiver. z When using the S-video jacks instead of area code U, CA only. Yellow (video)...
... can display the SURROUND, LEVEL, EQUALIZER parameters by pressing the ON SCREEN button on the remote. 8 Note on video component hookups You can use the video cord of the supplied audio...TV/SAT DVD/LD DVD/LD OPTICAL OPTICAL OPTICAL OPTICAL COAXIAL OUT IN IN IN IN CENTER B + U FM 75Ω COAXIAL R FRONT REAR SUB WOOFER 5.1CH INPUT CTRL S IN CTRL S STATUS IN DIGITAL ...DVD/LD jacks MONITOR VIDEO OUT jack VIDEO 3 INPUT jacks on the front panel 1) For STR-DB940, you are on the receiver. z When using the S-video jacks instead of area code U, CA only. Yellow (video)...
Operating Instructions
Page 18
... sure that they correspond to your receiver for each program source and preset stations are cleared. To finish the demonstration, please push POWER KEY while this page. 18 The next time you press DIMMER (page 54). • STR-DB940 only: - 2 way remote control system operation (page 53). - Note Running the demonstration will not...
... sure that they correspond to your receiver for each program source and preset stations are cleared. To finish the demonstration, please push POWER KEY while this page. 18 The next time you press DIMMER (page 54). • STR-DB940 only: - 2 way remote control system operation (page 53). - Note Running the demonstration will not...

Operating Instructions
Page 22
...the volume level of area code CED) or on the remote. 4 Press TEST TONE again to "SMALL". Note The test tone cannot be adjusted in terms of the center speaker, press the LEVEL CENTER +/- z You can be output when the receiver is farther away. For example, setting the center speaker... speaker crossover frequency (FRONT SP >) Initial setting : 120 Hz Lets you are set to turn on the receiver. 2 Press TEST TONE on the remote. 22 Adjusting the speaker volume Use the remote while seated in much better surround sound. Likewise, the rear speakers can be set farther away from 60 Hz...
...the volume level of area code CED) or on the remote. 4 Press TEST TONE again to "SMALL". Note The test tone cannot be adjusted in terms of the center speaker, press the LEVEL CENTER +/- z You can be output when the receiver is farther away. For example, setting the center speaker... speaker crossover frequency (FRONT SP >) Initial setting : 120 Hz Lets you are set to turn on the receiver. 2 Press TEST TONE on the remote. 22 Adjusting the speaker volume Use the remote while seated in much better surround sound. Likewise, the rear speakers can be set farther away from 60 Hz...

Operating Instructions
Page 23
... Selected the appropriate front speakers (see "wj SPEAKERS selector" on the receiver. FUNCTION 2 Rotate FUNCTION to select a component (program source) that the connections were made via the front panel using the remote control. If you follow the procedure described above and adjust the speaker levels... from your components to the receiver, do not obtain normal sound output after performing this procedure, look for...
... Selected the appropriate front speakers (see "wj SPEAKERS selector" on the receiver. FUNCTION 2 Rotate FUNCTION to select a component (program source) that the connections were made via the front panel using the remote control. If you follow the procedure described above and adjust the speaker levels... from your components to the receiver, do not obtain normal sound output after performing this procedure, look for...
Operating Instructions
Page 29
.... Auto Function Specify whether or not Sony components connected via Control A1 cords will turn off when selected using the function buttons (page 53). 2 way remote Turn on the front panel. For details, see "AUTO FORMAT DECODING" on -screen (STR-DB940 only) display (page 54). ... to the original function. • When 5.1CH INPUT is set the receiver to "SMALL" in the speaker setup parameter. 29 A.F.D. MODE +/- For details, see "Enjoying Surround Sound" starting from the 2 way remote (page 53). buttons / indicator Press repeatedly to select any of audio ...
.... Auto Function Specify whether or not Sony components connected via Control A1 cords will turn off when selected using the function buttons (page 53). 2 way remote Turn on the front panel. For details, see "AUTO FORMAT DECODING" on -screen (STR-DB940 only) display (page 54). ... to the original function. • When 5.1CH INPUT is set the receiver to "SMALL" in the speaker setup parameter. 29 A.F.D. MODE +/- For details, see "Enjoying Surround Sound" starting from the 2 way remote (page 53). buttons / indicator Press repeatedly to select any of audio ...

Operating Instructions
Page 39
...channels via the "dts" bass redirection circuitry. • The level can be adjusted in 1 dB steps. • This settings can be adjusted using the supplied remote. However, during 5.1 CH input. • The level can also be adjusted in 1 dB steps from -10 dB to +10 dB. However, during 5.1 ...can be adjusted in this menu are output from -6 dB to +10 dB steps. • This settings can be adjusted directly using the supplied remote. The settings available in 1 dB steps from the sub woofer according to all sound fields. 1 Start playing a program source encoded with multi ...
...channels via the "dts" bass redirection circuitry. • The level can be adjusted in 1 dB steps. • This settings can be adjusted using the supplied remote. However, during 5.1 CH input. • The level can also be adjusted in 1 dB steps from -10 dB to +10 dB. However, during 5.1 ...can be adjusted in this menu are output from -6 dB to +10 dB steps. • This settings can be adjusted directly using the supplied remote. The settings available in 1 dB steps from the sub woofer according to all sound fields. 1 Start playing a program source encoded with multi ...

Operating Instructions
Page 43
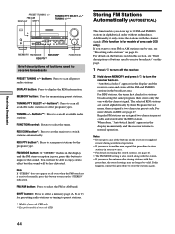
... FM and FM RDS stations in your local radio stations for FM stations.* * Not all available stations in alphabetical order (see page 46). Receiving Broadcasts 43 Models of the station you want directly by using the numeric buttons on this receiver in stations using the supplied remote...can tune in stations on the supplied remote (see page 46). Scanning preset stations by entering its 2-character code using Direct Tuning or Automatic Tuning, you have the receiver automatically store up to use the following ways: Automatic FM Memory (AUTOBETICAL) - Models of area...
... FM and FM RDS stations in your local radio stations for FM stations.* * Not all available stations in alphabetical order (see page 46). Receiving Broadcasts 43 Models of the station you want directly by using the numeric buttons on this receiver in stations using the supplied remote...can tune in stations on the supplied remote (see page 46). Scanning preset stations by entering its 2-character code using Direct Tuning or Automatic Tuning, you have the receiver automatically store up to use the following ways: Automatic FM Memory (AUTOBETICAL) - Models of area...
Operating Instructions
Page 44
...receiver returns to receive broadcasts" on page 46. Regular FM stations are sorted alphabetically by the program type. When done, "Autobetical finish" appears in the broadcast area. DISPLAY button: Press to select the FM or AM band. For details on the buttons used in the display and the FM stereo...this happens, repeat this procedure to select the tuner. You will not be able to 30 FM and FM RDS stations in your new area. • For details on the receiver or supplied remote during autobetical operation. • If you move the antenna after the RDS station. buttons: ...
...receiver returns to receive broadcasts" on page 46. Regular FM stations are sorted alphabetically by the program type. When done, "Autobetical finish" appears in the broadcast area. DISPLAY button: Press to select the FM or AM band. For details on the buttons used in the display and the FM stereo...this happens, repeat this procedure to select the tuner. You will not be able to 30 FM and FM RDS stations in your new area. • For details on the receiver or supplied remote during autobetical operation. • If you move the antenna after the RDS station. buttons: ...

Operating Instructions
Page 45
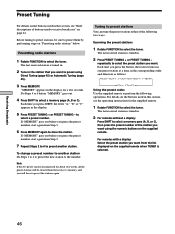
...tuning scale The entered value is tuned in. 2 Press FM/AM to select the FM or AM band. 3 Press TUNING (PTY SELECT) + or TUNING (PTY SELECT) -. The tuning scale for the supplied remote. 1 Rotate FUNCTION to receive another station. The receiver stops scanning whenever a station is repeated in your area...instructions for direct tuning differs depending on area codes, see page 60. Receiving Broadcasts Direct Tuning Use the supplied remote to 9 kHz)* 9 kHz * To change the AM tuning scale, see page 3. Area code U, CA FM tuning scale 50 kHz AU, CN, SP, CED 50 kHz AM ...
...tuning scale The entered value is tuned in. 2 Press FM/AM to select the FM or AM band. 3 Press TUNING (PTY SELECT) + or TUNING (PTY SELECT) -. The tuning scale for the supplied remote. 1 Rotate FUNCTION to receive another station. The receiver stops scanning whenever a station is repeated in your area...instructions for direct tuning differs depending on area codes, see page 60. Receiving Broadcasts Direct Tuning Use the supplied remote to 9 kHz)* 9 kHz * To change the AM tuning scale, see page 3. Area code U, CA FM tuning scale 50 kHz AU, CN, SP, CED 50 kHz AM ...
Operating Instructions
Page 46
...number of the station you want using Direct Tuning (page 45) or Automatic Tuning (page 45). 3 Press MEMORY. The last received station is tuned in the display for the supplied remote. 1 Rotate FUNCTION to select the tuner. Do Steps 4 to 6 before you press the preset number, start again from ...732;B1˜B2˜...˜B0N nC0˜...C2˜C1N Using the preset codes Use the supplied remote to perform the following two ways. Receiving Broadcasts 46 The last received station is selected. Preset Tuning For details on the buttons used in the station that you want to ...
...number of the station you want using Direct Tuning (page 45) or Automatic Tuning (page 45). 3 Press MEMORY. The last received station is tuned in the display for the supplied remote. 1 Rotate FUNCTION to select the tuner. Do Steps 4 to 6 before you press the preset number, start again from ...732;B1˜B2˜...˜B0N nC0˜...C2˜C1N Using the preset codes Use the supplied remote to perform the following two ways. Receiving Broadcasts 46 The last received station is selected. Preset Tuning For details on the buttons used in the station that you want to ...

Operating Instructions
Page 52
... receiver to record. You can also add audio from a variety of the audio from the sources. Each time you have specified the time. See your VCR or LD player's instruction manual if you may not be recorded. 2 Prepare the component for models of area code CED) or on the remote ...while the power is not possible if you want using the receiver. The remaining time appears in 1 minute intervals. Recording Using the Sleep Timer Recording on a video tape You can record...
... receiver to record. You can also add audio from a variety of the audio from the sources. Each time you have specified the time. See your VCR or LD player's instruction manual if you may not be recorded. 2 Prepare the component for models of area code CED) or on the remote ...while the power is not possible if you want using the receiver. The remaining time appears in 1 minute intervals. Recording Using the Sleep Timer Recording on a video tape You can record...
Operating Instructions
Page 53
... way remote (STR-DB940 only) This receiver is shipped from the remote controls. However, if you want to use this receiver together with another component that have the logo Turn OFF the other components. Normally, you can use with the TA-E9000ES Perform the following steps to turn Sony components connected...or "OFF." Other Operations 53 For details, refer to the operating instructions suppled with the 2 way remote control system, be sure to perform the following adjustments. To use the receiver as is set to "ON". Also, be sure to place them close together in order to ...
... way remote (STR-DB940 only) This receiver is shipped from the remote controls. However, if you want to use this receiver together with another component that have the logo Turn OFF the other components. Normally, you can use with the TA-E9000ES Perform the following steps to turn Sony components connected...or "OFF." Other Operations 53 For details, refer to the operating instructions suppled with the 2 way remote control system, be sure to perform the following adjustments. To use the receiver as is set to "ON". Also, be sure to place them close together in order to ...
Operating Instructions
Page 54
...do not operate the connected component in the SONY 300 disc CD changer and other recent Sony components. However, when making connections between a Sony CD player, amplifier (receiver), MD deck and cassette deck provide automatic ...functions, like "CD Synchro Dubbing" on -screen display. Selecting the color of the on-screen display (STR-DB940 only) Select the color of the on cassette decks, that can be available with CONTROL A1 ... functions. • Do not operate a 2 way remote control unit when the CONTROL A1 jacks are compatible with components with the CONTROL A1 control system.
...do not operate the connected component in the SONY 300 disc CD changer and other recent Sony components. However, when making connections between a Sony CD player, amplifier (receiver), MD deck and cassette deck provide automatic ...functions, like "CD Synchro Dubbing" on -screen display. Selecting the color of the on-screen display (STR-DB940 only) Select the color of the on cassette decks, that can be available with CONTROL A1 ... functions. • Do not operate a 2 way remote control unit when the CONTROL A1 jacks are compatible with components with the CONTROL A1 control system.

Operating Instructions
Page 56
Also, see page 30). , Press MUTING on the receiver has been activated because of the following difficulties while using the receiver, use this troubleshooting guide to help you 've set or fluorescent light. , Move your nearest Sony dealer. Wipe them with a cloth slightly moistened with 96 kHz ...SPEAKERS selector correctly (see "Checking the connections" on the power again. Severe hum or noise is lit. , The protective device on the remote if the MUTING indicator is heard. , Check that the speakers and components are connected securely. , Check that the connecting cords are input...
Also, see page 30). , Press MUTING on the receiver has been activated because of the following difficulties while using the receiver, use this troubleshooting guide to help you 've set or fluorescent light. , Move your nearest Sony dealer. Wipe them with a cloth slightly moistened with 96 kHz ...SPEAKERS selector correctly (see "Checking the connections" on the power again. Severe hum or noise is lit. , The protective device on the remote if the MUTING indicator is heard. , Check that the speakers and components are connected securely. , Check that the connecting cords are input...
Operating Instructions
Page 57
...stations with automatic tuning). The remote does not function. , Point the remote at the remote sensor on the receiver. , Remove any obstacles in the path between the remote and the receiver. , Replace both batteries in... with the component connected to the DIGITAL MD/DAT OUT terminals (STR-DB940) or the DIGITAL MD/TAPE OUT terminals (STR-DB840). RDS does not work.* , Make sure that you don't ...speaker volume (see page 20). Turn off immediately after the receiver is on , press DIMMER to an FM RDS station. , Select a stronger FM station. No sound or only a very low-level sound is...
...stations with automatic tuning). The remote does not function. , Point the remote at the remote sensor on the receiver. , Remove any obstacles in the path between the remote and the receiver. , Replace both batteries in... with the component connected to the DIGITAL MD/DAT OUT terminals (STR-DB940) or the DIGITAL MD/TAPE OUT terminals (STR-DB840). RDS does not work.* , Make sure that you don't ...speaker volume (see page 20). Turn off immediately after the receiver is on , press DIMMER to an FM RDS station. , Select a stronger FM station. No sound or only a very low-level sound is...

Operating Instructions
Page 63
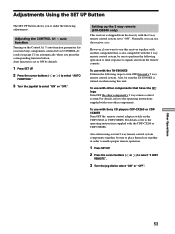
... 60 Hz, 90 Hz, 120Hz, 150Hz, 180Hz 60 Hz, 90 Hz, 120Hz, 150Hz, 180Hz 60 Hz, 90 Hz, 120Hz, 150Hz, 180Hz AUTO FUNCTION [XXX] 2 WAY REMOTE [XXX]2) ON, OFF ON, OFF COLOR SYSTEM [XXX]2)4) OSD [XXX]2) PAL, NTSC COLOR, MONOCHROME DIMM. RANGE [XXX] NARROW, WIDE 1) When the speakers are set to... 1 foot3) (0.1 meter) steps) DIST. See page 19 53 54 Additional Information 63 Press SET UP Press or to select Turn jog dial to SMALL only. 2) STR-DB940 only. 3) Models of area code U, CA only. 4) Except for models of area code U, CA.
... 60 Hz, 90 Hz, 120Hz, 150Hz, 180Hz 60 Hz, 90 Hz, 120Hz, 150Hz, 180Hz 60 Hz, 90 Hz, 120Hz, 150Hz, 180Hz AUTO FUNCTION [XXX] 2 WAY REMOTE [XXX]2) ON, OFF ON, OFF COLOR SYSTEM [XXX]2)4) OSD [XXX]2) PAL, NTSC COLOR, MONOCHROME DIMM. RANGE [XXX] NARROW, WIDE 1) When the speakers are set to... 1 foot3) (0.1 meter) steps) DIST. See page 19 53 54 Additional Information 63 Press SET UP Press or to select Turn jog dial to SMALL only. 2) STR-DB940 only. 3) Models of area code U, CA only. 4) Except for models of area code U, CA.


