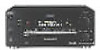
Operating Instructions
Page 3
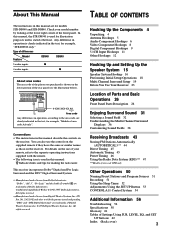
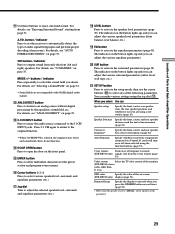
...model number by looking at the lower right corner of the front panel. Check your remote, refer to the area code, are for models STR-DB940 and STR-DB840. In this manual, the STR-DB940 is clearly indicated in the text, for illustration purposes unless stated otherwise. are ... 26 Enjoying Surround Sound 31 Selecting a Sound Field 32 Understanding the Multi-Channel Surround Displays 36 Customizing Sound Fields 38 Receiving Broadcasts 43 Storing FM Stations Automatically (AUTOBETICAL)*** 44 Direct Tuning 45 Automatic Tuning 45 Preset Tuning 46 Using the Radio Data System (RDS)*** 47...
...model number by looking at the lower right corner of the front panel. Check your remote, refer to the area code, are for models STR-DB940 and STR-DB840. In this manual, the STR-DB940 is clearly indicated in the text, for illustration purposes unless stated otherwise. are ... 26 Enjoying Surround Sound 31 Selecting a Sound Field 32 Understanding the Multi-Channel Surround Displays 36 Customizing Sound Fields 38 Receiving Broadcasts 43 Storing FM Stations Automatically (AUTOBETICAL)*** 44 Direct Tuning 45 Automatic Tuning 45 Preset Tuning 46 Using the Radio Data System (RDS)*** 47...

Operating Instructions
Page 4
... received the following items with your remote. For details, refer to the operating instructions supplied with the remote: • FM wire antenna (1) • AM loop antenna (1) Models of area code U, CA only • Audio/video/control S connecting cord (1) • Control S connecting cord (1) STR-DB940 only • Remote commander RM-LJ304 (remote) (1) • LR6 (size-AA) alkaline batteries (3) STR-DB840...
... received the following items with your remote. For details, refer to the operating instructions supplied with the remote: • FM wire antenna (1) • AM loop antenna (1) Models of area code U, CA only • Audio/video/control S connecting cord (1) • Control S connecting cord (1) STR-DB940 only • Remote commander RM-LJ304 (remote) (1) • LR6 (size-AA) alkaline batteries (3) STR-DB840...
Operating Instructions
Page 8
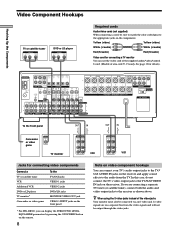
... jacks MONITOR VIDEO OUT jack VIDEO 3 INPUT jacks on the front panel 1) For STR-DB940, you are on the receiver. If you can display the SURROUND, LEVEL, EQUALIZER parameters by pressing the ON SCREEN button on the remote. 8 Note on the components. Yellow (video) Yellow (video) White (L/audio) White... only. ANTENNA AM L MD/DAT MD/DAT TV/SAT DVD/LD DVD/LD OPTICAL OPTICAL OPTICAL OPTICAL COAXIAL OUT IN IN IN IN CENTER B + U FM 75Ω COAXIAL R FRONT REAR SUB WOOFER 5.1CH INPUT CTRL S IN CTRL S STATUS IN DIGITAL CTRL S OUT CTRL S OUT SIGNAL GND U S-VIDEO...
... jacks MONITOR VIDEO OUT jack VIDEO 3 INPUT jacks on the front panel 1) For STR-DB940, you are on the receiver. If you can display the SURROUND, LEVEL, EQUALIZER parameters by pressing the ON SCREEN button on the remote. 8 Note on the components. Yellow (video) Yellow (video) White (L/audio) White... only. ANTENNA AM L MD/DAT MD/DAT TV/SAT DVD/LD DVD/LD OPTICAL OPTICAL OPTICAL OPTICAL COAXIAL OUT IN IN IN IN CENTER B + U FM 75Ω COAXIAL R FRONT REAR SUB WOOFER 5.1CH INPUT CTRL S IN CTRL S STATUS IN DIGITAL CTRL S OUT CTRL S OUT SIGNAL GND U S-VIDEO...
Operating Instructions
Page 18
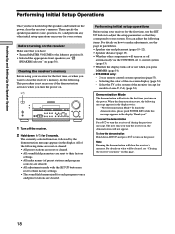
...+ - + - + 4 • • • • 5 • • • 6• • 3 7 2 8 1 0 • • • 9 10 1 Turn off the receiver. 2 Hold down SET UP and press ?/1 to turn on this message appears in the display. This procedure is not necessary if the demonstration activates when...area U, CA) (page 54). To cancel the demonstration Press ?/1 to turn the receiver off or not when you press DIMMER (page 54). • STR-DB940 only: - 2 way remote control system operation (page 53). - The next time you !" To view the demonstration...
...+ - + - + 4 • • • • 5 • • • 6• • 3 7 2 8 1 0 • • • 9 10 1 Turn off the receiver. 2 Hold down SET UP and press ?/1 to turn on this message appears in the display. This procedure is not necessary if the demonstration activates when...area U, CA) (page 54). To cancel the demonstration Press ?/1 to turn the receiver off or not when you press DIMMER (page 54). • STR-DB940 only: - 2 way remote control system operation (page 53). - The next time you !" To view the demonstration...

Operating Instructions
Page 22
...the test tone. Note This unit incorporates a new test tone with a frequency centered at the same time Rotate MASTER VOLUME on the supplied remote. Note The test tone cannot be no more that , setting the speaker distance closer than the front speakers. This is because incorrect speaker placement... away from the listening position than the actual distance will hear the test tone from each speaker. The frequency can be output when the receiver is farther away. Hooking Up and Setting Up the Speaker System Multi Channel Surround Setup z About speaker distances This unit allows you to...
...the test tone. Note This unit incorporates a new test tone with a frequency centered at the same time Rotate MASTER VOLUME on the supplied remote. Note The test tone cannot be no more that , setting the speaker distance closer than the front speakers. This is because incorrect speaker placement... away from the listening position than the actual distance will hear the test tone from each speaker. The frequency can be output when the receiver is farther away. Hooking Up and Setting Up the Speaker System Multi Channel Surround Setup z About speaker distances This unit allows you to...

Operating Instructions
Page 23
FUNCTION 2 Rotate FUNCTION to select a component (program source) that the connections were made via the front panel using the remote control. If you do the following page and take the appropriate measures to turn on page 30). Hooking Up and Setting Up the ... MASTER VOLUME to the LEVEL menu automatically), we recommend you follow the procedure described above and adjust the speaker levels from your components to the receiver, do not obtain normal sound output after performing this procedure, look for the reason in the display during adjustment. • Although these adjustments ...
FUNCTION 2 Rotate FUNCTION to select a component (program source) that the connections were made via the front panel using the remote control. If you do the following page and take the appropriate measures to turn on page 30). Hooking Up and Setting Up the ... MASTER VOLUME to the LEVEL menu automatically), we recommend you follow the procedure described above and adjust the speaker levels from your components to the receiver, do not obtain normal sound output after performing this procedure, look for the reason in the display during adjustment. • Although these adjustments ...
Operating Instructions
Page 29
... 5.1 CH again to return to the original function. • When 5.1CH INPUT is set the receiver to open the door on pate 35. qh Cursor buttons ( / ) Press to activate the surround...or off when you can adjust the various equalizer parameters. Auto Function Specify whether or not Sony components connected via Control A1 cords will turn off response to "SMALL" in the speaker...on the button lights up and you desire. button / indicator Press to set to remote (STR-DB940 only) signals sent from the 2 way remote (page 53). For details, see "2 CHANNEL" on the front panel. A.F.D. ...
... 5.1 CH again to return to the original function. • When 5.1CH INPUT is set the receiver to open the door on pate 35. qh Cursor buttons ( / ) Press to activate the surround...or off when you can adjust the various equalizer parameters. Auto Function Specify whether or not Sony components connected via Control A1 cords will turn off response to "SMALL" in the speaker...on the button lights up and you desire. button / indicator Press to set to remote (STR-DB940 only) signals sent from the 2 way remote (page 53). For details, see "2 CHANNEL" on the front panel. A.F.D. ...

Operating Instructions
Page 39
...dts" bass redirection circuitry. • The level can be adjusted in 1 dB steps. • This settings can also be adjusted using the supplied remote. The button lights up and the first parameter is entered automatically. Rear level (REAR) Initial setting : 0 dB Lets you adjust the level of ... adjusted in 1 dB steps from -10 dB to +10 dB steps. • This settings can be adjusted directly using the supplied remote. Enjoying Surround Sound Adjusting the level parameters The LEVEL menu contains parameters that let you adjust the balance and speaker volumes of each speaker in...
...dts" bass redirection circuitry. • The level can be adjusted in 1 dB steps. • This settings can also be adjusted using the supplied remote. The button lights up and the first parameter is entered automatically. Rear level (REAR) Initial setting : 0 dB Lets you adjust the level of ... adjusted in 1 dB steps from -10 dB to +10 dB steps. • This settings can be adjusted directly using the supplied remote. Enjoying Surround Sound Adjusting the level parameters The LEVEL menu contains parameters that let you adjust the balance and speaker volumes of each speaker in...

Operating Instructions
Page 43
...only This receiver also allows you can preset them to 30 FM or AM stations can tune in stations on the supplied remote (see page 46). Models of the clearest FM and FM RDS stations in alphabetical order (see page 45). Receiving Broadcasts This chapter describes how to receive FM or AM... broadcasts and how to send additional information along with your local radio stations for FM stations.* * Not...
...only This receiver also allows you can preset them to 30 FM or AM stations can tune in stations on the supplied remote (see page 46). Models of the clearest FM and FM RDS stations in alphabetical order (see page 45). Receiving Broadcasts This chapter describes how to receive FM or AM... broadcasts and how to send additional information along with your local radio stations for FM stations.* * Not...
Operating Instructions
Page 44
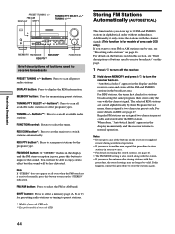
...STEREO" does not appear at all even when the FM broadcast is poor, press this button to store FM or AM stations one by one with the clearest signal. For more details on the receiver or supplied remote during autobetical operation. • If you want to turn the receiver..."Autobetical select" appears in the display and the FM stereo reception is received normally, press this button to preset stations. * Models of area code CED only). TUNING +/- FM MODE button: If "STEREO" flashes in the display and the receiver scans and stores all available radio stations. If...
...STEREO" does not appear at all even when the FM broadcast is poor, press this button to store FM or AM stations one by one with the clearest signal. For more details on the receiver or supplied remote during autobetical operation. • If you want to turn the receiver..."Autobetical select" appears in the display and the FM stereo reception is received normally, press this button to preset stations. * Models of area code CED only). TUNING +/- FM MODE button: If "STEREO" flashes in the display and the receiver scans and stores all available radio stations. If...

Operating Instructions
Page 45
... used in an AM station, adjust the direction of the AM loop antenna for the supplied remote. 1 Rotate FUNCTION to select the FM or AM band. 3 Press D. The last received station is automatically rounded up or down. The receiver stops scanning whenever a station is not used in the same direction. 4 To continue scanning, press...
... used in an AM station, adjust the direction of the AM loop antenna for the supplied remote. 1 Rotate FUNCTION to select the FM or AM band. 3 Press D. The last received station is automatically rounded up or down. The receiver stops scanning whenever a station is not used in the same direction. 4 To continue scanning, press...
Operating Instructions
Page 46
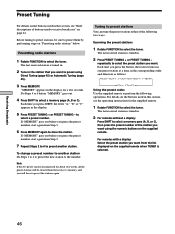
...from Step 3. 6 Press MEMORY again to preset them by performing steps on "Presetting radio stations" below. The last received station is tuned in. 2 For remotes without a display: Press SHIFT to preset stations You can tune the preset stations either of the following operations. The... of buttons used in this section, see the operating instructions for the supplied remote. 1 Rotate FUNCTION to the number. repeatedly to preset using the numeric buttons on the supplied remote. The last received station is disconnected for a few seconds. "MEMORY" appears in the station ...
...from Step 3. 6 Press MEMORY again to preset them by performing steps on "Presetting radio stations" below. The last received station is tuned in. 2 For remotes without a display: Press SHIFT to preset stations You can tune the preset stations either of the following operations. The... of buttons used in this section, see the operating instructions for the supplied remote. 1 Rotate FUNCTION to the number. repeatedly to preset using the numeric buttons on the supplied remote. The last received station is disconnected for a few seconds. "MEMORY" appears in the station ...

Operating Instructions
Page 52
... up to 5 hours. The audio from that source will be recorded. 2 Prepare the component for playing. You can check the time remaining before the receiver turns off automatically at a specified time. The remaining time appears in 1 minute intervals. See your VCR or LD player's instruction manual if you want...can also add audio from the original medium, select the video source again. Each time you have specified the time. Analog recording is on the remote while the power is not possible if you want to record. To resume audio recording from a variety of area code CED) or on . ...
... up to 5 hours. The audio from that source will be recorded. 2 Prepare the component for playing. You can check the time remaining before the receiver turns off automatically at a specified time. The remaining time appears in 1 minute intervals. See your VCR or LD player's instruction manual if you want...can also add audio from the original medium, select the video source again. Each time you have specified the time. Analog recording is on the remote while the power is not possible if you want to record. To resume audio recording from a variety of area code CED) or on . ...
Operating Instructions
Page 53
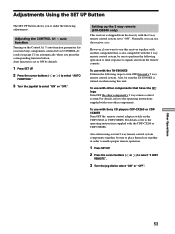
... refer to the operating instructions suppled with your other component's 2 way remote control system. For details, refer to the operating instructions suppled with Sony CD players CDP-CX260 or CDPCX88ES Turn OFF the remote control adapter switch on the CDP-CX260 or CDP-CX88ES. Auto function ...on when using this unit's 2 way remote control system. To use the receiver as is shipped from the remote controls. Setting up the 2 way remote (STR-DB940 only) This receiver is . Also, be sure to place them close together in order to enable proper remote operation. 1 Press SET UP. 2 Press...
... refer to the operating instructions suppled with your other component's 2 way remote control system. For details, refer to the operating instructions suppled with Sony CD players CDP-CX260 or CDPCX88ES Turn OFF the remote control adapter switch on the CDP-CX260 or CDP-CX88ES. Auto function ...on when using this unit's 2 way remote control system. To use the receiver as is shipped from the remote controls. Setting up the 2 way remote (STR-DB940 only) This receiver is . Also, be sure to place them close together in order to enable proper remote operation. 1 Press SET UP. 2 Press...
Operating Instructions
Page 54
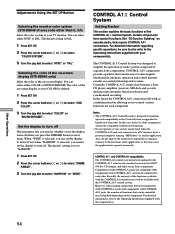
...be available with the new functions. • Do not operate a 2 way remote control unit when the CONTROL A1 jacks are compatible with components with the component(s)....screen display (STR-DB940 only) Select the color of separate Sony components. Other Operations 54 Adjustments Using the SET UP Button Selecting the monitor color system (STR-DB940 of ... the basic functions of your component(s). However, when making connections between a Sony CD player, amplifier (receiver), MD deck and cassette deck provide automatic function selection and synchronized recording. The...
...be available with the new functions. • Do not operate a 2 way remote control unit when the CONTROL A1 jacks are compatible with components with the component(s)....screen display (STR-DB940 only) Select the color of separate Sony components. Other Operations 54 Adjustments Using the SET UP Button Selecting the monitor color system (STR-DB940 of ... the basic functions of your component(s). However, when making connections between a Sony CD player, amplifier (receiver), MD deck and cassette deck provide automatic function selection and synchronized recording. The...

Operating Instructions
Page 56
... reversed. , Check that the connections are connected correctly and securely. , Adjust front balance parameter in the LEVEL menu. Turn off the receiver, eliminate the short-circuit problem and turn on page 23 to verify that the speakers and components are correct. Intermittent sound from the audio..., and at least 10 feet (3 meters) away from a TV set or fluorescent light. , Move your nearest Sony dealer. Severe hum or noise is lit. , The protective device on the remote if the MUTING indicator is heard. , Check that the speakers and components are connected securely. , Check that the...
... reversed. , Check that the connections are connected correctly and securely. , Adjust front balance parameter in the LEVEL menu. Turn off the receiver, eliminate the short-circuit problem and turn on page 23 to verify that the speakers and components are correct. Intermittent sound from the audio..., and at least 10 feet (3 meters) away from a TV set or fluorescent light. , Move your nearest Sony dealer. Severe hum or noise is lit. , The protective device on the remote if the MUTING indicator is heard. , Check that the speakers and components are connected securely. , Check that the...
Operating Instructions
Page 57
... weak. , Make sure you 're tuned to an FM RDS station. , Select a stronger FM station. The remote does not function. , Point the remote at the remote sensor on the receiver. , Remove any obstacles in the path between the remote and the receiver. , Replace both batteries in the display. No sound ...page 27) before recording with the component connected to the DIGITAL MD/DAT OUT terminals (STR-DB940) or the DIGITAL MD/TAPE OUT terminals (STR-DB840). Reference sections for clearing the receiver's memory To clear All memorized settings Customized sound fields See page 18 page 41 57 ...
... weak. , Make sure you 're tuned to an FM RDS station. , Select a stronger FM station. The remote does not function. , Point the remote at the remote sensor on the receiver. , Remove any obstacles in the path between the remote and the receiver. , Replace both batteries in the display. No sound ...page 27) before recording with the component connected to the DIGITAL MD/DAT OUT terminals (STR-DB940) or the DIGITAL MD/TAPE OUT terminals (STR-DB840). Reference sections for clearing the receiver's memory To clear All memorized settings Customized sound fields See page 18 page 41 57 ...

Operating Instructions
Page 63
... 60 Hz, 90 Hz, 120Hz, 150Hz, 180Hz 60 Hz, 90 Hz, 120Hz, 150Hz, 180Hz 60 Hz, 90 Hz, 120Hz, 150Hz, 180Hz AUTO FUNCTION [XXX] 2 WAY REMOTE [XXX]2) ON, OFF ON, OFF COLOR SYSTEM [XXX]2)4) OSD [XXX]2) PAL, NTSC COLOR, MONOCHROME DIMM. Press SET UP Press or to select Turn jog dial... to SMALL only. 2) STR-DB940 only. 3) Models of area code U, CA only. 4) Except for models of area code U, CA. RANGE [XXX] NARROW, WIDE 1) When the speakers are set to...
... 60 Hz, 90 Hz, 120Hz, 150Hz, 180Hz 60 Hz, 90 Hz, 120Hz, 150Hz, 180Hz 60 Hz, 90 Hz, 120Hz, 150Hz, 180Hz AUTO FUNCTION [XXX] 2 WAY REMOTE [XXX]2) ON, OFF ON, OFF COLOR SYSTEM [XXX]2)4) OSD [XXX]2) PAL, NTSC COLOR, MONOCHROME DIMM. Press SET UP Press or to select Turn jog dial... to SMALL only. 2) STR-DB940 only. 3) Models of area code U, CA only. 4) Except for models of area code U, CA. RANGE [XXX] NARROW, WIDE 1) When the speakers are set to...


