

Limited Warranty (U.S. Only)
Page 1
... of two (2) year from your convenience, Sony Electronics Inc. 4-557-173-02 General Stereo/Hifi Components/Tape Decks ® CD Players/Mini Disc Players/Audio Systems Hifi Audio LIMITED WARRANTY Sony Electronics Inc. ("Sony") warrants this Product is determined to be presented to service the Product. To obtain warranty service, you . This warranty does not cover customer instruction, installation, set up adjustments or signal reception problems. This warranty does not cover cosmetic damage...
... of two (2) year from your convenience, Sony Electronics Inc. 4-557-173-02 General Stereo/Hifi Components/Tape Decks ® CD Players/Mini Disc Players/Audio Systems Hifi Audio LIMITED WARRANTY Sony Electronics Inc. ("Sony") warrants this Product is determined to be presented to service the Product. To obtain warranty service, you . This warranty does not cover customer instruction, installation, set up adjustments or signal reception problems. This warranty does not cover cosmetic damage...
Operating Instructions
Page 2
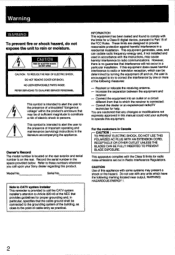
Owner's Record The model number is located on the rear exterior and serial number is on , the user is encouraged to try to provide reasonable protection against harmful interference in a particular installation. Record the serial number in Canada - Reorient or relocate the receiving antenna. - Consult the dealer or an experienced radio/TV technician for a Class B digital device, pursuant to I CAUTION: TO REDUCE THE RISK...
Owner's Record The model number is located on the rear exterior and serial number is on , the user is encouraged to try to provide reasonable protection against harmful interference in a particular installation. Record the serial number in Canada - Reorient or relocate the receiving antenna. - Consult the dealer or an experienced radio/TV technician for a Class B digital device, pursuant to I CAUTION: TO REDUCE THE RISK...
Operating Instructions
Page 3
...Operating with the remote commander 15 Changing the settings of the FUNCTION buttons 15 The on-screen-display of the STR-D2090 16 Adjusting basic audio controls 16 Adjusting volume 16 Adjusting left and right sound balance 16 Reinforcing the bass 16 Selecting the speaker system 16 Selecting a program source 17 To turn off the power at the desired time (The sleep timer function) 17 Labeling the program source 18 Receiving broadcasts 19 Tuning in a station directly (Direct tuning) 19 Scanning stations automatically (Auto tuning) 20 Presetting stations (Station preset...
...Operating with the remote commander 15 Changing the settings of the FUNCTION buttons 15 The on-screen-display of the STR-D2090 16 Adjusting basic audio controls 16 Adjusting volume 16 Adjusting left and right sound balance 16 Reinforcing the bass 16 Selecting the speaker system 16 Selecting a program source 17 To turn off the power at the desired time (The sleep timer function) 17 Labeling the program source 18 Receiving broadcasts 19 Tuning in a station directly (Direct tuning) 19 Scanning stations automatically (Auto tuning) 20 Presetting stations (Station preset...
Operating Instructions
Page 4
... auto mode. With these modes, you can learn' the various functions of other is supplied with the memorized sound field settings. On cleaning the cabinet Clean the cabinet, panel and controls with a soft cloth lightly moistened with appropriate equalization curve by a quartz lock digital synthesizer. • Station Index system allows you created in the factory for the FUNCTION/SOUND FIELD/PRESET TUNING buttons. If you can enjoy various audio/video program sources...
... auto mode. With these modes, you can learn' the various functions of other is supplied with the memorized sound field settings. On cleaning the cabinet Clean the cabinet, panel and controls with a soft cloth lightly moistened with appropriate equalization curve by a quartz lock digital synthesizer. • Station Index system allows you created in the factory for the FUNCTION/SOUND FIELD/PRESET TUNING buttons. If you can enjoy various audio/video program sources...

Operating Instructions
Page 5
... the Remote Commander Before operating remote commander, install the batteries as radiators or,air ducts. • in any AM station. 2 Turn off the power. 3 Press the POWER button while pressing the "+" INDEX SELECT/TUNING button. It will not operate the unit. Checking the Supplied Accessories After unpacking, check that the following adjustments. 1 Turn on top of the cabinet. In this case, replace batteries with STR-D1090) (1) • Sony batteries...
... the Remote Commander Before operating remote commander, install the batteries as radiators or,air ducts. • in any AM station. 2 Turn off the power. 3 Press the POWER button while pressing the "+" INDEX SELECT/TUNING button. It will not operate the unit. Checking the Supplied Accessories After unpacking, check that the following adjustments. 1 Turn on top of the cabinet. In this case, replace batteries with STR-D1090) (1) • Sony batteries...

Operating Instructions
Page 6
... reception. 5- 03 a 02 Adjust the direction. Extend this out of the connecting cord are the STR-D2090. • Do not connect the power cord to the AM antenna terminal. The STR-D2090 has the AMP MODE selector and the SURROUND OUT jacks on the connections are color-coded as follows: Red jacks and plugs: For the right channel of audio signals White jacks and plugs: For the left channel of insulated wire is no need to...
... reception. 5- 03 a 02 Adjust the direction. Extend this out of the connecting cord are the STR-D2090. • Do not connect the power cord to the AM antenna terminal. The STR-D2090 has the AMP MODE selector and the SURROUND OUT jacks on the connections are color-coded as follows: Red jacks and plugs: For the right channel of audio signals White jacks and plugs: For the left channel of insulated wire is no need to...

Operating Instructions
Page 8
...) 0 OM TAPE Alt•A • la) • to VIDEO 3/ INPUT on the front panel to AUDIO/ VIDEO OUT to AUDIO/ VIDEO IN VCR 1 to AUDIONIDEO OUT VCR 2/ LD Player to AUDIONIDEO OUT VCR 3 Camera/ recorder Caution for STR-D2090 When the MONITOR VIDEO OUT jack is connected and ON SCREEN ON/OFF is set to ON, the cursor mode operation buttons cannot be used for the other functions than the ON SCREEN function. 8
...) 0 OM TAPE Alt•A • la) • to VIDEO 3/ INPUT on the front panel to AUDIO/ VIDEO OUT to AUDIO/ VIDEO IN VCR 1 to AUDIONIDEO OUT VCR 2/ LD Player to AUDIONIDEO OUT VCR 3 Camera/ recorder Caution for STR-D2090 When the MONITOR VIDEO OUT jack is connected and ON SCREEN ON/OFF is set to ON, the cursor mode operation buttons cannot be used for the other functions than the ON SCREEN function. 8

Operating Instructions
Page 9
... one pair of rear speakers Center speaker Center speaker Center speaker Z0 ....;` • 4 • .47 .'L 00 0 0 0 010 O1O O1O Rear speaker (R) Rear speaker (L) Rear speaker (R) Rear speaker (L), Speaker impedance and power capability This receiver is designed to work best with speakers having nominal impedance from 8 to 16 ohms. Be sure to this unit. Connecting Speaker Systems Front, rear and center speakers can be distorted and will be connected to use the speakers having nominal impedance from 4 to 16 ohms. Note • When connecting the speaker cord to the...
... one pair of rear speakers Center speaker Center speaker Center speaker Z0 ....;` • 4 • .47 .'L 00 0 0 0 010 O1O O1O Rear speaker (R) Rear speaker (L) Rear speaker (R) Rear speaker (L), Speaker impedance and power capability This receiver is designed to work best with speakers having nominal impedance from 8 to 16 ohms. Be sure to this unit. Connecting Speaker Systems Front, rear and center speakers can be distorted and will be connected to use the speakers having nominal impedance from 4 to 16 ohms. Note • When connecting the speaker cord to the...

Operating Instructions
Page 11
Connecting to the Power Outlet By connecting the power cord of the oth?r audio equipment to SWITCHED AC OUTLET, this unit can supply the power source to the other audio equipment. . 7o4c71")'P®:A"rS9,.,:i7)@4 •occm
Connecting to the Power Outlet By connecting the power cord of the oth?r audio equipment to SWITCHED AC OUTLET, this unit can supply the power source to the other audio equipment. . 7o4c71")'P®:A"rS9,.,:i7)@4 •occm

Operating Instructions
Page 13
... (See page 16.) 0 VIDEO 3/INPUT jacks 0 BALANCE control (See page 16.) El EDIT VIDEO/AUDIO buttons (See pages 27, 28.) 0 DISPLAY GRAPHIC button (See page 38.) 0 DISPLAY INDEX button (See pages 20, 24.) 0 INDEX SELECT/TUNING -1+ buttons (See pages 20, 24.) El PRESET TUNING -1+ buttons (See pages 22, 24.) gTUNING LEVEL button (See page 20.) 23 MEMORY button (See pages 18, 21, 23.) E DIRECT TUNING button (See page 19.) [31FM MODE button (See page 19.) FM...
... (See page 16.) 0 VIDEO 3/INPUT jacks 0 BALANCE control (See page 16.) El EDIT VIDEO/AUDIO buttons (See pages 27, 28.) 0 DISPLAY GRAPHIC button (See page 38.) 0 DISPLAY INDEX button (See pages 20, 24.) 0 INDEX SELECT/TUNING -1+ buttons (See pages 20, 24.) El PRESET TUNING -1+ buttons (See pages 22, 24.) gTUNING LEVEL button (See page 20.) 23 MEMORY button (See pages 18, 21, 23.) E DIRECT TUNING button (See page 19.) [31FM MODE button (See page 19.) FM...
Operating Instructions
Page 14
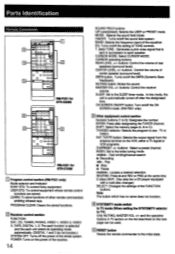
...D (disc) SKIP: Disc skip (for STR-D1090 M Program control section (RM-P321 only) Mode selector and indicator SONY STD: To control Sony equipment. in succession to 0): Designate the number. PROGRAM CLEAR: Clears the stored functions. ID Receiver control section FUNCTION: DAT, CD, TUNER, PHONO, VIDEO 1, VIDEO 2, VIDEO 3, TAPE, DIGITAL 1, 2: The each function is selected and the each speaker. MODE: Selects the sound field mode. CURSOR operating buttons REAR LEVEL +/- ANT TV/VTR button: Selects the output signal from the antenna terminal on the power of TONE controls. POWER: Turns on...
...D (disc) SKIP: Disc skip (for STR-D1090 M Program control section (RM-P321 only) Mode selector and indicator SONY STD: To control Sony equipment. in succession to 0): Designate the number. PROGRAM CLEAR: Clears the stored functions. ID Receiver control section FUNCTION: DAT, CD, TUNER, PHONO, VIDEO 1, VIDEO 2, VIDEO 3, TAPE, DIGITAL 1, 2: The each function is selected and the each speaker. MODE: Selects the sound field mode. CURSOR operating buttons REAR LEVEL +/- ANT TV/VTR button: Selects the output signal from the antenna terminal on the power of TONE controls. POWER: Turns on...

Operating Instructions
Page 16
.... The On-Screen-Display of this receiver is finished, the screen returns to a low level temporarily (- 20 dB attenuation) Press MUTING. Selecting the Speaker System To drive speaker system A: Set SPEAKERS to the receiver. Sound field function - When ON SCREEN of the STR-D2090 Adjusting Basic Audio Controls The STR-D2090 has the on -screen-display function is connected, no sound can enjoy superb sounds using the audio adjustment functions as before. Adjusting Volume To adjust volume Turn MASTER VOLUME. Reinforcing the Bass Press DBFB (Dynamic Bass Feedback) so...
.... The On-Screen-Display of this receiver is finished, the screen returns to a low level temporarily (- 20 dB attenuation) Press MUTING. Selecting the Speaker System To drive speaker system A: Set SPEAKERS to the receiver. Sound field function - When ON SCREEN of the STR-D2090 Adjusting Basic Audio Controls The STR-D2090 has the on -screen-display function is connected, no sound can enjoy superb sounds using the audio adjustment functions as before. Adjusting Volume To adjust volume Turn MASTER VOLUME. Reinforcing the Bass Press DBFB (Dynamic Bass Feedback) so...

Operating Instructions
Page 24
... receiver. TUNER sr • 4 Flirnrirlir- The FUNCTION buttons change to the numeric buttons. 2 Press DISPLAY INDEX to set to which the VHF antenna is displayed. According to video inputs connected to an equipment to the INDEX mode. TUNER Sr • UM i Frequency or the station index name you created is connected. 2 Turn on the monitor TV. 3 Select the desired program on the display. b - 4 For lower channnel index station + For higher channel idex station n Receiving FM Simulcast TV Programs...
... receiver. TUNER sr • 4 Flirnrirlir- The FUNCTION buttons change to the numeric buttons. 2 Press DISPLAY INDEX to set to which the VHF antenna is displayed. According to video inputs connected to an equipment to the INDEX mode. TUNER Sr • UM i Frequency or the station index name you created is connected. 2 Turn on the monitor TV. 3 Select the desired program on the display. b - 4 For lower channnel index station + For higher channel idex station n Receiving FM Simulcast TV Programs...
Operating Instructions
Page 31
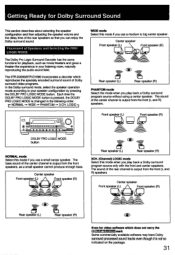
The STR-D2090/STR-D1090 incorporates a decoder which does not carry the m I DOLBY PRO LOGIC MODE button NORMAL mode Select this mode if you play back a Dolby surround program source without using a center speaker. LOGIC-1 WIDE mode Select this mode if you use a medium to your listening room, naturally reproducing the audio sound field. The bass sound of the center channel is output from the front (L and R) speakers. Front speaker (L) Front speaker (R) ..... ... The sound of the rear channel is output from the front (L and R) speakers. 0 0=1 i=t= °...
The STR-D2090/STR-D1090 incorporates a decoder which does not carry the m I DOLBY PRO LOGIC MODE button NORMAL mode Select this mode if you play back a Dolby surround program source without using a center speaker. LOGIC-1 WIDE mode Select this mode if you use a medium to your listening room, naturally reproducing the audio sound field. The bass sound of the center channel is output from the front (L and R) speakers. Front speaker (L) Front speaker (R) ..... ... The sound of the rear channel is output from the front (L and R) speakers. 0 0=1 i=t= °...

Operating Instructions
Page 32
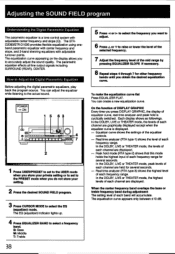
... be done with a center speaker: The test tone will be used for Dolby Surround Sound Adjusting the Speaker Volume To enjoy the surround sound to the maximum on playing any program sources, adjust the front, rear, and center (if connected ) speakers to select the center level mode and then adjust the level with a or t> or CENTER LEVEL +1- Sequence of center speakers Press A or V to the same volume level. You can be output automatically from your speaker system. 5 Press T. The SURR (surround) indicator lights up . 2 Press DOLBY. TONE on . Front...
... be done with a center speaker: The test tone will be used for Dolby Surround Sound Adjusting the Speaker Volume To enjoy the surround sound to the maximum on playing any program sources, adjust the front, rear, and center (if connected ) speakers to select the center level mode and then adjust the level with a or t> or CENTER LEVEL +1- Sequence of center speakers Press A or V to the same volume level. You can be output automatically from your speaker system. 5 Press T. The SURR (surround) indicator lights up . 2 Press DOLBY. TONE on . Front...

Operating Instructions
Page 33
... select the delay time mode and adjust the delay time with < or To turn off the surround effect Press SOUND FIELD ON/OFF to the USER mode and then adjust the speaker volume and delay time with the cursor operation buttons. for Dolby surround mode The delay time is a time between the surround sound from the front and that from 15 ms to 30 ms. To memorize the speaker volume and the delay time of the Rear Speakers - The normal sound without surround and equalizer effect...
... select the delay time mode and adjust the delay time with < or To turn off the surround effect Press SOUND FIELD ON/OFF to the USER mode and then adjust the speaker volume and delay time with the cursor operation buttons. for Dolby surround mode The delay time is a time between the surround sound from the front and that from 15 ms to 30 ms. To memorize the speaker volume and the delay time of the Rear Speakers - The normal sound without surround and equalizer effect...
Operating Instructions
Page 38
... adjusting the digital parametric equalizers, play back the program source. In the DOLBY, LIVE or THEATER mode, the levels of each channel are graphically displayed except when the equalizer curve is displayed. - Real time analyzer (RTA type-1) shows the level of each band will accumulate. In the DOLBY, LIVE or THEATER mode, the highest levels of each channel are held for several seconds. How to select the EQ (equalizer) mode. The STRD2090/STR-D1090 provides flexible equalization using...
... adjusting the digital parametric equalizers, play back the program source. In the DOLBY, LIVE or THEATER mode, the levels of each channel are graphically displayed except when the equalizer curve is displayed. - Real time analyzer (RTA type-1) shows the level of each band will accumulate. In the DOLBY, LIVE or THEATER mode, the highest levels of each channel are held for several seconds. How to select the EQ (equalizer) mode. The STRD2090/STR-D1090 provides flexible equalization using...

Operating Instructions
Page 39
... the sound field setting is adjusted, the sound field setting linked with the preset station or program source is replaced with the preset station or program source is also changed. 39 Enjoying with sound field data. 2 Press SOUND FIELD LINK. 3 Press the desired SOUND FIELD program. Therefore, if you ball up the factory preset setting. 2 Press the desired SOUND FIELD program. Linking the Sound Field Memory to turn off the LINK mode and then select other sound field is selected...
... the sound field setting is adjusted, the sound field setting linked with the preset station or program source is replaced with the preset station or program source is also changed. 39 Enjoying with sound field data. 2 Press SOUND FIELD LINK. 3 Press the desired SOUND FIELD program. Therefore, if you ball up the factory preset setting. 2 Press the desired SOUND FIELD program. Linking the Sound Field Memory to turn off the LINK mode and then select other sound field is selected...
Operating Instructions
Page 44
... program source equipment is turned off the unit, eliminate the short- Monaural program source is heard only at very low level is not set correctly. Connect the equipment correctly. If there is unbalanced. Tuning operation. No stations can be located by Auto-Tuning operation. One channel does not transmit audio, or the volume from the left and right speakers is no short-circuit problem, consult your nearest Sony dealer. 44 Directly tune in Dolby surround mode. SOUND...
... program source equipment is turned off the unit, eliminate the short- Monaural program source is heard only at very low level is not set correctly. Connect the equipment correctly. If there is unbalanced. Tuning operation. No stations can be located by Auto-Tuning operation. One channel does not transmit audio, or the volume from the left and right speakers is no short-circuit problem, consult your nearest Sony dealer. 44 Directly tune in Dolby surround mode. SOUND...
Operating Instructions
Page 45
... commander and the receiver. The FUNCTION/SOUND FIELD/PRESET TUNING buttons are not connected correctly. Make secure connections. Press ON SCREEN ON/OFF to the antenna ground terminal. The mode of the receiver is turned off . There is in a wrong mode. Replace the batteries with that of the remote commander. Place both are used at least 3 meters (10 feet) from the audio components. Problem Sound transmitted from the source of noise. The...
... commander and the receiver. The FUNCTION/SOUND FIELD/PRESET TUNING buttons are not connected correctly. Make secure connections. Press ON SCREEN ON/OFF to the antenna ground terminal. The mode of the receiver is turned off . There is in a wrong mode. Replace the batteries with that of the remote commander. Place both are used at least 3 meters (10 feet) from the audio components. Problem Sound transmitted from the source of noise. The...

