

Operating Instructions
Page 3
...Time of the Rear Speakers 29 Unpacking 5 Creating Custom Sound Fields 30 Checking the Supplied Accessories 5 Adjustable Parameters 30 Inserting Batteries into the Remote Commander 5 Adjusting Parameters 31 Hookups 6 Selecting the Sound Field Setting 32 Connecting an FM Antenna 6 Connecting an AM Antenna 6 Connecting Audio... Station 22 Scanning the Indexed Stations 23 Indexing a Program Source 23 Using the Sleep Timer 24 Programming the Remote Control 25 Programming Signals for Non-Sony Components 25 Programming a New Signal onto a Previously Programmed Button 26
...Time of the Rear Speakers 29 Unpacking 5 Creating Custom Sound Fields 30 Checking the Supplied Accessories 5 Adjustable Parameters 30 Inserting Batteries into the Remote Commander 5 Adjusting Parameters 31 Hookups 6 Selecting the Sound Field Setting 32 Connecting an FM Antenna 6 Connecting an AM Antenna 6 Connecting Audio... Station 22 Scanning the Indexed Stations 23 Indexing a Program Source 23 Using the Sleep Timer 24 Programming the Remote Control 25 Programming Signals for Non-Sony Components 25 Programming a New Signal onto a Previously Programmed Button 26
Operating Instructions
Page 4
.... U.S. Sound Field Settings • 6 adjustable Sound Fields simulate the way you would experience sound in a movie house. Programmable Remote Control • Remote control with "learning" capability allows you can experience Dolby Surround Sound right in your favorite stations in a station. 30 random FM... Normal, Phantom and 3 CH LOGIC). • The enhanced Dolby Pro Logic sound field, depending on the screen. Features of this Sony FM stereo/FM-AM receiver ! Digital Synthesis FM/AM Tuning • Allows you to increase. This circuit design allows the output impedance...
.... U.S. Sound Field Settings • 6 adjustable Sound Fields simulate the way you would experience sound in a movie house. Programmable Remote Control • Remote control with "learning" capability allows you can experience Dolby Surround Sound right in your favorite stations in a station. 30 random FM... Normal, Phantom and 3 CH LOGIC). • The enhanced Dolby Pro Logic sound field, depending on the screen. Features of this Sony FM stereo/FM-AM receiver ! Digital Synthesis FM/AM Tuning • Allows you to increase. This circuit design allows the output impedance...
Operating Instructions
Page 5
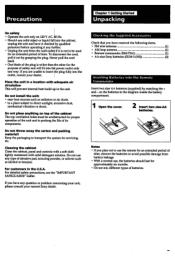
.... Notes • If you have received the following items. • FM wire antenna (1) • AM loop antenna (1) • Remote commander (RM-P341) (1) • AA-size Sony batteries (SUM-3 (NS)) (2) Inserting Batteries into the power outlet only one way. Never pull the cord itself. • One blade... of the plug is not to use the remote for approximately six months. • Do not mix different types of time...
.... Notes • If you have received the following items. • FM wire antenna (1) • AM loop antenna (1) • Remote commander (RM-P341) (1) • AA-size Sony batteries (SUM-3 (NS)) (2) Inserting Batteries into the power outlet only one way. Never pull the cord itself. • One blade... of the plug is not to use the remote for approximately six months. • Do not mix different types of time...

Operating Instructions
Page 10
... function you connect other high-wattage appliances to PHONO TUNER CD DAT/MD TAPE MONITOR TV, LD, VIDEO 1, VIDEO 2, VIDEO 3 Select the function with the remote commander, the power switches of the selected program. When a function selector is turned on the display. for example, a CD. 10 Selecting a Program Source POWER ON...
... function you connect other high-wattage appliances to PHONO TUNER CD DAT/MD TAPE MONITOR TV, LD, VIDEO 1, VIDEO 2, VIDEO 3 Select the function with the remote commander, the power switches of the selected program. When a function selector is turned on the display. for example, a CD. 10 Selecting a Program Source POWER ON...
Operating Instructions
Page 12
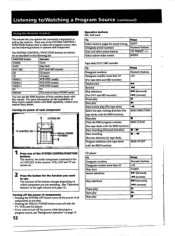
...2 mode) VIDEO 3 VCR (VTR 3 mode) TV PHONO TV (The receiver enters PHONO mode) You can use the RMS function of Sony stereo cassette decks with this remote. Listening to select the program source, then use the following list. For more information on . 2 Press the button for tape deck)... 0 30 0 J 0 0 ••moo ocmc3 VISUAL POWER TVNIDEO 2 1 Press one of the SYSTEM CONTROL/ FUNCTION buttons first to /Watching a Program Source (continued) Using the Remote Control The remote lets you want to the AC OUTLET of the receiver, VCR, LDP and TV are turned on the availability of...
...2 mode) VIDEO 3 VCR (VTR 3 mode) TV PHONO TV (The receiver enters PHONO mode) You can use the RMS function of Sony stereo cassette decks with this remote. Listening to select the program source, then use the following list. For more information on . 2 Press the button for tape deck)... 0 30 0 J 0 0 ••moo ocmc3 VISUAL POWER TVNIDEO 2 1 Press one of the SYSTEM CONTROL/ FUNCTION buttons first to /Watching a Program Source (continued) Using the Remote Control The remote lets you want to the AC OUTLET of the receiver, VCR, LDP and TV are turned on the availability of...
Operating Instructions
Page 13
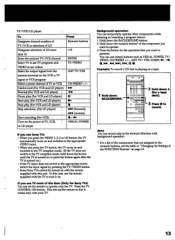
... time (Only for the operation that are assigned to the numeric buttons, see videos Select the output signal from the antenna terminal on with the remote supplied with this case, use certain buttons such as VISUAL POWER, TV/ VIDEO, CH PRESET +/-, ANT TV/ VTR, D.SKIP,110,-, •, 44, NI, 144, II... 14. 13 O ;moo l=poo moo op 2 Hold down the numeric button* of the component you want to operate. 3 Press the button for Sony TVs) You can use the remote supplied with the TV to turn it works only with background operation. * For a list of LD more than 10 Enter the selected TV...
... time (Only for the operation that are assigned to the numeric buttons, see videos Select the output signal from the antenna terminal on with the remote supplied with this case, use certain buttons such as VISUAL POWER, TV/ VIDEO, CH PRESET +/-, ANT TV/ VTR, D.SKIP,110,-, •, 44, NI, 144, II... 14. 13 O ;moo l=poo moo op 2 Hold down the numeric button* of the component you want to operate. 3 Press the button for Sony TVs) You can use the remote supplied with the TV to turn it works only with background operation. * For a list of LD more than 10 Enter the selected TV...
Operating Instructions
Page 14
... any of 'the other components, you want to the receiver. Note You can be canceled. Programming Signals for Non-Sony Components Once this remote learns the signals of your other Sony components fail to "learn " only the sigrials from the button(s) after steps 2 and 3-0, the learning mode will... "learn ." 0 Remove your system. Note If you control them. If this programming function. In addition, the remote can literally "learn " the signal from non-Sony components and let you do not perform the next operation in step 0, the LEARN indicator blinks rapidly. 4 Repeat step 3 ...
... any of 'the other components, you want to the receiver. Note You can be canceled. Programming Signals for Non-Sony Components Once this remote learns the signals of your other Sony components fail to "learn " only the sigrials from the button(s) after steps 2 and 3-0, the learning mode will... "learn ." 0 Remove your system. Note If you control them. If this programming function. In addition, the remote can literally "learn " the signal from non-Sony components and let you do not perform the next operation in step 0, the LEARN indicator blinks rapidly. 4 Repeat step 3 ...
Operating Instructions
Page 18
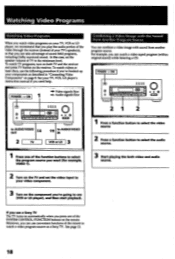
... audio portion of the video through the receiver (instead of your TV's speakers), so that you can use convenient functions of the remote to watch a video program source on a Sony TV. POWER ON - - POWER ON 0 0 0 0 0 120 6 6 41- E12;5' 0 0 0 0 O 6a 0 CO) to AUDIONIDEO OUT Of 2 TV Of to AUDIONIDEO IN VCR or LD...
... audio portion of the video through the receiver (instead of your TV's speakers), so that you can use convenient functions of the remote to watch a video program source on a Sony TV. POWER ON - - POWER ON 0 0 0 0 0 120 6 6 41- E12;5' 0 0 0 0 O 6a 0 CO) to AUDIONIDEO OUT Of 2 TV Of to AUDIONIDEO IN VCR or LD...
Operating Instructions
Page 24
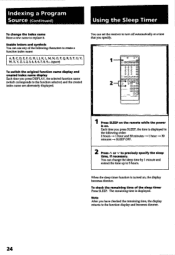
You can set the receiver to turn off automatically at a time that you specify. 1 1 Press SLEEP on the remote while the power is turned on . You can use any of the sleep timer Press SLEEP. The remaining time is displayed in the following characters ...
You can set the receiver to turn off automatically at a time that you specify. 1 1 Press SLEEP on the remote while the power is turned on . You can use any of the sleep timer Press SLEEP. The remaining time is displayed in the following characters ...

Operating Instructions
Page 25
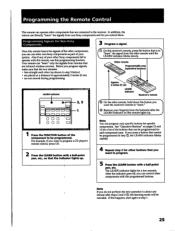
...the LEARN indicator on pages 12 and 13 for Non-Sony Components Once this remote lights up . [ 0 On the other (as part of your system. Other remote Programmable area (operative buttons) • Approx. 2 inches (5 cm) LEARN indicator Receiver's remote 2, 5 t=1 C:3 CI) 4-- After the indicator ... Press the LEARN button with a ball-point pen, etc., so that the indicator lights up . Programming the Remote Control This remote can operate other Sony components fail to operate with the programmed buttons. Note You can be programmed. The LEARN indicator lights for specific...
...the LEARN indicator on pages 12 and 13 for Non-Sony Components Once this remote lights up . [ 0 On the other (as part of your system. Other remote Programmable area (operative buttons) • Approx. 2 inches (5 cm) LEARN indicator Receiver's remote 2, 5 t=1 C:3 CI) 4-- After the indicator ... Press the LEARN button with a ball-point pen, etc., so that the indicator lights up . Programming the Remote Control This remote can operate other Sony components fail to operate with the programmed buttons. Note You can be programmed. The LEARN indicator lights for specific...

Operating Instructions
Page 26
In this case, clear the signal stored in that button following conditions. • Placing the remotes too far apart from each other than Sony can be programmed only when they are low. The previously programmed signal is full. How many signals can you can "learn" only the signals output ...
In this case, clear the signal stored in that button following conditions. • Placing the remotes too far apart from each other than Sony can be programmed only when they are low. The previously programmed signal is full. How many signals can you can "learn" only the signals output ...
Operating Instructions
Page 28
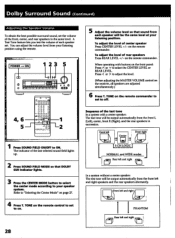
.... g POWER -• ON - 1 23 5 Q 4, 6 I .0.. - . .- 0 ...-. = .1) r----.•=7:f':-'-- 41 Press SOUND FIELD ON/OFF to "Selecting the Center Mode" on the remote commander to set to select the CENTER LEVEL or REAR LEVEL. A Test Tone feature lets you test the volume of the front, center, and rear... speakers to your listening position using the remote. on the remote commander. Front left and right( Nff . 1 1 PHANTOM ff) Rear left and right speakers and the rear speakers alternately. You can...
.... g POWER -• ON - 1 23 5 Q 4, 6 I .0.. - . .- 0 ...-. = .1) r----.•=7:f':-'-- 41 Press SOUND FIELD ON/OFF to "Selecting the Center Mode" on the remote commander to set to select the CENTER LEVEL or REAR LEVEL. A Test Tone feature lets you test the volume of the front, center, and rear... speakers to your listening position using the remote. on the remote commander. Front left and right( Nff . 1 1 PHANTOM ff) Rear left and right speakers and the rear speakers alternately. You can...

Operating Instructions
Page 31
.../DEFEAT on the front panel or EQ/TONE ON/OFF on the sound field you select. After adjusting, the settings are different depending on the remote commander. If you create your own sound field, it is automatically stored in memory, replacing the pre-programmed sound field. Even if the AC power...
.../DEFEAT on the front panel or EQ/TONE ON/OFF on the sound field you select. After adjusting, the settings are different depending on the remote commander. If you create your own sound field, it is automatically stored in memory, replacing the pre-programmed sound field. Even if the AC power...
Operating Instructions
Page 34
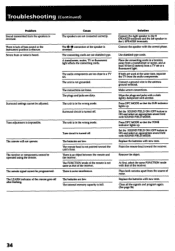
...DPC MODE so that of bass sound or the instrument position is lack of the receiver. Remove the object. The remote signal cannot be operated using the remote. Replace the batteries with the correct phase. The audio components are used at least 10 feet (3 meters) from ...page 26) 34 A transformer, motor, TV or fluorescent light affects the connecting cords. The unit is reversed. The FUNCTION mode of the remote is not same as that the TONE indicator lights up . There is turned off after flashing. The connecting cords are not connected correctly....
...DPC MODE so that of bass sound or the instrument position is lack of the receiver. Remove the object. The remote signal cannot be operated using the remote. Replace the batteries with the correct phase. The audio components are used at least 10 feet (3 meters) from ...page 26) 34 A transformer, motor, TV or fluorescent light affects the connecting cords. The unit is reversed. The FUNCTION mode of the remote is not same as that the TONE indicator lights up . There is turned off after flashing. The connecting cords are not connected correctly....

Operating Instructions
Page 35
... 120 W Dimensions 430 x 160 x 425 mm (17 x 6 2/, x 16 9/ 7 inches) Mass 13.1 kg (28 lb 14 oz) Supplied accessories FM wire antenna (1) AM loop antenna (1) Remote commander (1) Sony Batteries SUM-3(NS) (2) Design and specifications are subject to rated outpist. Video section Inputs Outputs VIDEO 1,2,3: 1 Vp-p 75 ohms VIDEO 1, 2, MONITOR: 1 Vp-p 75 ohms General...
... 120 W Dimensions 430 x 160 x 425 mm (17 x 6 2/, x 16 9/ 7 inches) Mass 13.1 kg (28 lb 14 oz) Supplied accessories FM wire antenna (1) AM loop antenna (1) Remote commander (1) Sony Batteries SUM-3(NS) (2) Design and specifications are subject to rated outpist. Video section Inputs Outputs VIDEO 1,2,3: 1 Vp-p 75 ohms VIDEO 1, 2, MONITOR: 1 Vp-p 75 ohms General...

Operating Instructions
Page 36
I I' I n I I I 1I I 1 1 1 1 ! m 1241231 1:1 POWER switch l=1FM MODE button (See page 15.) ID FM/AM button (See pages 15, 16.) El Remote sensor 0 LEVEL button (See page 16.) El Display window M Numeric buttons (See pages 15, 16, 17.) 0 INDEX SELECT/TUNING +/- Identifying the Parts and Controls Front ...
I I' I n I I I 1I I 1 1 1 1 ! m 1241231 1:1 POWER switch l=1FM MODE button (See page 15.) ID FM/AM button (See pages 15, 16.) El Remote sensor 0 LEVEL button (See page 16.) El Display window M Numeric buttons (See pages 15, 16, 17.) 0 INDEX SELECT/TUNING +/- Identifying the Parts and Controls Front ...

Operating Instructions
Page 37
... ON button(See pages 12 13) f SLEEP button(See page 24) g LEARN indicator (See pages 25, 26) "Can not be used with this unit. 34 Remote Control oJ O 0 CID 41 O0 0 O0 0 O 0 ===i _ 11 12 3 14 ID 1=1 LEARN button (See pages 25, 26) 1=1 SYSTEM OFF button (See pages 12) ID SYSTEM CONTROUFUNCTION...
... ON button(See pages 12 13) f SLEEP button(See page 24) g LEARN indicator (See pages 25, 26) "Can not be used with this unit. 34 Remote Control oJ O 0 CID 41 O0 0 O0 0 O 0 ===i _ 11 12 3 14 ID 1=1 LEARN button (See pages 25, 26) 1=1 SYSTEM OFF button (See pages 12) ID SYSTEM CONTROUFUNCTION...
Operating Instructions
Page 38
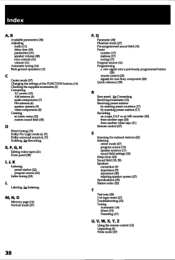
...-programmed sound field (19) Preset number (17) stations (17) tuning (17) Program source (12) Programming a new signal onto a previously programmed button (26) remote control (25) signals for non-Sony component (25) Quick reference (39) R Rear panel. g Connecting. Receiving broadcasts (15) Receiving preset stations by entering preset numbers (17) by scanning preset stations...
...-programmed sound field (19) Preset number (17) stations (17) tuning (17) Program source (12) Programming a new signal onto a previously programmed button (26) remote control (25) signals for non-Sony component (25) Quick reference (39) R Rear panel. g Connecting. Receiving broadcasts (15) Receiving preset stations by entering preset numbers (17) by scanning preset stations...


