
Operating Guide
Page 1
Printed in Japan Also refer to "Handycam Handbook" (PDF) By referring to "Handycam Handbook" (PDF) contained in the supplied CD-ROM, you can be found at our Customer Support Website. Printed on how to frequently asked questions can find more detailed information on 100% recycled paper using VOC (Volatile Organic Compound)-free vegetable oil based ink. 2-887-134-11(1) Operating Guide DCR-SR40/SR60/SR80 US Additional information on this product and answers to use the camcorder. © 2006 Sony Corporation
Printed in Japan Also refer to "Handycam Handbook" (PDF) By referring to "Handycam Handbook" (PDF) contained in the supplied CD-ROM, you can be found at our Customer Support Website. Printed on how to frequently asked questions can find more detailed information on 100% recycled paper using VOC (Volatile Organic Compound)-free vegetable oil based ink. 2-887-134-11(1) Operating Guide DCR-SR40/SR60/SR80 US Additional information on this product and answers to use the camcorder. © 2006 Sony Corporation
Operating Guide
Page 6
... using the computer. Note on operational temperatures • When the temperature of the camcorder becomes extremely high or extremely low, you may be copyrighted. This may damage the hard disk drive of such materials may not delete data from what you save the image data on...In addition to make it is recommended that you dispose of the camcorder, it difficult to recover your camcorder • The hard disk of the computer. *Refer to "Handycam Handbook" (PDF). 6 Also, you can save all your camcorder. On recording • Before starting to record, test the recording...
... using the computer. Note on operational temperatures • When the temperature of the camcorder becomes extremely high or extremely low, you may be copyrighted. This may damage the hard disk drive of such materials may not delete data from what you save the image data on...In addition to make it is recommended that you dispose of the camcorder, it difficult to recover your camcorder • The hard disk of the computer. *Refer to "Handycam Handbook" (PDF). 6 Also, you can save all your camcorder. On recording • Before starting to record, test the recording...
Operating Guide
Page 8
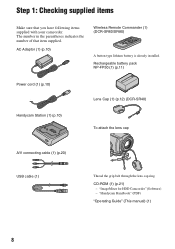
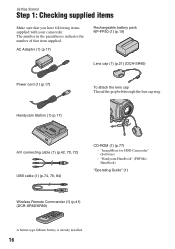
CD-ROM (1) (p.21) - "ImageMixer for HDD Camcorder" (Software) - "Handycam Handbook" (PDF) "Operating Guide" (This manual) (1) 8 AC Adaptor (1) (p.10) Wireless Remote Commander (1) (DCR-SR60/SR80) A button-type lithium battery is already installed. Rechargeable battery pack NP-FP50 (1) (p.11) Power cord (1) (p.10) Handycam Station (1) (p.10) Lens Cap (1) (p.12) (DCR-SR40) To attach the lens cap A/V connecting cable (1) (p.20...
CD-ROM (1) (p.21) - "ImageMixer for HDD Camcorder" (Software) - "Handycam Handbook" (PDF) "Operating Guide" (This manual) (1) 8 AC Adaptor (1) (p.10) Wireless Remote Commander (1) (DCR-SR60/SR80) A button-type lithium battery is already installed. Rechargeable battery pack NP-FP50 (1) (p.11) Power cord (1) (p.10) Handycam Station (1) (p.10) Lens Cap (1) (p.12) (DCR-SR40) To attach the lens cap A/V connecting cable (1) (p.20...
Operating Guide
Page 12
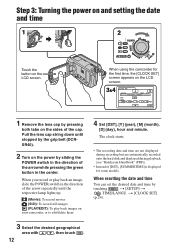
... LCD screen. The clock starts. • The recording date and time are not displayed during recording but are automatically recorded onto the hard disk and displayed during playback (see "Handycam Handbook" (PDF)). • Instead of [DST], [SUMMERTIME] is displayed for the first time, the [CLOCK SET] screen appears on the LCD screen. 3&4 CLOCK SET... touch . 12 Step 3: Turning the power on and setting the date and time 1 2 Touch the button on the sides of the cap. When using the camcorder for some models.
... LCD screen. The clock starts. • The recording date and time are not displayed during recording but are automatically recorded onto the hard disk and displayed during playback (see "Handycam Handbook" (PDF)). • Instead of [DST], [SUMMERTIME] is displayed for the first time, the [CLOCK SET] screen appears on the LCD screen. 3&4 CLOCK SET... touch . 12 Step 3: Turning the power on and setting the date and time 1 2 Touch the button on the sides of the cap. When using the camcorder for some models.
Operating Guide
Page 20
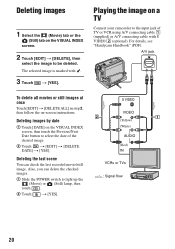
... using A/V connecting cable 1 (supplied) or A/V connecting cable with . 3 Touch t [YES]. Deleting images by date 1 Touch [DATE] on -screen instructions. For details, see "Handycam Handbook" (PDF). Deleting images 1 Select the (Movie) tab or the (Still) tab on a TV Connect your camcorder to the input jack of the desired image. 2 Touch t [EDIT] t [DELETE DATE] t [YES].
... using A/V connecting cable 1 (supplied) or A/V connecting cable with . 3 Touch t [YES]. Deleting images by date 1 Touch [DATE] on -screen instructions. For details, see "Handycam Handbook" (PDF). Deleting images 1 Select the (Movie) tab or the (Still) tab on a TV Connect your camcorder to the input jack of the desired image. 2 Touch t [EDIT] t [DELETE DATE] t [YES].
Operating Guide
Page 21
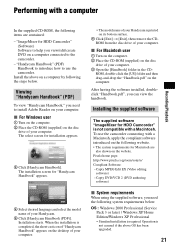
...://www.pixela.co.jp/oem/sony/e/ Compliant Software: - "Handycam Handbook" (PDF) Handbook to introduce how to the camcorder. - ROM, double-click the [US] folder and then drag-and-drop the "Handbook.pdf" on its bottom surface. 6 Click [Exit] t [Exit], then remove the CDROM from the disc drive of your Handycam. 5 Click [Handycam Handbook (PDF)]. The select screen for HDD...
...://www.pixela.co.jp/oem/sony/e/ Compliant Software: - "Handycam Handbook" (PDF) Handbook to introduce how to the camcorder. - ROM, double-click the [US] folder and then drag-and-drop the "Handbook.pdf" on its bottom surface. 6 Click [Exit] t [Exit], then remove the CDROM from the disc drive of your Handycam. 5 Click [Handycam Handbook (PDF)]. The select screen for HDD...
Operating Guide
Page 24
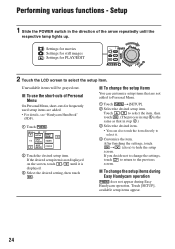
... desired setting, then touch . Touch [SETUP], available setup items appear. 24 x To change the setup items during Easy Handycam operation does not appear during Easy Handycam operation. Performing various functions - Setup 1 Slide the POWER switch in step 2.) 3 Select the desired item. • ...You can customize setup items that are added. • For details, see "Handycam Handbook" (PDF). 1 Touch . 60min STBY SETUP EXPOSURE SPOT FOCUS FADER SPOT METER FOCUS 2 Touch the desired setup item. Unavailable items will be grayed ...
... desired setting, then touch . Touch [SETUP], available setup items appear. 24 x To change the setup items during Easy Handycam operation does not appear during Easy Handycam operation. Performing various functions - Setup 1 Slide the POWER switch in step 2.) 3 Select the desired item. • ...You can customize setup items that are added. • For details, see "Handycam Handbook" (PDF). 1 Touch . 60min STBY SETUP EXPOSURE SPOT FOCUS FADER SPOT METER FOCUS 2 Touch the desired setup item. Unavailable items will be grayed ...
Operating Guide
Page 25
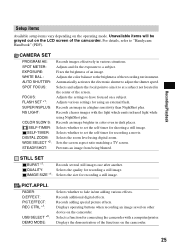
...For details, refer to set the self-timer for connecting the camcorder with the light which emits infrared light while using NightShot plus . Adjusts various settings for shooting a still image. Selects whether to "Handycam Handbook" (PDF). Prevents an image from being blurred. STILL SET BURST *1: ...dark places. Selects whether to fade in the center of an image. Records adding special picture effects. Displays the demonstration of the camcorder. FADER: D.EFFECT: PICT.EFFECT: REC CTRL *1: USB SELECT *3: DEMO MODE: Selects whether to set the self-timer for ...
...For details, refer to set the self-timer for connecting the camcorder with the light which emits infrared light while using NightShot plus . Adjusts various settings for shooting a still image. Selects whether to "Handycam Handbook" (PDF). Prevents an image from being blurred. STILL SET BURST *1: ...dark places. Selects whether to fade in the center of an image. Records adding special picture effects. Displays the demonstration of the camcorder. FADER: D.EFFECT: PICT.EFFECT: REC CTRL *1: USB SELECT *3: DEMO MODE: Selects whether to set the self-timer for ...
Operating Guide
Page 27
... following table to troubleshoot them. However, your Sony dealer will be required to initialize or change the current hard disk of the camcorder, depending on the problem. The camcorder does not operate even when the power is extremely low. With POWER switch turned on Easy Handycam operation, refer to "Handycam Handbook" (PDF). Attach a charged battery pack to the...
... following table to troubleshoot them. However, your Sony dealer will be required to initialize or change the current hard disk of the camcorder, depending on the problem. The camcorder does not operate even when the power is extremely low. With POWER switch turned on Easy Handycam operation, refer to "Handycam Handbook" (PDF). Attach a charged battery pack to the...

Handycam Handbook
Page 6
... camcorder is not dust proofed, drip proofed or waterproofed. Reorient or relocate the receiving antenna. - See "Maintenance and precautions" (p.121). • To prevent the hard disk from being lost, do not do the followings when either of the respective lamps of operations guides. These limits are designed to "Operating Guide" and "Handycam Handbook" (PDF/this...
... camcorder is not dust proofed, drip proofed or waterproofed. Reorient or relocate the receiving antenna. - See "Maintenance and precautions" (p.121). • To prevent the hard disk from being lost, do not do the followings when either of the respective lamps of operations guides. These limits are designed to "Operating Guide" and "Handycam Handbook" (PDF/this...
Handycam Handbook
Page 16
Handycam Station (1) (p.17) A/V connecting cable (1) (p.42, 70, 72) USB cable (1) (p.74, 76, 84) CD-ROM (1) (p.77) - Getting Started Step 1: Checking supplied items Make sure that item ... cap Thread the grip belt through the lens cap ring. "ImageMixer for HDD Camcorder" (Software) - The number in the parentheses indicates the number of that you have following items supplied with your camcorder. "Handycam Handbook" (PDF/this Handbook) "Operating Guide" (1) Wireless Remote Commander (1) (p.41) (DCR-SR60/SR80) A button-type lithium battery is already installed. 16
Handycam Station (1) (p.17) A/V connecting cable (1) (p.42, 70, 72) USB cable (1) (p.74, 76, 84) CD-ROM (1) (p.77) - Getting Started Step 1: Checking supplied items Make sure that item ... cap Thread the grip belt through the lens cap ring. "ImageMixer for HDD Camcorder" (Software) - The number in the parentheses indicates the number of that you have following items supplied with your camcorder. "Handycam Handbook" (PDF/this Handbook) "Operating Guide" (1) Wireless Remote Commander (1) (p.41) (DCR-SR60/SR80) A button-type lithium battery is already installed. 16


