Operating Guide
Page 6
...not possible due to a malfunction of the camcorder. • TV color systems differ depending on a TV, you may damage the hard disk drive of your camcorder. This may not record or playback the camcorder to provide protection to the camcorder. Change the screen language before using the computer... on the operating system of the computer. *Refer to "Handycam Handbook" (PDF). 6 You cannot dub copyright protected software on connecting the camcorder to a computer • Do not format the hard disk of the camcorder may not be recognized, or recording or playback may vary depending...
...not possible due to a malfunction of the camcorder. • TV color systems differ depending on a TV, you may damage the hard disk drive of your camcorder. This may not record or playback the camcorder to provide protection to the camcorder. Change the screen language before using the computer... on the operating system of the computer. *Refer to "Handycam Handbook" (PDF). 6 You cannot dub copyright protected software on connecting the camcorder to a computer • Do not format the hard disk of the camcorder may not be recognized, or recording or playback may vary depending...
Operating Guide
Page 8
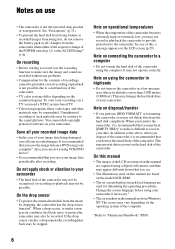
.... The number in the parentheses indicates the number of that you have following items supplied with your camcorder. AC Adaptor (1) (p.10) Wireless Remote Commander (1) (DCR-SR60/SR80) A button-type lithium battery is already installed. "ImageMixer for HDD Camcorder" (Software) - "Handycam Handbook" (PDF) "Operating Guide" (This manual) (1) 8 Step 1: Checking supplied items Make sure that item supplied.
.... The number in the parentheses indicates the number of that you have following items supplied with your camcorder. AC Adaptor (1) (p.10) Wireless Remote Commander (1) (DCR-SR60/SR80) A button-type lithium battery is already installed. "ImageMixer for HDD Camcorder" (Software) - "Handycam Handbook" (PDF) "Operating Guide" (This manual) (1) 8 Step 1: Checking supplied items Make sure that item supplied.
Operating Guide
Page 31
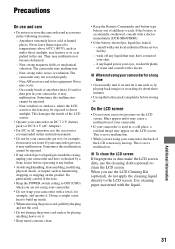
...screen may malfunction. x When not using your camcorder on and let it . This is accidentally swallowed, consult with a doctor immediately (DCR-SR60/SR80). • If the battery electrolytic ... LCD screen. Noise may malfunction. - Sometimes this instruction manual. • Do not let your camcorder with plenty of your camcorder. • If your skin. - Near AM receivers and... fingerprints or dust make the LCD screen dirty, use the accessories recommended in your local authorized Sony service facility. - if any solid object or liquid gets inside . • When removing ...
...screen may malfunction. x When not using your camcorder on and let it . This is accidentally swallowed, consult with a doctor immediately (DCR-SR60/SR80). • If the battery electrolytic ... LCD screen. Noise may malfunction. - Sometimes this instruction manual. • Do not let your camcorder with plenty of your camcorder. • If your skin. - Near AM receivers and... fingerprints or dust make the LCD screen dirty, use the accessories recommended in your local authorized Sony service facility. - if any solid object or liquid gets inside . • When removing ...
Operating Guide
Page 35
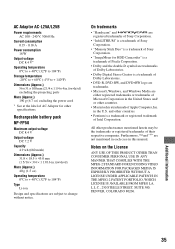
...trademarks • "Handycam" and are registered trademarks of Sony Corporation. • "InfoLITHIUM" is a trademark of Sony Corporation. • "Memory Stick Duo" is a trademark of Sony Corporation. •...176;F) Dimensions (Approx.) 56 × 31 × 100 mm (2 1/4 × 1 1/4 × 4 in this manual. Rechargeable battery pack NP-FP50 Maximum output voltage DC 8.4 V Output voltage DC 7.2 V Capacity 4.9 wh (680 mAh) ...) excluding the power cord * See at the label of AC Adaptor for HDD Camcorder" is a trademark of Pixela Corporation. • Dolby and the double-D symbol are...
...trademarks • "Handycam" and are registered trademarks of Sony Corporation. • "InfoLITHIUM" is a trademark of Sony Corporation. • "Memory Stick Duo" is a trademark of Sony Corporation. •...176;F) Dimensions (Approx.) 56 × 31 × 100 mm (2 1/4 × 1 1/4 × 4 in this manual. Rechargeable battery pack NP-FP50 Maximum output voltage DC 8.4 V Output voltage DC 7.2 V Capacity 4.9 wh (680 mAh) ...) excluding the power cord * See at the label of AC Adaptor for HDD Camcorder" is a trademark of Pixela Corporation. • Dolby and the double-D symbol are...

Handycam Handbook
Page 27
...; To perform settings such as focusing manually and adding special effects, cancel Easy Handycam operation. EASY button The settings of the EASY button. If you set . using your camcorder with just one press of your camcorder with automatic settings Using Easy Handycam operation Easy Handycam operation is not displayed during Easy Handycam operation Touch [SETUP] to 26...
...; To perform settings such as focusing manually and adding special effects, cancel Easy Handycam operation. EASY button The settings of the EASY button. If you set . using your camcorder with just one press of your camcorder with automatic settings Using Easy Handycam operation Easy Handycam operation is not displayed during Easy Handycam operation Touch [SETUP] to 26...
Handycam Handbook
Page 35
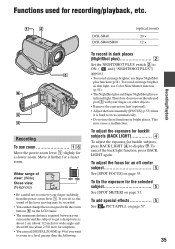
...a faster zoom. If you want to zoom to a level greater than the following: DCR-SR40 DCR-SR60/SR80 (optical zoom) 20 × 12 × To record in dark places (NightShot plus 2 Set... to remove your fingers or other objects. • Remove the conversion lens (optional). • Adjust the focus manually ([FOCUS], p.53) when it further for the selected subject 5 See [SPOT METER] on page 53. To .... 35 on the LCD frame. • The minimum distance required between your camcorder and the subject to get a sharp focus is hard to ON. ( and ["NIGHTSHOT PLUS"] appear.) • To record an ...
...a faster zoom. If you want to zoom to a level greater than the following: DCR-SR40 DCR-SR60/SR80 (optical zoom) 20 × 12 × To record in dark places (NightShot plus 2 Set... to remove your fingers or other objects. • Remove the conversion lens (optional). • Adjust the focus manually ([FOCUS], p.53) when it further for the selected subject 5 See [SPOT METER] on page 53. To .... 35 on the LCD frame. • The minimum distance required between your camcorder and the subject to get a sharp focus is hard to ON. ( and ["NIGHTSHOT PLUS"] appear.) • To record an ...
Handycam Handbook
Page 42
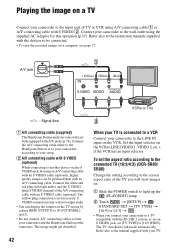
...to [16:9 WIDE]. Refer also to the manual supplied with an A/V connecting cable. The TV switched to LINE (VIDEO 1, VIDEO 2, etc.), if the VCR has an input selector. Connect the A/V connecting cable either to the Handycam Station or to your camcorder, according to your setup. 2 A/V connecting ...cable with S VIDEO (optional) When connecting to another device via an S VIDEO jack, set the aspect ratio according to the connected TV (16:9/4:3) (DCR-SR60/ SR80) Change the setting ...
...to [16:9 WIDE]. Refer also to the manual supplied with an A/V connecting cable. The TV switched to LINE (VIDEO 1, VIDEO 2, etc.), if the VCR has an input selector. Connect the A/V connecting cable either to the Handycam Station or to your camcorder, according to your setup. 2 A/V connecting ...cable with S VIDEO (optional) When connecting to another device via an S VIDEO jack, set the aspect ratio according to the connected TV (16:9/4:3) (DCR-SR60/ SR80) Change the setting ...
Handycam Handbook
Page 51
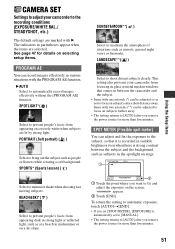
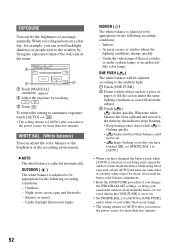
...the atmosphere of situations such as sunsets, general night views or fireworks. See page 47 for more than five minutes. This setting also prevents your camcorder to the recording conditions (EXPOSURE/WHITE BAL./ STEADYSHOT, etc.) The default settings are marked with one asterisk (*) can be adjusted to focus on ... focusing on glass or metal mesh in windows that it is recorded in suitable brightness even when there is automatically set to [MANUAL]. • The setting returns to [AUTO] after you remove the power source for details on selecting setup items. PROGRAM AE You can record...
...the atmosphere of situations such as sunsets, general night views or fireworks. See page 47 for more than five minutes. This setting also prevents your camcorder to the recording conditions (EXPOSURE/WHITE BAL./ STEADYSHOT, etc.) The default settings are marked with one asterisk (*) can be adjusted to focus on ... focusing on glass or metal mesh in windows that it is recorded in suitable brightness even when there is automatically set to [MANUAL]. • The setting returns to [AUTO] after you remove the power source for details on selecting setup items. PROGRAM AE You can record...
Handycam Handbook
Page 52
...after you have touched , set [WHITE BAL.] to [AUTO]. • When you have changed the battery pack while [AUTO] is selected, or you bring your camcorder outdoors from inside the house, or vice versa during the [ONE PUSH] is adjusted to the ambient light. 1 Touch [ONE PUSH]. 2 Frame a white object such.... EXPOSURE You can fix the brightness of the recording environment. When recording indoors on . • Set [WHITE BAL.] to the brightness of an image manually. appears. 2 Adjust the exposure by fixing the exposure to that of the wall side of the room. 60min STBY EXPOSURE...
...after you have touched , set [WHITE BAL.] to [AUTO]. • When you have changed the battery pack while [AUTO] is selected, or you bring your camcorder outdoors from inside the house, or vice versa during the [ONE PUSH] is adjusted to the ambient light. 1 Touch [ONE PUSH]. 2 Frame a white object such.... EXPOSURE You can fix the brightness of the recording environment. When recording indoors on . • Set [WHITE BAL.] to the brightness of an image manually. appears. 2 Adjust the exposure by fixing the exposure to that of the wall side of the room. 60min STBY EXPOSURE...
Handycam Handbook
Page 53
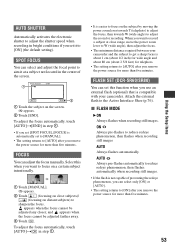
.... Select this function when you use an external flash (optional) that is compatible with your camcorder and the subject to get a sharp focus is not capable of the screen. ON Always...8226; The setting returns to [AUTO] after you remove the power source for recording. FLASH SET (DCR-SR60/SR80) You can select and adjust the focal point to aim it to [ON] (the default setting).... When you want to focus on a certain subject intentionally. 1 Touch [MANUAL]. 9 appears. 2 Touch (focusing on close range, move the power zoom lever to W (wide angle), then...
.... Select this function when you use an external flash (optional) that is compatible with your camcorder and the subject to get a sharp focus is not capable of the screen. ON Always...8226; The setting returns to [AUTO] after you remove the power source for recording. FLASH SET (DCR-SR60/SR80) You can select and adjust the focal point to aim it to [ON] (the default setting).... When you want to focus on a certain subject intentionally. 1 Touch [MANUAL]. 9 appears. 2 Touch (focusing on close range, move the power zoom lever to W (wide angle), then...
Handycam Handbook
Page 54
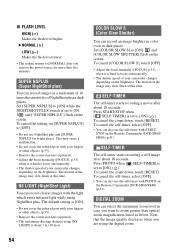
...power source for more than optical zoom magnification listed as below. To cancel [COLOR SLOW S], touch [OFF]. • Adjust the focus manually ([FOCUS], p.53), when it is hard to [ON] ( ). SELF-TIMER The self-timer starts recording a movie after about 10 seconds. To cancel the count down ,...• You can record images at this time. This may slow down at a maximum of 16 times the sensitivity of your camcorder changes depending on the Remote Commander (DCR-SR60/SR80) (p.41). x FLASH LEVEL HIGH( ) Makes the flash level higher. and [COLOR SLOW SHUTTER] flash on the screen...
...power source for more than optical zoom magnification listed as below. To cancel [COLOR SLOW S], touch [OFF]. • Adjust the focus manually ([FOCUS], p.53), when it is hard to [ON] ( ). SELF-TIMER The self-timer starts recording a movie after about 10 seconds. To cancel the count down ,...• You can record images at this time. This may slow down at a maximum of 16 times the sensitivity of your camcorder changes depending on the Remote Commander (DCR-SR60/SR80) (p.41). x FLASH LEVEL HIGH( ) Makes the flash level higher. and [COLOR SLOW SHUTTER] flash on the screen...

Handycam Handbook
Page 55
...like the image displayed on a wide (16:9) TV screen. while recording movies - Refer also to the instruction manuals supplied with the ID-1/ID-2 system, or via an S VIDEO jack, and play back an image on a... MOVIE] (p.57) • When you select the zooming level. Using the Setup items DCR-SR40 DCR-SR60/SR80 (optical zoom) 20 × 12 × The right side of the bar shows the digital... factor. Set [STEADYSHOT] to full mode automatically. The zooming zone appears when you connect your camcorder to a TV compatible with your TV to the full-screen mode, you can view the image...
...like the image displayed on a wide (16:9) TV screen. while recording movies - Refer also to the instruction manuals supplied with the ID-1/ID-2 system, or via an S VIDEO jack, and play back an image on a... MOVIE] (p.57) • When you select the zooming level. Using the Setup items DCR-SR40 DCR-SR60/SR80 (optical zoom) 20 × 12 × The right side of the bar shows the digital... factor. Set [STEADYSHOT] to full mode automatically. The zooming zone appears when you connect your camcorder to a TV compatible with your TV to the full-screen mode, you can view the image...
Handycam Handbook
Page 70
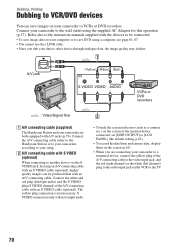
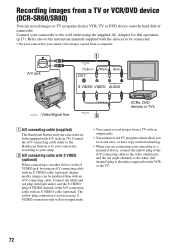
Refer also to the instruction manuals supplied with the devices to be produced than with an A/V connecting cable. The yellow plug connection is not necessary. Connect the A/V connecting cable either to the Handycam Station or to your camcorder, according to your computer or to save DVD ...White) (Red) IN S VIDEO VIDEO AUDIO VCRs or DVD recorders : Video/Signal flow 1 A/V connecting cable (supplied) The Handycam Station and your camcorder are connecting your camcorder to a monaural device, connect the yellow plug of the A/V connecting cable to the video input jack, and the red (right...
Refer also to the instruction manuals supplied with the devices to be produced than with an A/V connecting cable. The yellow plug connection is not necessary. Connect the A/V connecting cable either to the Handycam Station or to your camcorder, according to your computer or to save DVD ...White) (Red) IN S VIDEO VIDEO AUDIO VCRs or DVD recorders : Video/Signal flow 1 A/V connecting cable (supplied) The Handycam Station and your camcorder are connecting your camcorder to a monaural device, connect the yellow plug of the A/V connecting cable to the video input jack, and the red (right...
Handycam Handbook
Page 71
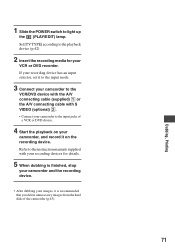
...). 71 If your recording device has an input selector, set it on the recording device. Refer to the instruction manuals supplied with your recording devices for your camcorder to light up the (PLAY/EDIT) lamp. Set [TV TYPE] according to the playback device (p.42). 2 Insert the recording ...8226; After dubbing your images, it is recommended that you delete unnecessary images from the hard disk of a VCR or DVD device. 4 Start the playback on your camcorder, and record it to the input mode. 3 Connect your camcorder to the VCR/DVD device with the A/V connecting cable (supplied) 1 or the ...
...). 71 If your recording device has an input selector, set it on the recording device. Refer to the instruction manuals supplied with your recording devices for your camcorder to light up the (PLAY/EDIT) lamp. Set [TV TYPE] according to the playback device (p.42). 2 Insert the recording ...8226; After dubbing your images, it is recommended that you delete unnecessary images from the hard disk of a VCR or DVD device. 4 Start the playback on your camcorder, and record it to the input mode. 3 Connect your camcorder to the VCR/DVD device with the A/V connecting cable (supplied) 1 or the ...
Handycam Handbook
Page 72
... the A/V connecting cable either to the Handycam Station or to your camcorder, according to another device via the S VIDEO jack, by using the supplied AC Adaptor for this operation (p.17). Refer also to the instruction manuals supplied with the devices to be produced than with S VIDEO (optional) When ... VCR, TV or DVD device onto the hard disk of the A/V connecting cable with A/V jacks (p.76). The yellow plug connection is not necessary. Recording images from a TV or VCR/DVD device (DCR-SR60/SR80) You can be connected. • On your camcorder, you are both equipped with an S ...
... the A/V connecting cable either to the Handycam Station or to your camcorder, according to another device via the S VIDEO jack, by using the supplied AC Adaptor for this operation (p.17). Refer also to the instruction manuals supplied with the devices to be produced than with S VIDEO (optional) When ... VCR, TV or DVD device onto the hard disk of the A/V connecting cable with A/V jacks (p.76). The yellow plug connection is not necessary. Recording images from a TV or VCR/DVD device (DCR-SR60/SR80) You can be connected. • On your camcorder, you are both equipped with an S ...
Handycam Handbook
Page 75
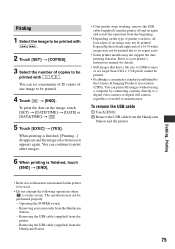
... and right ends of a 16:9 (wide) image may not support the date printing function. Dubbing, Printing • Refer also to the instruction manual for details. • Still images that have , all four edges of an image may not be printed with / . Operating the POWER switch ...image, touch [SET] t [DATE/TIME] t [DATE] or [DAY&TIME] t . 5 Touch [EXEC] t [YES]. Refer to your camcorder from the beginning. • Depending on again and restart the operation from the Handycam Station - The operations may not be printed. 4 Touch t [END]. Removing the USB cable (supplied) from the...
... and right ends of a 16:9 (wide) image may not support the date printing function. Dubbing, Printing • Refer also to the instruction manual for details. • Still images that have , all four edges of an image may not be printed with / . Operating the POWER switch ...image, touch [SET] t [DATE/TIME] t [DATE] or [DAY&TIME] t . 5 Touch [EXEC] t [YES]. Refer to your camcorder from the beginning. • Depending on again and restart the operation from the Handycam Station - The operations may not be printed. 4 Touch t [END]. Removing the USB cable (supplied) from the...
Handycam Handbook
Page 76
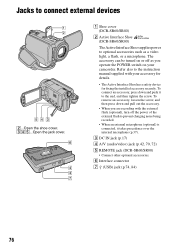
...) 4 A/V (audio/video) jack (p.42, 70, 72) 5 REMOTE jack (DCR-SR60/SR80) • Connect other optional accessories. 6 Interface connector 7 (USB) jack (p.74, 84) 76 Refer also to the instruction manual supplied with the external flash (optional), turn off as you operate the POWER switch on or...out the accessory. • When you are recording with your camcorder. Jacks to connect external devices 2...Open the shoe cover. 345...Open the jack cover. 1 Shoe cover (DCR-SR60/SR80) 2 Active Interface Shoe (DCR-SR60/SR80) The Active Interface Shoe supplies power to prevent charging noise...
...) 4 A/V (audio/video) jack (p.42, 70, 72) 5 REMOTE jack (DCR-SR60/SR80) • Connect other optional accessories. 6 Interface connector 7 (USB) jack (p.74, 84) 76 Refer also to the instruction manual supplied with the external flash (optional), turn off as you operate the POWER switch on or...out the accessory. • When you are recording with your camcorder. Jacks to connect external devices 2...Open the shoe cover. 345...Open the jack cover. 1 Shoe cover (DCR-SR60/SR80) 2 Active Interface Shoe (DCR-SR60/SR80) The Active Interface Shoe supplies power to prevent charging noise...
Handycam Handbook
Page 83
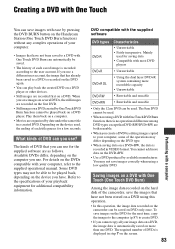
...83 Performing with One Touch (One Touch DVD Burn) Among the image data recorded on the hard disk of the camcorder, save the images that have not been stored on a DVD using a low quality DVD...with One Touch You can save images with ease by pressing the DVD BURN button on the Handycam Station (One Touch DVD Burn function) without any complex operations of your computer. • Images...of your image data on a DVD, the image data is recorded according to the supplied operational manual. Refer to the specifications of each saved image is automatically saved on the DVDs compatible with the...
...83 Performing with One Touch (One Touch DVD Burn) Among the image data recorded on the hard disk of the camcorder, save the images that have not been stored on a DVD using a low quality DVD...with One Touch You can save images with ease by pressing the DVD BURN button on the Handycam Station (One Touch DVD Burn function) without any complex operations of your computer. • Images...of your image data on a DVD, the image data is recorded according to the supplied operational manual. Refer to the specifications of each saved image is automatically saved on the DVDs compatible with the...
Handycam Handbook
Page 105
... the camcorder, recording may stop. • Fragmentation has occurred. Adjust the focus manually (p.53). [STEADYSHOT] does not function. • Set [STEADYSHOT] to [ON] (p.55). • [STEADYSHOT] may not work for an excessive camera shake even if [STEADYSHOT] is set [EXPOSURE] to [MANUAL] ...phenomenon is not a malfunction. Turn off the camcorder and take it for auto focus. Perform [HDD FORMAT] (p.58). Cancel Easy Handycam operation (p.29). This is not a malfunction. The recording stops. • The temperature of your camcorder is extremely high. This is not a ...
... the camcorder, recording may stop. • Fragmentation has occurred. Adjust the focus manually (p.53). [STEADYSHOT] does not function. • Set [STEADYSHOT] to [ON] (p.55). • [STEADYSHOT] may not work for an excessive camera shake even if [STEADYSHOT] is set [EXPOSURE] to [MANUAL] ...phenomenon is not a malfunction. Turn off the camcorder and take it for auto focus. Perform [HDD FORMAT] (p.58). Cancel Easy Handycam operation (p.29). This is not a malfunction. The recording stops. • The temperature of your camcorder is extremely high. This is not a ...
Handycam Handbook
Page 121
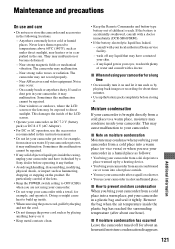
... mechanical vibration. The camcorder may malfunction. - Sometimes this instruction manual. • Do not let your camcorder on moisture condensation Moisture may be repaired. • If any further. • Avoid rough handling,disassembling, modifying, physical shock, or impact such as by a Sony dealer before storing it... water and consult with a doctor immediately (DCR-SR60/SR80). • If the battery electrolytic liquid has leaked, - Near windows or outdoors, where the LCD screen or the lens may condense when you bring your camcorder from a cold place into a warm place (or...
... mechanical vibration. The camcorder may malfunction. - Sometimes this instruction manual. • Do not let your camcorder on moisture condensation Moisture may be repaired. • If any further. • Avoid rough handling,disassembling, modifying, physical shock, or impact such as by a Sony dealer before storing it... water and consult with a doctor immediately (DCR-SR60/SR80). • If the battery electrolytic liquid has leaked, - Near windows or outdoors, where the LCD screen or the lens may condense when you bring your camcorder from a cold place into a warm place (or...


