User Guide
Page 2
Network Menu .....44 Network Tab 44 Wireless Tab - Saving pan/tilt/zoom position .63 Tour Tab - Setting of 802.1X authentication function 54 Client certificate Tab 55 CA certificate Tab 57 Setting the 802.1X authentication function - Basic setting of wireless connection 45 Dynamic IP ...the Camera 26 Controlling via the control panel 26 Panning and tilting by clicking the monitor image 26 Panning, tilting and zooming by specifying the area 26 Zooming an image by the Administrator ....... 17 Operating the Camera Administrator and User 18 Logging in the camera .......29...
Network Menu .....44 Network Tab 44 Wireless Tab - Saving pan/tilt/zoom position .63 Tour Tab - Setting of 802.1X authentication function 54 Client certificate Tab 55 CA certificate Tab 57 Setting the 802.1X authentication function - Basic setting of wireless connection 45 Dynamic IP ...the Camera 26 Controlling via the control panel 26 Panning and tilting by clicking the monitor image 26 Panning, tilting and zooming by specifying the area 26 Zooming an image by the Administrator ....... 17 Operating the Camera Administrator and User 18 Logging in the camera .......29...
User Guide
Page 3
... to FTP Server - DDNS setting Menu .. 91 Others Using the Supplied IP Setup Program 94 Starting the IP Setup Program 94 Bandwidth control Tab 94 Date time Tab 95 Rebooting the Camera 95 Using the SNC audio upload tool - Setting the periodical FTP client activity 70 Recording Images in Memory - Setting the Image memory...
... to FTP Server - DDNS setting Menu .. 91 Others Using the Supplied IP Setup Program 94 Starting the IP Setup Program 94 Bandwidth control Tab 94 Date time Tab 95 Rebooting the Camera 95 Using the SNC audio upload tool - Setting the periodical FTP client activity 70 Recording Images in Memory - Setting the Image memory...
User Guide
Page 4
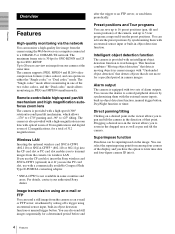
...Dragging a desired area in the viewer allows you to +25° tilting. Remote-controllable high-speed pan/tilt mechanism and high magnification autofocus zoom lens The camera is 30 fps for SNC-RZ50N and 25 fps for a total of alarm outputs. This function combines...panning/tilting Clicking on a computer connected to control peripheral devices by synchronizing them with two sets of 312 magnifications. Up to 20 users can view an image from among four corners of the display, and you have the option to write time data and four-figure camera ID into the CF card slot or PC card slot...
...Dragging a desired area in the viewer allows you to +25° tilting. Remote-controllable high-speed pan/tilt mechanism and high magnification autofocus zoom lens The camera is 30 fps for SNC-RZ50N and 25 fps for a total of alarm outputs. This function combines...panning/tilting Clicking on a computer connected to control peripheral devices by synchronizing them with two sets of 312 magnifications. Up to 20 users can view an image from among four corners of the display, and you have the option to write time data and four-figure camera ID into the CF card slot or PC card slot...

User Guide
Page 6
...the User's Guide Depending on the computer display. You are cautioned that the displays shown in materials of the Network Camera, connecting examples and how to operate the SNCRZ50N/RZ50P Network Camera from the lens or optical filter. • Use a soft, dry cloth to strong vibration or shock Ventilation ...To prevent heat buildup, do not block air circulation around the camera. How to Use This User's Guide This User's...
...the User's Guide Depending on the computer display. You are cautioned that the displays shown in materials of the Network Camera, connecting examples and how to operate the SNCRZ50N/RZ50P Network Camera from the lens or optical filter. • Use a soft, dry cloth to strong vibration or shock Ventilation ...To prevent heat buildup, do not block air circulation around the camera. How to Use This User's Guide This User's...

User Guide
Page 7
Overview System Requirements These are the requirements for the computer that displays the image or controls the camera. Processor Intel Pentium 4, 1.5 GHz or higher (Pentium 4, 2.4 GHz or higher recommended) RAM 256 MB or more OS Microsoft Windows 2000, Windows XP, Windows Vista Web browser Microsoft Internet Explorer Ver.6.0 or later 7 System Requirements
Overview System Requirements These are the requirements for the computer that displays the image or controls the camera. Processor Intel Pentium 4, 1.5 GHz or higher (Pentium 4, 2.4 GHz or higher recommended) RAM 256 MB or more OS Microsoft Windows 2000, Windows XP, Windows Vista Web browser Microsoft Internet Explorer Ver.6.0 or later 7 System Requirements

User Guide
Page 8
...click "Save this case, click Allow. The program detects the network cameras connected to the local network and lists them on page 11 or "Configuring Windows Firewall" in your Web browser. When you are using the IP Setup Program 1 Insert the CD-ROM in "When using Windows ...can assign an IP address in two ways: • Using the IP Setup Program stored in the supplied Installation Manual. If it for monitoring images after installation and connection of the network about the assigned IP address. Assigning the IP Address to the Camera To connect the camera to a network, you will...
...click "Save this case, click Allow. The program detects the network cameras connected to the local network and lists them on page 11 or "Configuring Windows Firewall" in your Web browser. When you are using the IP Setup Program 1 Insert the CD-ROM in "When using Windows ...can assign an IP address in two ways: • Using the IP Setup Program stored in the supplied Installation Manual. If it for monitoring images after installation and connection of the network about the assigned IP address. Assigning the IP Address to the Camera To connect the camera to a network, you will...

User Guide
Page 9
... DNS server addresses automatically: Select Obtain DNS server address automatically. 6 Click on the network. 8 Set the DNS server address. To obtain the IP address automatically from a DHCP server: Select Obtain an IP address automatically. The network settings for the selected camera are "admin." Note The Third DNS server address and Fourth DNS server address are...
... DNS server addresses automatically: Select Obtain DNS server address automatically. 6 Click on the network. 8 Set the DNS server address. To obtain the IP address automatically from a DHCP server: Select Obtain an IP address automatically. The network settings for the selected camera are "admin." Note The Third DNS server address and Fourth DNS server address are...

User Guide
Page 10
... mask: 255.0.0.0 Wireless LAN setting Type: Adhoc SSID: snc-rz50 Channel: 11 ch WEP: Nothing IP address: 10.0.0.100 Subnet mask: 255.0.0.0 The welcome page of the camera network is correctly assigned. 12 To access the camera directly, double-click the camera name in the list. In this case, allow the ...not appear after step 12. Delete the downloaded file, and click the Setup icon again. 10 Assigning the IP Address to perform installation correctly. Tip The factory setting of the network camera is not set the SSL function (SSL tab, page 49) to continue reading. (The model on the...
... mask: 255.0.0.0 Wireless LAN setting Type: Adhoc SSID: snc-rz50 Channel: 11 ch WEP: Nothing IP address: 10.0.0.100 Subnet mask: 255.0.0.0 The welcome page of the camera network is correctly assigned. 12 To access the camera directly, double-click the camera name in the list. In this case, allow the ...not appear after step 12. Delete the downloaded file, and click the Setup icon again. 10 Assigning the IP Address to perform installation correctly. Tip The factory setting of the network camera is not set the SSL function (SSL tab, page 49) to continue reading. (The model on the...

User Guide
Page 11
...Information Bar" appears, click OK. Preparation If the information bar appears, click on the configuration of Windows Firewall. (No cameras are shown in the list. The cameras will be displayed in the list even if they are detected.) In this case, operate as follows: Example: In ... "Security Warning" may not operate correctly depending on the bar and select Install ActiveX Control.... Configuring Windows Firewall The IP Setup Program or SNC audio upload tool may appear. If " Internet Explorer - Security Warning" appears, click Run. Security Warning" appears, click Install.
...Information Bar" appears, click OK. Preparation If the information bar appears, click on the configuration of Windows Firewall. (No cameras are shown in the list. The cameras will be displayed in the list even if they are detected.) In this case, operate as follows: Example: In ... "Security Warning" may not operate correctly depending on the bar and select Install ActiveX Control.... Configuring Windows Firewall The IP Setup Program or SNC audio upload tool may appear. If " Internet Explorer - Security Warning" appears, click Run. Security Warning" appears, click Install.

User Guide
Page 12
..." appears, click Yes. When the above procedure is added to view files, Web browser will not open automatically. Then the IP Setup Program is completed, the cameras connected in the local network are displayed in the CD-ROM. Note If you install software such as follows: Example: In case of... IP Setup Program If pop-up "AutoPlay" appears when a CD-ROM is inserted into the CD-ROM drive, click Install or run program...
..." appears, click Yes. When the above procedure is added to view files, Web browser will not open automatically. Then the IP Setup Program is completed, the cameras connected in the local network are displayed in the CD-ROM. Note If you install software such as follows: Example: In case of... IP Setup Program If pop-up "AutoPlay" appears when a CD-ROM is inserted into the CD-ROM drive, click Install or run program...

User Guide
Page 13
...operate as follows: The installation of Windows Firewall. (No cameras are detected.) In this case, click Continue. 13 Assigning the IP Address to continue" appear, click Continue. Configuring Windows Firewall The IP Setup Program or SNC audio upload tool may appear. In this case, confirm ...the Windows Firewall configuration as IP Setup Program, message "User Account Control - Windows needs your permission to the Camera An unidentified program wants access to...
...operate as follows: The installation of Windows Firewall. (No cameras are detected.) In this case, click Continue. 13 Assigning the IP Address to continue" appear, click Continue. Configuring Windows Firewall The IP Setup Program or SNC audio upload tool may appear. In this case, confirm ...the Windows Firewall configuration as IP Setup Program, message "User Account Control - Windows needs your permission to the Camera An unidentified program wants access to...

User Guide
Page 14
Then the IP Setup Program is completed, the cameras connected in the local network are displayed in the IP Setup Program. When the above procedure is added to the Program or port list. 14 Assigning the IP Address to keep Windows Firewall On, continue with the following steps. 5 Select the "Exceptions" tab. 6 Select Add Program.... 7 If the Add Program dialog appears, select IP Setup Program and click OK. 4 Select Off in the list. Preparation The cameras will be displayed in the "General" tab. 8 Click OK. If you want to the Camera
Then the IP Setup Program is completed, the cameras connected in the local network are displayed in the IP Setup Program. When the above procedure is added to the Program or port list. 14 Assigning the IP Address to keep Windows Firewall On, continue with the following steps. 5 Select the "Exceptions" tab. 6 Select Add Program.... 7 If the Add Program dialog appears, select IP Setup Program and click OK. 4 Select Off in the list. Preparation The cameras will be displayed in the "General" tab. 8 Click OK. If you want to the Camera

User Guide
Page 15
...dialog may appear. Use Internet Explorer as the Web browser. 1 Start the Web browser on the computer and type the IP address of the certificate. For details, refer to the camera, check that you set the SSL function (SSL tab, page 49) to On, "Security Alert" dialog may appear ...function Note The model on sale in China does not support the SSL function. When Internet Explorer 6 is confirmed. Preparation Accessing the Camera Using the Web Browser After the IP address has been assigned to " Using the SSL function" on page 15. 2 Click Enter. The main viewer is displayed. ...
...dialog may appear. Use Internet Explorer as the Web browser. 1 Start the Web browser on the computer and type the IP address of the certificate. For details, refer to the camera, check that you set the SSL function (SSL tab, page 49) to On, "Security Alert" dialog may appear ...function Note The model on sale in China does not support the SSL function. When Internet Explorer 6 is confirmed. Preparation Accessing the Camera Using the Web Browser After the IP address has been assigned to " Using the SSL function" on page 15. 2 Click Enter. The main viewer is displayed. ...

User Guide
Page 16
... Explorer, then select Internet Options and click the Security tab. 2 Click the Internet icon (when using the camera via the Internet) or Local intranet icon (when using the camera via a local network). 3 Set the slider to Medium or lower. (If the slider is not displayed, click Default Level.)... HTTP and SSL connections separately to access, enter the following in the address box of the camera is displayed for Internet Explorer. Preparation When Internet Explorer 7 is used When you enter the camera IP address, "Certificate Error" may be lower. • The Web page displayed when you log...
... Explorer, then select Internet Options and click the Security tab. 2 Click the Internet icon (when using the camera via the Internet) or Local intranet icon (when using the camera via a local network). 3 Set the slider to Medium or lower. (If the slider is not displayed, click Default Level.)... HTTP and SSL connections separately to access, enter the following in the address box of the camera is displayed for Internet Explorer. Preparation When Internet Explorer 7 is used When you enter the camera IP address, "Certificate Error" may be lower. • The Web page displayed when you log...

User Guide
Page 17
... logging in with those of the image sent from the camera. Preparation Basic Configuration by the Administrator You can also set for this network camera. Select the white balance mode according to the installing position, network conditions or purpose of the image. Prepare a panorama image.... Synchronize the date and time of the camera with the initial conditions set various functions ...
... logging in with those of the image sent from the camera. Preparation Basic Configuration by the Administrator You can also set for this network camera. Select the white balance mode according to the installing position, network conditions or purpose of the image. Prepare a panorama image.... Synchronize the date and time of the camera with the initial conditions set various functions ...
User Guide
Page 18
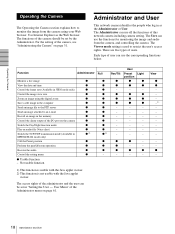
...) Call the Preset position z z Perform the pan/tilt/zoom operation z z Receive the audio z z Control the setting menu z - The functions of the Administrator menu on page 61. The access rights of this network camera including camera setting. User Menu" of the camera should be set by the Administrator. Administrator and User This network camera identifies the people who log in...
...) Call the Preset position z z Perform the pan/tilt/zoom operation z z Receive the audio z z Control the setting menu z - The functions of the Administrator menu on page 61. The access rights of this network camera including camera setting. User Menu" of the camera should be set by the Administrator. Administrator and User This network camera identifies the people who log in...

User Guide
Page 19
The usable codecs and viewers are displayed depending on your computer and type the IP address of Network Camera is displayed. Operating the Camera Logging in the Camera menu (page 41). Welcome Page Logging in to Single codec You can select Java applet viewer. When H.264 is set to Homepage - For...can monitor the image of the selected video codec (JPEG, MPEG4 or H.264). Welcome Page When Mode is selected The welcome page of the camera you can monitor JPEG and MPEG4. When MPEG4 is set to Dual codec You can select Java applet viewer. 19 Logging in as a user ...
The usable codecs and viewers are displayed depending on your computer and type the IP address of Network Camera is displayed. Operating the Camera Logging in the Camera menu (page 41). Welcome Page Logging in to Single codec You can select Java applet viewer. When H.264 is set to Homepage - For...can monitor the image of the selected video codec (JPEG, MPEG4 or H.264). Welcome Page When Mode is selected The welcome page of the camera you can monitor JPEG and MPEG4. When MPEG4 is set to Dual codec You can select Java applet viewer. 19 Logging in as a user ...

User Guide
Page 20
...welcome page and the main viewer correctly" on the welcome page. ActiveX viewer This viewer can use the following dialog appears. Operating the Camera With the Java applet viewer 3 Enter the user name and password for the first time. 20 Logging in to higher than Medium.... Welcome Page The following viewers. With the ActiveX viewer (MPEG4/H.264) Displaying the Administrator menu directly When the administrator sets the camera functions, the Administrator menu can change them using the User menu of the JPEG, MPEG4 and H.264 video codecs. The user name "admin...
...welcome page and the main viewer correctly" on the welcome page. ActiveX viewer This viewer can use the following dialog appears. Operating the Camera With the Java applet viewer 3 Enter the user name and password for the first time. 20 Logging in to higher than Medium.... Welcome Page The following viewers. With the ActiveX viewer (MPEG4/H.264) Displaying the Administrator menu directly When the administrator sets the camera functions, the Administrator menu can change them using the User menu of the JPEG, MPEG4 and H.264 video codecs. The user name "admin...

User Guide
Page 21
... the Administrator. Tip Every page of this viewer when the camera image is enabled in the Local Area Network (LAN) Settings of Internet Explorer, the camera image may not be logged in the network camera using ActiveX viewer (JPEG) Camera control section Monitor image section Main menu 21 Configuration of Main... you display the main viewer of the camera for the first time When you should be displayed. Click Yes and install ActiveX Control. Check the version of the Proxy server, consult your authorized Sony dealer. For the setting of Java displayed in "Java (Sun)". In that ...
... the Administrator. Tip Every page of this viewer when the camera image is enabled in the Local Area Network (LAN) Settings of Internet Explorer, the camera image may not be logged in the network camera using ActiveX viewer (JPEG) Camera control section Monitor image section Main menu 21 Configuration of Main... you display the main viewer of the camera for the first time When you should be displayed. Click Yes and install ActiveX Control. Check the version of the Proxy server, consult your authorized Sony dealer. For the setting of Java displayed in "Java (Sun)". In that ...

User Guide
Page 22
.... Control panel Click to display the following control panel. (Displayed only when the camera image is used.) Click to capture a still image shot by the camera and to store it in the computer. (page 25) Control Click to control pan, tilt and zoom functions from the main viewer. (page 26) Preset position (Displayed only when.... (page 24) View size Selects the view size to be shown in memory.) Select the Preset position name from the drop-down list. Operating the Camera Main viewer using the pan, tilt and zoom functions. Home Displays the welcome page.
.... Control panel Click to display the following control panel. (Displayed only when the camera image is used.) Click to capture a still image shot by the camera and to store it in the computer. (page 25) Control Click to control pan, tilt and zoom functions from the main viewer. (page 26) Preset position (Displayed only when.... (page 24) View size Selects the view size to be shown in memory.) Select the Preset position name from the drop-down list. Operating the Camera Main viewer using the pan, tilt and zoom functions. Home Displays the welcome page.


